

Empower your organization with passwordless authentication and Zero Trust access
In this post designed for IT professionals and security-focused organizations, we explore how to elevate device protection and identity assurance through Multi-Factor Unlock (MFU) using Microsoft Intune.
Microsoft Intune continues to evolve bringing more seamless, centralized, and intelligent ways to manage modern endpoints. By enabling MFU, you can add an additional layer of security that requires users to authenticate with more than one method before unlocking their devices, effectively reducing the risk of unauthorized access and aligning your environment with Zero Trust principles.
What Is Multi-Factor Unlock (MFU)?
Multi-Factor Unlock (MFU) is a Windows Hello for Business security feature that reinforces device access control through the combination of multiple authentication factors such as a PIN, biometric verification (fingerprint or facial recognition), or trusted hardware signals before granting device access.
When managed through Microsoft Intune, administrators gain the ability to define, enforce, and monitor which authentication methods are required, ensuring consistent security standards across all corporate devices.
In essence, MFU requires users to unlock their devices using two different Windows Hello for Business methods, drastically strengthening endpoint identity protection.
What’s the User Experience Like?
From the user’s perspective, the experience is simple yet more secure. Once the MFU policy is applied, the device will prompt users to authenticate using two distinct unlock factors (for example, a PIN and facial recognition).
The process is fast, intuitive, and designed to minimize friction while maintaining strong security. To help visualize this flow, here’s the official Microsoft documentation video that demonstrates how Multi-Factor Unlock works in practice.
See the video link in the More Information section below.
OMA-URI Configuration Reference
Below is a quick reference table summarizing the key OMA-URI paths used to configure Multi-Factor Unlock components in Intune:

These policies correspond to the following internal identifiers used by Windows Hello for Business:
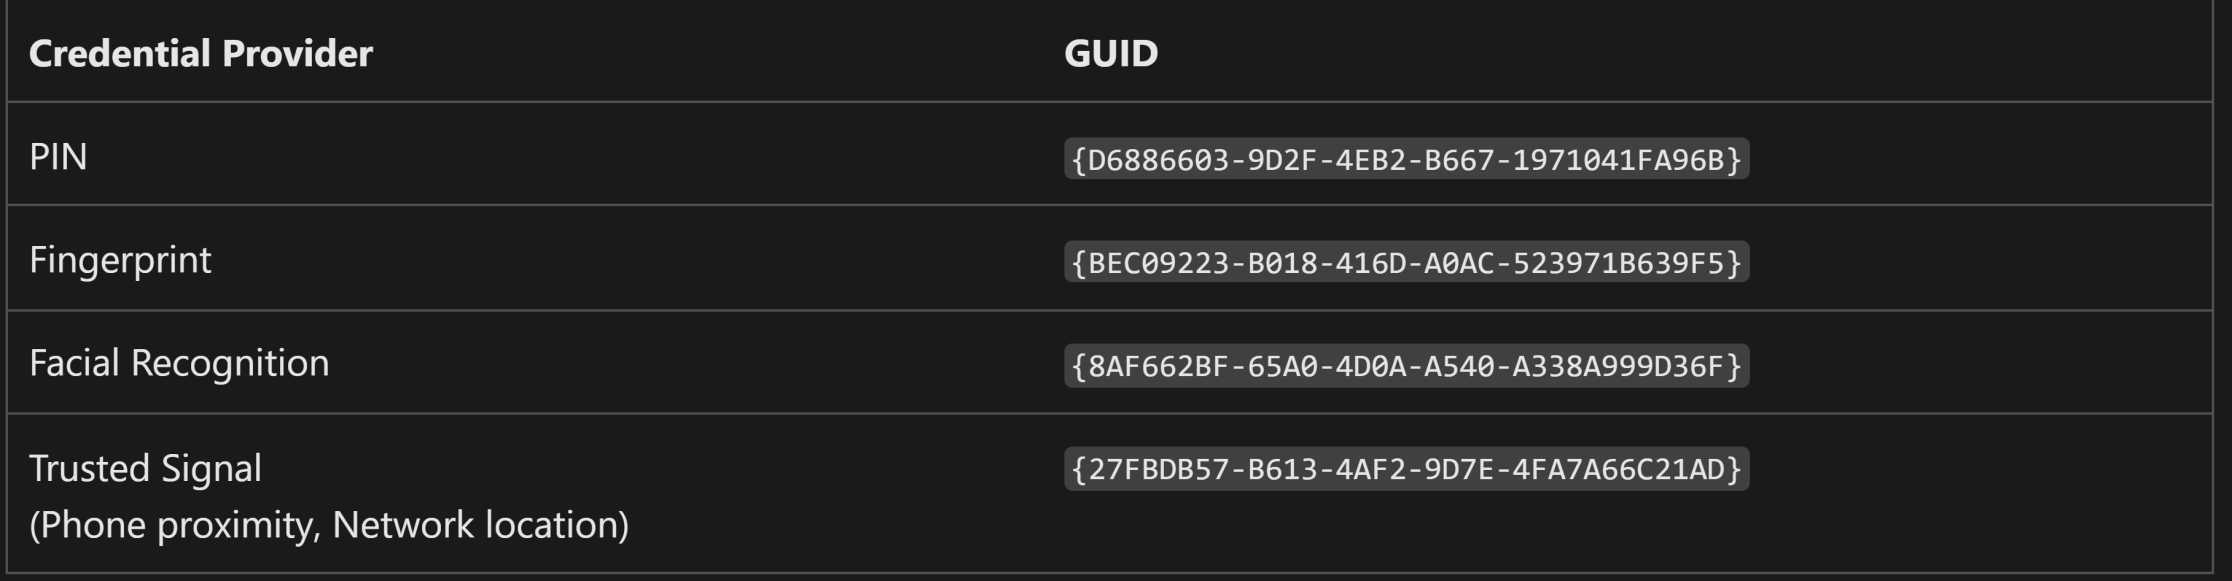
How to configure Multi-factor unlock with Microsoft Intune
In this section we will show you, how you can configure Multi-factor unlock in Microsoft Intune. Make sure you have your Intune Administrator Account ready and follow the steps below.
Step-by-Step: Deploy via Intune
How to Create the Policy in Microsoft Intune Admin Center
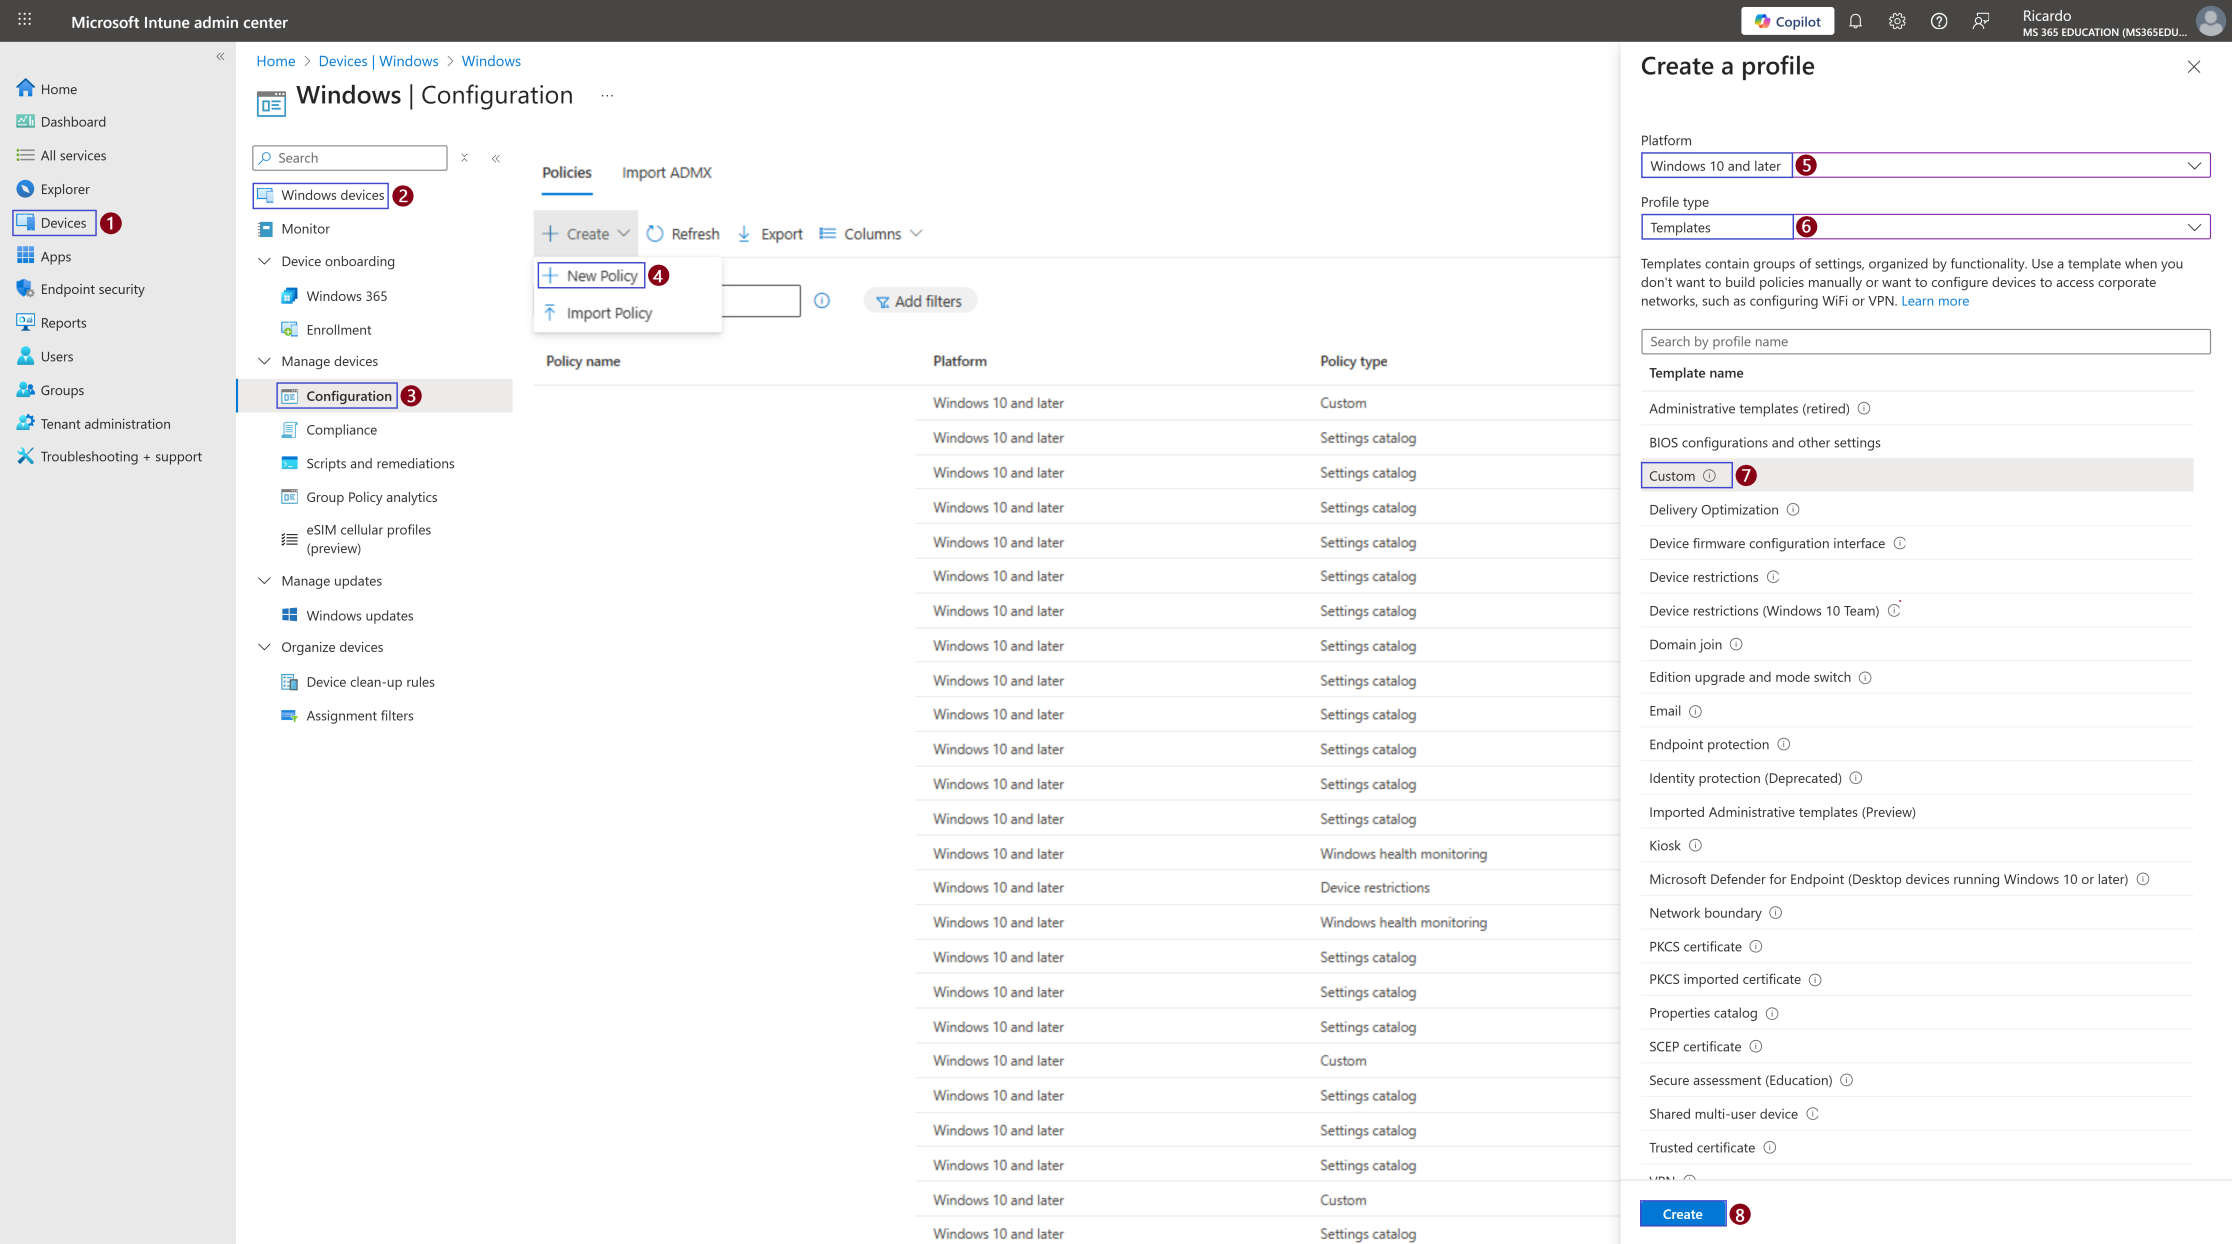
Follow the steps below to create your Custom OMA-URI configuration policy in Microsoft Intune:
In the Microsoft Intune admin center, go to Devices.
Select Windows devices.
Under Policy, choose Configuration.
Click + Create, and then select New Policy.
In the Create a profile pane, set Platform = Windows 10 and later.
Set Profile type = Templates.
From the list, select Custom.
Click Create to proceed.
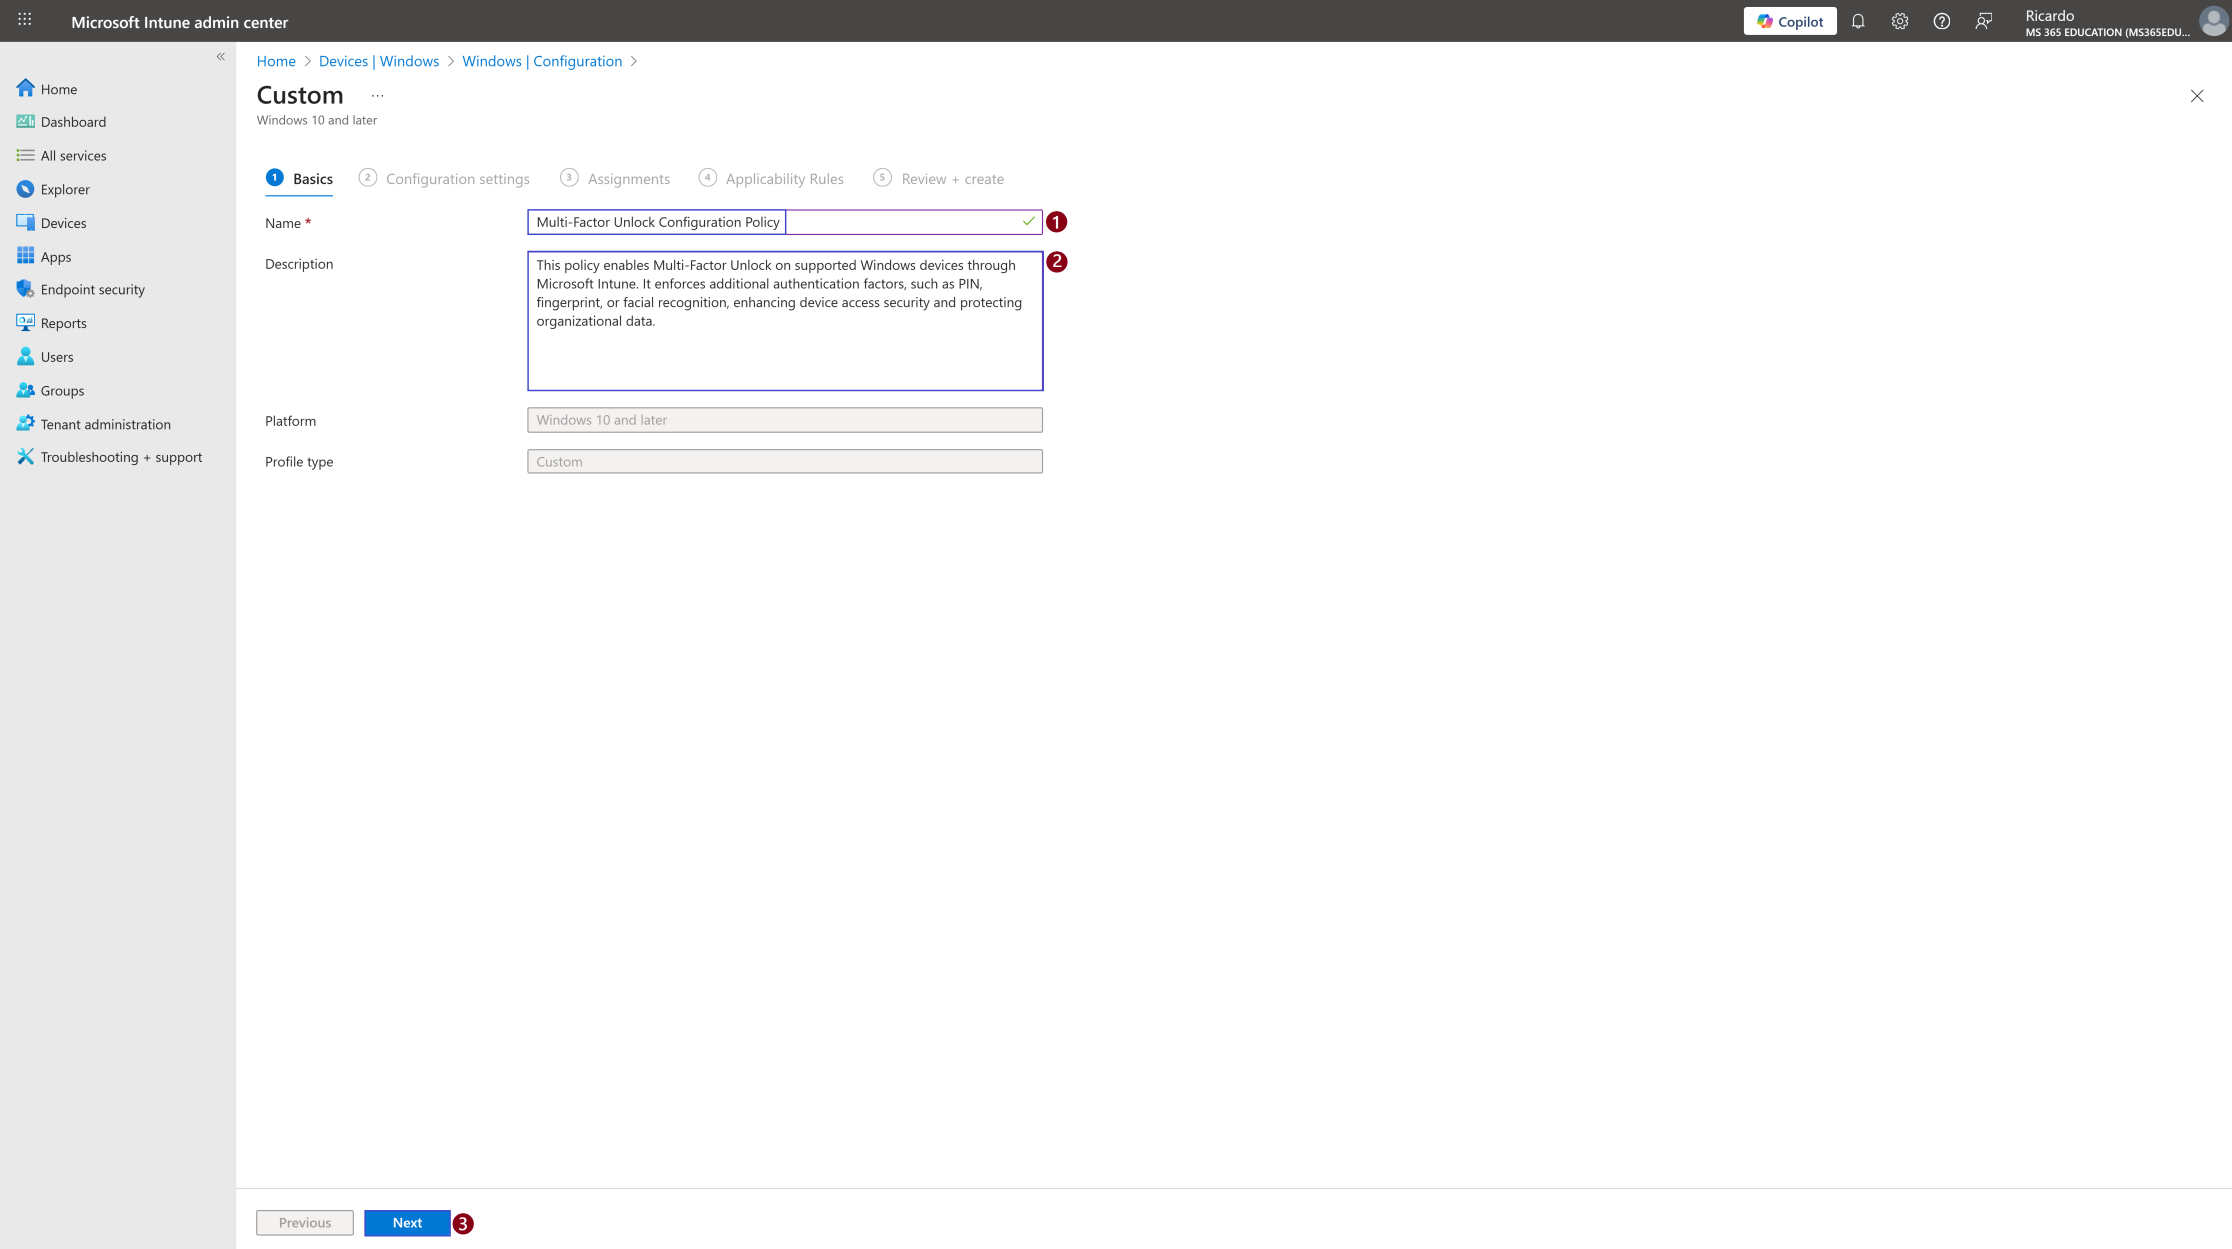
After creating the custom policy, you’ll be taken to the Basics tab. In this section, we’ll define a clear name and description for our configuration profile. This helps identify the purpose of the policy and ensures easier management later, especially in environments with multiple custom OMA-URI profiles.
For example, you can name your policy Multi-Factor Unlock Configuration Policy and provide a brief description explaining its function, such as enabling multi-factor unlock on supported Windows devices through Microsoft Intune.
Once completed, click Next to proceed to the configuration settings.
Create OMA-URI Settings
In this step, we’ll create three OMA-URI settings to define the authentication methods and unlock rules.
Overview of the OMA-URI settings
OMA-URI 1 – First Unlock Factor Defines the credential providers allowed as the first unlock factor.
OMA-URI 2 – Second Unlock Factor Defines the credential providers allowed as the second unlock factor.
OMA-URI 3 – Signal Rules Defines the trusted signals used to trigger or validate device unlock conditions.
Configure the Policy in Intune
As mentioned in the table above, we’ll use the listed GUIDs to configure our OMA-URI settings. Follow the steps below to add the OMA-URI to your policy.
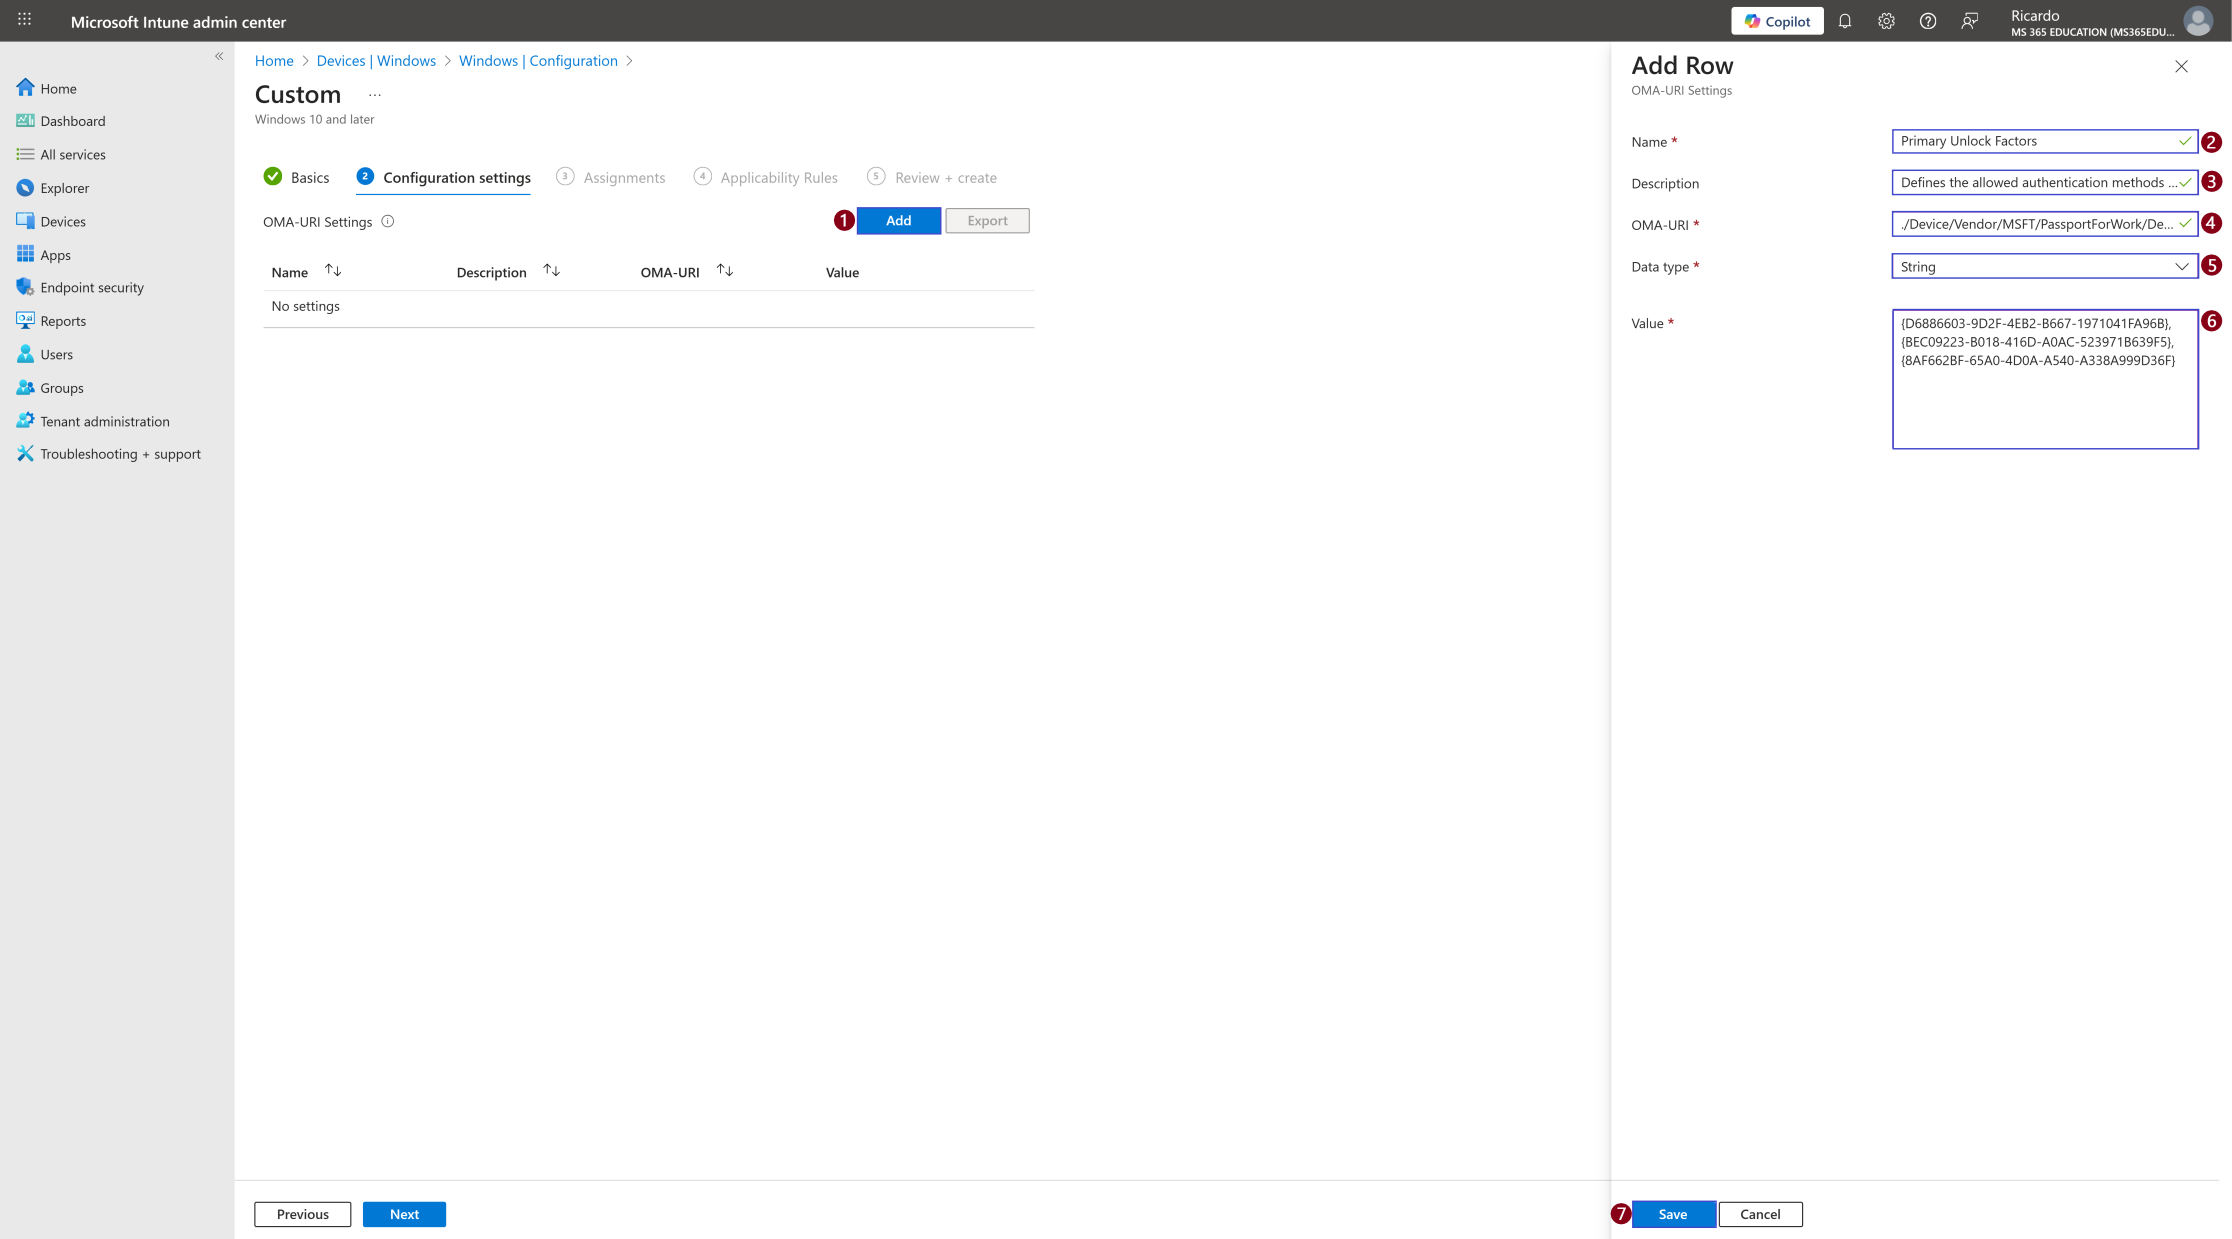
Click Add to create a new OMA-URI setting.
Enter the following details:
Name: Primary Unlock Factors
Description: Defines the allowed authentication methods for the first unlock factor.
OMA-URI: ./Device/Vendor/MSFT/PassportForWork/DeviceUnlock
Data Type: String
Value: {D6886603-9D2F-4EB2-B667-1971041FA96B},{BEC09223-B018-416D-A0AC-523971B639F5},{8AF662BF-65A0-4D0A-A540-A338A999D36F}
Configure the Second OMA-URI Setting
Now, let’s create the second OMA-URI policy, which defines the allowed second unlock factors for multi-factor authentication on Windows devices.
In this example, we’ll allow users to unlock their devices using PIN and Trusted Signals (for example, when the phone is connected via Bluetooth). You can customize these options according to your organization’s security requirements.
Steps to Configure:
Click Add to create a new OMA-URI setting.
Enter the following details:
Name: Secondary Unlock Factors
Description: Defines the allowed second unlock methods (PIN and Trusted Signal).
OMA-URI: ./Device/Vendor/MSFT/PassportForWork/DeviceUnlock/GroupB
Data Type: String
Value: {D6886603-9D2F-4EB2-B667-1971041FA96B},{27FBDB57-B613-4AF2-9D7E-4FA7A66C21AD}
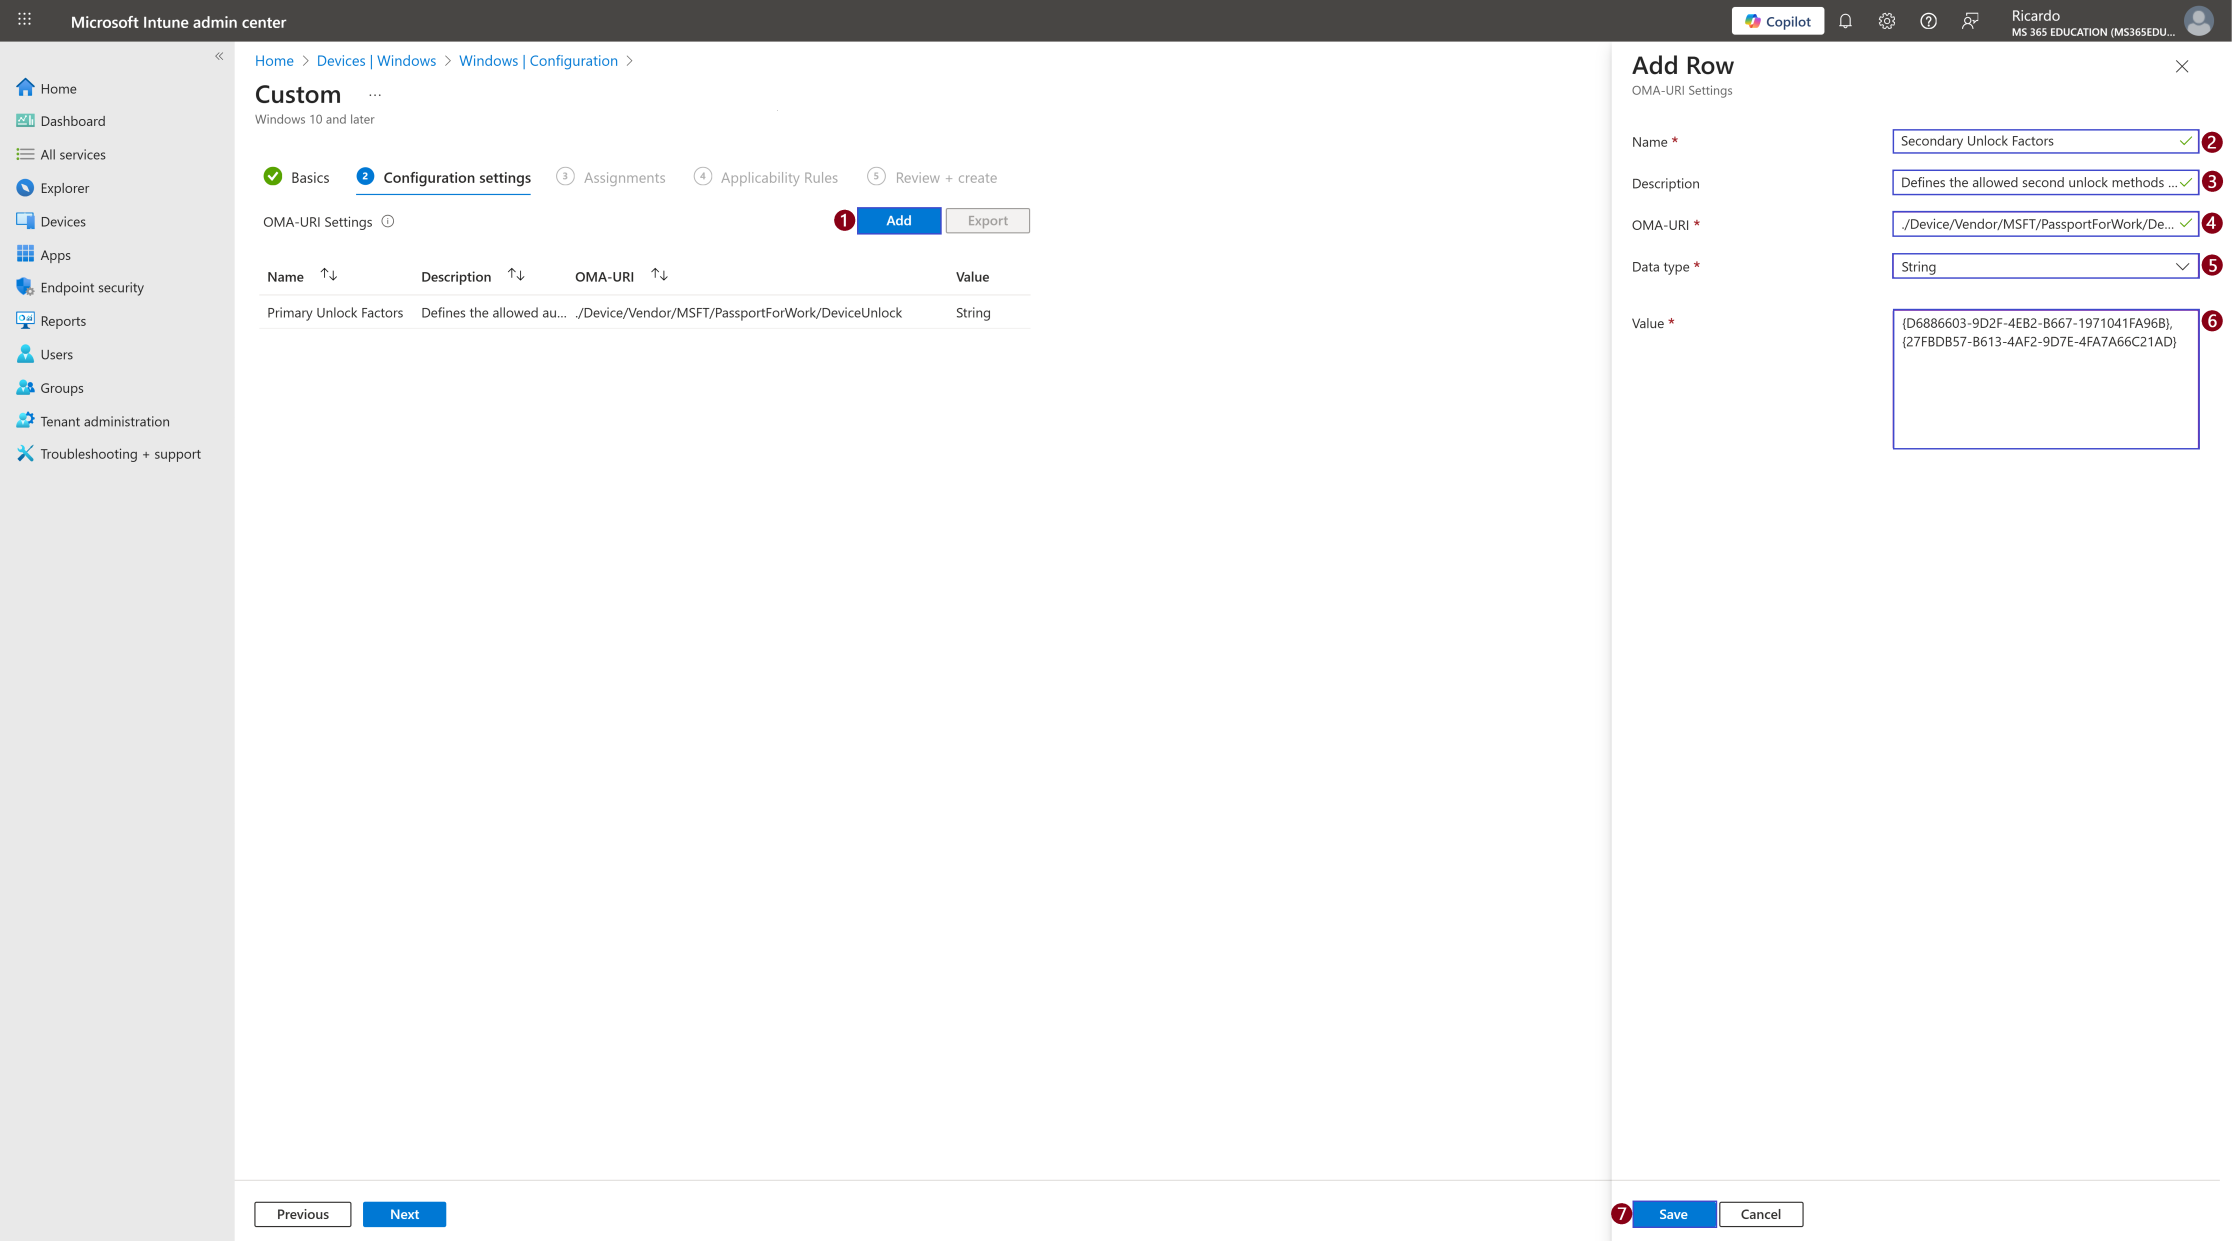
Tip: You can modify the Value field to include or exclude other factors such as fingerprint or facial recognition, depending on your environment’s authentication needs.
Configure the Third OMA-URI Setting - Signal Rules for Device Unlock
Finally, let’s create the third OMA-URI policy, which defines the Signal Rules used by Windows to determine when a trusted proximity or network condition can be used as part of the multi-factor unlock process.
In this example, we’ll set a default signal rule using Bluetooth proximity. You can further customize this configuration to allow authentication based on local network presence or specific Wi-Fi connections for even tighter security controls.
To learn more about available signal options and parameters, visit the official Microsoft Learn: Multi-Factor Unlock Documentation.
Steps to Configure:
Click Add to create a new OMA-URI setting.
Enter the following details:
Name: Device Unlock Signal Rules
Description: Defines trusted signal rules for multi-factor unlock (e.g., Bluetooth proximity).
OMA-URI: ./Device/Vendor/MSFT/PassportForWork/DeviceUnlock/Plugins
Data Type: String
Value: <rule schemaVersion=”1.0″> <signal type=”bluetooth” scenario=”Authentication” classOfDevice=”512″ rssiMin=”-10″ rssiMaxDelta=”-10″/> </rule>
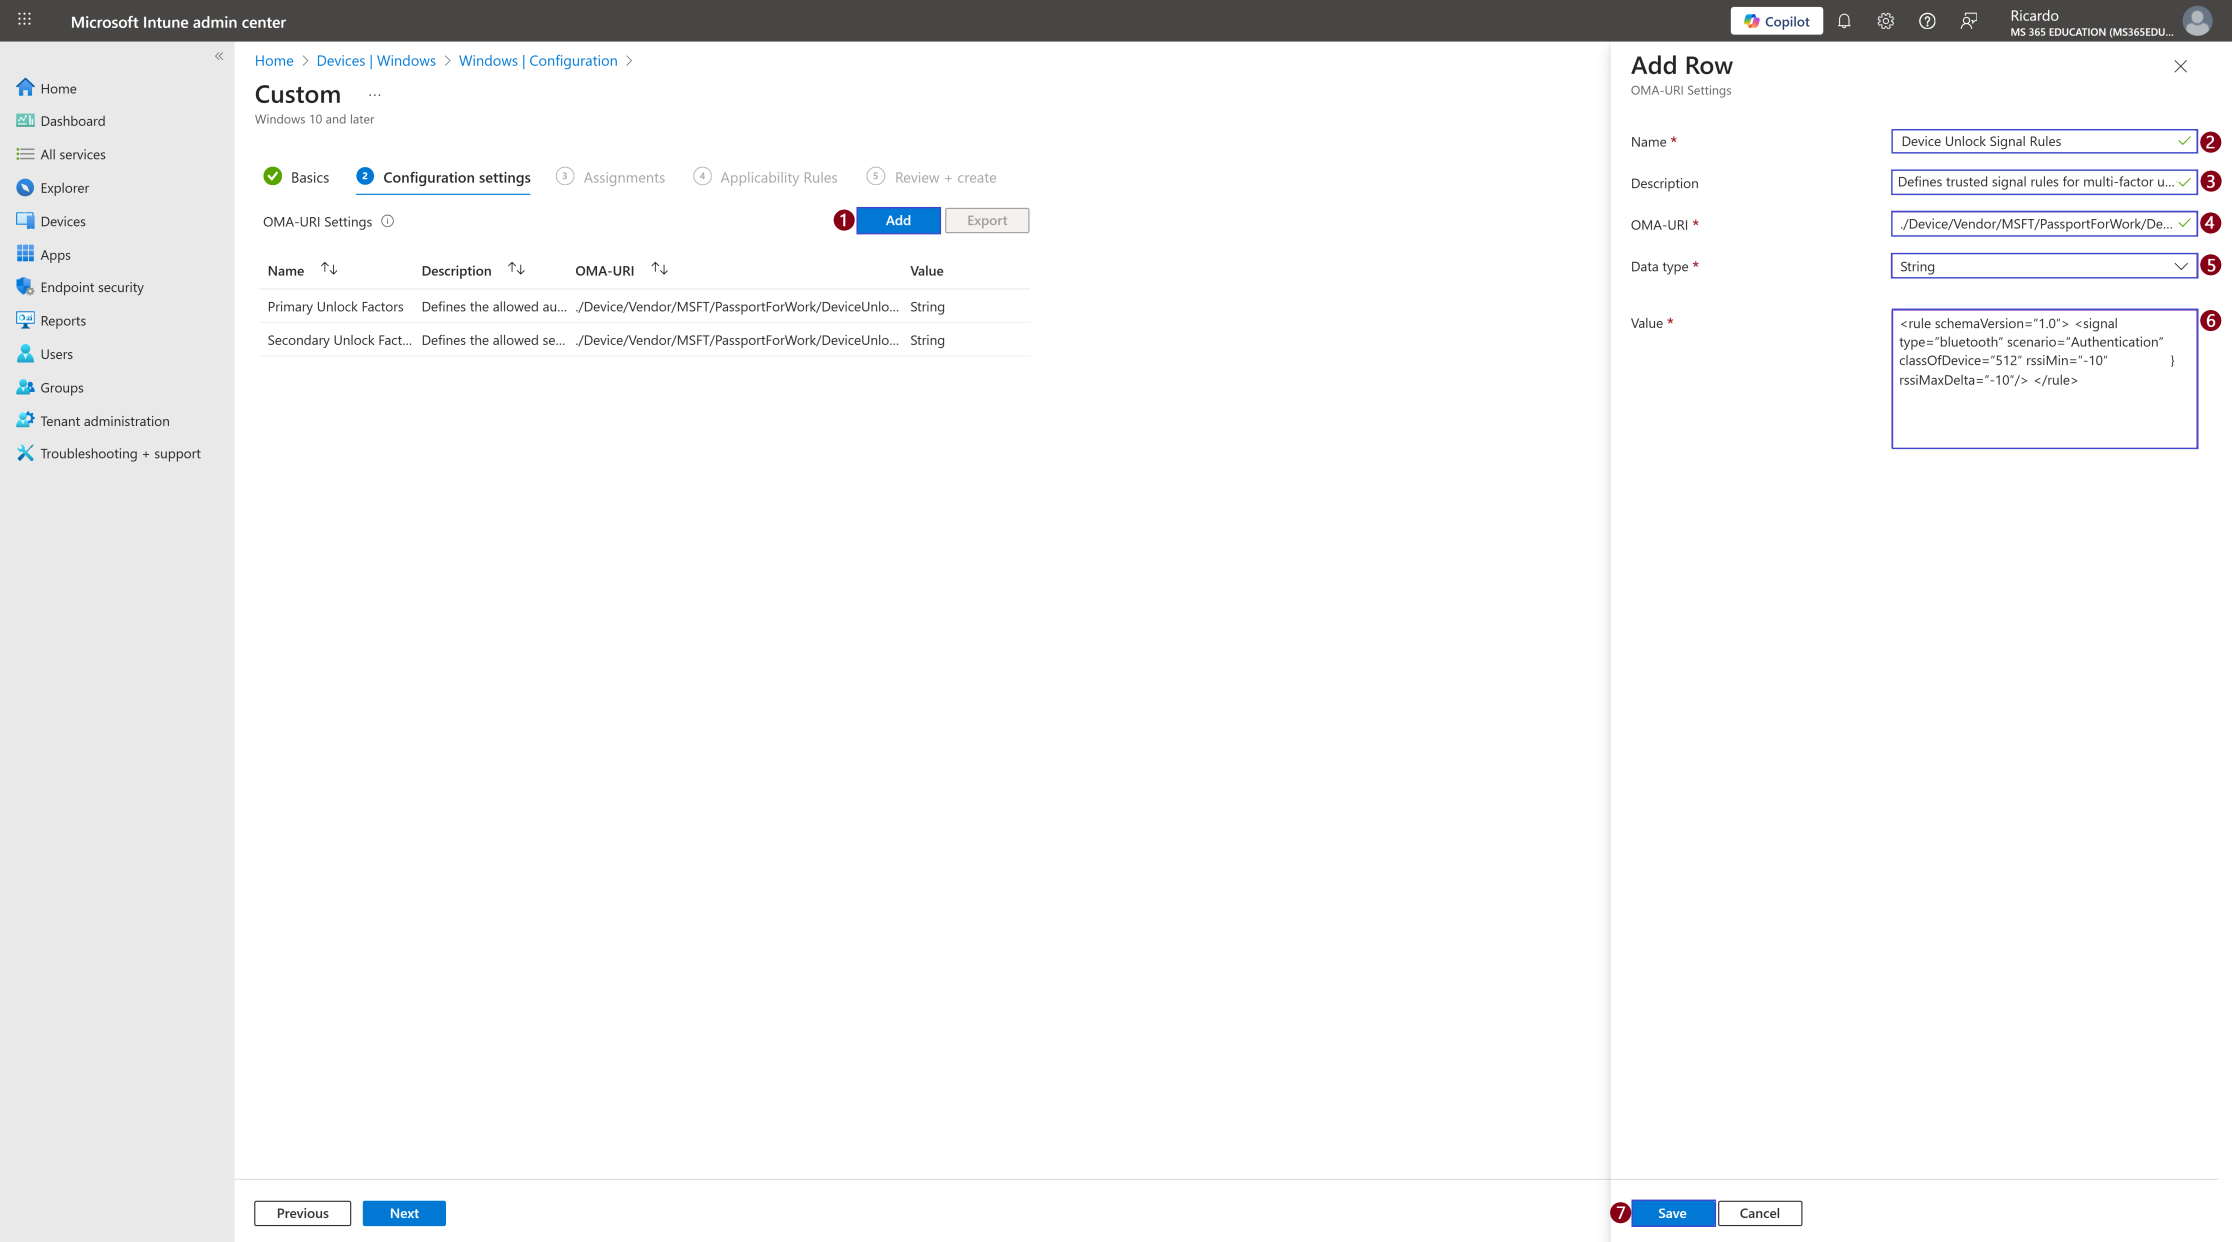
💡 Tip: You can modify the XML Value to include other signal types, such as Wi-Fi SSID or network location, depending on your environment’s trusted access design.
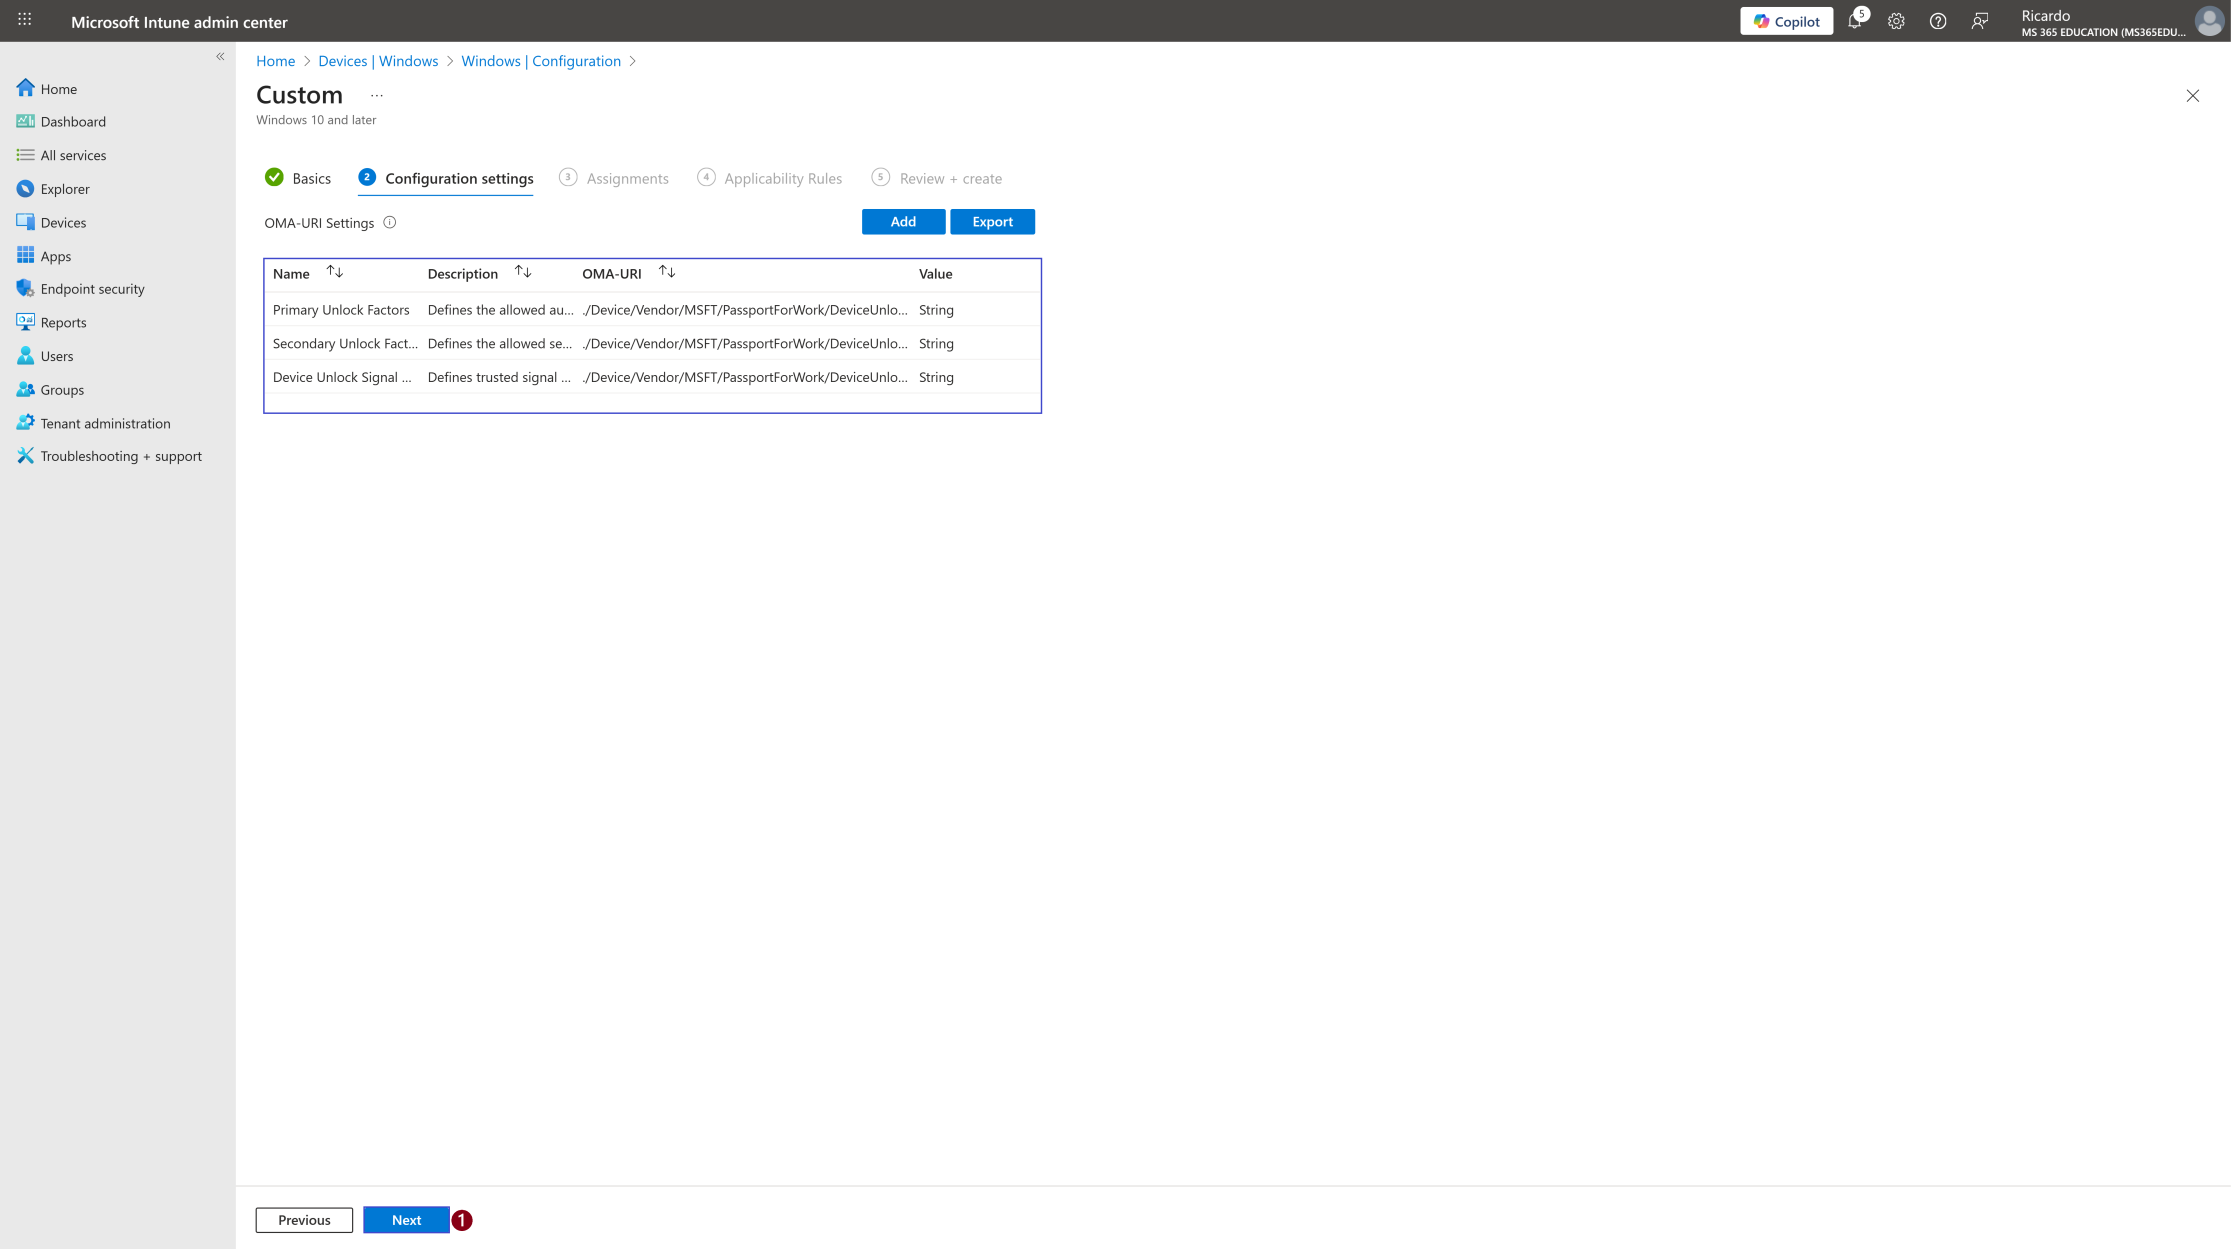
Perfect! You now have all three OMA-URI configuration settings successfully created.
Assign the Policy to Target Devices
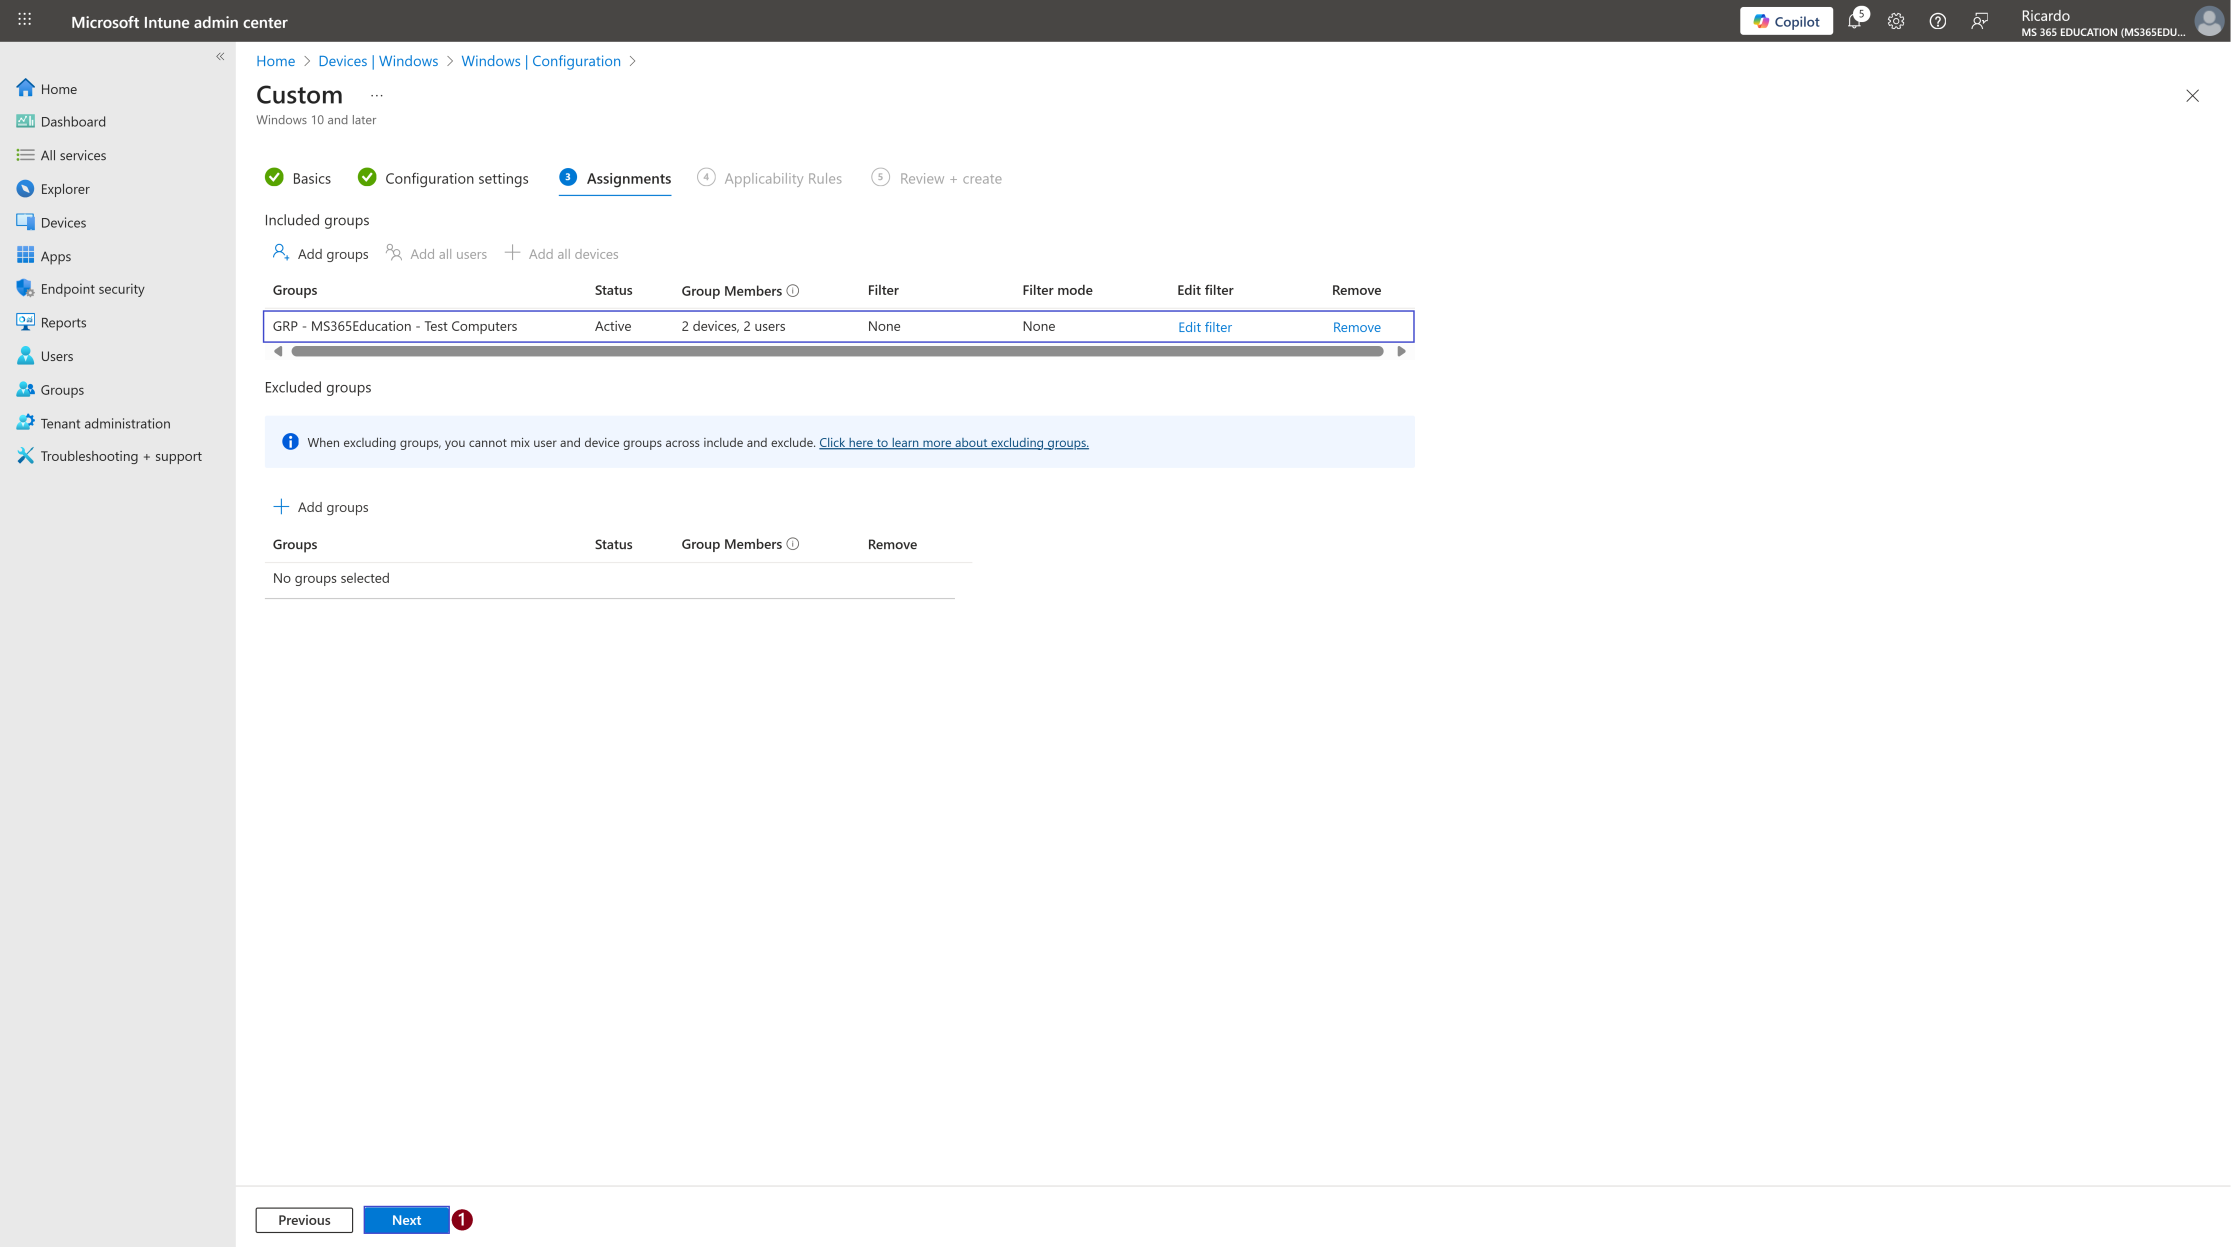
In the Assignments section, you'll define who will receive this policy. This step is essential, as it determines which users or devices the configuration will apply to.
To deploy this policy to a specific group:
Click on Add groups under the Include groups section. A list of available groups will appear use the search bar to quickly find the target group.
Once you've selected the appropriate group(s), confirm your choice. Click Next to move forward to the Applicability Rules.
Applicability Rules
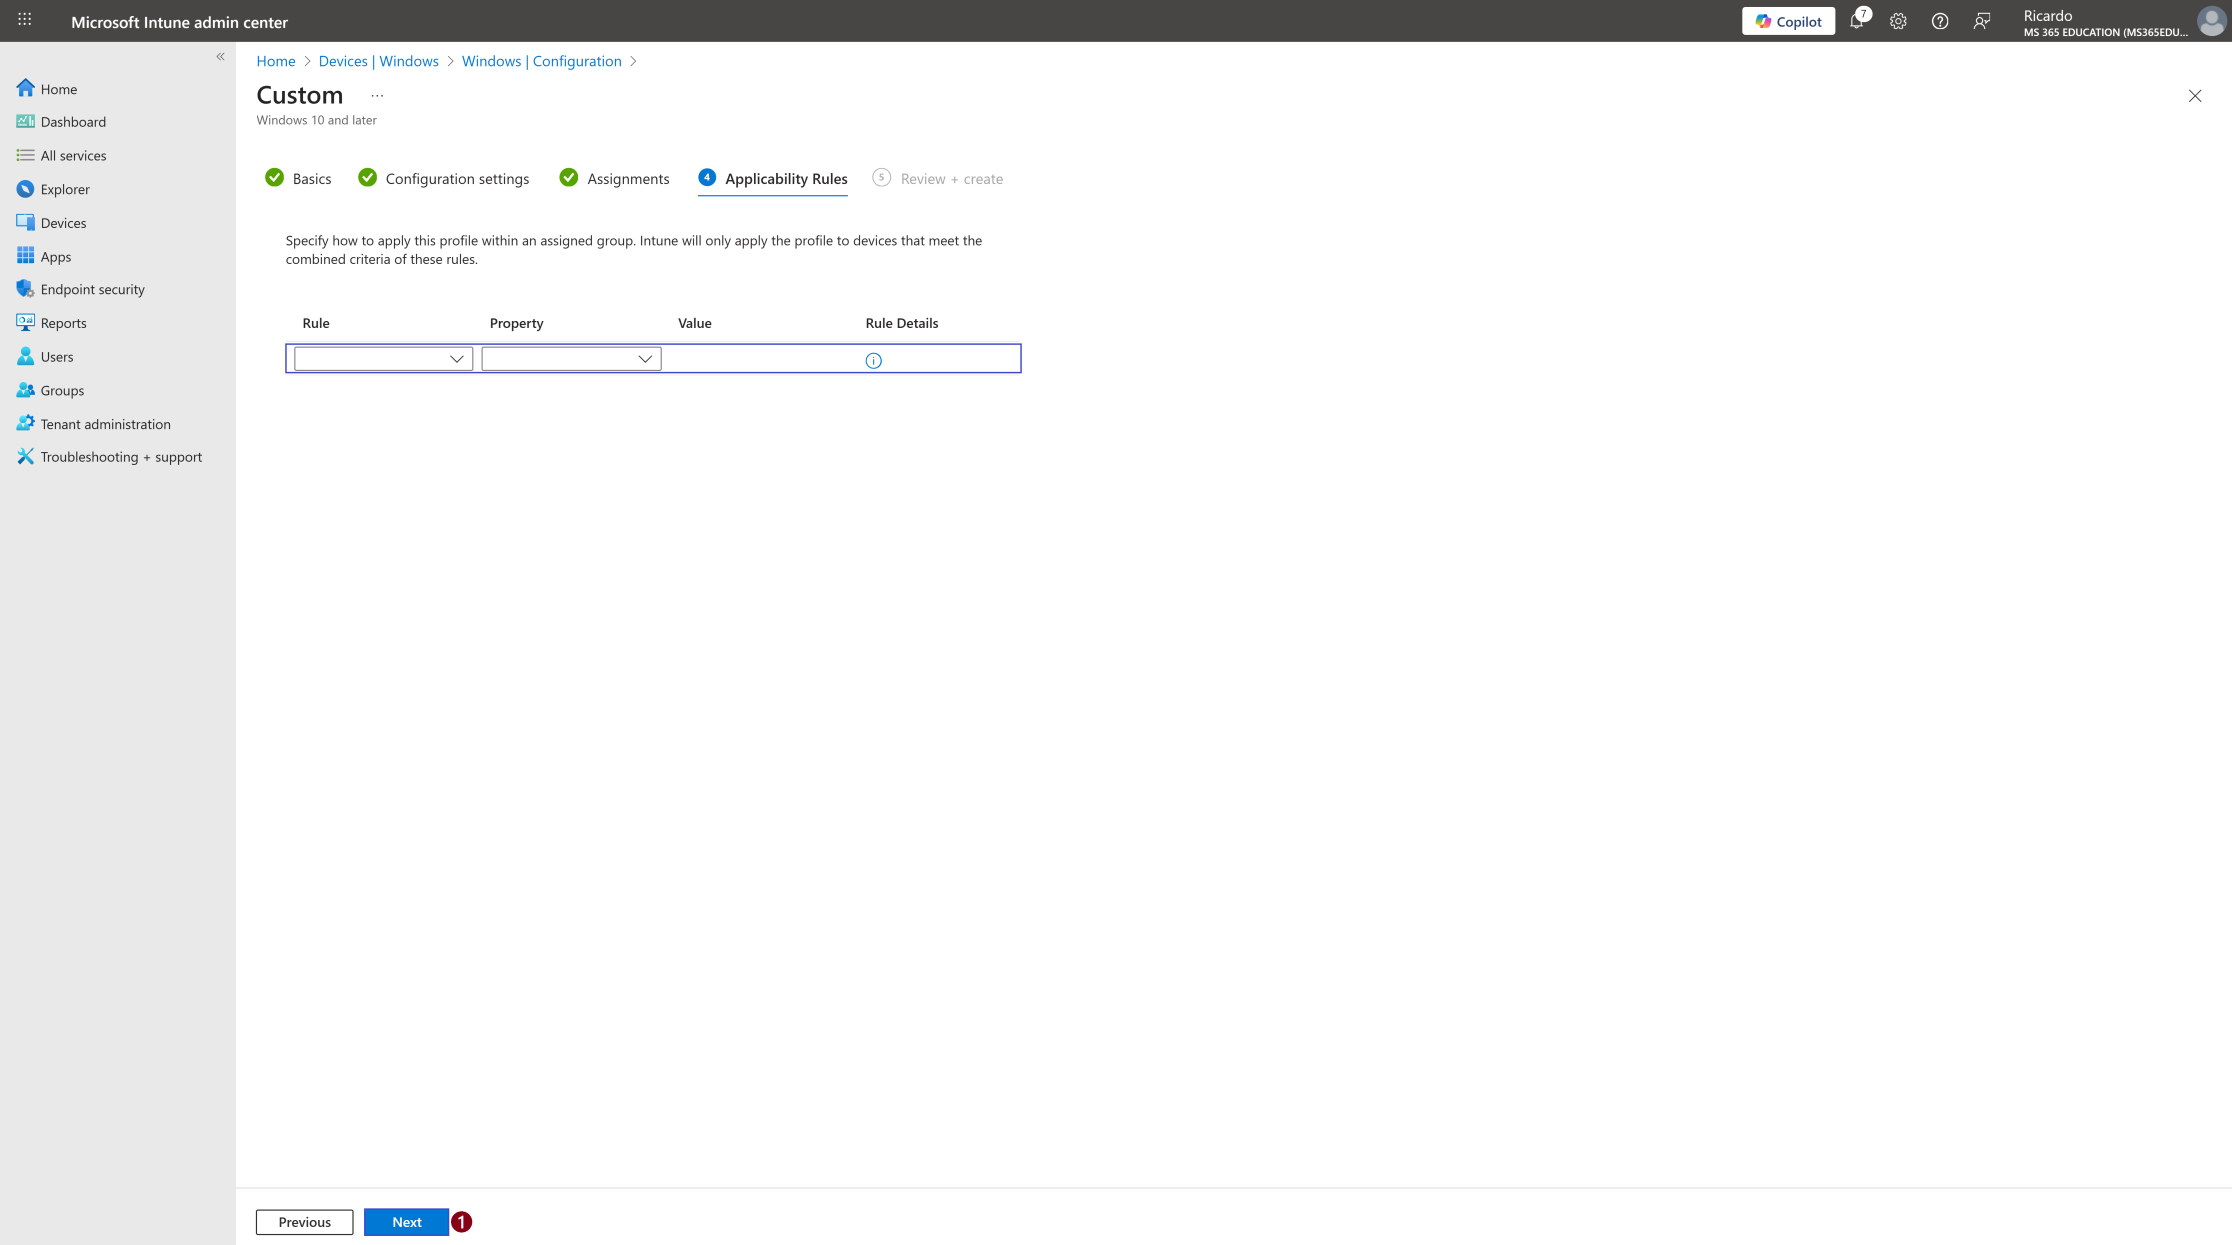
In this section, we can define rules that determine how the profile will be applied within the assigned device group. These rules allow you to control the deployment of the OMA-URI configuration, ensuring that the policy only targets devices matching specific criteria.
For example:
Specify how to apply this profile within an assigned group. Intune will only apply the profile to devices that meet the combined criteria of these rules.
Rule Property Value Rule Details Assign profile if OS edition Windows 10/11 Professional Applies only to devices running Windows 10 or 11 Pro editions.
Using applicability rules like this helps refine deployment, ensuring your policy is only delivered to devices that meet certain conditions such as OS version, edition, or build number.
However, in my case, I’ll leave this section blank so the configuration applies to all devices in the assigned group defined in the (Assignments).
Review and Create the Policy
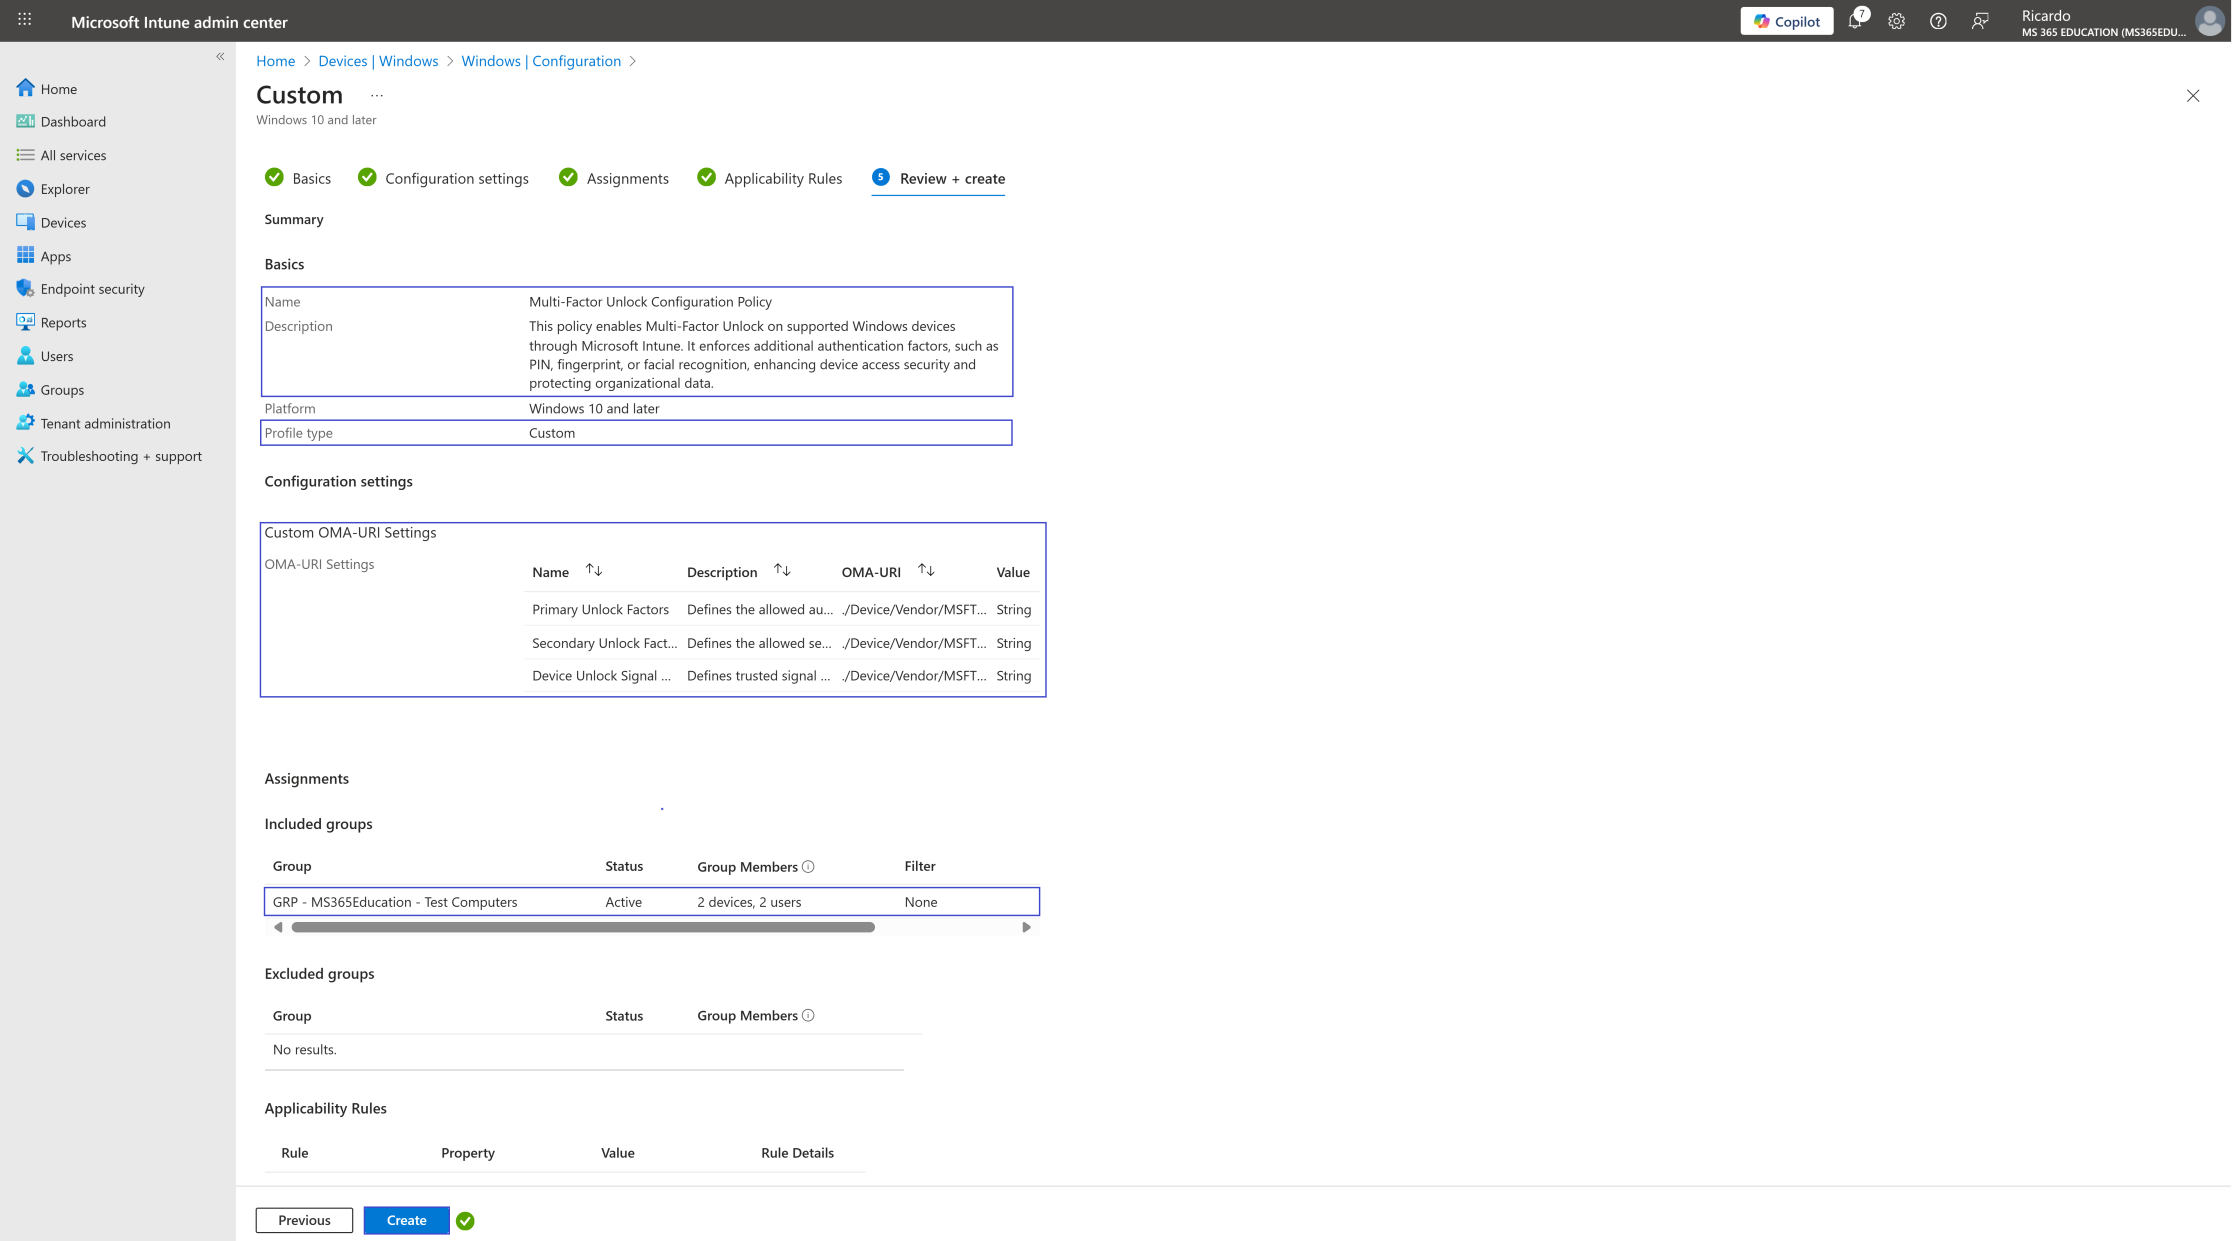
After completing the Assignments step, you'll land on the final tab: Review + Create.
This is your chance to review a full summary of the configuration including the basic details, selected settings, and group assignments. Take a moment to carefully review all entries to ensure everything is accurate and aligned with your intent.
If you need to make any changes, you can easily navigate back to the previous tabs and update the information as needed.
Once everything looks good, click Create to deploy the policy.
Your configuration will now be saved and pushed to the assigned devices based on the group you selected.
Monitor Policy Deployment Status
After creating and assigning the Prevent Edge from Deleting Saved Passwords policy, it’s important to monitor whether the configuration has been successfully deployed to all targeted devices.
By default, Intune policy deployment can take up to 8 hours. To speed up the process, you can manually trigger a device sync using the Company Portal app or initiate a sync through the Intune Management Extension.
How to Verify Deployment Status
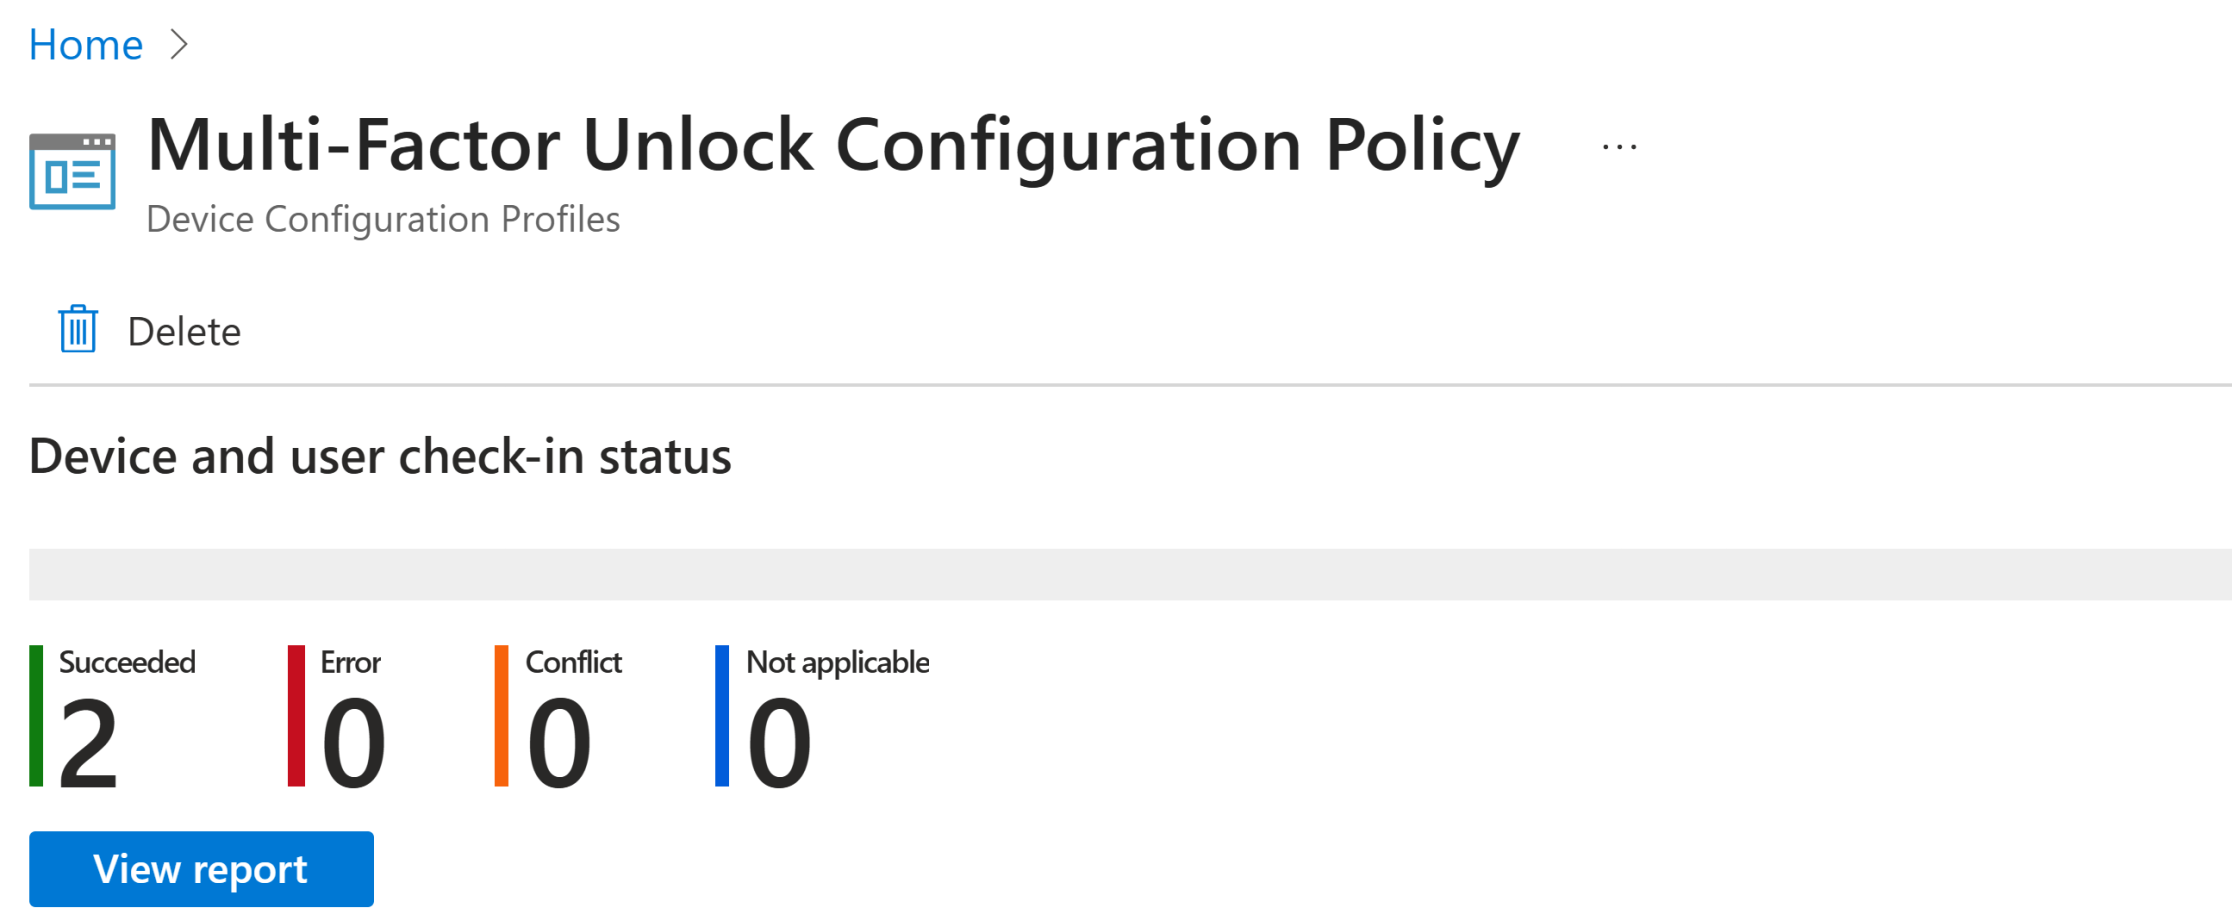
In the Microsoft Intune admin center, navigate to: Devices ➝ Configuration profiles
Use the search bar to locate the profile you created (e.g., Multi-Factor Unlock Configuration Policy)
Click on the policy name to open its Overview page
Review key deployment metrics such as:
Success
In progress
Error
Not applicable
This visibility ensures that the policy has been properly applied, and allows administrators to take corrective actions if devices are non-compliant or facing deployment issues.
Client-Side Verification via Event Viewer
After manually syncing the device or waiting for Intune to automatically apply the configuration, you can confirm that the Multi-Factor Unlock OMA-URI policy has been successfully enforced using the Event Viewer on the client device.
This step is especially valuable for troubleshooting or auditing deployments in environments that require strict compliance and security validation.
Steps to Verify Policy Application
Open Event Viewer on the target Windows device.
Navigate to: Applications and Services Logs ➝ Microsoft ➝ Windows ➝ DeviceManagement-Enterprise-Diagnostics-Provider ➝ Admin
In the right-hand pane, click Filter Current Log.
Look for Event ID 813 or 814 these typically indicate that an OMA-URI policy was successfully processed by the Intune Management Extension.
Open the event details and verify that the OMA-URI path and value data correspond to your configured settings.
For example:
OMA-URI: ./Device/Vendor/MSFT/PassportForWork/DeviceUnlock Value: {D6886603-9D2F-4EB2-B667-1971041FA96B},{BEC09223-B018-416D-A0AC-523971B639F5},{8AF662BF-65A0-4D0A-A540-A338A999D36F} Status: Successfully applied
6. Confirm that no error codes (such as 0x87d1fde8 or 0x87d1fdeb) are present these would indicate issues applying the policy.
You may also see additional fields like:
Enrollment ID
User SID
Scope (Device/User)
These fields can help you identify which user or enrollment profile processed the OMA-URI configuration.
Pro Tip:
Always verify that the Event timestamp matches your last policy sync and that the status shows “Successfully applied.” This is one of the most reliable methods to confirm that the Multi-Factor Unlock configuration was deployed correctly especially useful when diagnosing delayed, failed, or conflicting deployments.
More Information
Multi-factor Unlock – Microsoft Learn: https://learn.microsoft.com/en-us/windows/security/identity-protection/hello-for-business/multifactor-unlock?tabs=intune#configure-unlock-factors (Microsoft Learn)
PassportForWork CSP – Microsoft Learn (Custom OMA-URI path for Windows Hello for Business) https://learn.microsoft.com/en-us/windows/client-management/mdm/passportforwork-csp (Microsoft Learn)
Windows Hello for Business Policy Settings – Microsoft Learn (Lists the setting “Configure device unlock factors” and OMA-URI path) https://learn.microsoft.com/en-us/windows/security/identity-protection/hello-for-business/policy-settings (Microsoft Learn)
Thank you!
Ricardo Barbosa
Microsoft MVP | Microsoft Certified Trainer (MCT)
Intune & Cloud Architect | Technology Director at Altelix.com