

In this article, I will guide you through the process of setting up an App Registration in Azure, highlighting its key advantages and scenarios where registering an app is essential.
App registrations play a critical role in enabling applications to authenticate and securely integrate with Azure services, Microsoft Graph, and other APIs. By registering an app, you gain the ability to control access permissions, enhance security with OAuth 2.0 protocols, and simplify management of application identities.
This setup is particularly useful in scenarios such as:
Developing custom applications that need to access Microsoft resources.
Integrating third-party services with your Azure environment.
Configuring multi-tenant applications for wider accessibility.
Step 1: How to set up an app registration
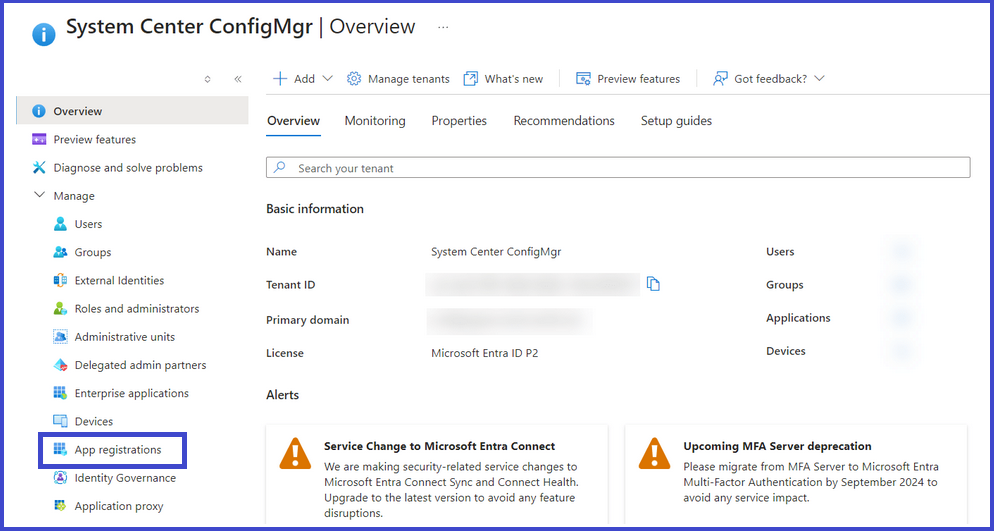
Log in to portal.azure.com as an Application Administrator, Cloud Application Administrator, or Global Administrator, and navigate to the Microsoft Entra ID blade.
Browse to App registrations as shown in the figure below.
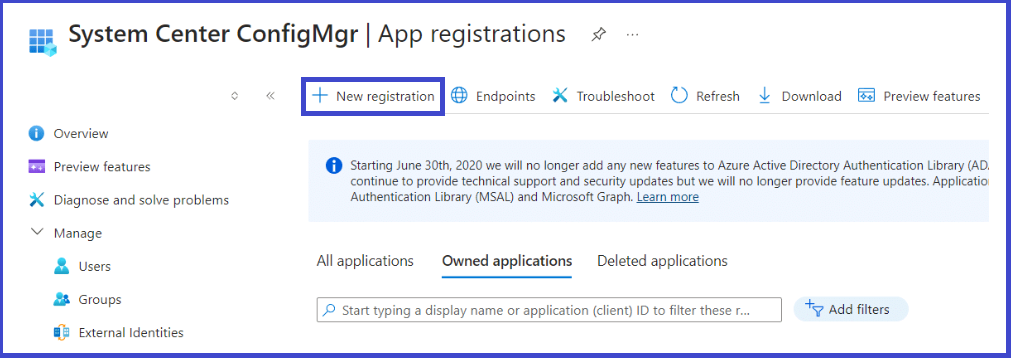
Click on New registration.
Step 2: Configure the App Registration
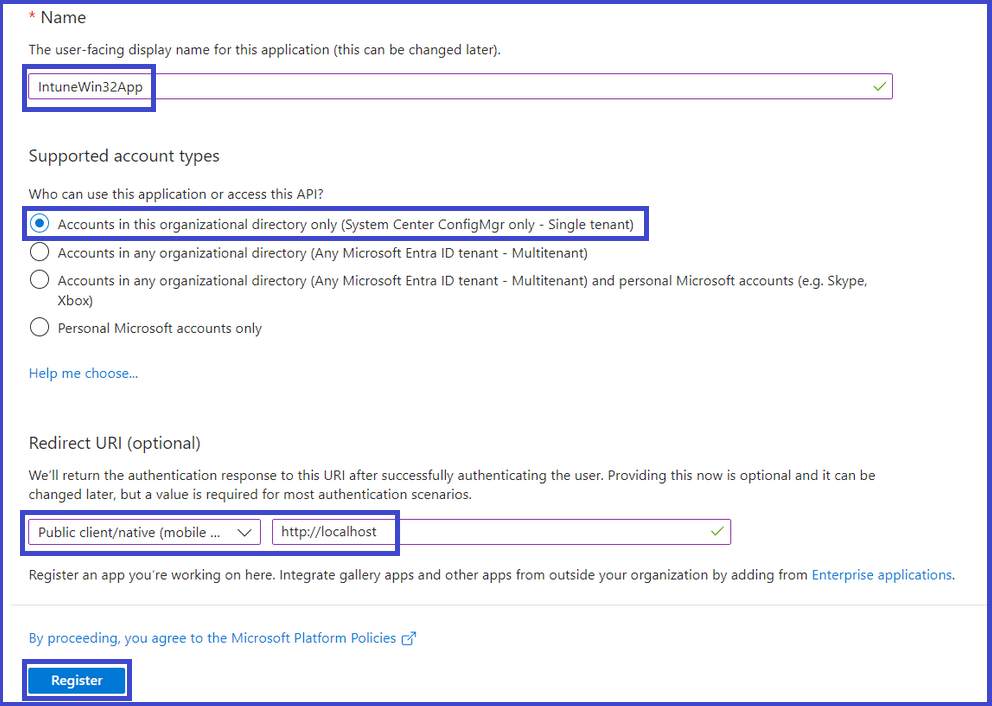
Provide a Name: Enter a meaningful name for the app registration to easily identify its purpose.
Choose the Supported Account Type: Under Who can use this application or access this API, ensure that Accounts in this organizational directory only is selected. Unless you specifically require multi-tenant support and fully understand its implications, it is recommended to keep this default selection.
Set the Redirect URI:
Select Public client/native (mobile & desktop) as the Redirect URI type.
Enter http://localhost in the text field (note: this must be HTTP, not HTTPS).
4. Complete the Registration: Once all fields are filled correctly, click Register to finalize the app registration process.
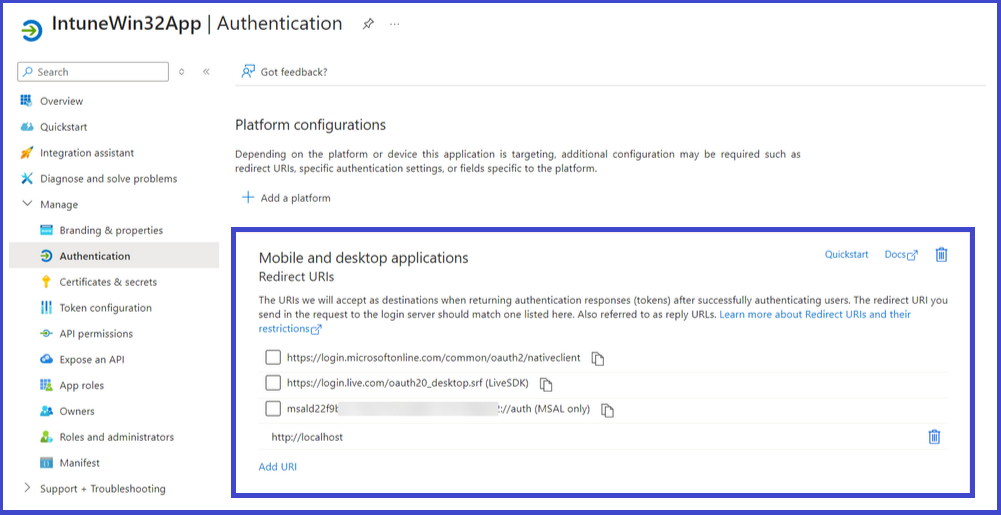
In the Authentication section of the newly registered application, ensure it resembles what’s shown below.
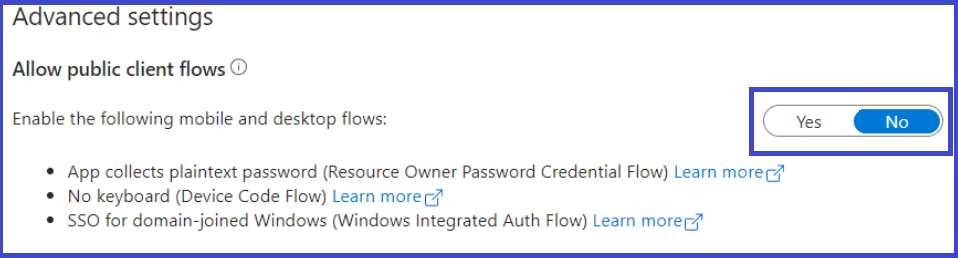
Optional: Enabling Device Code Flow
If you wish to enable Device Code flow, an additional configuration is required:
Navigate to the Authentication section of the app registration.
Locate the setting labeled Enable the following mobile and desktop flows.
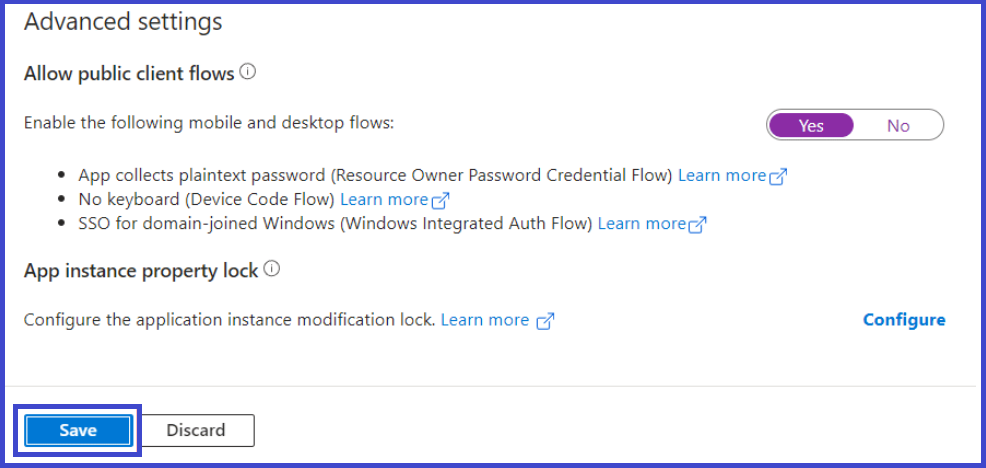
Flip the toggle from No to Yes to enable this feature.
This configuration allows your application to support device code authentication, which is particularly useful for user-friendly, secure logins on devices with limited input capabilities.
Click Save.
Step 3: Configure Permissions for the App Registration With the app registration successfully created, the next step is to grant the necessary permissions to the application. This ensures the app has the access it needs to function correctly, particularly for the IntuneWin32App module.
💡 Note: If you require additional permissions, such as the ability to read groups, you can add permissions like Group.Read.All to this app registration. However, for basic functionality, the minimum required permissions are:
DeviceManagementApps.ReadWrite.All
To configure these permissions:
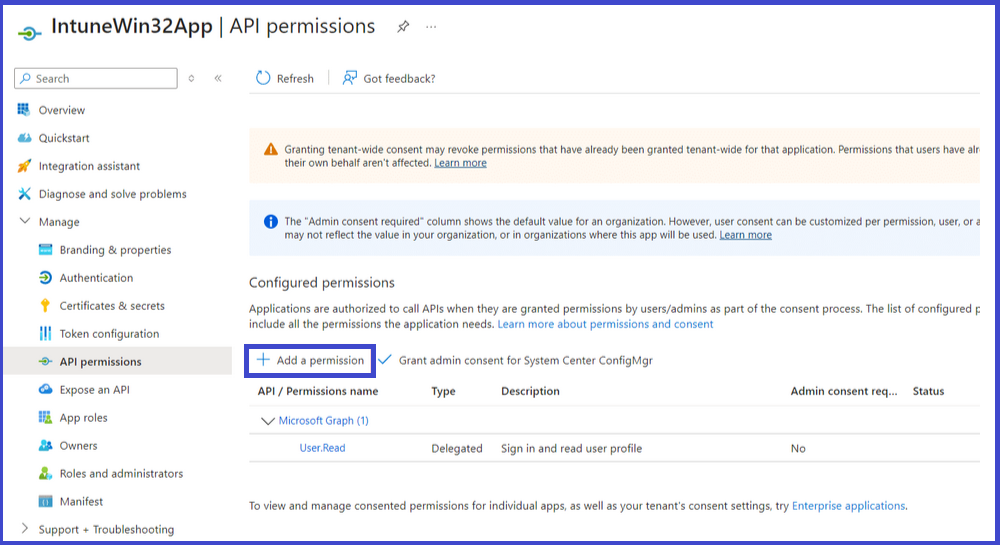
Navigate to the API permissions blade in the Azure portal.
Click Add a permission to begin adding the required permissions.
This step is critical to ensure the app registration has the appropriate scope for interacting with Intune and related APIs.
Click on Microsoft Graph.
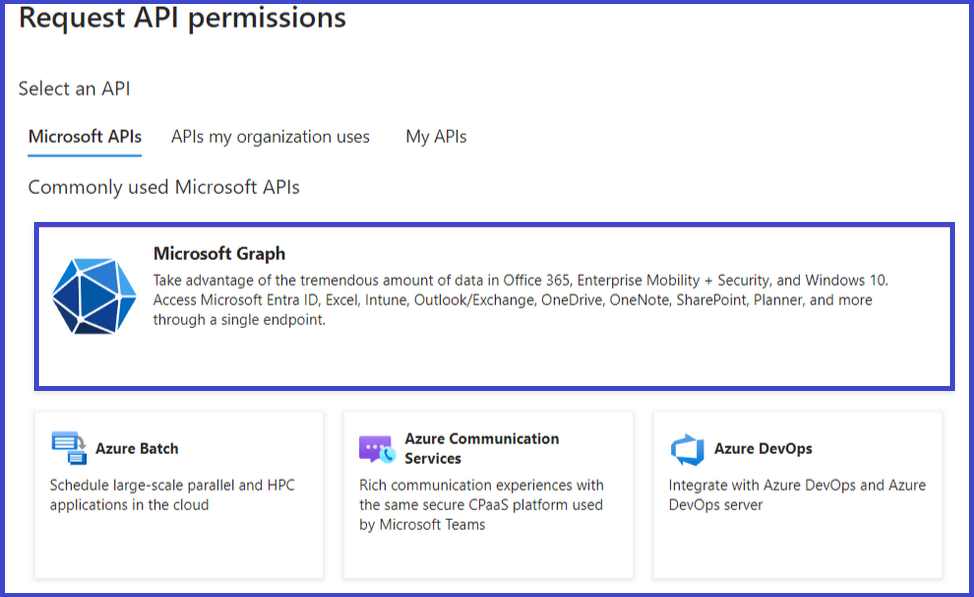
At this stage, it’s crucial to select the appropriate type of permissions: either Delegated permissions or Application permissions. While it is possible to configure the same permissions for both types, it is considered a best practice to separate them into different app registrations for better management and clarity.
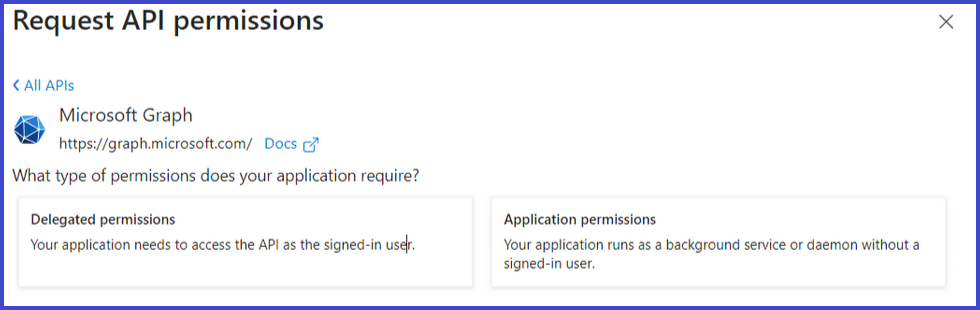
Step 4: Delegated permissions
Delegated permissions should be selected if you’re interactively authenticating using the Connect-MSIntuneGraph function of the IntuneWin32App module. This is typically used when you manually execute a script that prompts for your authentication credentials.
For example, usage with Connect-MSIntuneGraph could look like:
Connect-MSIntuneGraph -TenantId "tenant.onmicrosoft.com" -ClientID "<your_client_id>"
If this is how you’re using the module, select Delegated permissions.
Application permissions Application permissions should be selected if you’re planning to authenticate in an automated scenario, such as when a script is scheduled to run at a specific time, or if you prefer not to be prompted for interactive authentication by using a Client Secret.
For example, usage with Connect-MSIntuneGraph could look like:
Connect-MSIntuneGraph -TenantId "tenant.onmicrosoft.com" -ClientID "<your_client_id>" -ClientSecret "<your_secret>"
If this is how you’re going to use the module, select Application permissions.
Configure the desired permission type Once the correct permission type has been identified based on your authentication method, do the following:
In the Select permissions section, search for DeviceManagementApps.
Select DeviceManagementApps.ReadWrite.All and click Add permissions.
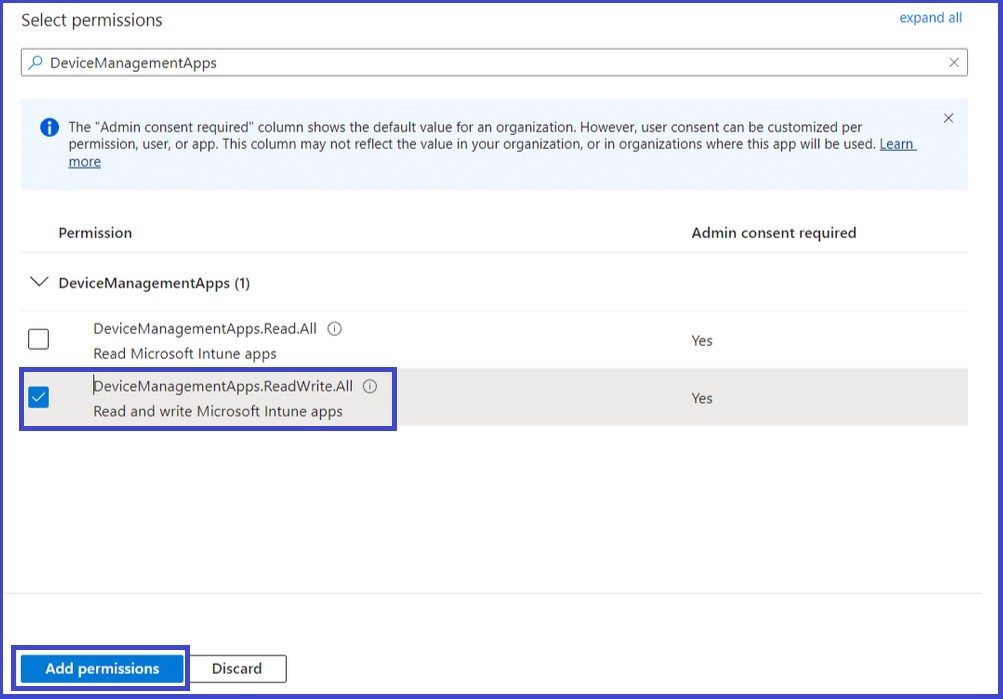
Once the permissions have been added, the last step is to ensure admin consent have been granted for those that require it.
Click Grant admin consent for <tenant name>.
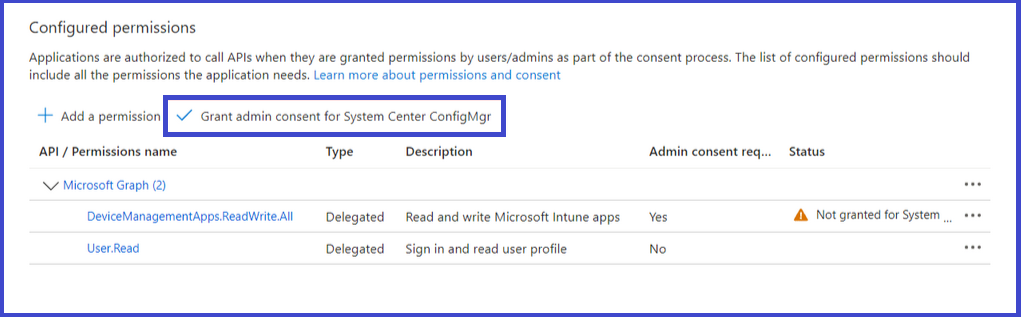
Click Yes in the prompt that appears for confirmation of the admin consent.

The Status field should now have changed to a green checkmark.
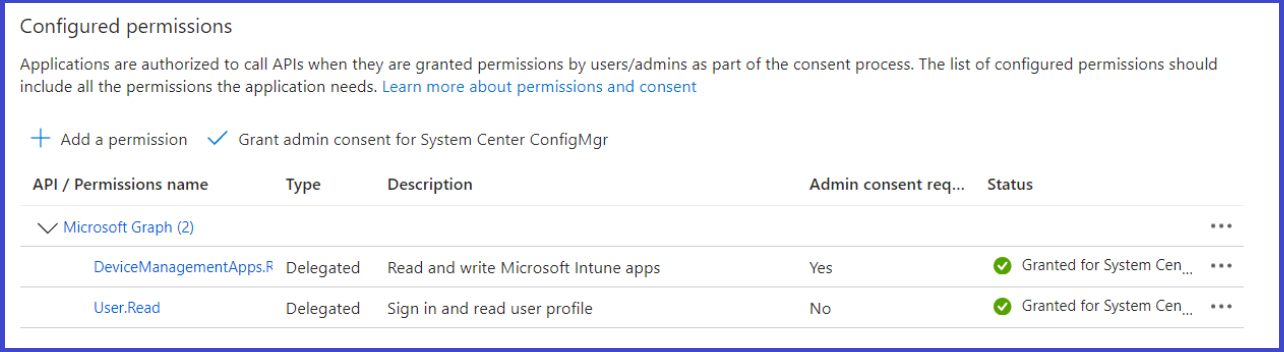
Now, follow the same steps above to add the following permissions, using the same permission type that you added earlier:
Don’t forget to grant admin consent.
Authenticate using the Connect-MSIntuneGraph function
With the new app registration set up with the minimum required permissions for the intended permission type, the Connect-MSIntuneGraph function will now always require the ClientID parameter to be included in the command line. This change will be mandatory in the next release.
Here’s how the function should be used, depending on the authentication scenario:
Delegated authentication (interactive)
To invoke the authorization code authentication flow, use: Connect-MSIntuneGraph -TenantId "tenant.onmicrosoft.com" -ClientID "<your_client_id>"
Client Credentials authentication (non-interactive)
To use a client secret: Connect-MSIntuneGraph -TenantId "tenant.onmicrosoft.com" -ClientID "<your_client_id>" -ClientSecret "<your_secret>"
To use a certificate: Connect-MSIntuneGraph -TenantId "tenant.onmicrosoft.com" -ClientID "<your_client_id>" -ClientCert "<your_X509Certificate>"
Device Code authentication (interactive)To invoke a device code authentication flow, use:Connect-MSIntuneGraph -TenantId "tenant.onmicrosoft.com" -ClientID "<your_client_id>" -DeviceCode
More Information
For additional guidance on configuring App Registrations in Azure, refer to the following resources on Microsoft Learn:
Quickstart: Register an app in the Microsoft identity platform This guide provides step-by-step instructions to register an application, including setting up redirect URIs and configuring platform settings. https://learn.microsoft.com/en-us/entra/identity-platform/quickstart-register-app
Implement app registration Explore how to implement app registration, configure application permissions, and plan your line-of-business application registration strategy. https://learn.microsoft.com/en-us/training/modules/implement-app-registration/
Register an application with the Microsoft identity platform Learn how to register your application and configure platform settings to integrate with Microsoft Entra ID. https://learn.microsoft.com/en-us/graph/auth-register-app-v2
These resources provide comprehensive instructions on setting up, managing, and optimizing app registrations in Azure, ensuring secure and efficient integration with Microsoft services.
Thank you!
🖥️ Ricardo Barbosa
📘 MCT Microsoft Certified Trainer | ☁️ Cloud Architect
🌐 Technology Director - https://altelix.com