

Understanding High-Severity Threat Remediation in Intune
In this article, we’re going to dive deep into how Microsoft Intune and Microsoft Defender Antivirus work together to contain high-severity threats automatically and why configuring the correct remediation action is essential for strengthening your organization’s security posture.
We’ll explore how these threats operate, how automated containment drastically reduces exposure time, and how the right Intune policy can create a consistent, predictable, and Zero Trust–aligned defense strategy across all endpoints.
Why Automated Remediation Matters
In modern environments, high-severity threats are not just “malware alerts” they are active security incidents. They often involve malicious payloads capable of:
Stealing credentials
Establishing backdoors
Encrypting data (ransomware)
Moving laterally across the network
Exfiltrating sensitive information
Disrupting operations
These are the threats that cannot wait for user intervention, manual review, or delayed response.
That’s where Intune and Defender come together.
Microsoft Intune provides the policy Remediation Action for High-Severity Threats, which defines exactly what Microsoft Defender Antivirus should do the moment a high-severity threat is detected. This setting determines the automated action the endpoint will take without relying on user decisions or manual triage.
High-severity detections typically include:
Advanced spyware
Trojans and credential stealers
Ransomware components
Malware injecting persistence or lateral movement capabilities
Scripts or payloads targeting system integrity
These attacks represent immediate, high-impact risks that require instant, standardized action.
Balancing Security, Speed, and User Experience
Organizations implementing this policy usually evaluate it through two critical perspectives:
Maximum Security & Immediate Response
To contain a high-severity threat, speed is everything. Automated remediation often represents the difference between:
A contained incident or
A full-scale breach
By forcing the endpoint to take action within seconds, organizations drastically reduce dwell time one of the most important metrics in cybersecurity.
Minimum Disruption & Controlled Impact
Security cannot come at the cost of chaos. While you want the fastest response, you also want to:
Avoid unnecessary file deletions
Prevent user confusion
Reduce false positives
Maintain operational continuity
This policy allows organizations to deliver security at speed, while still preserving user productivity and minimizing disruption.
Why This Policy Is Essential in Intune
The Remediation Action for High-Severity Threats policy provides benefits at every level of the organization:
For users
Threats are handled silently and instantly, without pop-ups or decisions they are not trained to make.
For administrators
Response becomes centralized, predictable, and consistent regardless of device type or user behavior.
For the organization
Security posture improves dramatically, incident response becomes faster, and compliance requirements (like Zero Trust) are met more effectively.
Intune offers six remediation actions, each with different levels of impact. However, one action consistently stands out as the most secure and balanced:
Quarantine - The Ideal Action for High-Severity Threats
Quarantine isolates the malicious file safely, preventing execution while preserving the sample for:
Investigation
Forensics
Threat intelligence
SOC analysis
It’s the perfect blend of protection, control, and visibility.
Real-World Example - Why Quarantine Is the Right Choice
Imagine this scenario:
A user downloads a compressed file from a phishing email. Hidden inside is a high-severity Trojan designed to steal passwords and contact a remote command-and-control server.
The moment Microsoft Defender scans the file:
It detects the high-severity malware.
The Intune remediation policy triggers instantly.
The malicious file is moved directly to quarantine - no user interaction required.
No delay. No hesitation. No chance for the threat to execute.
This is the power of automated remediation: fast, consistent, and controlled security at scale.
Configure the Policy Through the Intune Admin Center
When you configure the Remediation Action for High-Severity Threats policy through Intune, you override any local settings on the device. This ensures that neither a user nor a local administrator can weaken, disable, or alter the security response intentionally or accidentally.
Centralizing this configuration in Intune guarantees that every Windows device receives the same consistent behavior, reinforcing Zero Trust, reducing exposure time, and strengthening your overall endpoint security strategy.
Below is the step-by-step guide to deploying this policy directly from the Intune portal.
Step-by-Step: Deploy the Policy in Intune
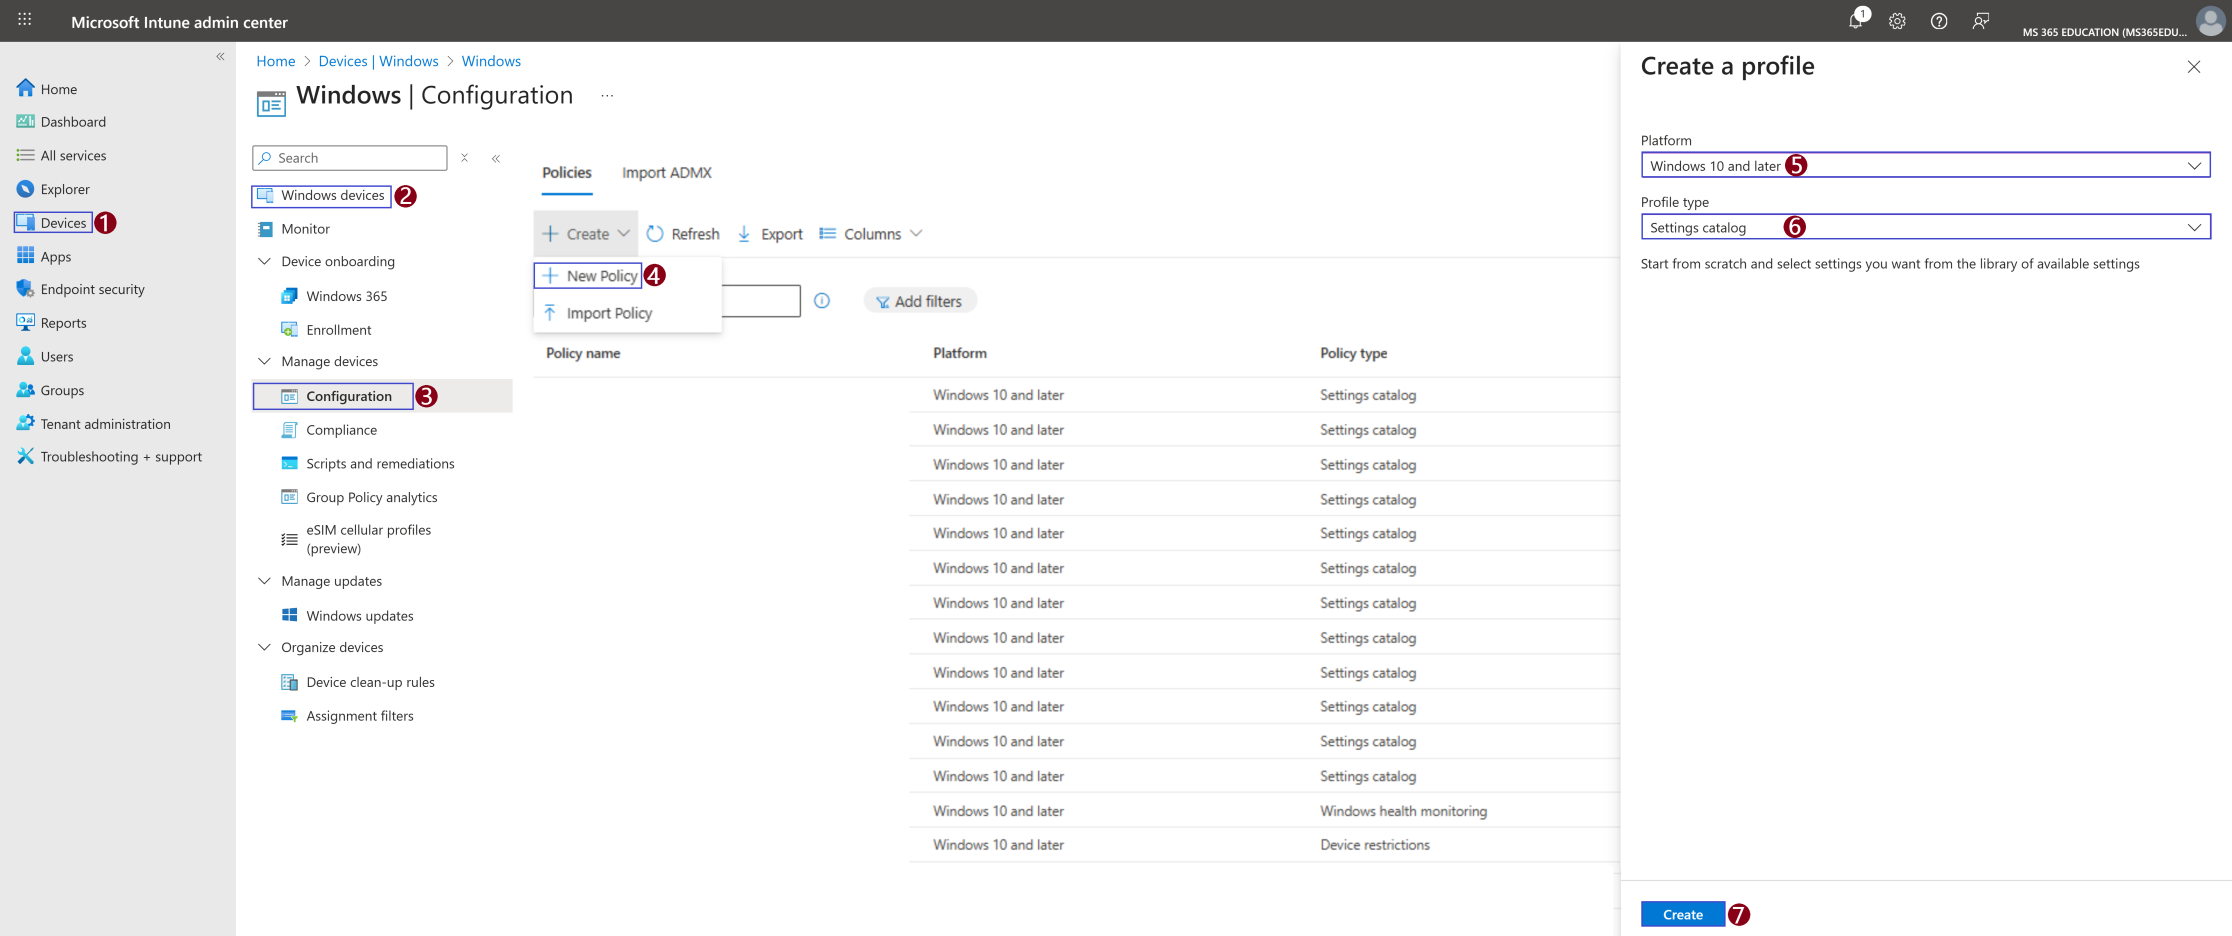
Follow the steps below to create and assign the High-Severity Threat Remediation policy using the Settings Catalog, matching the visual flow shown in the screenshot:
Here’s how to configure the policy in the Microsoft Intune Admin Center:
In the Microsoft Intune admin center, go to Devices
Select Windows devices
Under the Policy section, choose Configuration profiles
Click on + Create and then select New Policy
In the Create a profile pane, set Platform = Windows 10 and later
Set the Profile type = Settings catalog
Click Create to proceed
Define Basic Profile Details
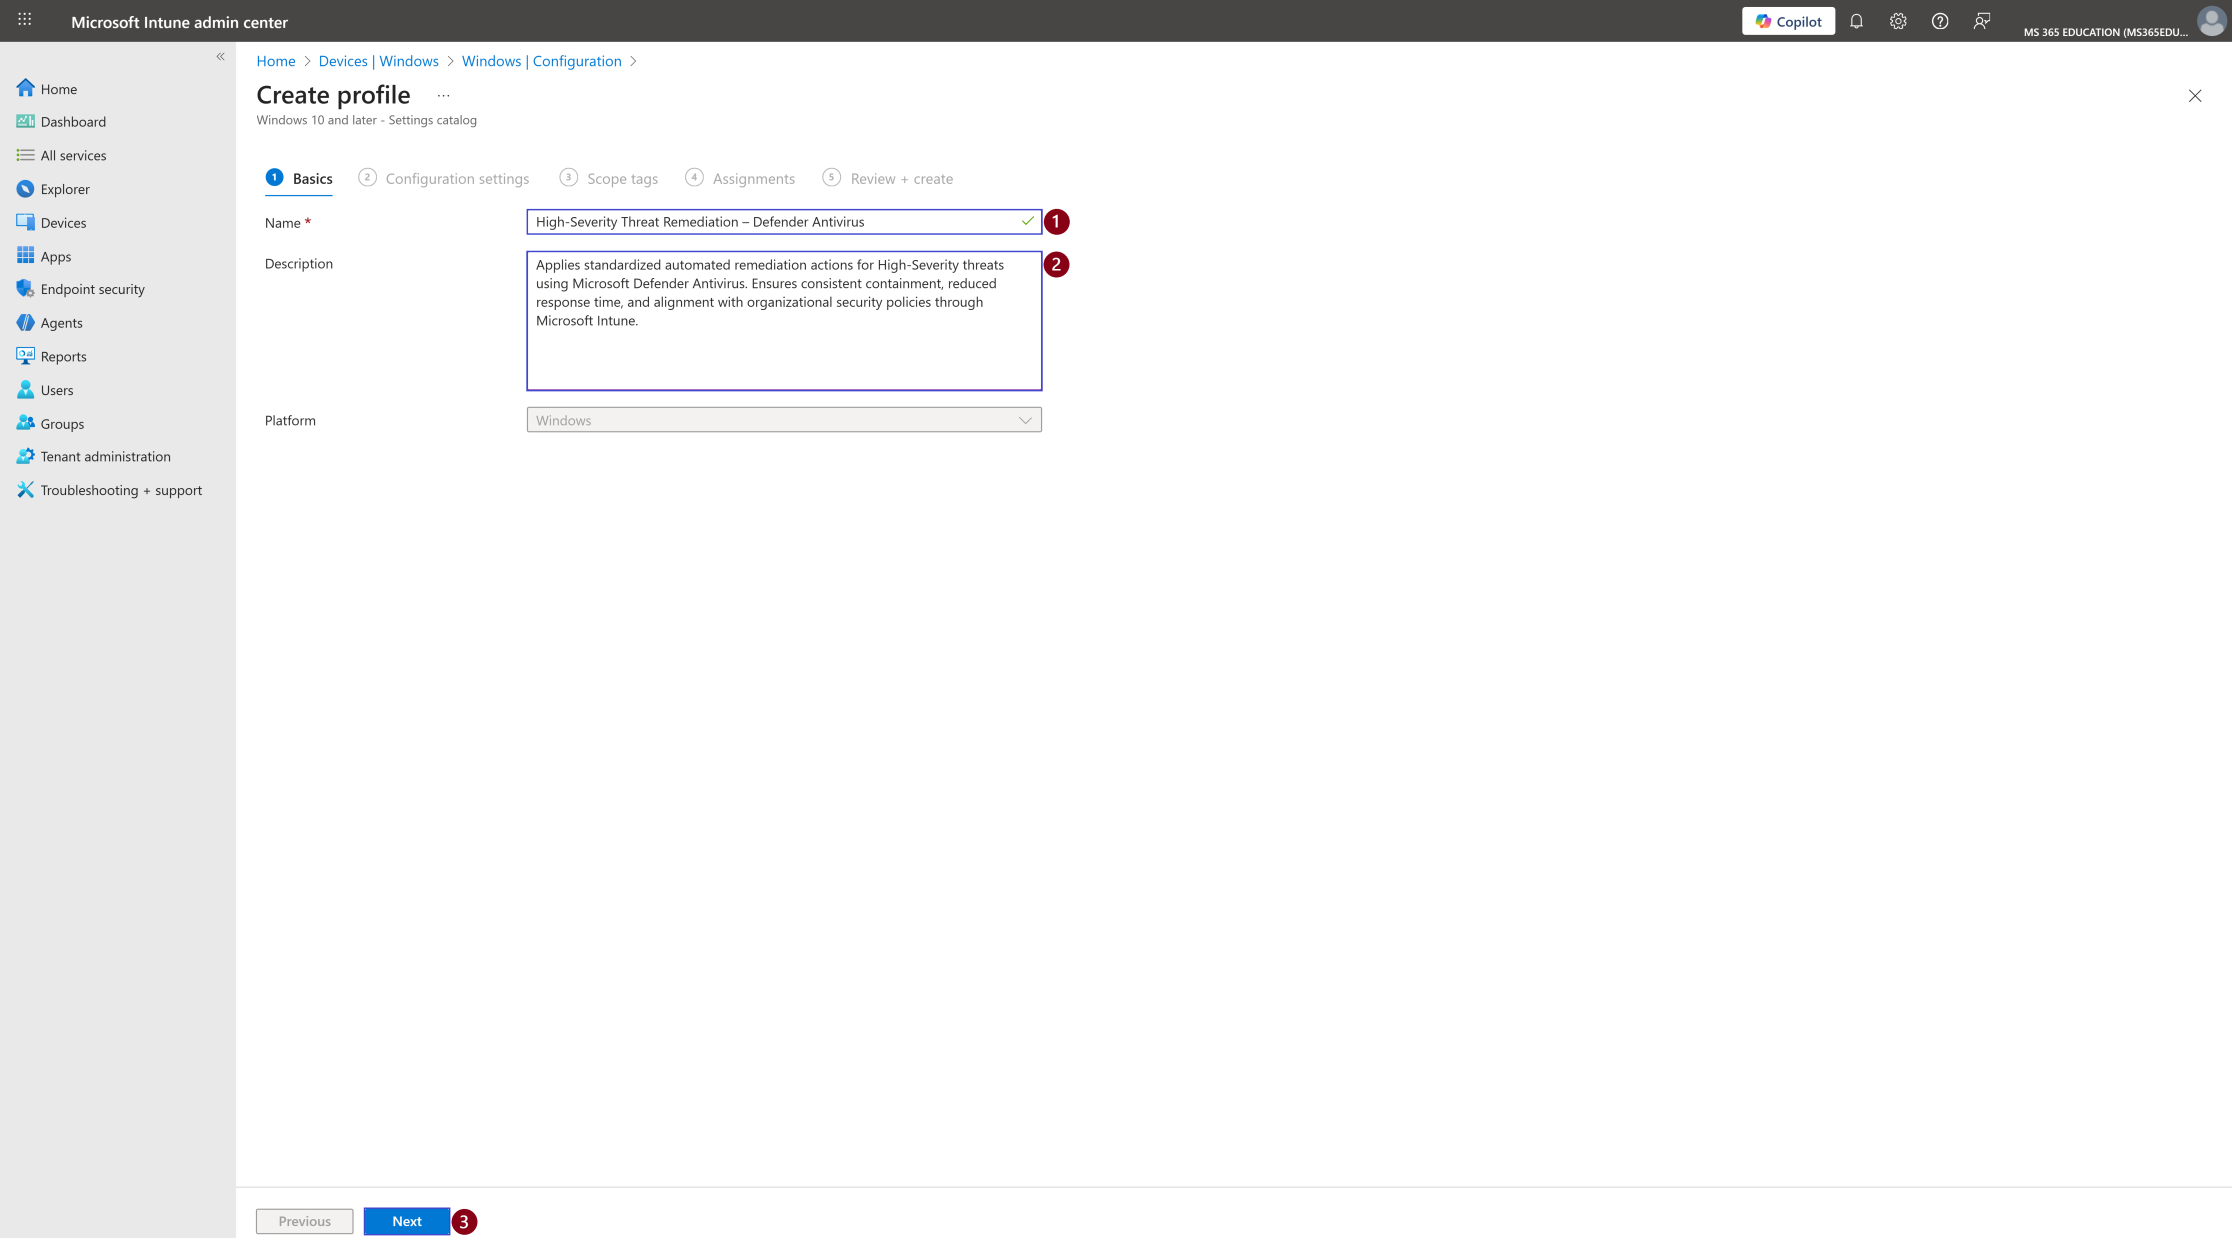
After initiating the creation of the policy, the next step is to define the basic profile details. This section ensures the configuration is clearly identifiable and easy to maintain especially in environments with multiple Defender or security-related policies.
You will enter a Name, Description, and confirm the Platform (which is already set to Windows 10 and later based on your previous selection).
Suggested Name and Description
Name: High-Severity Threat Remediation – Defender Antivirus
Description: Applies standardized automated remediation actions for High-Severity threats using Microsoft Defender Antivirus. Ensures consistent containment, reduced response time, and alignment with organizational security policies through Microsoft Intune.
No changes are required in the Platform field. Once the Name and Description are completed, click Next to proceed to the configuration settings.
Selecting Values for the Policy
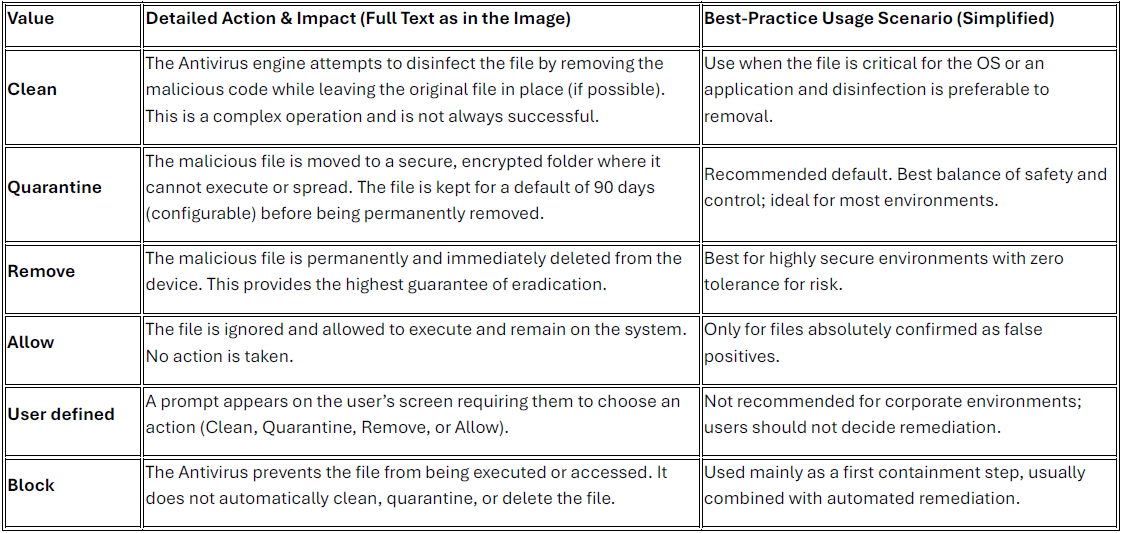
This policy offers six remediation options for handling high-severity threats: Clean, Quarantine, Remove, Allow, User defined, and Block. Each value determines how Microsoft Defender Antivirus responds when malicious content is detected.
For this configuration, the recommended choice is Clean, where the service attempts to recover the file and disinfect it removing only the malicious code while preserving the original, safe content whenever possible. This option provides balanced protection while minimizing disruption, especially when the file is important for system or application functionality.
Below, you will find a summarized table that provides an overview of each remediation value, including its behavior and ideal usage scenario.
Configure Remediation Action for High-Severity Threats
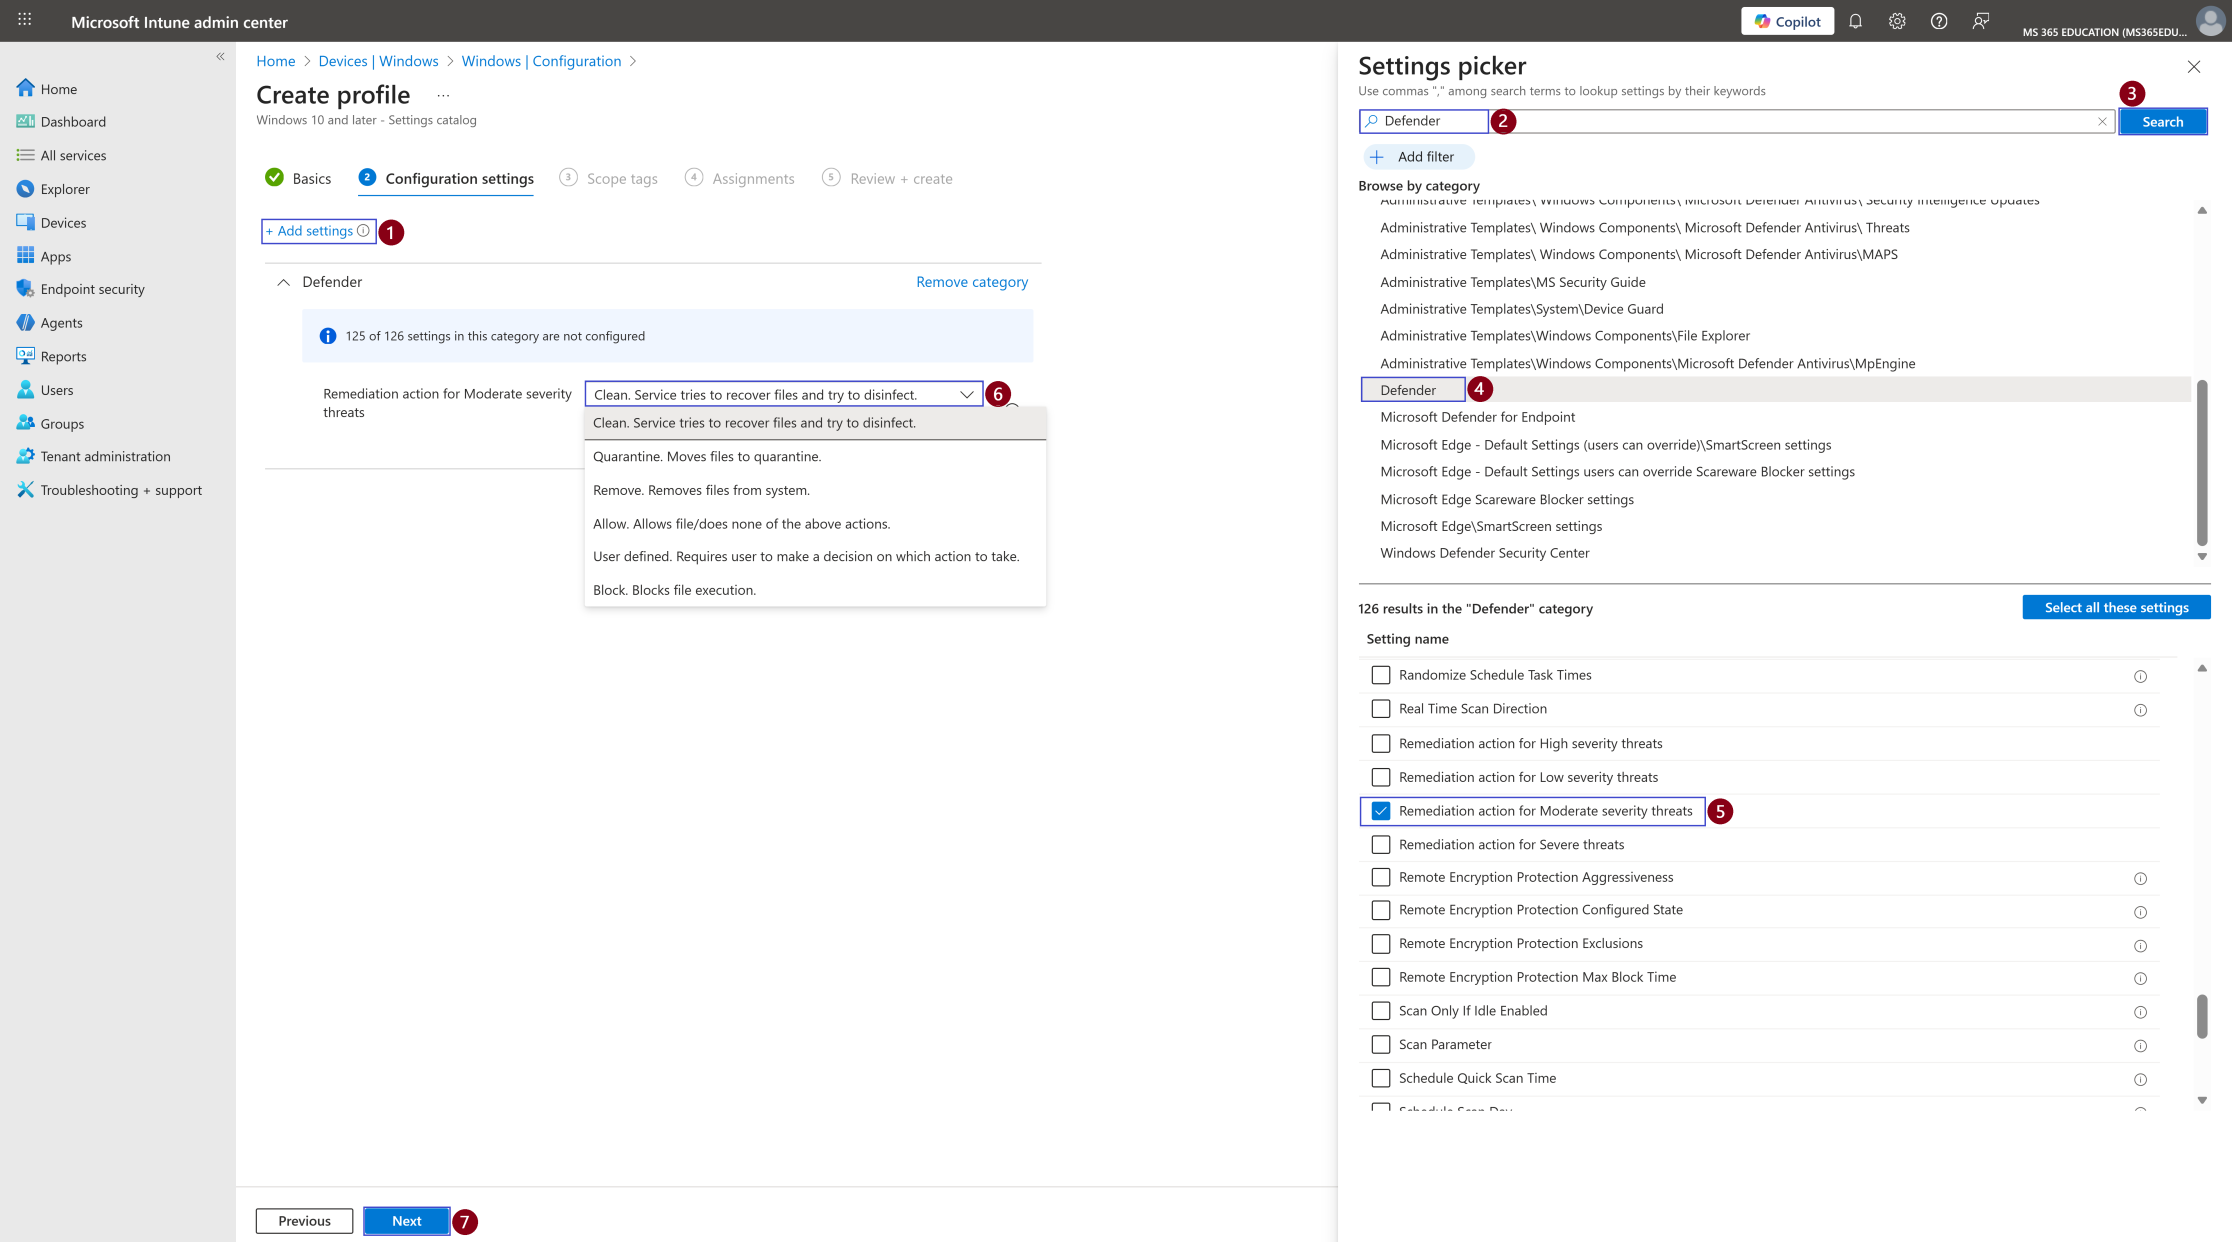
After defining the basic profile details and now that we understand the purpose and impact of each of the six available remediation actions the next step is to configure the appropriate response using the Intune Settings Catalog.
Inside the Configuration settings tab, click + Add settings to open the Settings picker. From there, you'll select the Defender policy that controls how Microsoft Defender Antivirus should respond to High-Severity Threats.
In the Settings picker (following the steps in the screenshot):
On the Configuration settings page, click + Add settings This opens the Settings picker panel on the right side.
In the search bar, type Defender This filters all settings related to Microsoft Defender Antivirus.
Click the Search button This loads all available Defender settings.
Under "Browse by category," select Defender This reveals every Defender policy available in the Settings Catalog.
From the results list, check the box for: Remediation action for High severity threats
In the main configuration pane, configure the setting: Clean. Service tries to recover files and try to disinfect. This ensures Defender attempts to repair infected files before taking additional actions.
After confirming the setting, click Next to proceed to the Scope tags page.
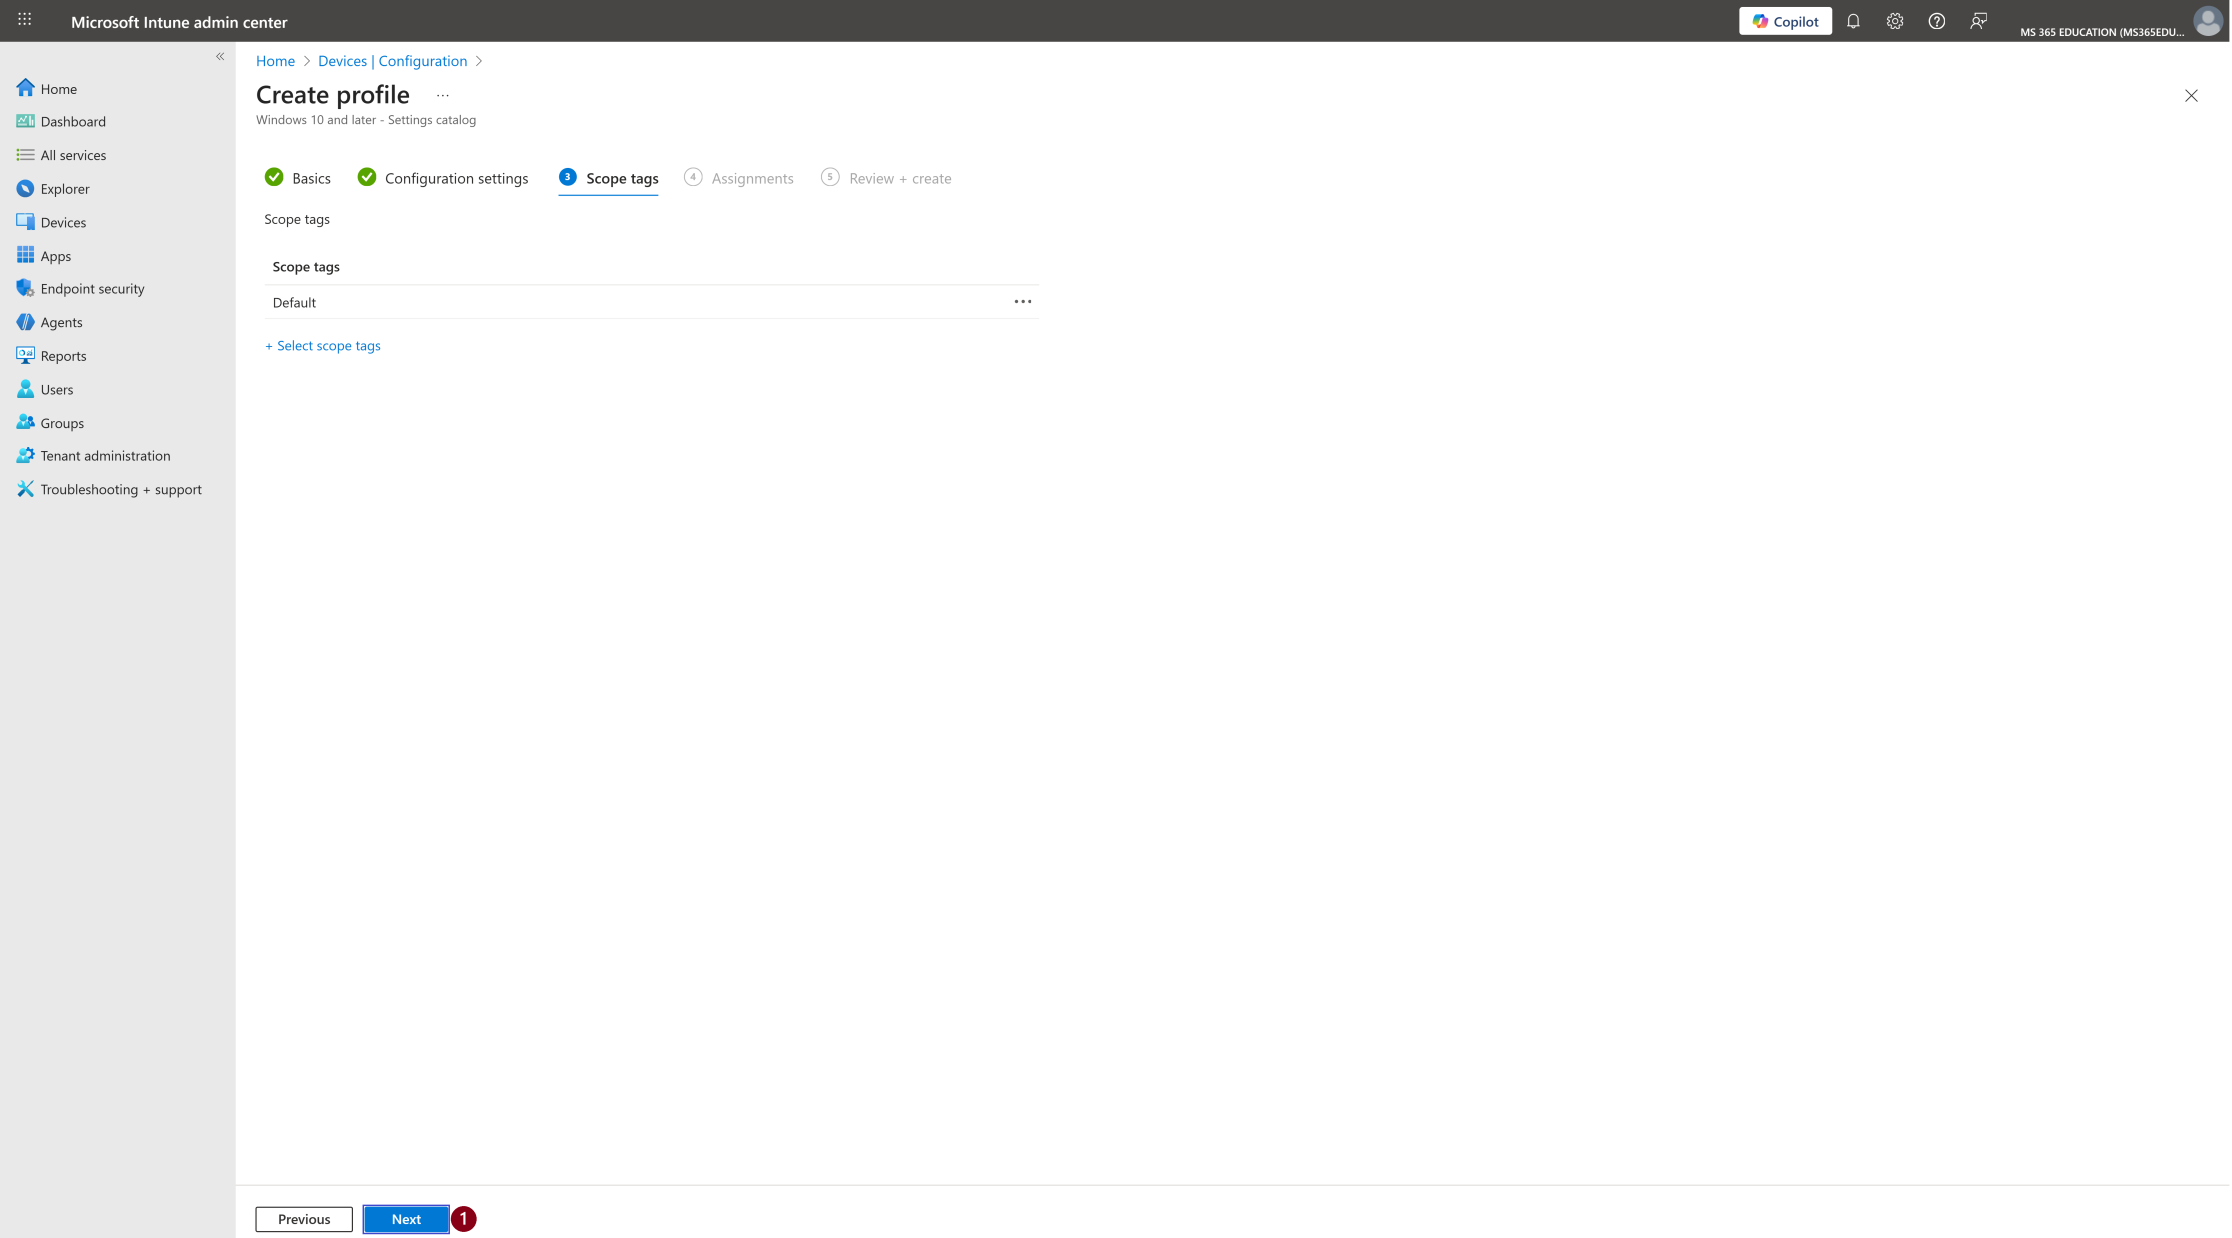
Configure Scope Tags (Optional)
The next step is the Scope tags tab. Scope tags are typically used to associate policies with specific groups or administrative units within your organization, especially in larger or delegated environments.
For this particular policy, scope tags are not required. If you don’t need to assign the policy to a custom scope, you can simply leave this section blank.
Click Next to continue to the Assignments step.
Assign the Policy to Target Devices
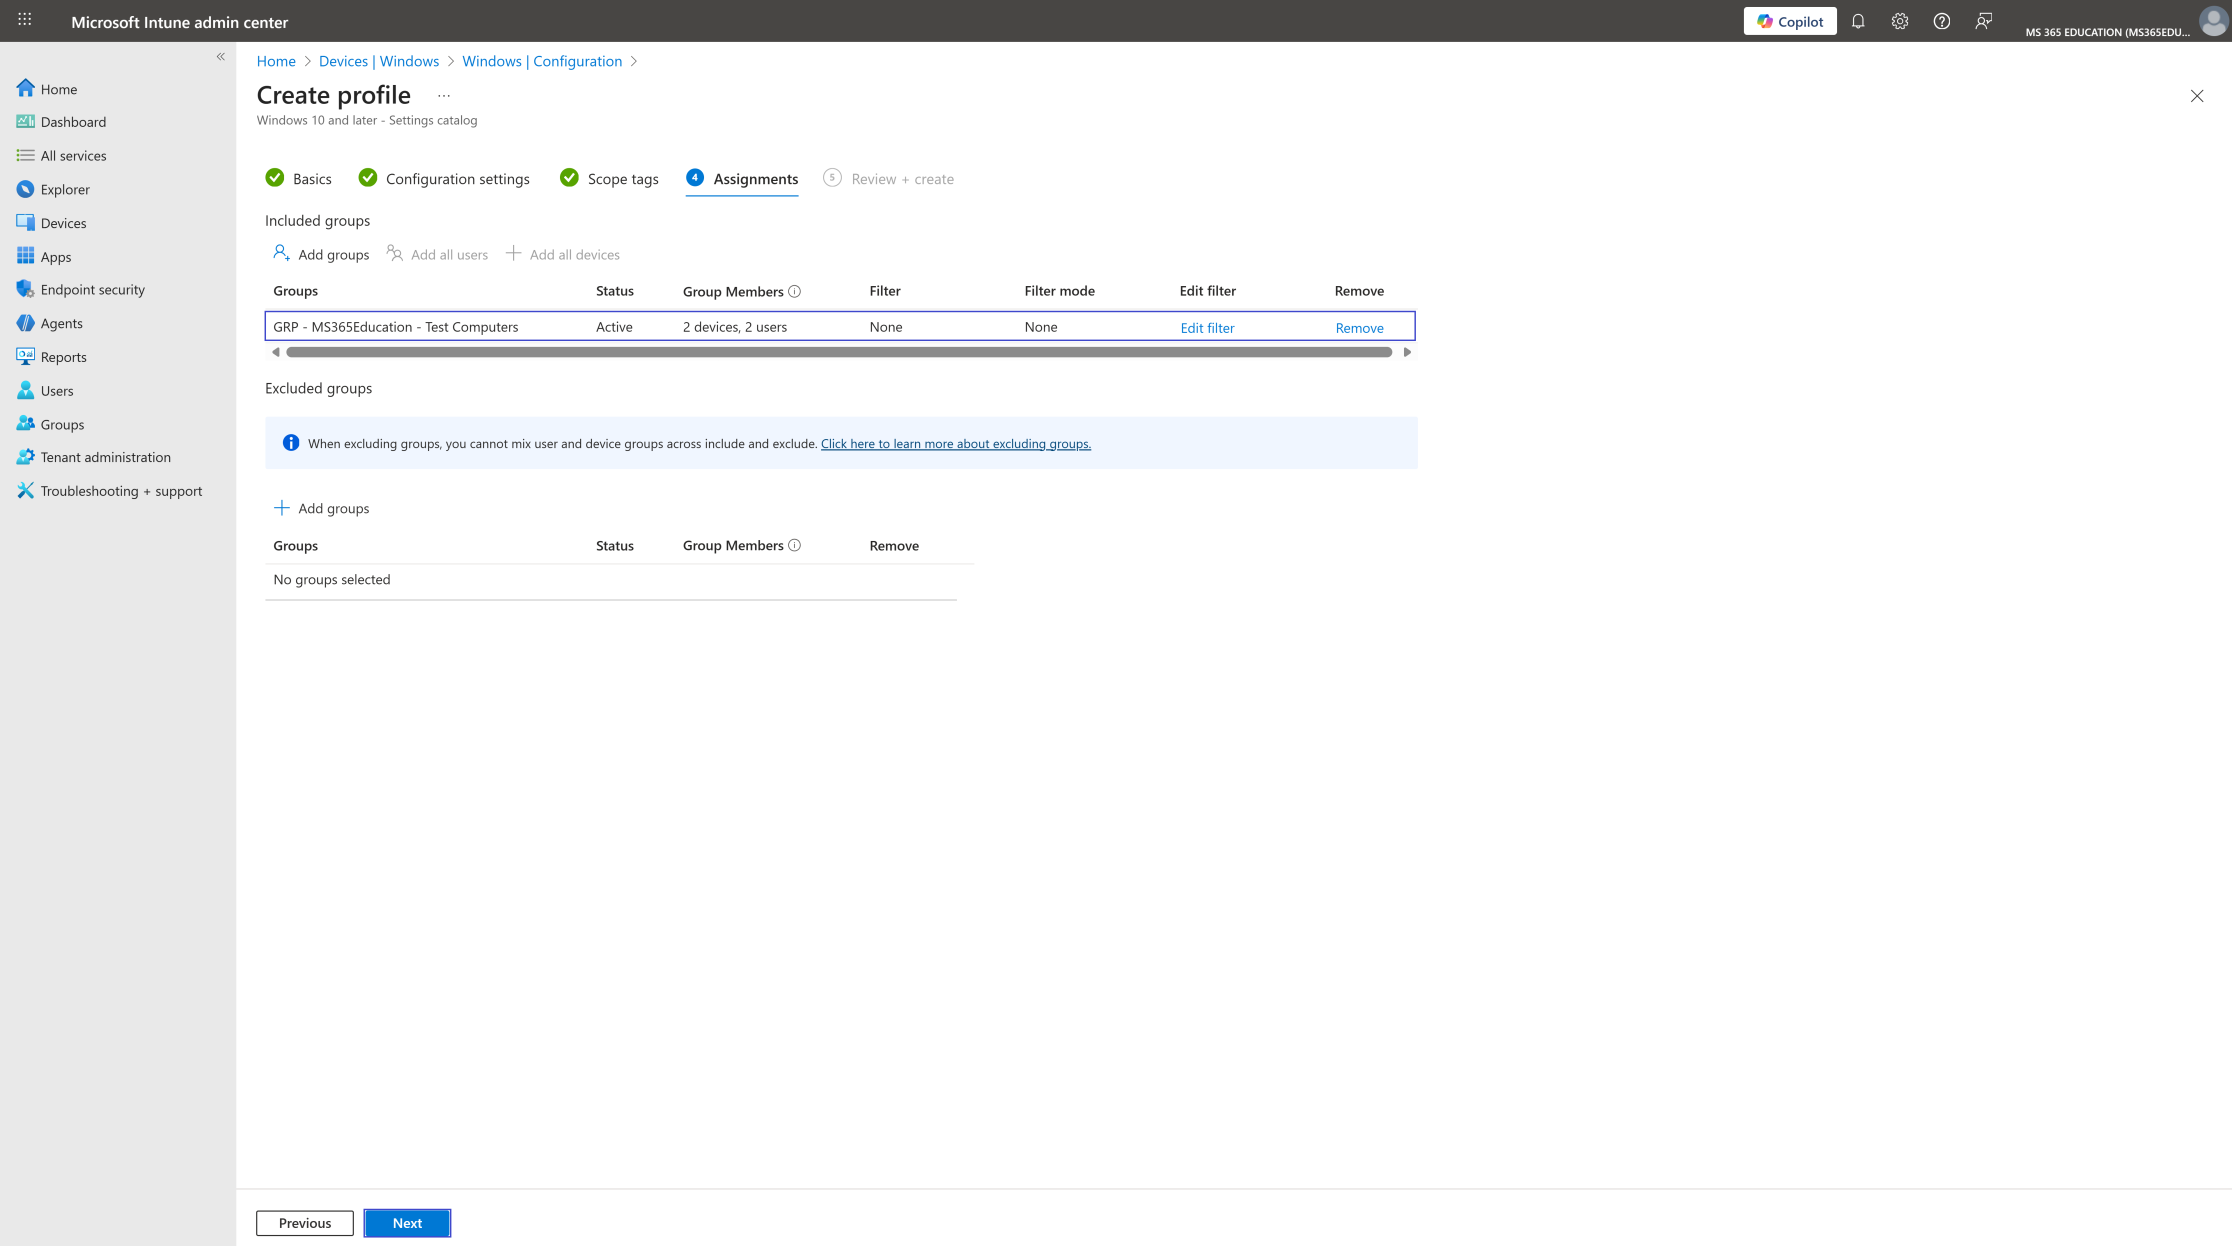
In the Assignments section, you'll define who will receive this policy. This step is essential, as it determines which users or devices the configuration will apply to.
To deploy this policy to a specific group:
Click on Add groups under the Include groups section. A list of available groups will appear use the search bar to quickly find the target group.
Once you've selected the appropriate group(s), confirm your choice. Click Next to move forward to the final step: Review + Create.
Review and Create the Policy
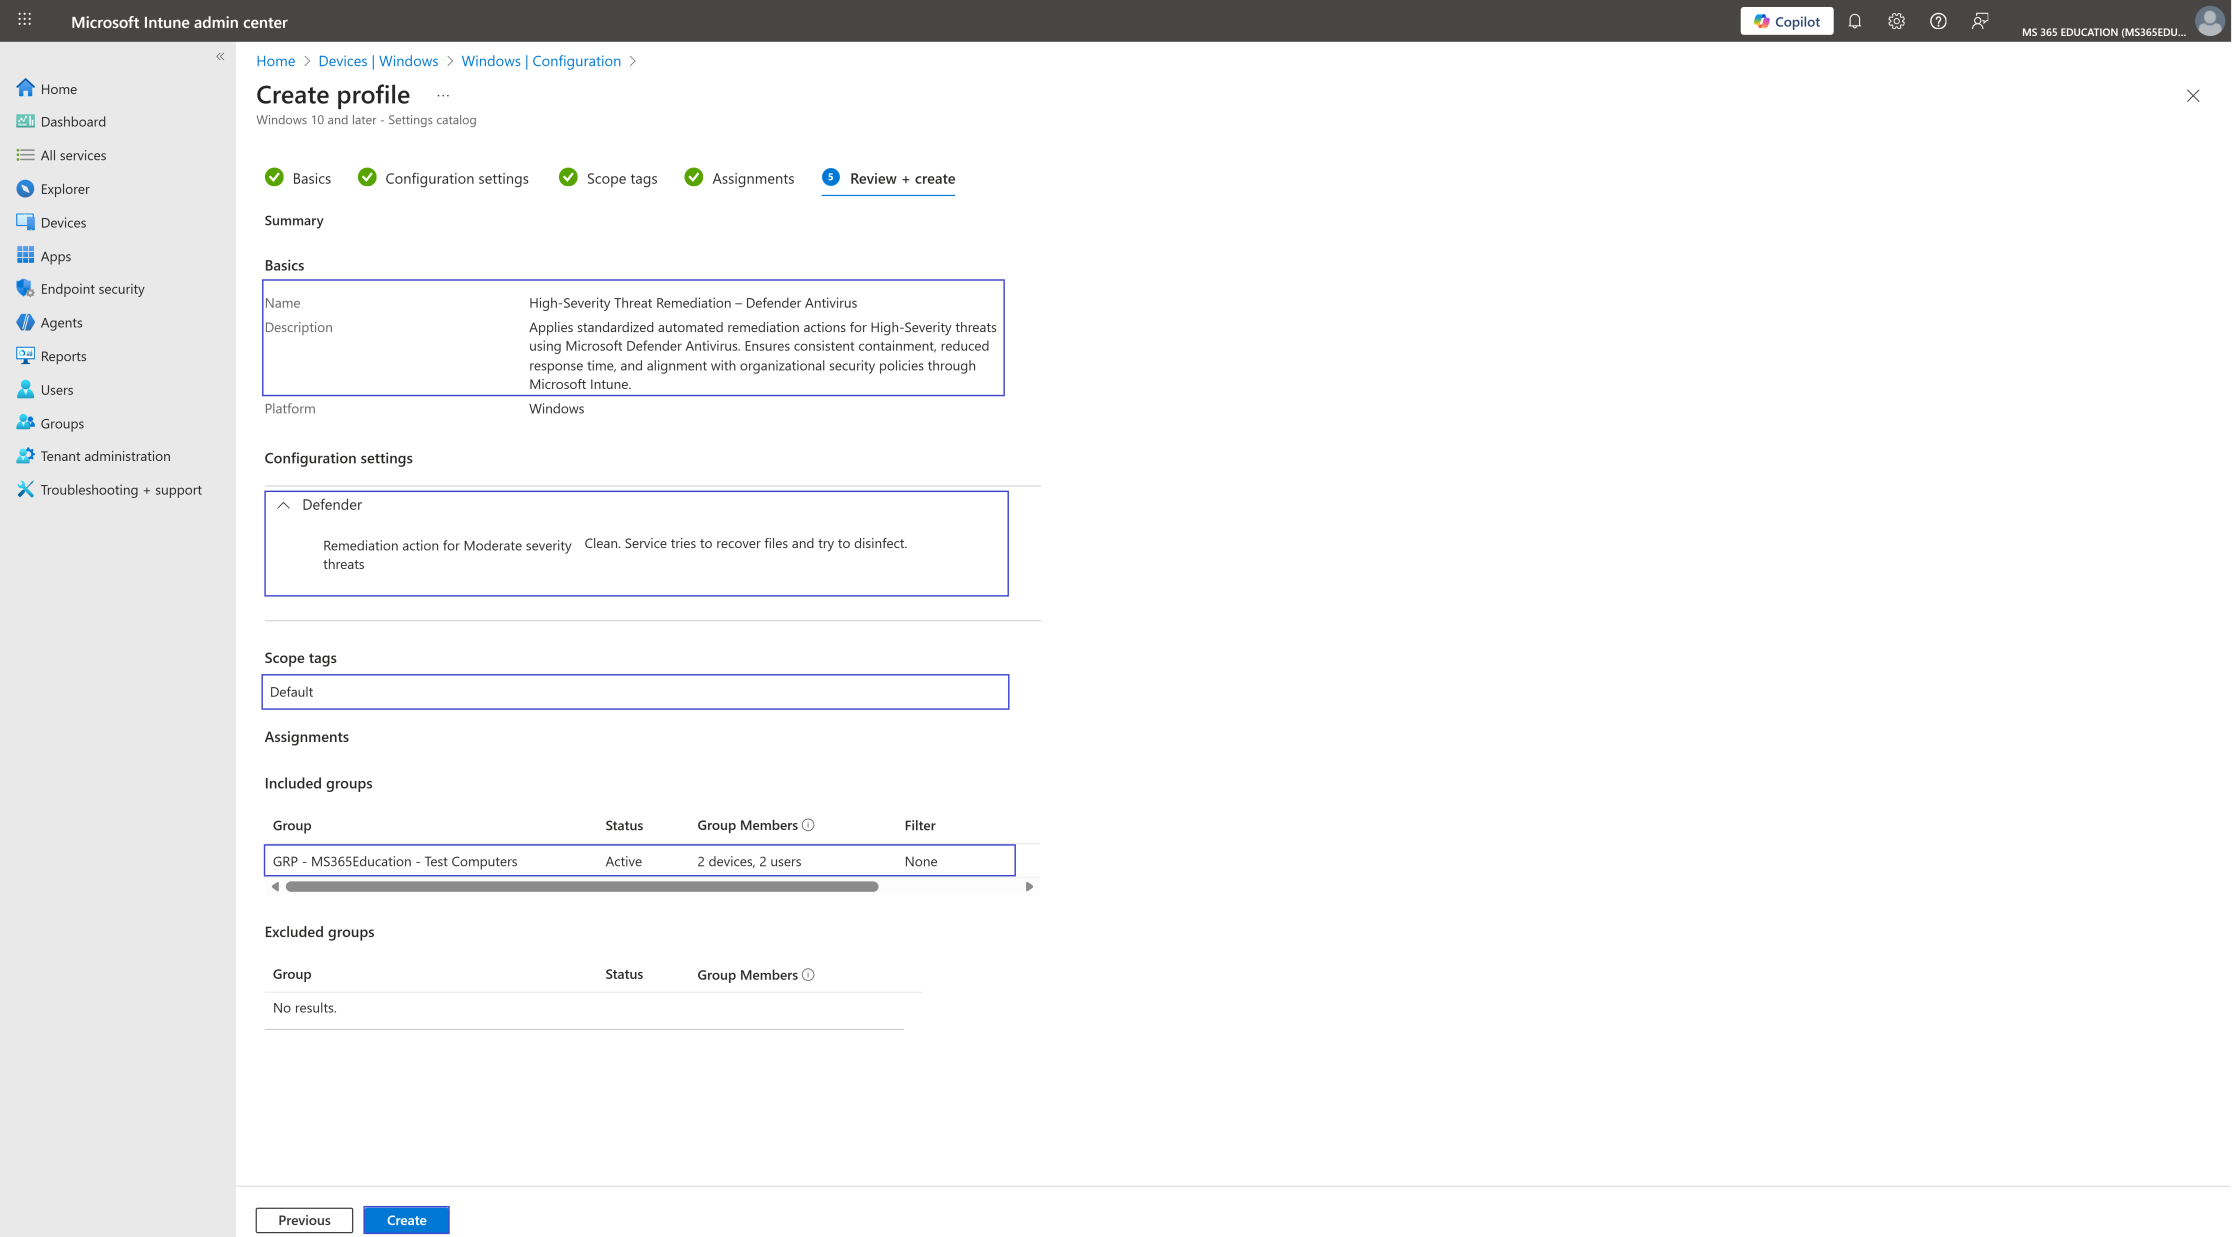
After completing the Assignments step, you'll land on the final tab: Review + Create.
This is your chance to review a full summary of the configuration including the basic details, selected settings, and group assignments. Take a moment to carefully review all entries to ensure everything is accurate and aligned with your intent.
If you need to make any changes, you can easily navigate back to the previous tabs and update the information as needed.
Once everything looks good, click Create to deploy the policy.
Your configuration will now be saved and pushed to the assigned devices based on the group you selected.
Monitor Policy Deployment Status
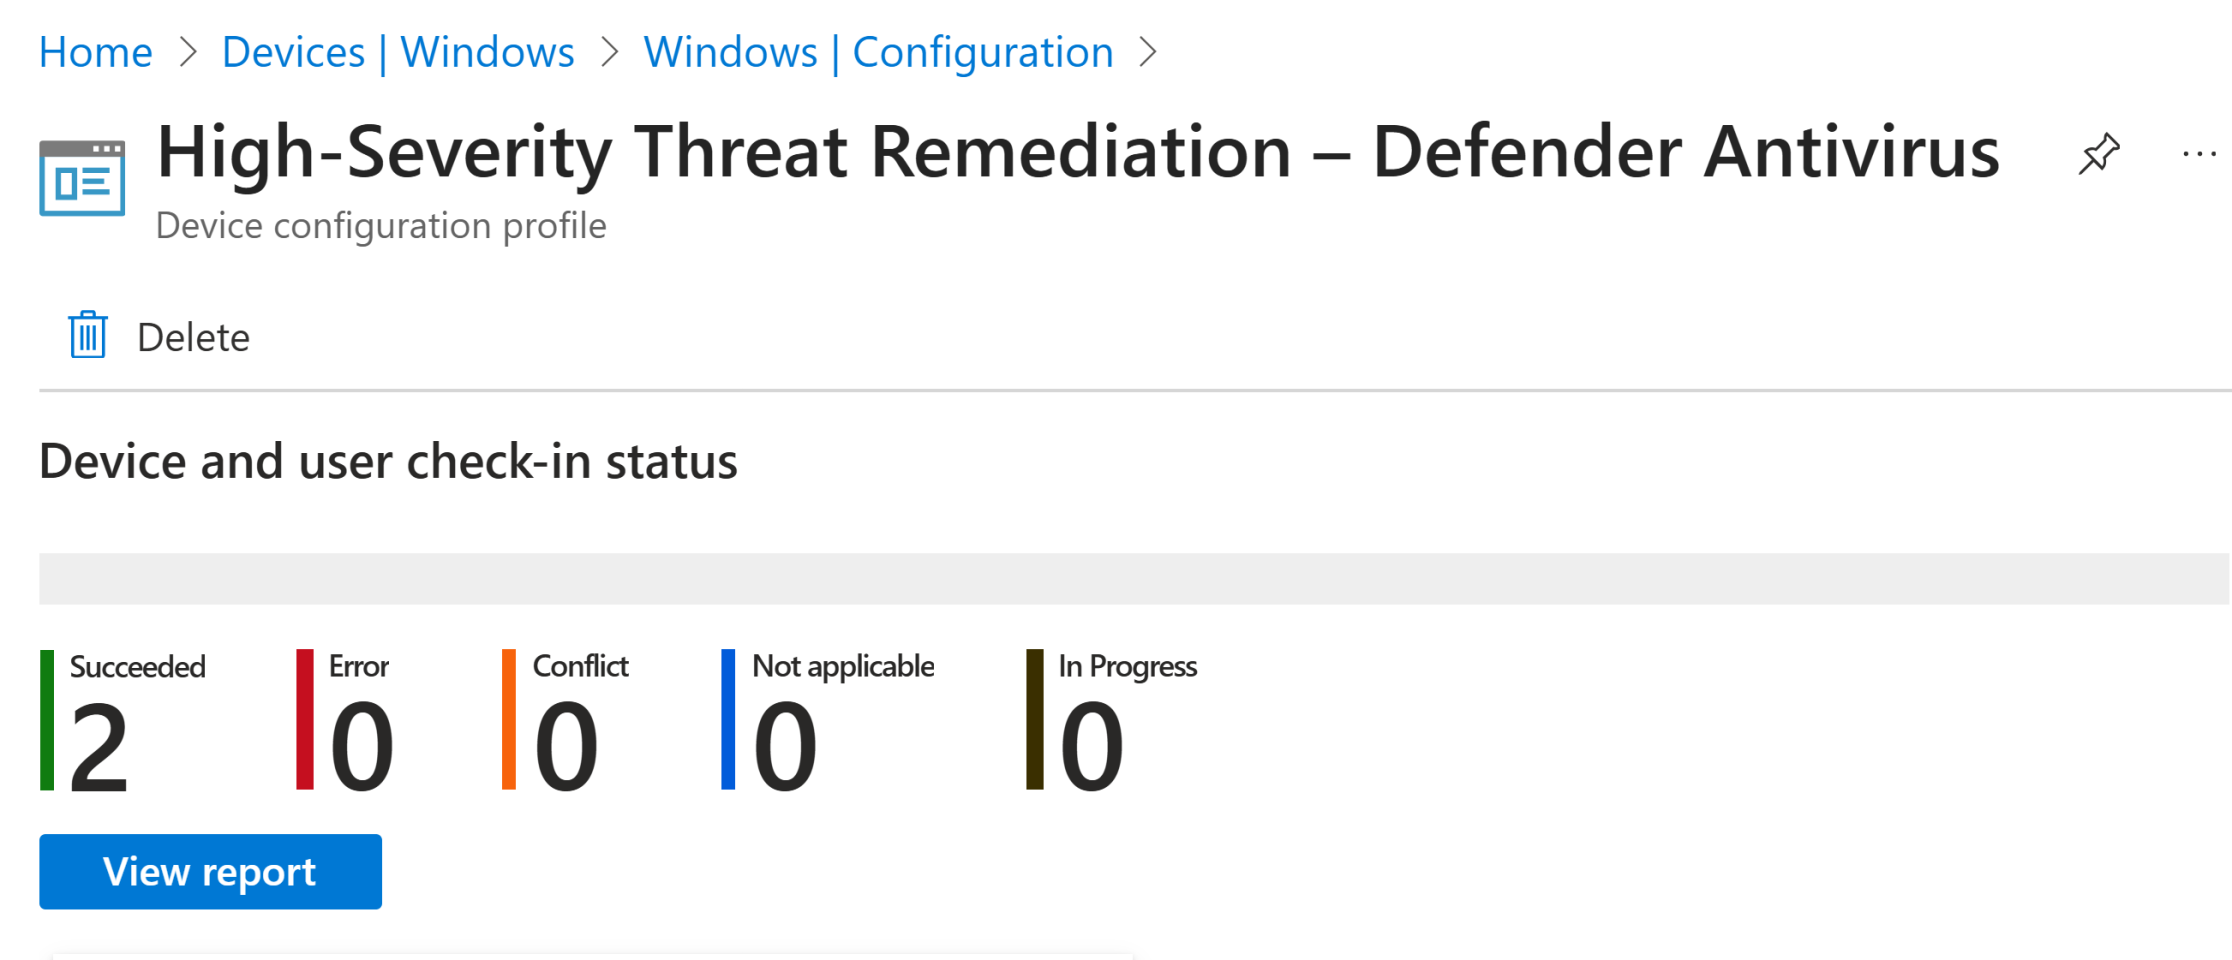
After creating and assigning the High-Severity Threat Remediation Action policy, it’s essential to verify whether the configuration has been successfully applied to all targeted devices. This ensures that Microsoft Defender Antivirus is enforcing your chosen remediation action such as Clean, Quarantine, or Remove whenever a high-severity threat is detected.
While Intune can take up to 8 hours to deliver policies automatically, you can speed up the process by:
Manually triggering a device sync using the Company Portal
Initiating a sync via the Intune Management Extension
Or remotely syncing from the Intune Admin Center
How to Verify Deployment Status
In the Microsoft Intune Admin Center, navigate to: Devices ➝ Configuration profiles
Use the search bar to locate the policy you created, for example: “High-Severity Threat Remediation Action”
Click the policy name to open the Overview page and review the deployment summary.
Review Key Deployment Metrics
You’ll see the following indicators:
Success – The policy was applied correctly on the device
In progress – The device is still receiving or processing the configuration
Error – Deployment failed and may require investigation
Not applicable – The device does not support this specific Defender policy
Why Monitoring Matters
Verifying deployment ensures that every endpoint is enforcing your remediation strategy. This is critical because:
High-severity threats require immediate, automated containment
Missed deployments may leave devices vulnerable
Consistent enforcement strengthens Zero Trust and compliance posture
Faster remediation reduces the chance of malware execution or lateral movement
By monitoring the policy rollout, you ensure that all endpoints are fully protected and responding consistently to high-severity threats exactly as your security strategy requires.
Client-Side Verification via Event Viewer
After syncing the device, you can verify whether the High-Severity Threat Remediation policy has been successfully applied by reviewing the device’s Event Viewer logs. This step is essential for troubleshooting, auditing, and ensuring that Microsoft Defender is enforcing the correct automated action when a high-severity threat is detected.
How to Verify Policy Enforcement
Open Event Viewer on the Windows device.
Navigate to: Applications and Services Logs ➝ Microsoft ➝ Windows ➝ DeviceManagement-Enterprise-Diagnostics-Provider ➝ Admin
In the right pane, click Filter Current Log…
Look for Event ID 813 or 814 - these confirm that Intune successfully processed the configuration profile.
Inside the event details, verify that the setting: “Remediation action for High severity threats” was applied with the selected action (e.g., Clean, Quarantine, etc.).
Pro Tip
Always match the event timestamp with the most recent device sync. Event IDs 813/814 are the most reliable indicators that Intune successfully enforced the remediation policy on the endpoint.
Conclusion
Protecting endpoints from high-severity threats is not just a security recommendation it’s a core requirement in modern Zero Trust environments. By configuring automated remediation through Intune, organizations eliminate delays, prevent user-driven mistakes, and ensure that critical malware is contained instantly and consistently.
This policy strengthens your environment by providing:
Faster, automated threat containment
Consistent enforcement across all managed devices
Reduced attack surface and exposure time
Stronger compliance and audit readiness
Key Takeaway
Even a single misconfigured remediation action can open the door to system compromise. By enforcing the High-Severity Threat Remediation policy through Intune, you ensure that every device reacts the same way immediately, securely, and without user interference stopping dangerous threats before they spread.
More Information
Configure remediation for Microsoft Defender Antivirus detections Official documentation on configuring remediation options (Clean, Quarantine, Remove, etc.) for Microsoft Defender Antivirus, including how to manage them via Intune, Configuration Manager, Group Policy, and other methods. https://learn.microsoft.com/en-us/defender-endpoint/configure-remediation-microsoft-defender-antivirus
Configure Microsoft Defender Antivirus using Microsoft Intune Guidance on how to use Intune to deploy and manage Microsoft Defender Antivirus policies on Windows devices, including endpoint security profiles and configuration flows. https://learn.microsoft.com/en-us/defender-endpoint/use-intune-config-manager-microsoft-defender-antivirus
View and organize the Microsoft Defender for Endpoint alerts queue Explains how severity levels (Low, Moderate, High, Severe) are defined and used in Defender, helping you understand what “High severity” means in the context of your remediation policy. https://learn.microsoft.com/en-us/defender-endpoint/alerts-queue
Create a policy using settings catalog in Microsoft Intune Official documentation on the Settings Catalog, the same mechanism you used in this article to configure “Remediation action for High severity threats” via Intune. https://learn.microsoft.com/en-us/intune/intune-service/configuration/settings-catalog
Troubleshoot MDM enrollment and policy using DeviceManagement-Enterprise-Diagnostics-Provider logs Covers where and how to read DeviceManagement-Enterprise-Diagnostics-Provider logs (including events like 813/814) in Event Viewer to validate Intune policy processing on Windows devices. https://learn.microsoft.com/en-us/mem/intune/fundamentals/intune-endpoints#mdm-protocol-logs-on-the-client
Thank you!
🖥️ Ricardo Barbosa
🎖️ Microsoft MVP | 📘 Microsoft Certified Trainer (MCT)
☁️ Intune & Cloud Architect |💼 Technology Director at Altelix.com