

Modern Endpoint Customization: Manage Windows Jump Lists via Intune Like a Pro
Today, we’re exploring how to control the visibility of recent Jump Lists on the Windows Start Menu and Taskbar using an Intune policy.
The Start menu provides a wide range of customization options through Intune, including nearly 41 categories of policy settings. One of these is “Hide Recent Jump Lists”, which allows you to manage whether users can see recently opened files when right-clicking an app pinned to the Start menu or taskbar.
🔐 Why This Setting Matters
Enabling this policy can help enhance privacy and reduce visual clutter, especially in shared-use scenarios such as training rooms, reception kiosks, or shift-based workstations. When applied, the policy:
Prevents users from seeing recently opened items in Jump Lists.
Automatically disables the toggle in Settings > Personalization > Start (the option becomes grayed out).
Helps enforce privacy standards and a clean UI across endpoints.
⚙️ What Happens When the Policy is Enabled?
Once this policy is enabled and the device is rebooted:
Jump Lists are no longer visible on both the Start menu and taskbar.
The option “Show recently opened items in Jump Lists” in the Settings app becomes grayed out, preventing users from changing it.
A system restart is required for the changes to take full effect.
This enforces the configuration at the system level, leaving no room for user override.
📋 What Does the Policy Actually Do?
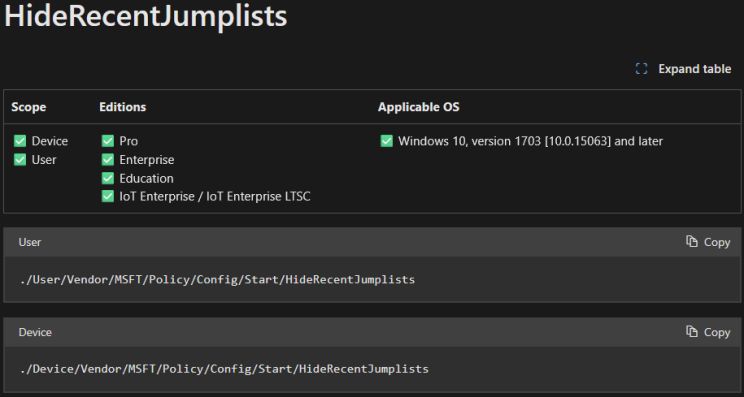
The "Hide Recent Jump Lists" policy directly interacts with the Start Menu configuration layer through CSP (Configuration Service Provider). It works by targeting this OMA-URI setting:
OMA-URI: ./Vendor/MSFT/Policy/Config/Start/HideRecentJumplists
Data Type: Integer
Value: 1 = Hide Jump Lists 0 = Show Jump Lists (default behavior)
When set to 1, Jump Lists are disabled, and the user-facing toggle is locked down in Settings. This makes it a powerful tool for managing consistency, security, and user experience across corporate endpoints.
📌 CSP Reference
Understanding the underlying CSP is essential when deploying this policy using Intune's custom configuration profiles. The screenshot below (insert here if needed) provides visibility into the actual setting path used by Windows to enforce this behavior.
⚠️ Important Notes
✅ This setting is supported on both Windows 10 and Windows 11. The HideRecentJumplists policy works on both operating systems and is enforced through the same OMA-URI path.
🔁 A system reboot is required for the policy to take full effect on the device.
🧪 As always, it's recommended to test the configuration in a pilot group before deploying it at scale in production environments.
✅ Bonus Tip: You can use either the ./Device/... or ./User/... CSP path depending on whether you're targeting device-level or user-level scope via Intune.
This is a simple but powerful way to improve endpoint hygiene and privacy. Whether you’re managing shared devices or fine-tuning the user experience, Jump List control is a great example of the precision Intune offers.
Creating the Intune Policy Profile
Now that you've reviewed the CSP details, it's time to create the policy in Intune.
Follow the steps below to begin the deployment process:
Sign in to the Microsoft Intune admin center.
In the left-hand menu, select Devices
Click on Windows Devices under the “By platform” section
Select Configuration
Click + New Policy to begin configuring your policy
Under Platform, select Windows 10 and later
For Profile type, choose Settings catalog
Click Create to proceed
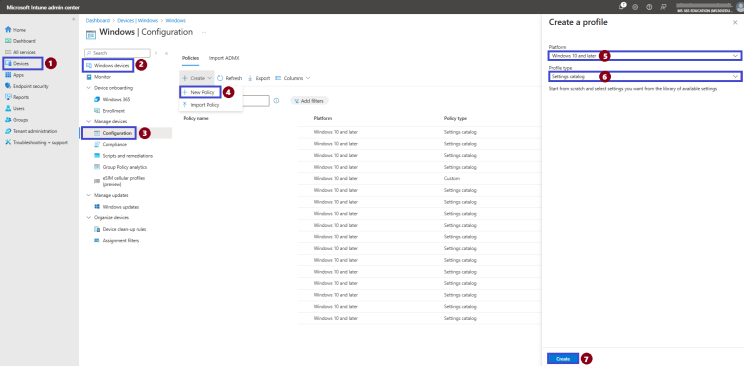
Once the profile is created, you’ll be able to define the specific setting to manage Jump Lists visibility using the Settings Catalog.
Basic Information of the Policy
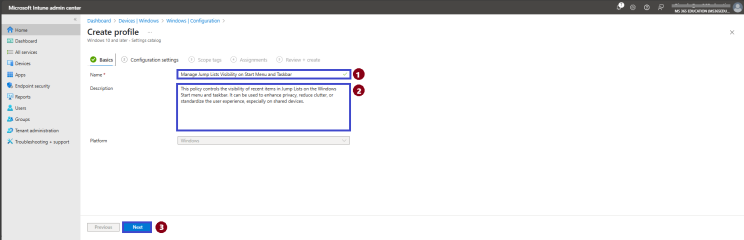
After initiating the profile creation, the next step is to complete the Basics section. This involves entering a clear and descriptive policy name, an optional description, and reviewing the platform information.
The Platform is automatically set to Windows 10 and later, so no changes are needed here.
Providing a meaningful name and description will help ensure the policy is easy to identify and maintain in the future, especially in environments with multiple custom configurations.
Policy Name: Manage Jump Lists Visibility on Start Menu and Taskbar
Description: This policy controls the visibility of recent items in Jump Lists on the Windows Start menu and taskbar. It can be used to enhance privacy, reduce clutter, or standardize the user experience, especially on shared devices.
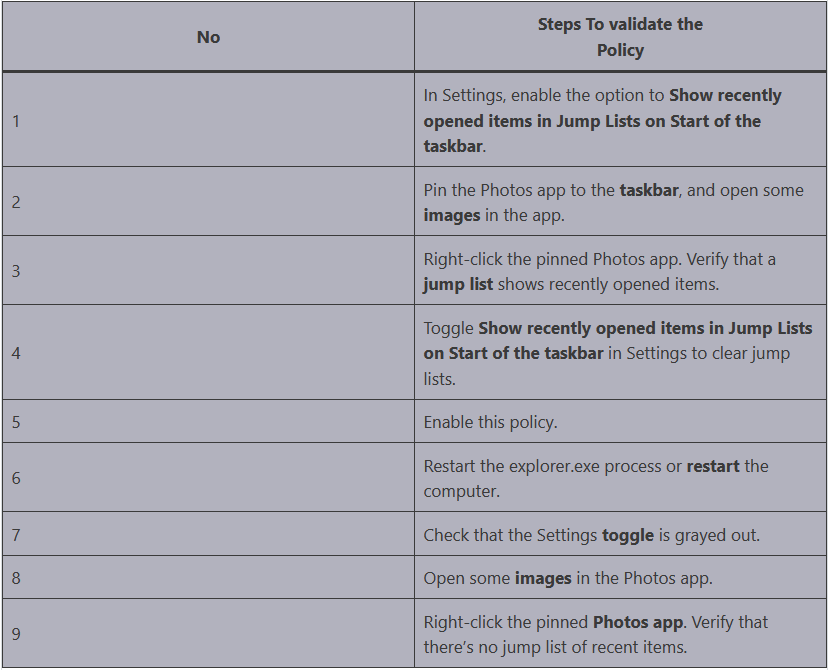
To help you verify that the policy is working as expected, the following table outlines the exact steps to test Jump List visibility before and after the setting is enforced:
Select the Setting Using the Settings Picker
Now that you're in the Configuration settings tab, it's time to add the specific policy setting. Follow the steps below, referencing the image provided:
Click on + Add settings to open the Settings Picker window.
In the search bar, type Hide Recent Jump.
Click Search to locate the available settings.
From the filtered results, select the Start category.
Choose Hide Recent Jumplists (User).
Set the policy to Enabled.
Click Next to continue configuring the profile.
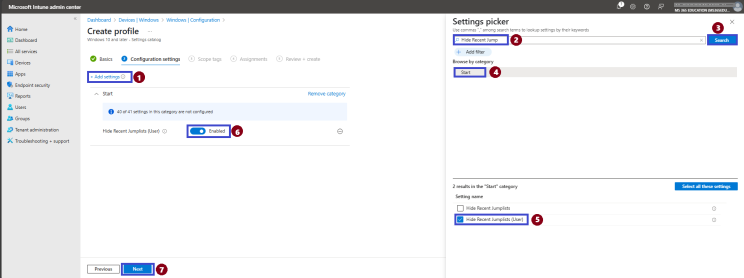
We're applying this policy at the user level in this example, which is ideal for environments with individual user preferences or profiles.
💡 Tip: By default, this setting appears as "Disabled". In this case, we are switching it to "Enabled" to hide recently opened items from Jump Lists and prevent users from viewing them.
Add Scope Tags to a Policy
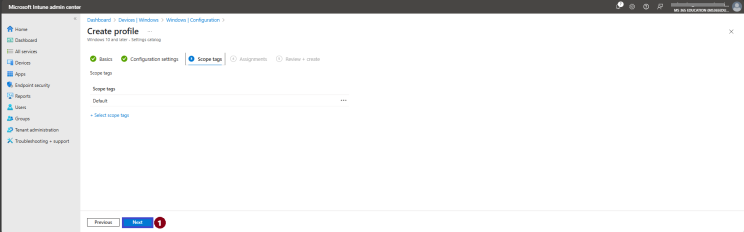
Now you are on the next step called Scope Tags. A scope tag is used to assign policies to specific groups within an organization. In this step, you can select a scope tag for the policy. However, I suggest skipping this section because it is not needed for this policy. So, I clicked Next to continue.
Assigning the Policy
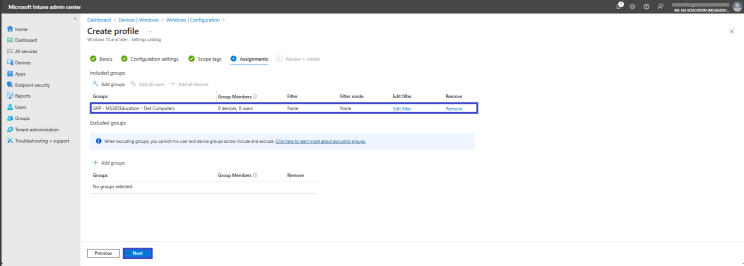
The next step is the Assignments section, where you define which user or device groups will receive the policy.
Since our goal is to target a specific group, this step is essential for proper deployment.
Under Include groups, click Add groups.
A window will appear showing available Azure AD groups.
Use the search bar to quickly locate the group you want to assign the policy to.
Select the desired group and confirm your choice.
Once the group is selected, click Next to proceed to the final step.
Review + Create – Finalizing the Policy
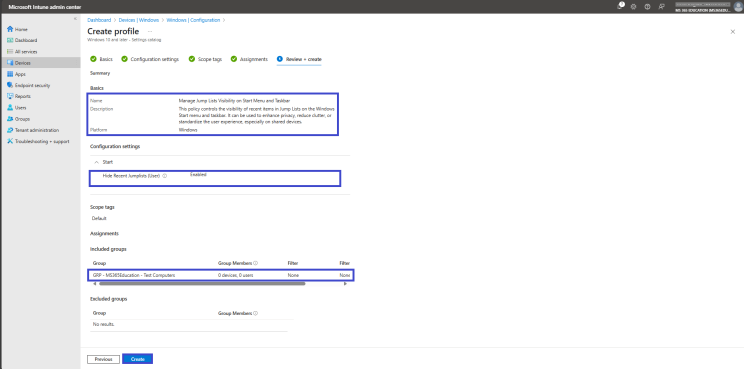
After completing the Assignments step, you'll reach the final stage: Review + Create.
This tab provides a full summary of all the information you've entered, including:
Basic details (name, description, platform)
Configuration settings you've defined
Targeted assignment groups
Carefully review each section to ensure everything is correct and aligned with your deployment goals.
Once everything looks good, click Create to finalize and deploy the policy.
Your configuration will now be applied based on the assignment scope you defined.
Monitoring Status – Verifying Policy Deployment
After creating and assigning the policy, it's important to monitor whether it has been successfully applied to the target devices.
You can wait for the automatic sync cycle (which may take up to 8 hours), or you can manually trigger a sync using the Company Portal app to accelerate the process.
Once the device has synced, follow these steps to verify the deployment status in the Intune admin center:
Navigate to Devices > Configuration Profiles.
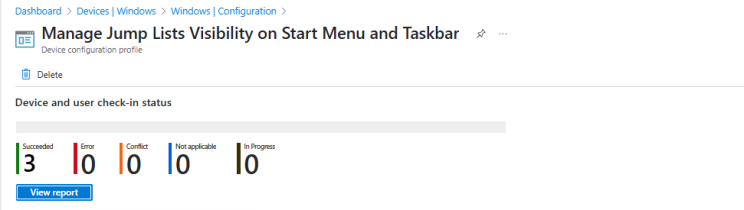
In the list of configuration profiles, use the search bar to locate your policy by name. In this example, we named the policy: 👉 “Manage Jump Lists Visibility on Start Menu and Taskbar”
Click on the policy name to open its details.
Here, you'll see the deployment status, including how many devices have successfully received the policy, how many are pending, and any errors if applicable.
Monitoring ensures the configuration is working as expected and allows for quick troubleshooting if needed.
Client-Side Verification – Hide Recent Jump Lists Policy
The Hide Recent Jump Lists policy is enforced by the MDM PolicyManager under the Start category. Once deployed via Intune, you can verify whether the policy has been successfully applied directly on the client device using the Event Viewer.
How to Verify on the Client:
Open Event Viewer on the Windows device where the policy was targeted.
Navigate to: Applications and Services Logs > Microsoft > Windows > DeviceManagement-Enterprise-Diagnostics-Provider > Admin
In the right-hand panel, click Filter Current Log.
Filter for Event ID 813, which confirms that a policy has been successfully applied.
Open the event details to check if the HideRecentJumplists policy is listed and reflects the expected value.
Example Log Output (Descriptive Format):
When the policy is applied, an Event ID 813 entry typically includes:
Policy Name: HideRecentJumplists (or HideRecentJumplists_User if applied at user level)
Policy Area: Start (indicating the category within the CSP structure)
Enrollment ID: Unique identifier generated during MDM enrollment (e.g., B1E9301C-8666-412A-BA2F-3BF8A55BFA62)
Current User: Usually set to User if deployed at the user level, or Device for device scope
Integer Value (Int Value): 0x1 means the policy is Enabled (i.e., hiding recent items), while 0x0 means Disabled
Enrollment Type: Commonly shown as 0x6, representing MDM-managed devices
Scope: Typically 0x1 for user-level policies, and 0x0 for device-level policies
💡 Important Tip:
⚠️ Note: Values such as Enrollment ID, scope, and user/device context may vary depending on deployment method and session. Always confirm that the policy name (HideRecentJumplists) and the configured value (Enabled or Disabled) match the intended settings defined in Intune.
🛠️ Troubleshooting Tips:
✅ Make sure the device has recently synced with Microsoft Intune
🔄 Confirm the target Azure AD group includes the device or user
⚔️ Check for conflicting settings in other configuration profiles
🔧 Trigger a manual sync via the Company Portal app or the Intune Admin Center
📚 For deeper diagnostics, consult the official Microsoft Learn CSP documentation or enable advanced MDM logs
📚 More Information
To deepen your understanding of configuring and managing the Hide Recent Jump Lists policy using Microsoft Intune, refer to the following official Microsoft Learn resources:
Policy CSP – Start Learn more about the Start CSP, including the HideRecentJumplists setting. 🔗 https://learn.microsoft.com/en-us/windows/client-management/mdm/policy-csp-start
Device restriction settings for Windows 10/11 in Microsoft Intune Review available restriction settings, including Start menu configurations. 🔗 https://learn.microsoft.com/en-us/mem/intune/configuration/device-restrictions-windows-10
Create a policy using the Settings Catalog in Intune Step-by-step guidance on creating policies using the Settings Catalog. 🔗 https://learn.microsoft.com/en-us/mem/intune/configuration/settings-catalog
Thank you!
🖥️ Ricardo Barbosa
📘 MCT Microsoft Certified Trainer | ☁️ Cloud Architect
🌐 Technology Director - https://altelix.com