

Getting started with Microsoft Connected Cache
Microsoft Connected Cache is now available as a standalone solution, designed to optimize content delivery for Windows feature updates, quality updates, Microsoft 365 Apps, Intune apps, Store apps, and Windows Defender definition updates. Essentially, it’s a software-only caching solution that streamlines the distribution of Microsoft content within your environment.
Managed via the Azure portal, Connected Cache can be deployed on both Windows and Linux hosts, whether they are physical or virtual. This powerful solution helps organizations protect their WAN links in locations where bandwidth management is critical, offering better control over the download behavior of Windows clients. By leveraging Microsoft Intune, Windows clients can be configured to target a specific Connected Cache host using Delivery Optimization policies.
This post will provide an introduction to Connected Cache, guide you through the setup process, and conclude with steps for configuring Delivery Optimization and sharing insights on the Connected Cache experience.
Note: A Microsoft Connected Cache node requires at least a Windows Enterprise E3/A3 license.
Introducing Microsoft Connected Cache
When starting with Microsoft Connected Cache, it’s helpful to begin with a clear understanding of what it is and how it works. At its core, Connected Cache is a caching solution designed to optimize content delivery by preventing Windows clients from directly accessing the Content Delivery Network (CDN) for updates and applications. Instead of each client individually downloading content like Windows feature and quality updates, Microsoft 365 apps and updates, Intune apps, Store apps, and Windows Defender definition updates from the CDN, clients retrieve the required content from a local cache host. This significantly reduces the load on the WAN link, improving bandwidth efficiency and performance in distributed environments.
While the concept may seem straightforward, the technical implementation involves the coordination of several key services and components. Connected Cache relies on the integration and collaboration of these elements to create a seamless caching and content delivery solution. These components work together to ensure reliable and efficient distribution of Microsoft content within the organization.
The benefits of Connected Cache are most evident in environments with multiple clients requiring frequent updates, as it centralizes and accelerates content delivery while minimizing external network traffic. The following sections will dive deeper into the technical components and their roles in building a complete Connected Cache solution.
Azure services: The Azure portal is used for creating and configuring Connected Cache nodes, and Azure IoT Edge container management service is used for deploying the Connected Cache container to the host.
Connected Cache host: The Connected Cache host is the Windows or Linux host that is used for caching content, that is requested by Windows clients, and delivering the requested content to those Windows clients.
Microsoft Intune services: The Microsoft Intune services are used for configuring Delivery Optimization (DO) on Windows clients to use the Connected Cache host.
Delivery Optimization services: The Delivery Optimization (DO) services are used by Windows clients to download required Microsoft content from alternate sources, in addition to the traditional internet-based servers.
Content Delivery Network: The Content Delivery Network (CDN) contains the Microsoft content and is used for filling the cache of the Connected Cache host and can be used by Windows clients as fallback location for content.
Setting up Microsoft Connected Cache
Once you’re familiar with the components involved in Connected Cache, the next step is to proceed with its setup. The setup process involves three main stages: creating an Azure resource, setting up and configuring the Connected Cache node, and finally deploying the Connected Cache software on a Windows host. Each stage plays a critical role in ensuring the successful implementation of Connected Cache within your environment.
By following these steps, you can establish a robust caching solution that optimizes content delivery and reduces network bandwidth usage. Let’s dive into each step in detail.
Step 1: Creating the Connected Cache Azure resource
The first step is creating the required Connected Cache Azure resource. That Azure resource will eventually contain the Connected Cache node(s). The following four steps walk through the actions for creating that Azure resource.
Open the Microsoft Azure portal and navigate to All services > Connected Caches for Enterprise & Education
On the Connected Caches for Enterprise & Education page, click Create Connected Caches for Enterprise & Education
On the Basics page, select the Subscription, Resource Group and Location that should be used for the Connected Cache resource, specify a unique name for the Connected Cache resource, and click Review + Create
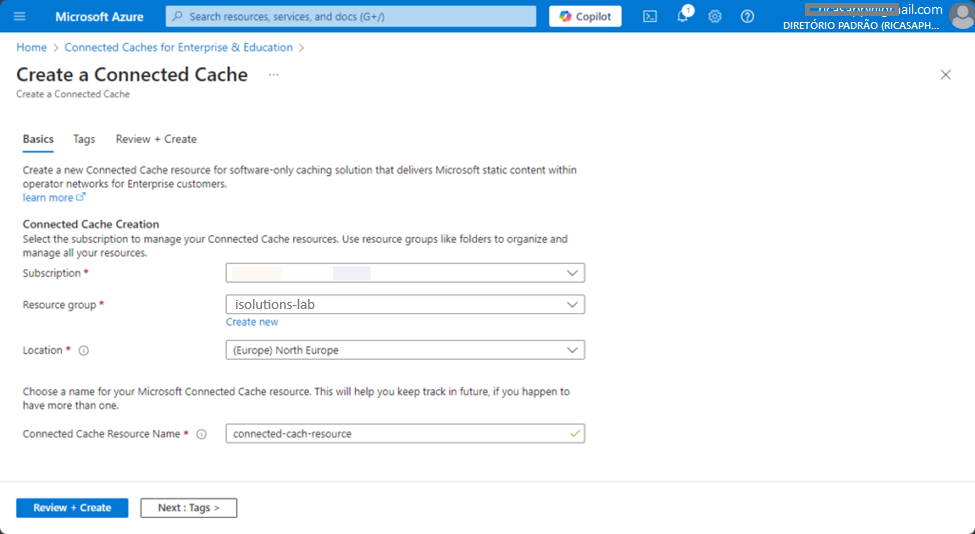
4. On the Review + Create page, verify the configuration and click Create
Step 2: Creating the Connected Cache node
The second step is creating the Connected Cache node within the created Azure resource. That node will eventually contain the required settings for deploying the Connected Cache node. The following three steps walk through the actions for creating that Connected Cache node for a Windows host.
Open the Microsoft Azure portal and navigate to All services > Connected Caches for Enterprise & Education
Select the just created Connected Cache resource, navigate to Cache Node Management > Cache Nodes and click Create Cache Node
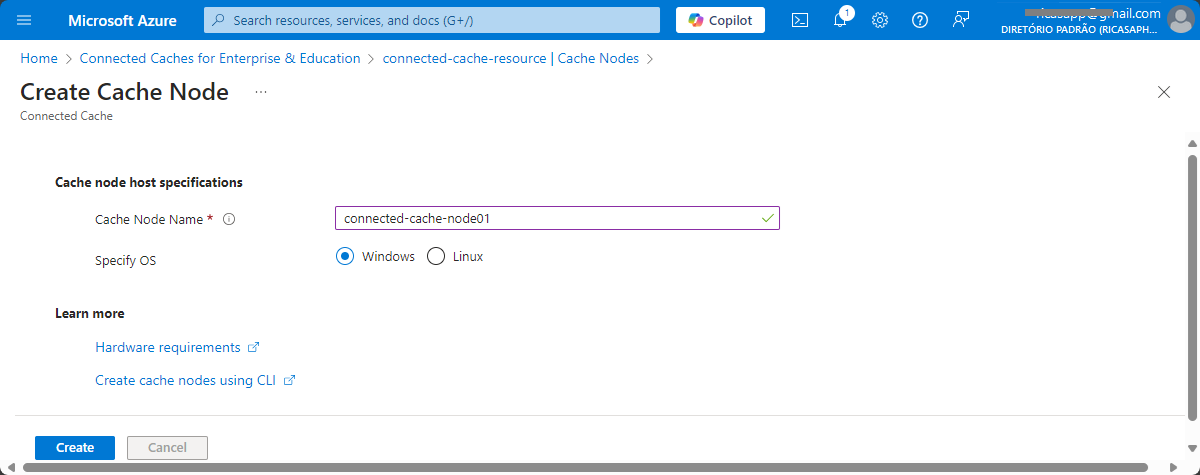
On the Create Cache Node page, as shown below in Figure 2, specify a unique name for the Connected Cache node, select the Windows as the platform and click Create
Step 3: Configuring the Connected Cache node
The third step is to go through the configuration of the created Connected Cache node. That configuration contains the details of the Connected Cache node that determines its size, connectivity, provisioning, and update behavior. The following five steps walk through the actions for further configuring the Connected Cache node for a Windows host.
Open the Microsoft Azure portal and navigate to All services > Connected Caches for Enterprise & Education
Select the just created Connected Cache resource, navigate to Cache Node Management > Cache Nodes and select the just created Connected Cache node
On the Configuration page, as shown below in Figure 3, specify the following information and click Save
Operating System: This information is already specified based on the selected platform during the creation
Cache drive folder: This information is fixed when installing on a Windows host
Cache drive size: Specify the cache drive size that can be used by the Connected Cache node
Enable proxy: (Optional) Select this box when the connection to the Internet is through an unauthenticated proxy server
Proxy host name or IP address: (Optional) Specify the proxy host name or IP address when using a proxy server
Port: (Optional) Specify the port number when using a proxy server
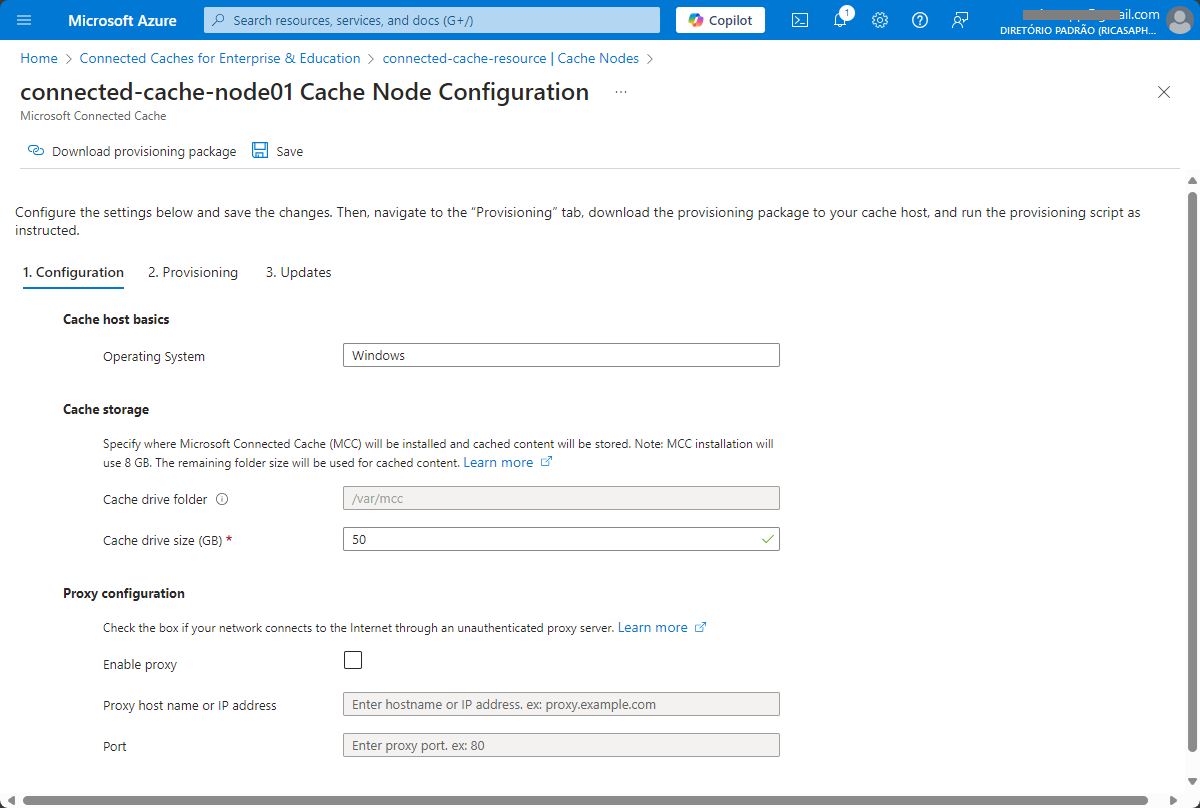
Note: The installation of Connected Cache will already used 8GB of the available cache drive size.
4. On the Provisioning page, as shown below in Figure 4, choose the account used as the Connected Cache runtime account and click Save
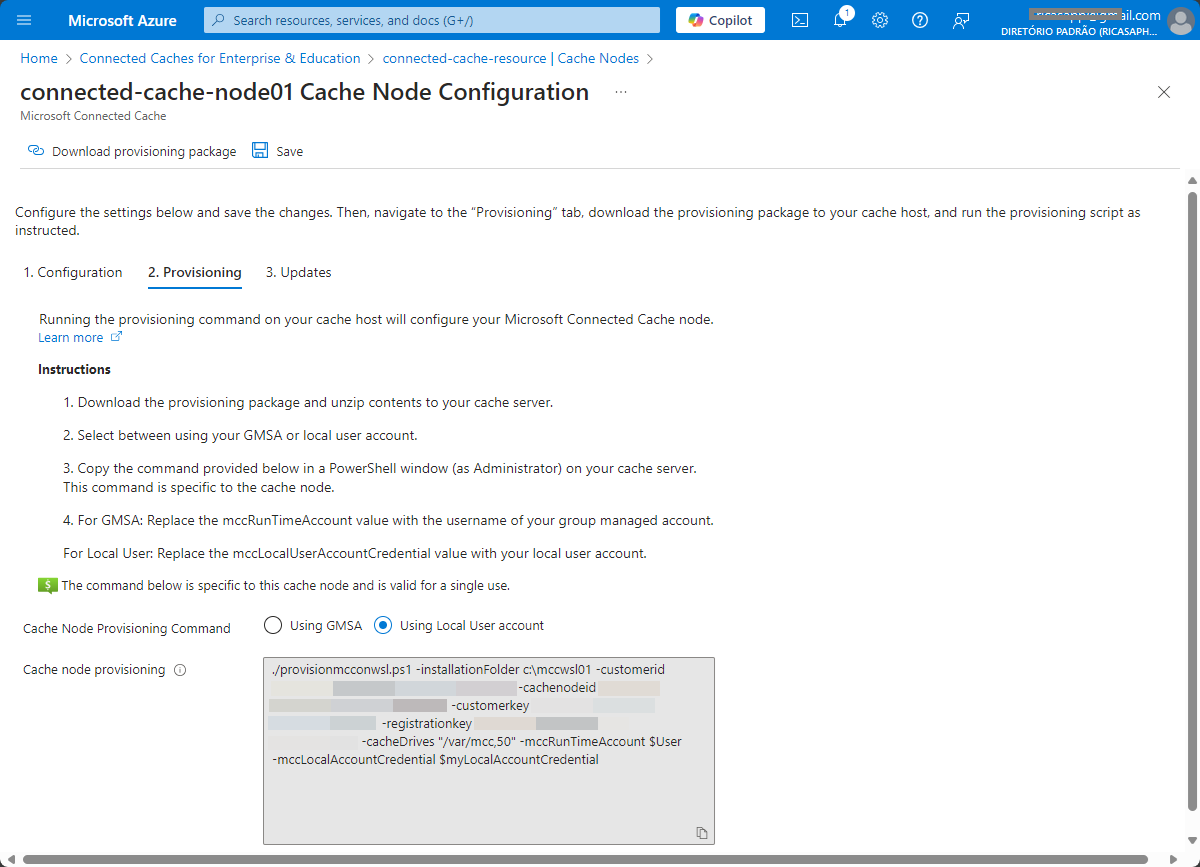
Note: The choice is between Group Managed Service Account (gMSA) and local user account. That account must be available during installation of the Connected Cache host and must have Log on as a batch job on the Windows host.
5. On the Updates page, as shown below in Figure 5, choose the update (speed) ring that should be used for the Connected Cache node and click Save
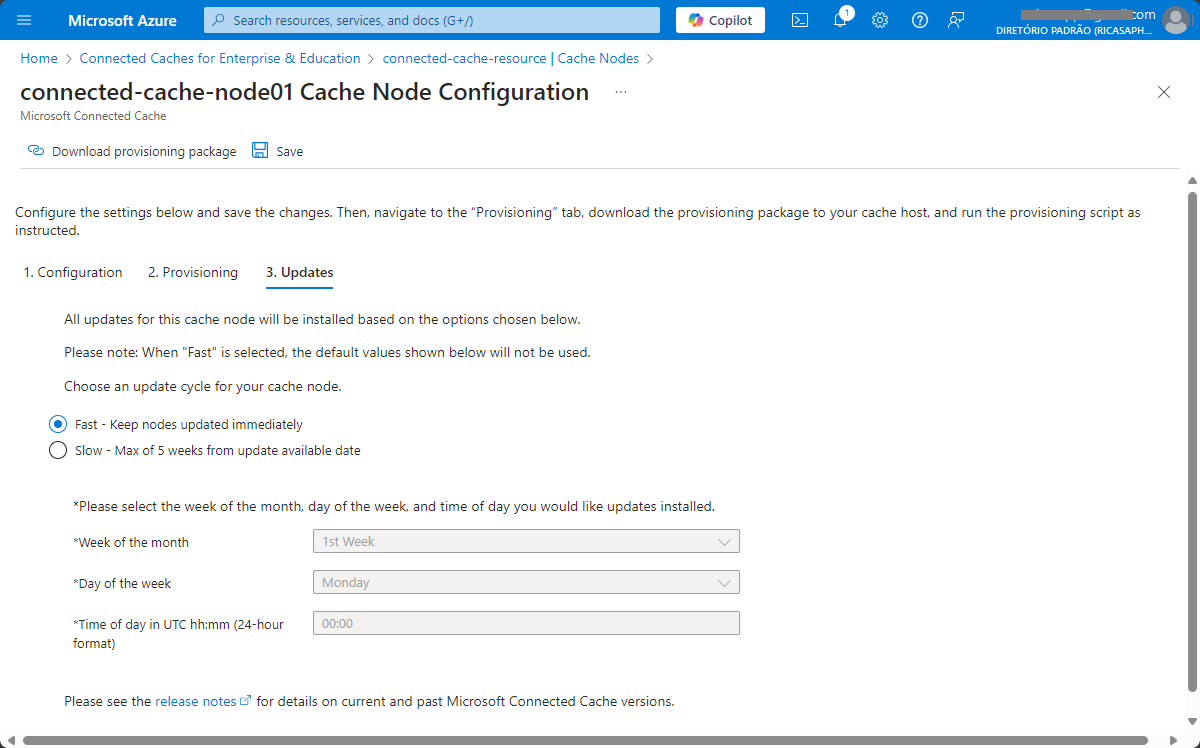
Note: The choice is between the fast and slow update ring, in which the fast update ring keeps nodes updated immediately and the slow update ring waits a maximum of 5 weeks to keep nodes updated.
Step 4: Deploying Connected Cache caching software to Windows host
The fourth and final step is deploying the Connected Cache software to a Windows host. This process involves several key activities, starting with preparing the Windows host and culminating in executing the provisioning script. When deploying the Connected Cache software using a local user account on a Windows host, it’s essential to carefully follow these four steps to ensure a smooth and successful implementation.
1. Prepare the Windows host for the provisioning of the Connected Cache node
Install Windows Subsystem for Linux on the Windows host
Create the local user account on the Windows host and store the password
Permit the local user account to Log on as a batch job on the Windows host
2. Download the provisioning package from the Connected Cache node configuration and extract the files
3. Copy the Cache Node Provisioning Command from the Connected Cache node provisioning configuration
4. Run the cache node provisioning command on the Windows host
Open a PowerShell windows as an administrator
Change the directory to the location of the extracted provisioning package
Set the ExecutionPolicy to Unrestricted or ByPass to allow the provisioning script to rung
Set the $User variable to the created local user account in the format of ‘Computer\User‘
Set the $myLocalAccountCredential variable to a PSCredential object based on the username and password (in a secure string) of the created local user account
Run the copied cache node provisioning command with the different variables
Note: Forgetting the Log on as a batch job on the Windows host will result in error 2147943785 during the deployment.
Configuring Delivery Optimization on Windows clients
Once the Connected Cache node is set up, the next step is ensuring that Windows clients utilize it for downloading Microsoft content. This can be achieved by leveraging Microsoft Intune to configure Delivery Optimization settings on the Windows clients. Specifically, this involves configuring the DOCacheHost or DOCacheHostSource policies.
Fortunately, these settings are readily available in the Settings Catalog, simplifying the configuration process significantly. The following 8 steps outline how to configure the DOCacheHost policy using the Settings Catalog, enabling Windows clients to recognize and utilize the designated Connected Cache host.
Open the Microsoft Intune admin center portal and navigate to Devices > Windows > Configuration profiles
On the Windows | Configuration profiles blade, click Create > New Policy
On the Create a profile blade, select Windows 10 and later > Settings catalog and click Create
On the Basics page, provide at least a unique name to distinguish it from similar profiles and click Next
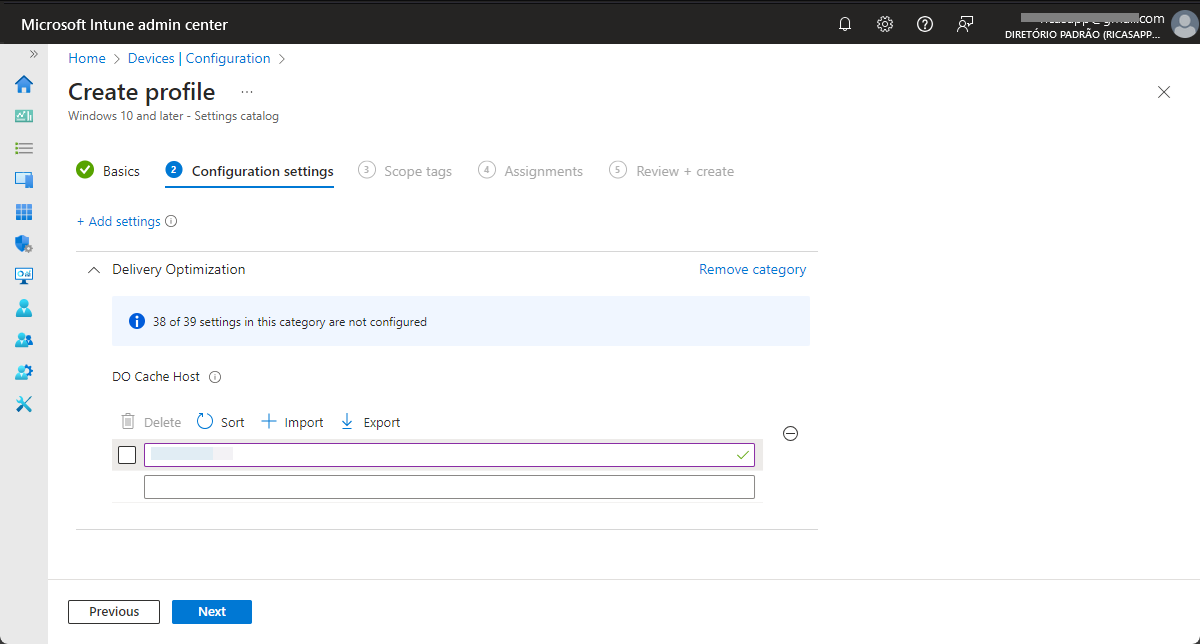
On the Configuration settings page, as shown below in Figure 5, perform the following actions and click Next
Click Add settings, navigate to Delivery Optimization and select the following setting in Settings picker DO Cache Host
Specify the fully qualified domain name (FQDN) or IP address of the Connected Cache node to make sure that Windows clients know where to locate their Microsoft content
6. On the Scope tags page, configure the required scope tags and click Next
7. On the Assignments page, configure the assignment for the required user or devices and click Next
8. On the Review + create page, verify the configuration and click Create
Note: To improve the chances of pulling content from the Connected Cache node, configure the delay before falling back to other the HTTP source, by using DelayCacheServerFallbackBackground and DelayCacheServerFallbackForeground.
Experiencing Microsoft Connected Cache
Once the Connected Cache node has been successfully configured and deployed, and the Windows clients are set up to utilize it, it’s time to evaluate how well the new setup is performing. There are several methods to verify if the configuration is functioning as intended—that is, whether the Windows clients are actively using the Connected Cache node.
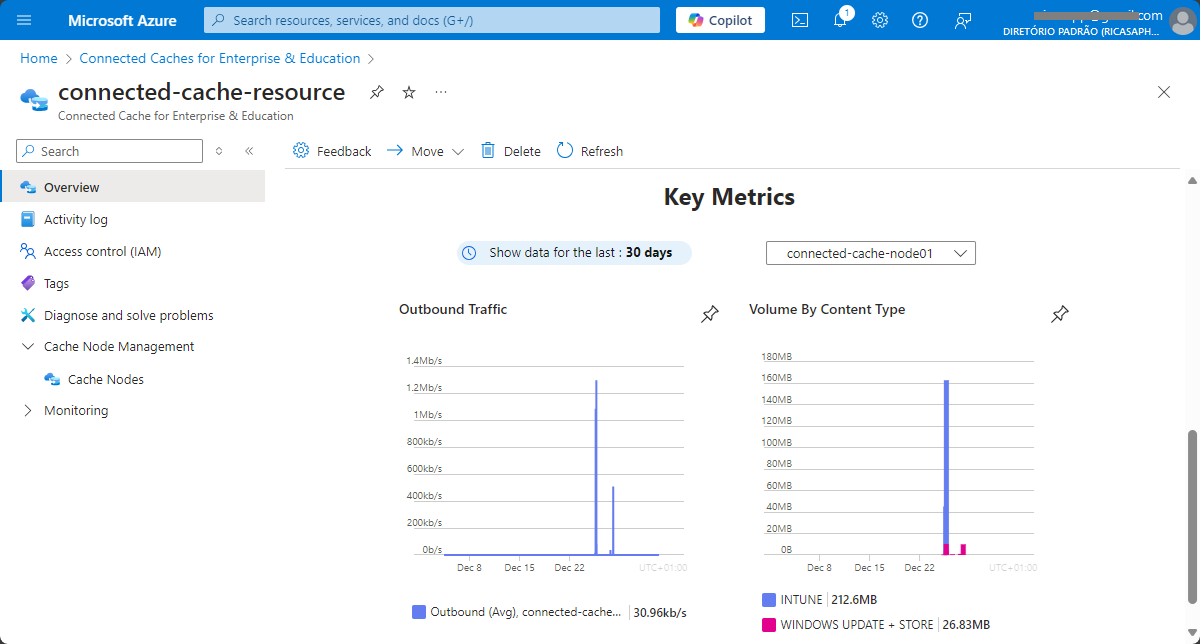
The simplest and most effective method is to review the key metrics of the Connected Cache node. These metrics are accessible through the overview section of the Connected Cache resource in the Azure portal, as illustrated in Figure 7. This view provides a detailed breakdown of the outbound traffic handled by the Connected Cache resource, including the types of content being served. In this specific example, the metrics clearly demonstrate that the Connected Cache is being used to deliver content for Intune and Windows Updates.
Analyzing Connected Cache from a Windows Client Perspective
In addition to evaluating Connected Cache metrics from the server side, it’s also possible to monitor it directly from a Windows client perspective. This can be done in several ways, but the two most accessible and efficient methods are:
Using the Activity Monitor for Delivery Optimization – This is available directly within the Windows Settings app.
Using the Delivery Optimization Troubleshooter – A PowerShell script provided by Microsoft via the PowerShell Gallery.
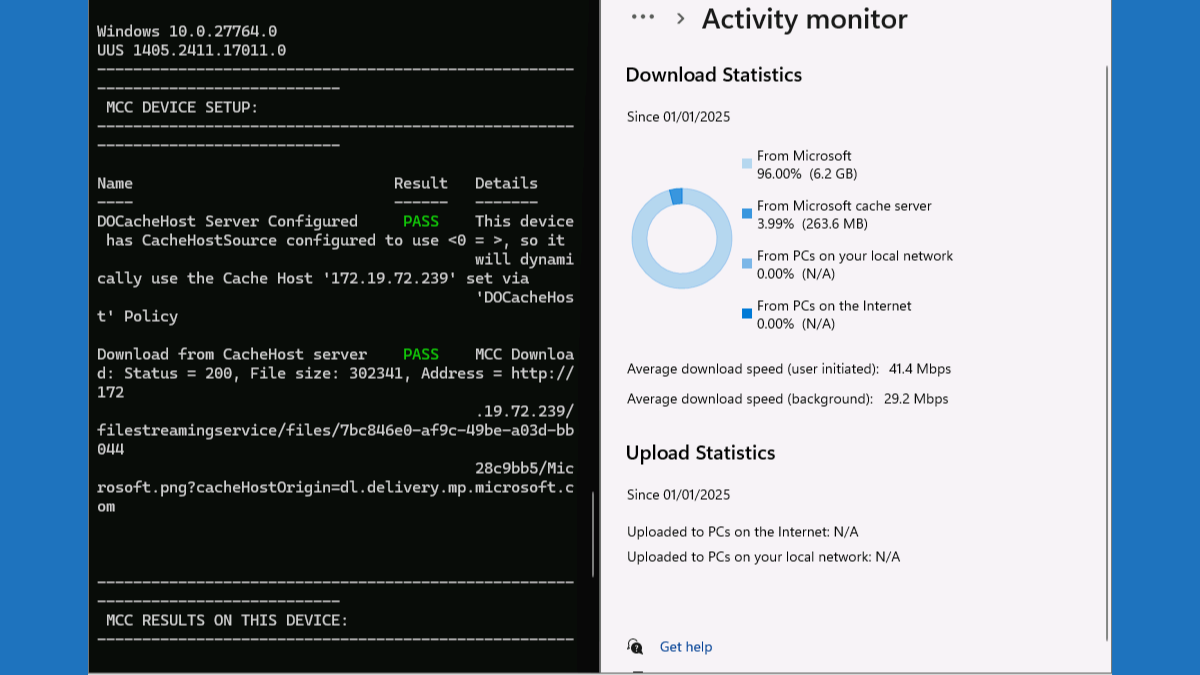
Figure 8 below provides an overview of both options. For a quick analysis, you can use the DeliveryOptimizationTroubleshooter.ps1 -MCC command to obtain detailed insights about the Windows client configuration, usage information, and recommended actions. This is illustrated on the left side of the figure.
Alternatively, you can navigate to Windows Update > Advanced options > Delivery Optimization > Activity monitor for download statistics. This includes details on the usage of the Connected Cache node, as shown on the right side of the figure. In this example, the Activity Monitor confirms that the Windows client is actively utilizing the Connected Cache node.
More information
For more information about the introduction of Microsoft Connected Cache, refer to the following docs.
Microsoft Connected Cache for Enterprise and Education Overview | Microsoft Learn
Create and configure Microsoft Connected Cache nodes | Microsoft Learn
Deploy Microsoft Connected Cache software to a Windows host machine | Microsoft Learn
Thank you!
🖥️ Ricardo Barbosa
📘 MCT Microsoft Certified Trainer | ☁️ Cloud Architect
🌐 Technology Director - https://altelix.com