

Deploying Windows 11 effectively across multiple devices is a key priority for IT administrators aiming to save time and ensure consistency. Traditionally, many schools and organizations have relied on tools like SCCM (System Center Configuration Manager) or MDT (Microsoft Deployment Toolkit) to create custom 'golden images' for deployment. However, these methods require manually building and maintaining images, a time-consuming process that is prone to errors and delays.
With MDT no longer officially supporting Windows 11 and scheduled to be retired by 2027, now is the perfect opportunity to transition to modern deployment solutions. Intune Autopilot offers a more streamlined, flexible, and future-ready approach to device provisioning. It eliminates the need for traditional imaging, enabling real-time configuration and application deployment as devices are powered on and connected to the internet.
What is Autopilot?
Microsoft Autopilot is a groundbreaking, cloud-based deployment solution that redefines how organizations set up and manage Windows devices. Designed for simplicity and efficiency, it transforms the out-of-box experience (OOBE) for end users, while empowering IT administrators to pre-configure devices with tailored organizational policies, essential applications, and precise settings. By leveraging zero-touch deployment, seamless integration with Azure Active Directory and Microsoft Intune, and flexible options such as Azure AD Join or Hybrid Azure AD Join, Autopilot eliminates the complexities of traditional imaging processes, dramatically reducing setup times and minimizing errors.
What sets Autopilot apart is its ability to support full customization and remote management, ensuring devices are not just deployed but optimized for performance and security throughout their lifecycle. This makes it the perfect solution for dynamic, scalable IT environments that demand both speed and precision.
In this comprehensive guide, we will walk you through the entire process of deploying Windows 11 with Intune Autopilot. You’ll learn how to retrieve the necessary hardware hash, whether from diagnostics during the OOBE phase or directly from your reseller. The guide addresses both Entra ID Joined (Cloud Only) and Entra ID Hybrid Joined (Domain Joined) scenarios, ensuring all bases are covered.
By the end of this guide, you will be equipped with the knowledge and tools to create a seamless, future-proof deployment process. With Microsoft Autopilot, devices can arrive ready to use, fully configured, and secure straight out of the box, paving the way for an efficient and modern IT infrastructure.
Prerequisites for Setting Up Autopilot
Before you can configure Autopilot for device setup, ensure you meet the following prerequisites:
1. Entra ID (Azure Active Directory)
A valid Entra ID tenant is required to register and manage devices within your organization.
2. Microsoft Intune
Microsoft Intune is essential for device management, application deployment, and enforcing configuration policies. Ensure you have an active Intune license (included with Microsoft 365 A3 and other plans).
3. Windows 11 Pro, Enterprise, or Education
Devices must be running a licensed version of Windows 11 Pro or higher to support Autopilot deployment.
Step 1: Import Devices for Autopilot Deployment
To use Autopilot and pre-import devices, you'll need their Hardware Hash IDs and Serial Numbers.
Automatic Import
The easiest and most efficient method is to request this information from your reseller. They can provide a CSV file containing the Hardware Hash and Serial Numbers, allowing you to import up to 500 devices at once.
Pro Tip: If you're managing a large number of devices, take advantage of the ‘GroupTag’ field in the CSV file to categorize devices for specific deployment scenarios. For instance, you can use tags like HPDesktop or HPLaptop to streamline the process of assigning Autopilot profiles later.
Manual Export
If obtaining the Hardware Hash and Serial Numbers from your reseller isn’t an option, you can manually export this information from each device:
On the OOBE (Out-of-Box Experience) page, press CTRL + SHIFT + D.
This will export the required logs to a USB drive, including a CSV file with the Hardware Hash and Serial Numbers.
In Intune navigate to Devices > Enrolment >Windows Autopilot > Devices and click Import.
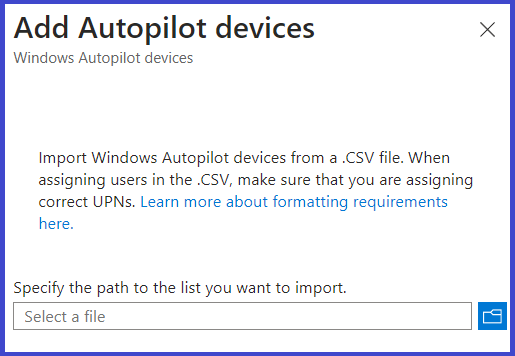
Here you can select the CSV file containing the Hardware Hash and Serial Numbers. Your devices should now show up under Autopilot Devices.
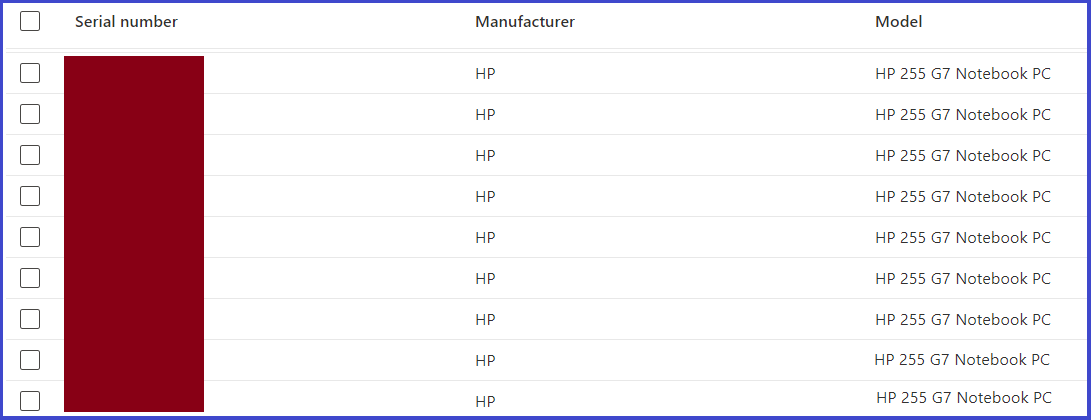
Create Autopilot Device Group
To ensure that applications, configuration settings, and deployment profiles are correctly applied to Autopilot devices during setup, you need to create a Dynamic Device Group. This group will automatically include devices registered for Autopilot deployment.
Steps to Create the Group:
Navigate to Groups > All groups > New Group.
Fill in the required details, such as the group name and description, for easy identification.
Under Membership Type, select Dynamic Device.
This dynamic grouping ensures that Autopilot devices are automatically organized, making it easier to manage and assign deployment profiles seamlessly.
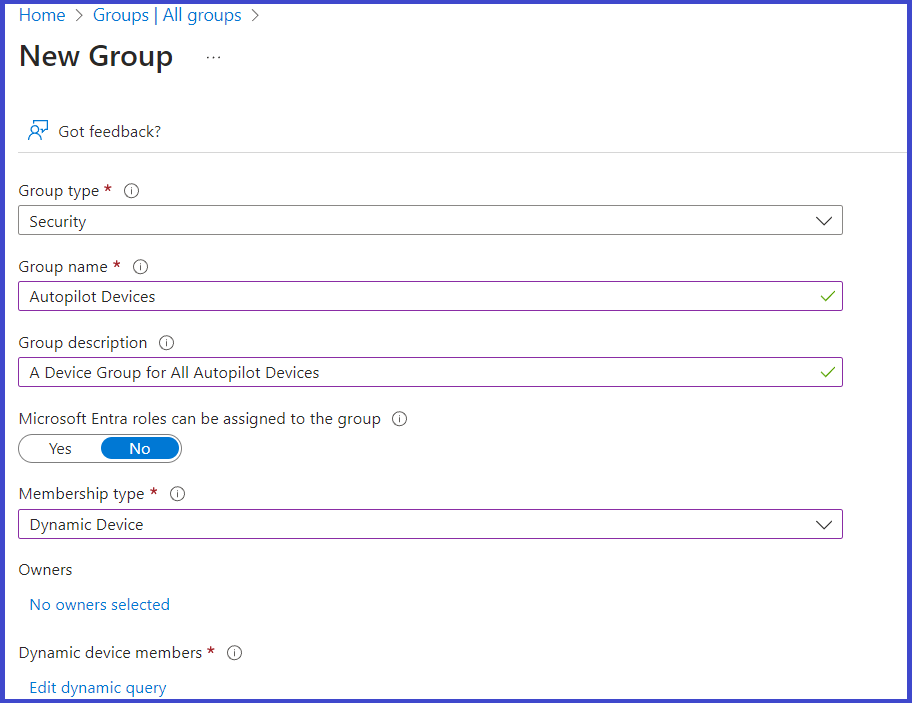
To ensure devices are added automatically to dynamic groups, edit the Dynamic Query and use the following syntax:
Query for All Autopilot Devices:
(device.devicePhysicalIDs -any _ -contains "[ZTDId]")
Filtered Autopilot Devices:
Use the GroupTag field to create specific dynamic groups. For example:
Devices Tagged for Domain Join (AutoPilotDomain):
(device.devicePhysicalIDs -any -contains "[ZTDId]") -and (device.devicePhysicalIDs -any -contains "[OrderID]:AutoPilotDomain")
Devices Tagged for Cloud Deployment (AutoPilotCloud):
(device.devicePhysicalIDs -any -contains "[ZTDId]") -and (device.devicePhysicalIDs -any -contains "[OrderID]:AutoPilotCloud")
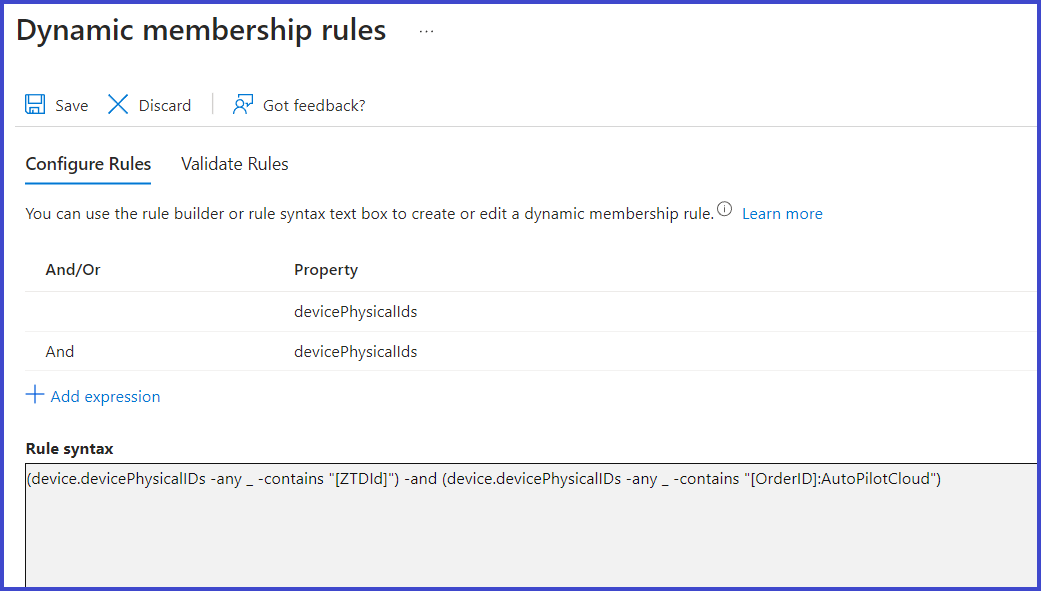
Save the Group. You should now begin to see the devices added to your group based on your dynamic device query.
Step 2: Create Autopilot Deployment Profile
To tailor your Autopilot deployment, you can create a new Deployment Profile or modify the Default Profile. Follow these steps:
Navigate to Devices > Enrolment > Windows Autopilot > Deployment Profiles.
Click +Create Profile and select Windows PC as the profile type.
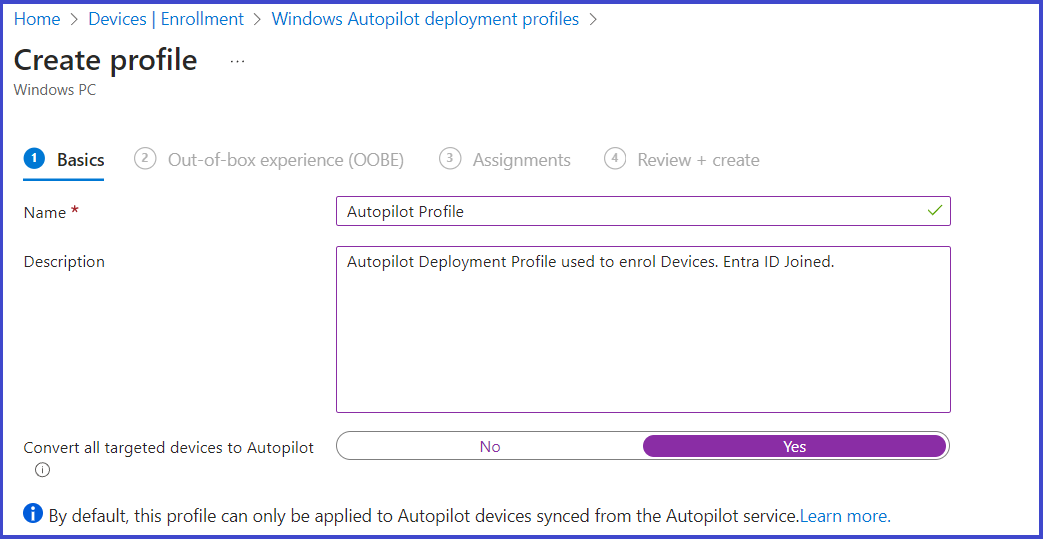
Assign your profile a clear and descriptive name to ensure easy identification.
Optionally, provide a description to outline the profile’s purpose or key configurations.
Configure Your Out-of-Box Experience Settings
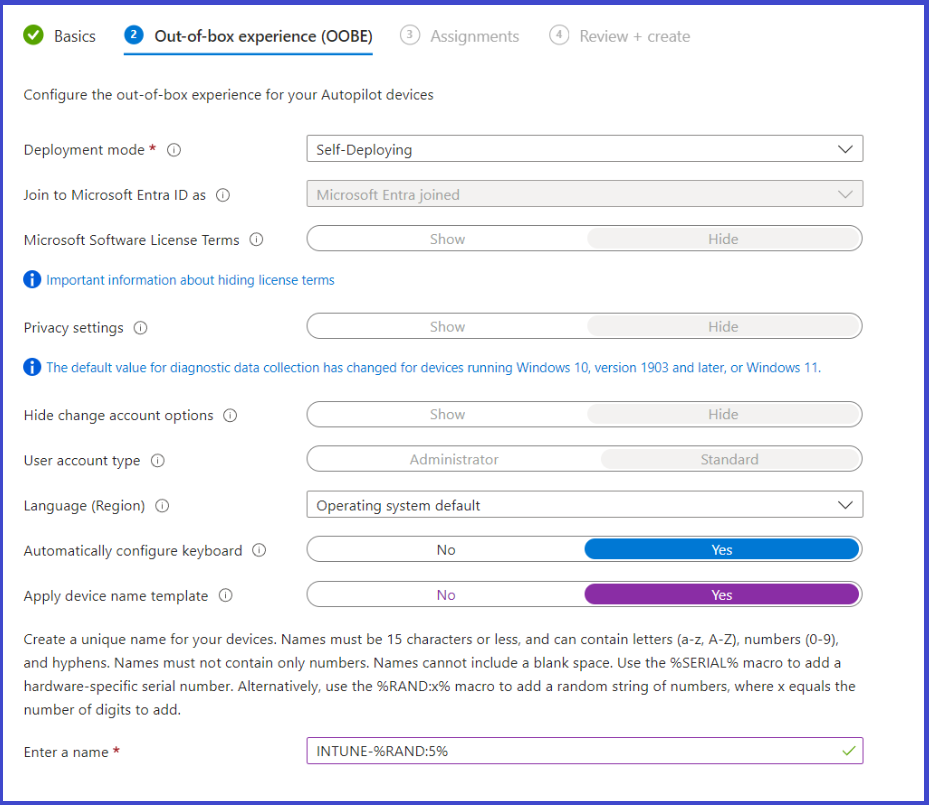
When setting up your out-of-box experience (OOBE) settings, consider the deployment mode that best fits your needs. If you plan to enroll your device(s) as Entra ID Joined (Full Cloud), the Self-Deploying deployment mode is ideal for achieving seamless zero-touch installations.
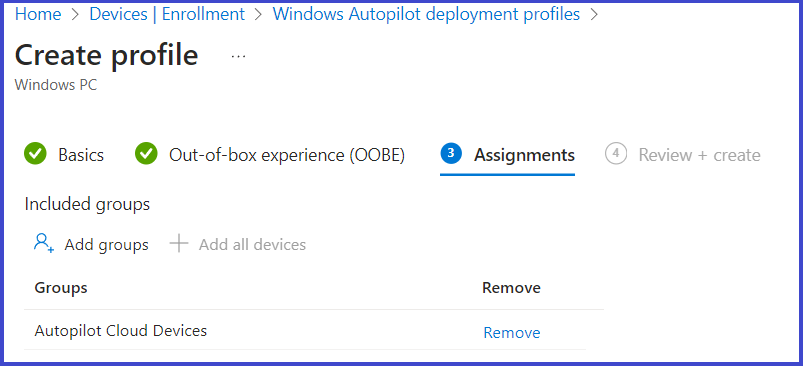
Assign the deployment profile to the dynamic device group you created in step 1 earlier.
Enrolling Devices as Entra ID Hybrid Joined (Domain Joined)
If you intend to enroll your devices as Entra ID Hybrid Joined (Domain Joined), select the User-Driven deployment mode and follow the additional steps outlined below to complete the domain join process for Autopilot devices.
If this is not required, you can proceed directly to Step 3.
2.1: Configure settings for Microsoft Autopilot Domain Join (Optional)
Set Up Active Directory / Microsoft Entra Connect Sync (AAD Connect) (Optional)
To maintain a clean and organized Active Directory environment, it is recommended to create a dedicated Organizational Unit (OU) in Active Directory, named, for example, ‘Intune’.
This approach helps you easily identify and manage devices added via Intune and Autopilot, ensuring a more streamlined and efficient directory structure.
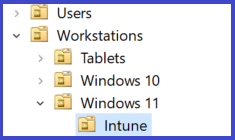
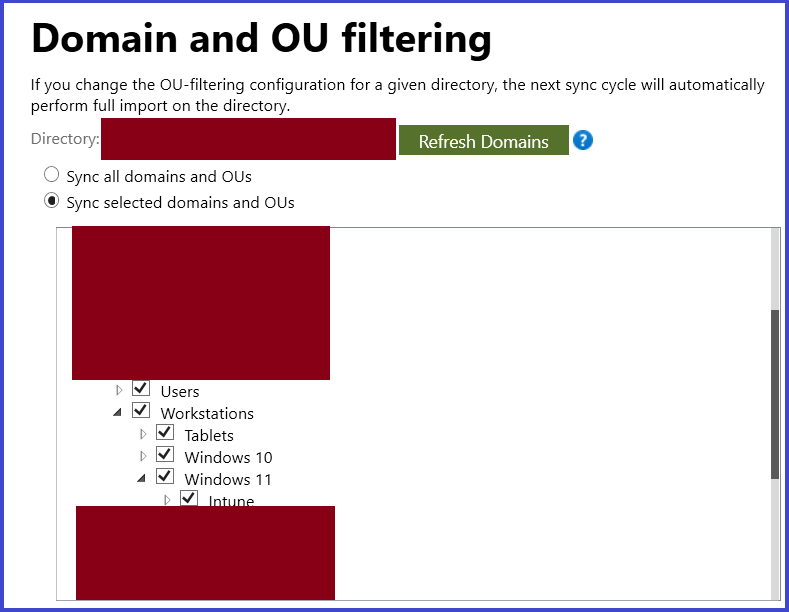
Once you have created this OU, ensure it is synced to Entra (Azure AD) using the Entra ID Connect Tool. To verify, open the Entra ID Connect Tool and select Configure.
Under Domain and OU Filtering, confirm that your newly created OU is selected for synchronization.
Configure Domain Join Profile (Optional)
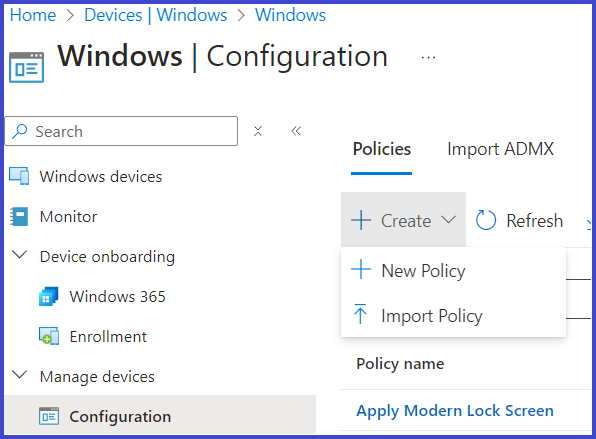
In order to join devices to your domain, you will need to Create a Domain Join policy in Intune. Head over to Devices > Configuration > +Create and add a new policy.
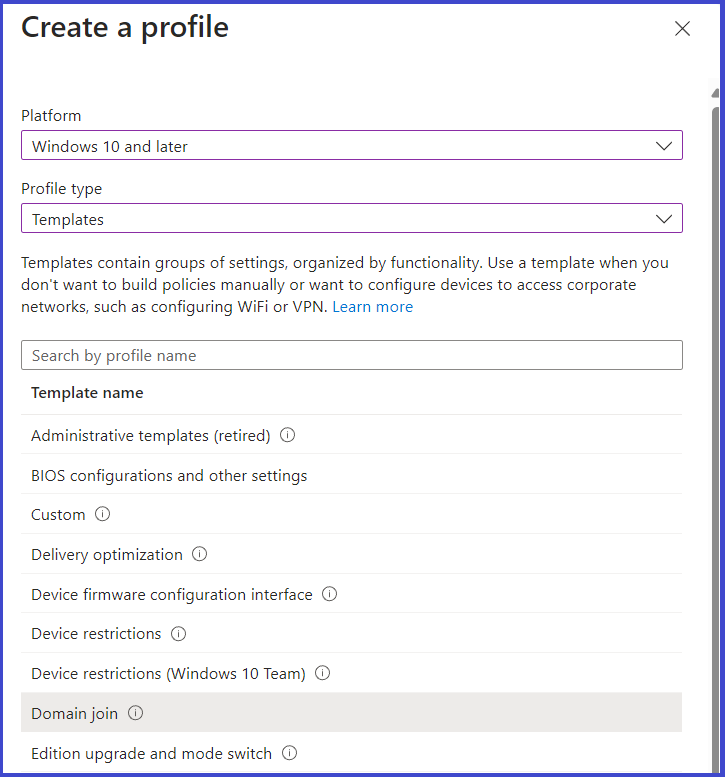
Select Windows 10 and Later > Templates > Domain Join
Give your profile a suitable name and configure the domain settings

Apply your Domain Join Profile to the Autopilot Group you created earlier.
Download and Configure the Intune Connector for Active Directory (Optional)
The decision between adopting a Full Cloud or Hybrid approach to endpoint management often depends on specific organizational needs. A common reason for choosing a hybrid setup is the reliance on legacy systems or printers that require a domain to function.
If you plan to Domain Join your Autopilot devices as Entra ID Hybrid Joined, the first step is to download the Intune Connector for Active Directory.
In the Intune Admin Centre Navigate to Devices > Enrolment >Intune Connector for Active Directory.
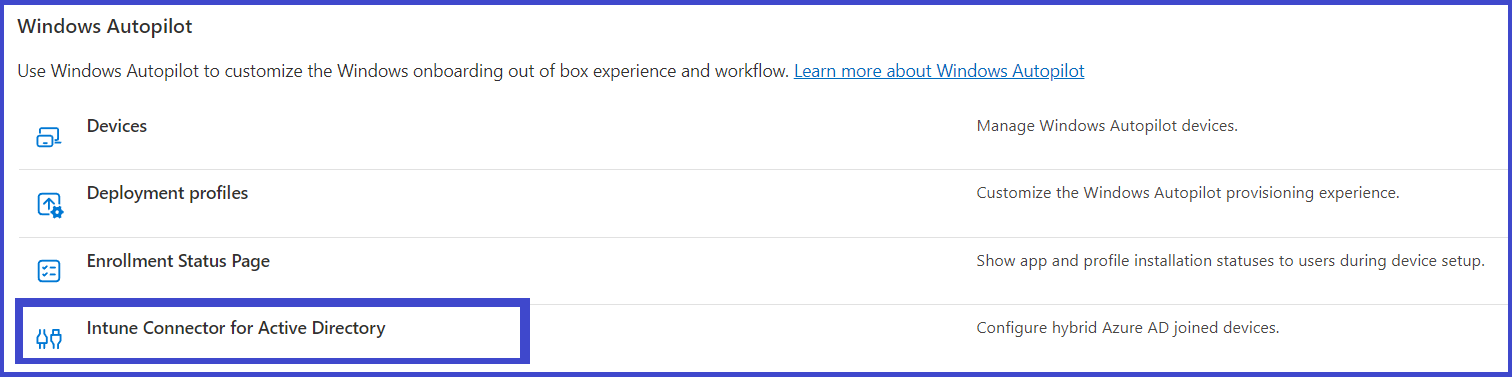
Click Add.
Download the Installer file and Copy it to your AD server.
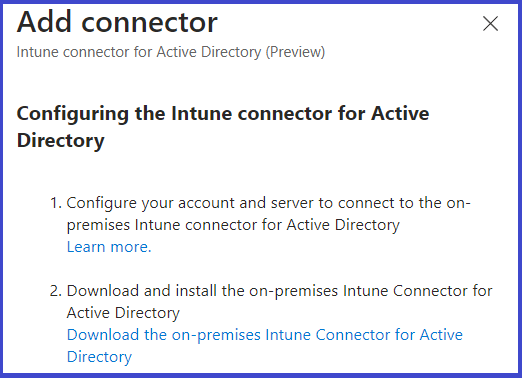
Run the Installer and Configure the Intune Connector
Launch the installer and sign in using your admin credentials.
Requirements for the Intune Connector:
The Intune Connector for Active Directory must be installed on a computer running Windows Server 2016 or later with .NET Framework version 4.7.2 or higher.
The server hosting the Intune Connector must have access to both the Internet and Active Directory.
The account used to set up the Intune Connector must have Global Administrator permissions.
Verifying the Installation:
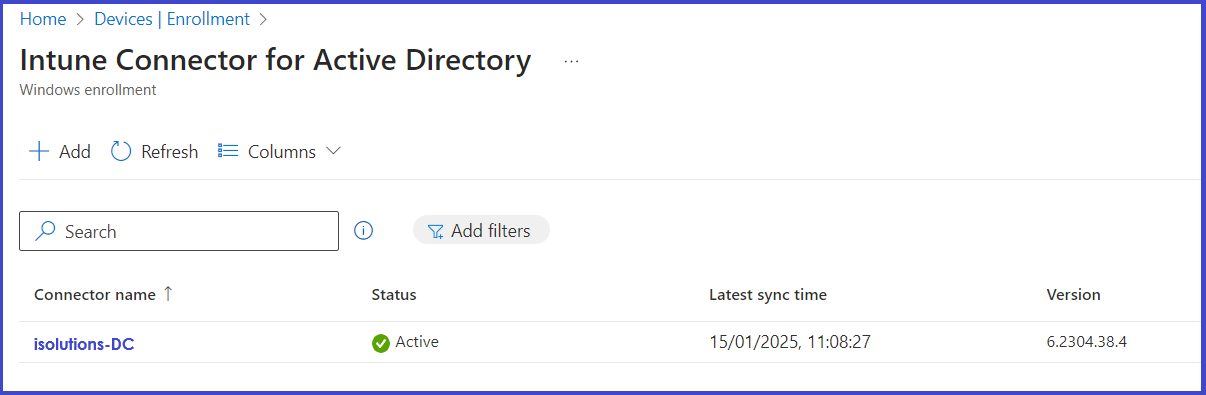
To confirm that the Intune Connector has been successfully installed, return to Devices > Enrolment > Intune Connector for Active Directory. Ensure your server appears in the list and its status shows as Active.
Step 3: Create Deployment Status Page
The Enrollment Status Page (ESP) appears during the initial device setup and the first user sign-in. When enabled, it provides users with a real-time view of the configuration progress for assigned apps and policies targeted to their device.
How to Configure:
Navigate to Devices > Enrollment > Windows Autopilot > Enrollment Status Page.
Choose to either create a New Profile or edit the Default Profile, depending on your requirements.
Enabling this feature enhances transparency and ensures users are informed during the setup process.
Create a New Profile or edit the default profile.
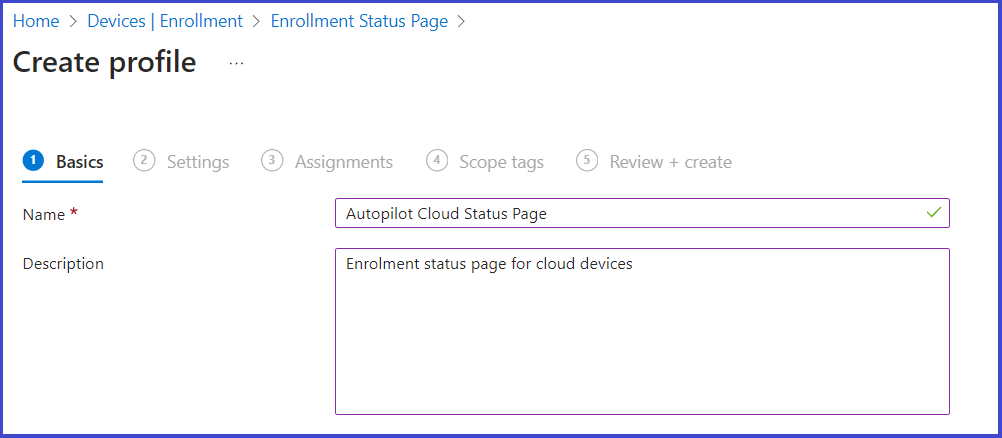
Here, you can decide whether to show the configuration progress to the end user. Configure these settings according to your needs; in my experience, leaving it as default often works best.
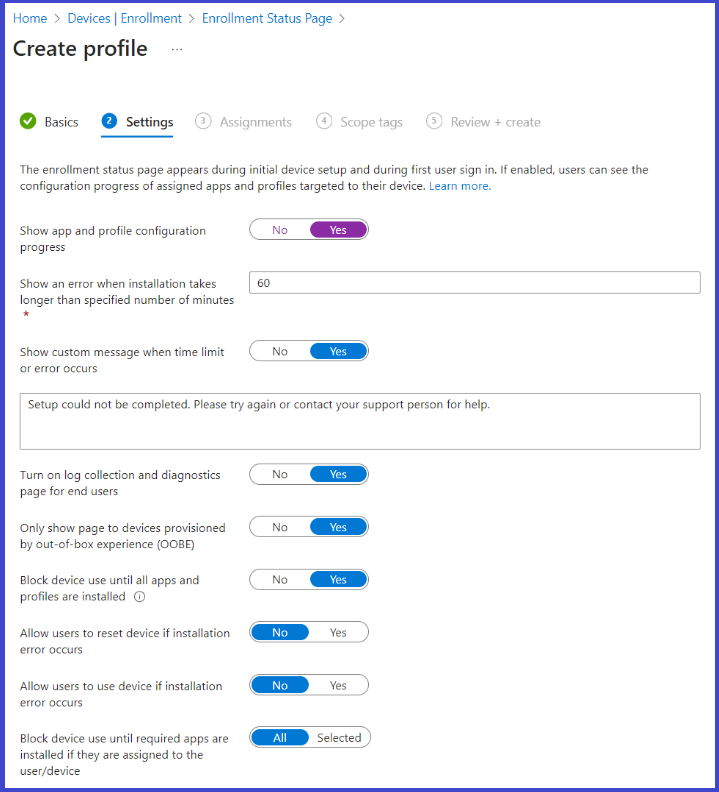
Assign the profile to your Dynamic Device Group you created in Step 1.
‘Block device use until all apps and profiles are installed’ This setting ensures that devices are fully provisioned with all required apps and configurations, such as certificates, safeguarding software, and other essential settings, before they can be used.
Step 4: Deploy Required Apps
A key reason for using traditional imaging methods is the ability to pre-deploy applications before devices reach the end user. To replicate this process with Intune and Autopilot, you can easily deploy the required apps by navigating to the ‘Apps’ blade in Intune and selecting ‘Windows Apps’.
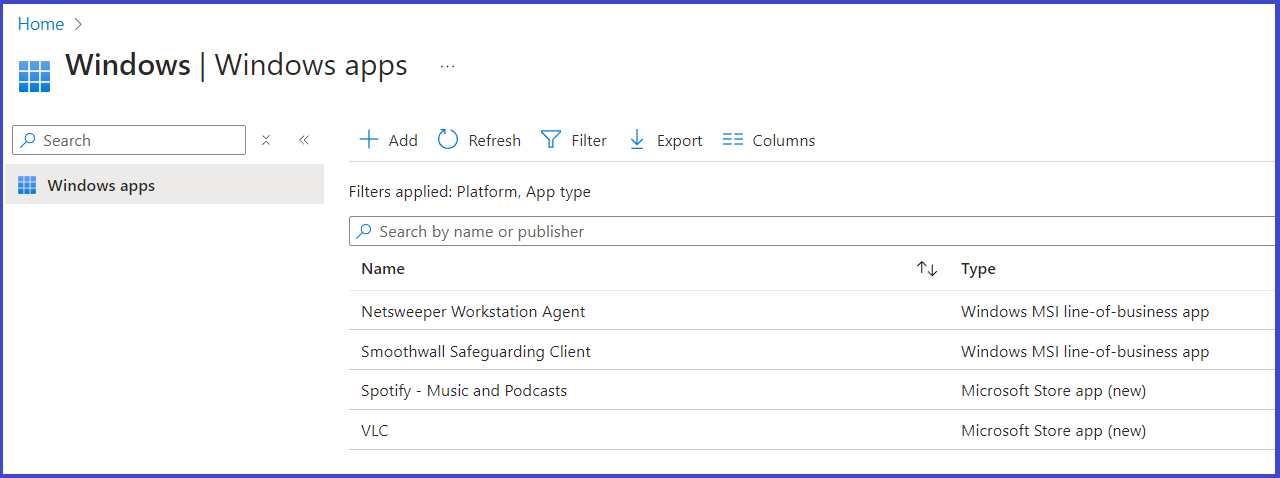
Identify the apps you want to be installed during the provisioning process (e.g., the Smoothwall client). For each app, go to its settings, and under ‘Assignments’, select the Dynamic Device Group created in Step 1.
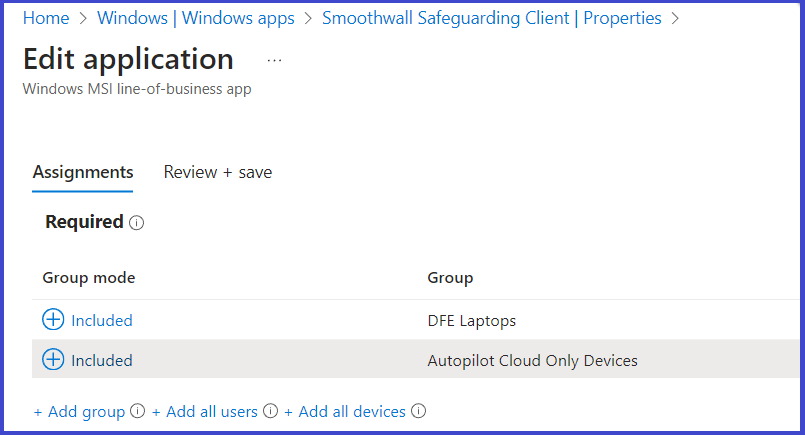
If you have enabled the ‘Block device use until all apps and profiles are installed‘ setting in Step 3 this will install before the device is provisioned.
Step 5: Trim the fat (Remove Unwanted Apps)
One significant drawback of deploying PCs out-of-the-box is the overwhelming amount of pre-installed bloatware, either from the OEM or Microsoft. While tools like MDT or SCCM allow you to use my free WIMSimple tool to remove unwanted apps from image files, this approach isn't applicable for Intune deployments.
To address this, I initially considered developing a custom script to remove unnecessary apps during provisioning. However, after some research, I discovered an excellent script that already handles this task perfectly!
Head over to Andrew Taylor’s Blog to download the latest Intune Debloat Script and save it to your PC.
Adding the Script in Intune:
In Intune, navigate to Devices > Scripts and Remediations.
Click Platform Scripts and select Add New.
Choose Windows 10 or later as the platform.
This script simplifies the process of removing unwanted apps during provisioning, ensuring a cleaner, more efficient deployment.
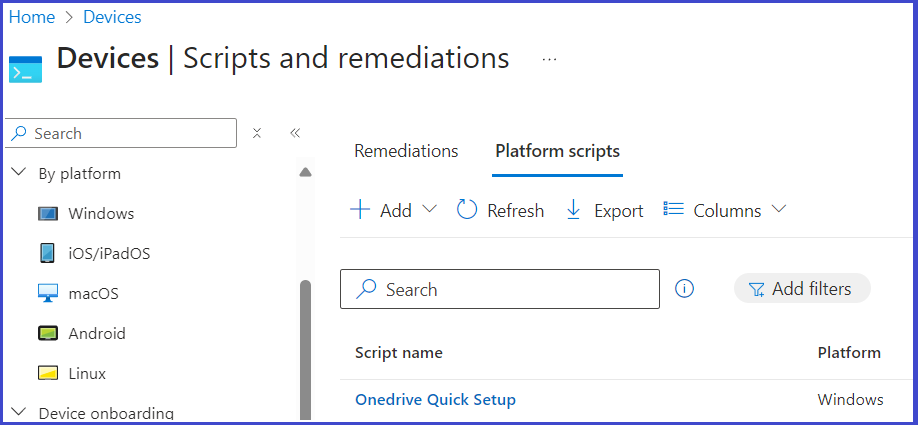
Import the script downloaded from Andrews Blog and change the following settings.
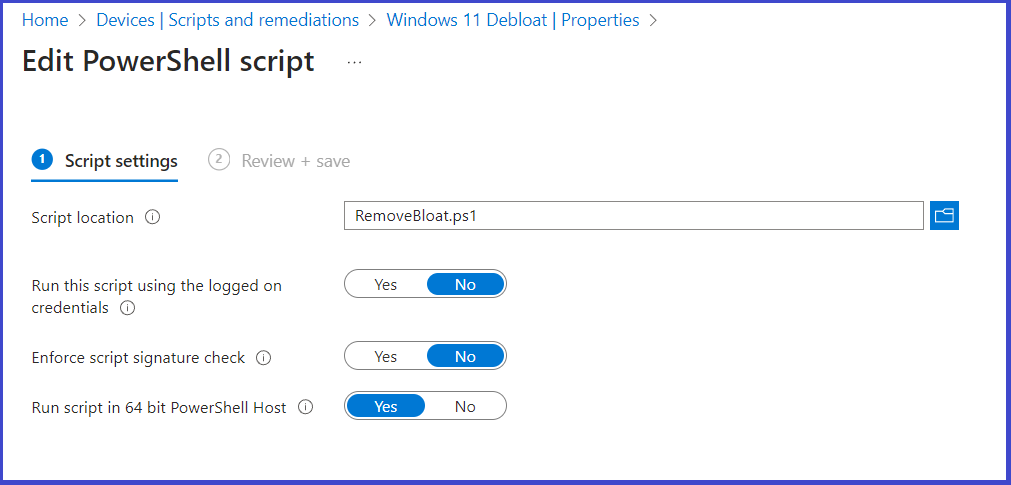
Deploy the script to the same group you created in step 1.
Step 6: Connect your device
With all configurations in place, the final step is to connect your Autopilot device to the internet.
What Happens Next:
Power On the Device: Turn on your Autopilot-enabled device.
Automatic Provisioning: Once connected to the internet, the device will automatically retrieve the apps, policies, and settings you've configured in Intune.
Seamless Setup: The provisioning process runs without requiring manual intervention, ensuring the device is ready for use with all necessary configurations applied.
This step highlights the efficiency of Autopilot by eliminating the need for traditional imaging or manual setups, providing users with a fully functional device right out of the box.
More Information
For additional guidance on deploying Windows 11 using Intune Autopilot, refer to the following resources on Microsoft Learn:
These resources provide comprehensive instructions on setting up, managing, and optimizing Windows 11 deployments with Intune Autopilot.
Thank you!
🖥️ Ricardo Barbosa
📘 MCT Microsoft Certified Trainer | ☁️ Cloud Architect
🌐 Technology Director - https://altelix.com