

How to Deploy "Allow Device Name to be Sent in Windows Diagnostic Data" in Intune via Settings Catalog
Windows diagnostic data is critical for maintaining the security, performance, and overall health of devices. This data, collected by Microsoft, includes essential information about your device's settings and capabilities, helping to ensure reliable operations, detect issues early, and protect against potential threats.
By leveraging the Settings Catalog in Intune, IT administrators can streamline the process of creating and managing policies, making it easy to configure settings tailored to organizational needs. This centralized hub consolidates all available configuration options into one accessible location, simplifying policy deployment and management.
What is the Diagnostic Data Viewer?
The Diagnostic Data Viewer is a Windows application that allows users to review the diagnostic data being sent from their device to Microsoft. The app organizes this information into clear categories based on how it’s used, providing transparency and insights into the data collection process.
Deploying the Policy via Intune Settings Catalog
To deploy the Allow Device Name to be Sent in Windows Diagnostic Data policy, follow these steps:
Sign in to the Microsoft Intune Admin Center.
Navigate to Devices > Configuration.
Click New Policy to create a new configuration profile.
This straightforward process ensures that your organization's devices are properly configured to send the necessary diagnostic data securely and efficiently.
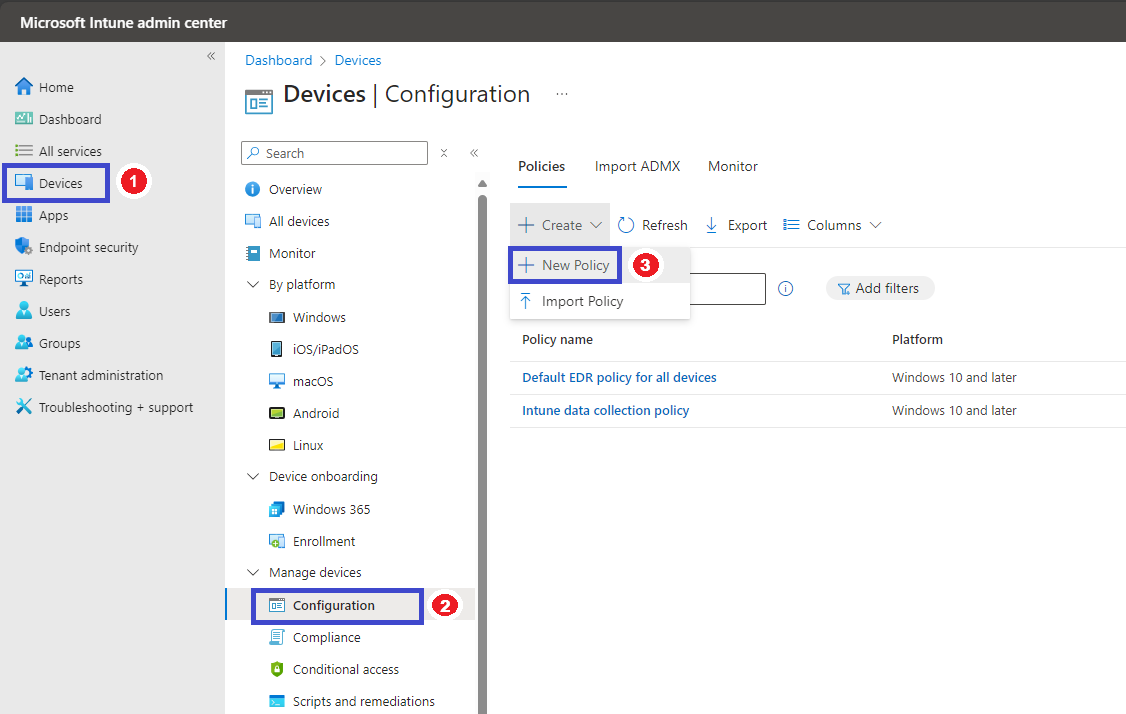
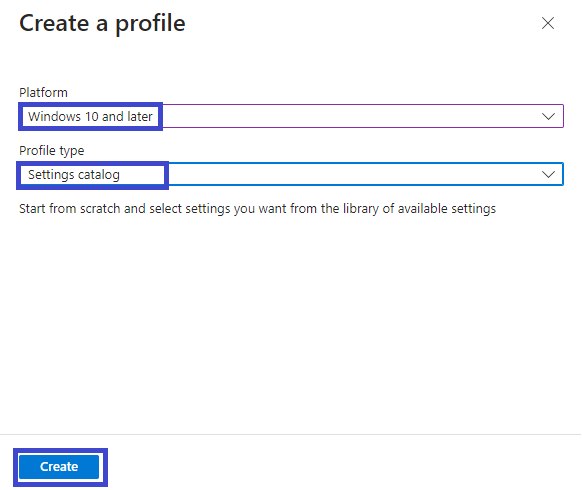
4. Select Windows 10 and later as the Platform.
5. Choose Settings Catalog as the Profile Type.
6. After selecting these options, click Create to proceed.
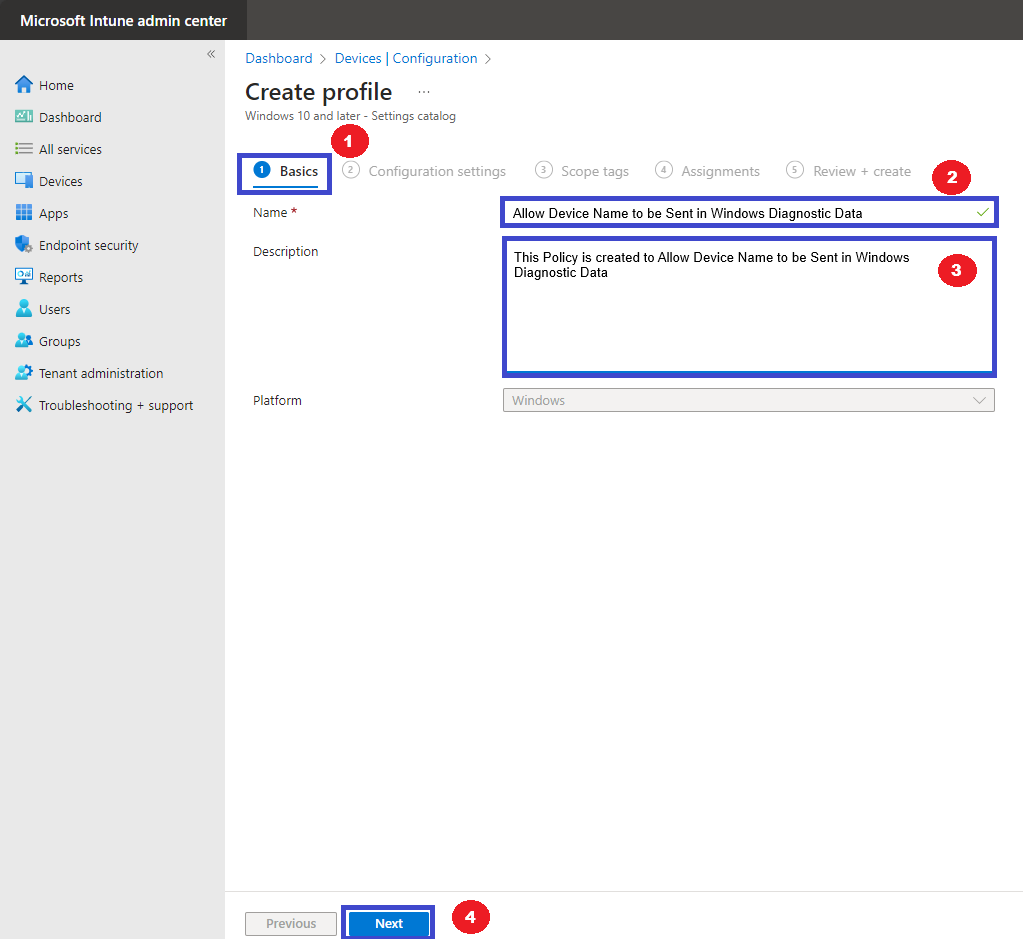
Basics: Setting Up Your Policy
The Basics tab is the starting point in the Intune Settings Catalog when creating a new profile. This section allows you to define the foundational details of your policy.
Name: Provide a clear and descriptive name for your policy to ensure easy identification in the future.
Description: Add a brief explanation of the policy's purpose (optional but recommended) to help you or your team quickly understand its function.
Once you've entered these details, click the Next button to proceed to the next configuration step.
This step lays the groundwork for an organized and effective policy deployment.

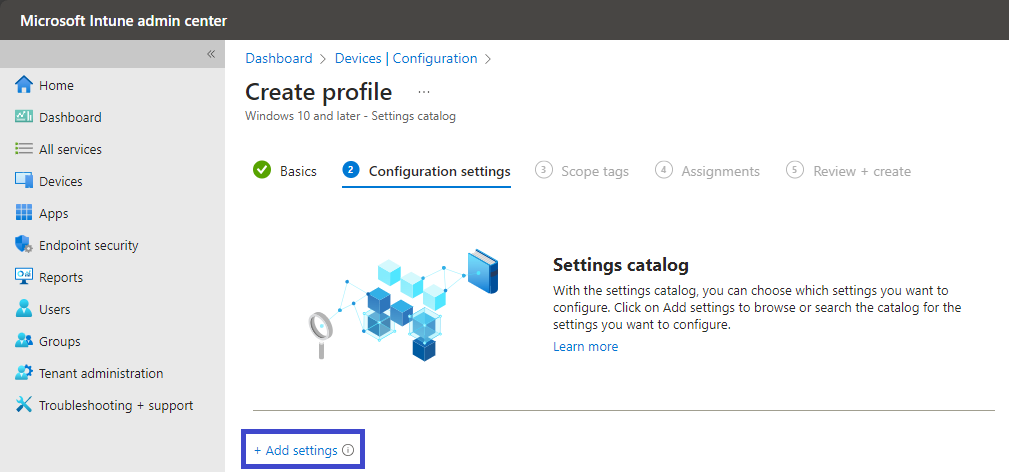
Configuration Settings
The next step is the Configuration Settings section, a critical part of policy creation. This section allows you to define and customize the specific settings for your policy using the Settings Catalog.
Click on + Add Settings to open the catalog.
Browse through the categories or use the search bar to quickly locate the settings you want to configure.
This streamlined approach ensures you can easily identify and apply the desired settings, tailoring the policy to meet your organization’s specific requirements.
Settings Picker: Choosing Your Configuration
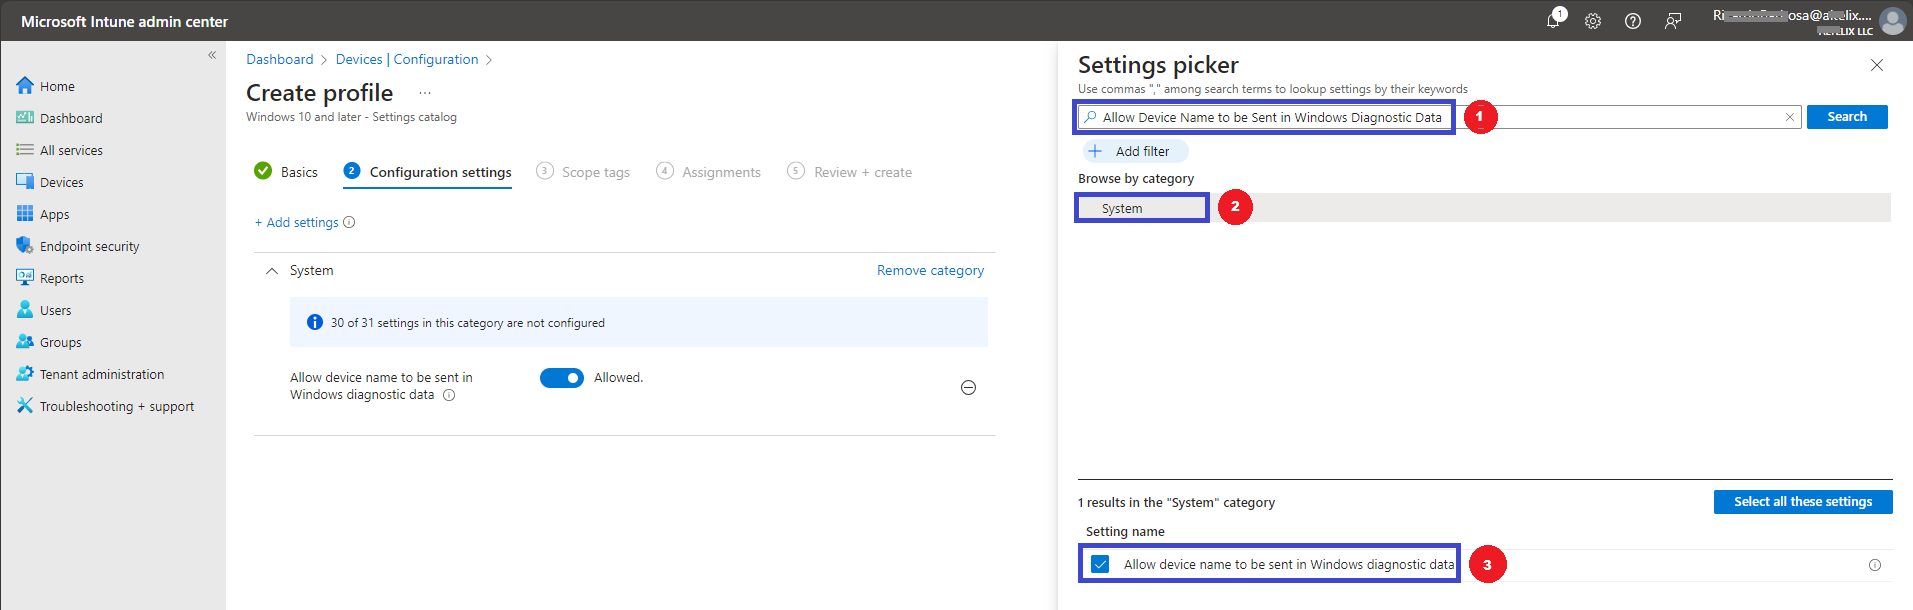
Click on + Add Settings to open the Settings Picker window, where you can select the configurations for your policy.
To streamline the process:
Use the search bar to quickly locate specific settings.
Alternatively, browse by category for a more comprehensive view of available options.
For this policy, navigate to the System category and manually select Allow Device Name to be Sent in Windows Diagnostic Data. This intuitive interface simplifies the process of tailoring your settings to meet your organizational needs efficiently.
Configuration Settings
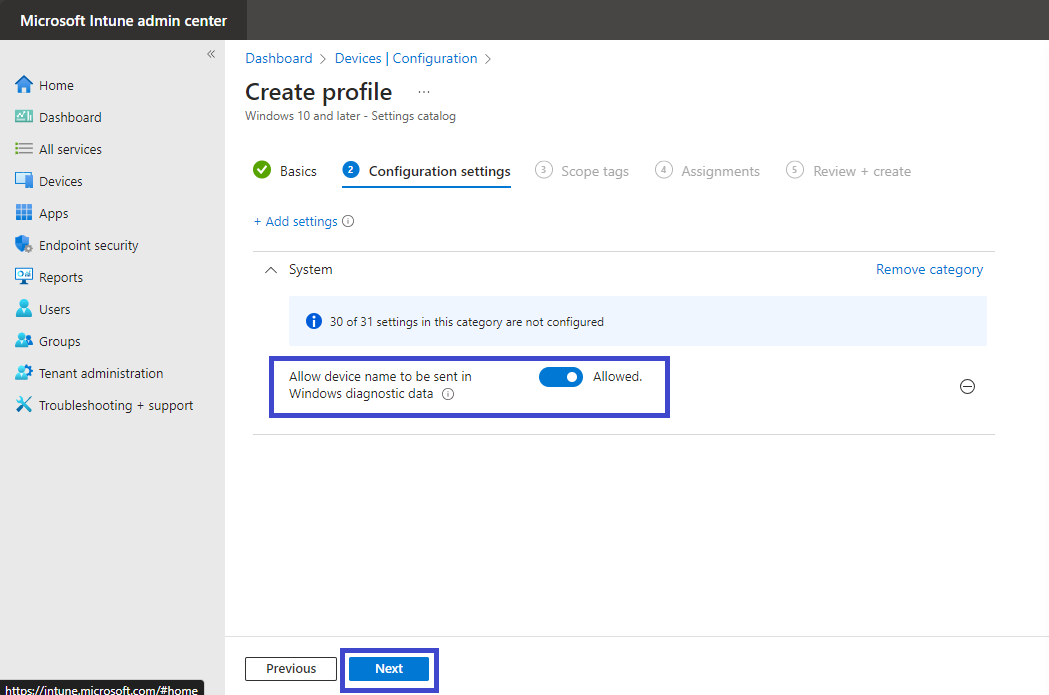
After selecting the desired policy, it will appear on the Configuration Settings page. Here, you’ll see a toggle switch for the Allow Device Name to be Sent in Windows Diagnostic Data setting.
To enable this option, ensure the toggle switch is set to On, allowing manual entries for the device name in diagnostic data.
Carefully review your configuration to confirm it aligns with your organization’s requirements.
Once you’ve made the necessary adjustments, proceed to the next step to finalize the policy setup.
Policy Information and Additional Details
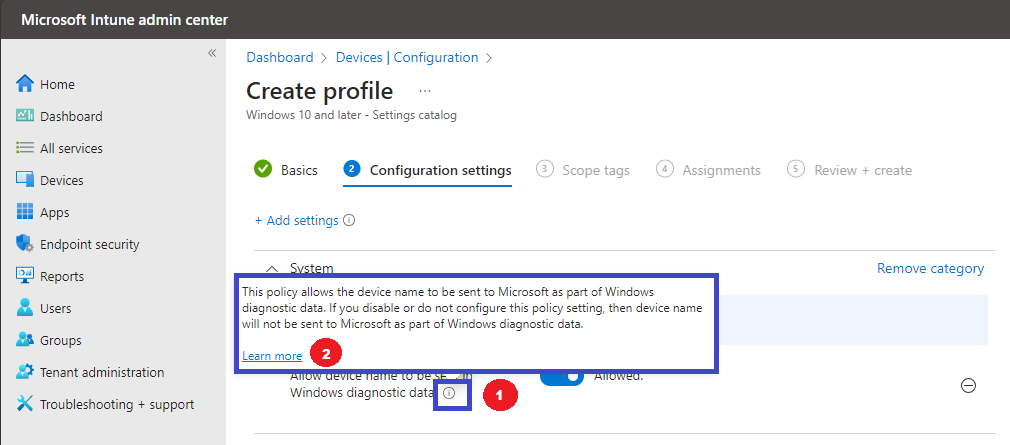
Clicking on the “i” icon will display a popup with detailed information about the policy, helping you better understand its purpose and functionality.
If you’d like to dive deeper into the policy CSP (Configuration Service Provider), click the “Learn More” button provided in the popup.
Once you’ve reviewed the details, click the “Next” button to proceed with the policy configuration.
This step ensures you have all the relevant information before finalizing your settings.
Policy CSP Information
The Allow Device Name to be Sent in Windows Diagnostic Data policy determines whether the device name is included in diagnostic data sent to Microsoft.
Enabled: When this policy is enabled, the device name will be sent as part of the diagnostic data, allowing for improved diagnostics, troubleshooting, and product improvement insights.
Disabled or Not Configured: If this policy is disabled or left unconfigured, the device name will not be included in the diagnostic data sent to Microsoft, potentially limiting certain diagnostic and support capabilities.
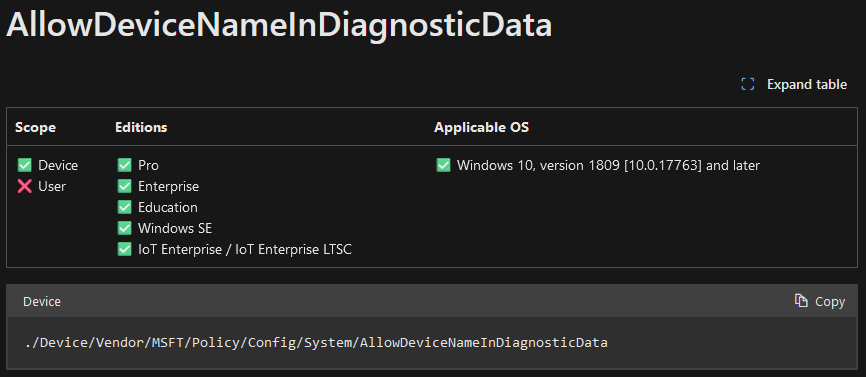
Policy CSP Path
The CSP (Configuration Service Provider) path for this policy is: ./Device/Vendor/MSFT/Policy/Config/System/AllowDeviceNameInDiagnosticData
This path ensures that the policy can be applied and managed effectively through mobile device management (MDM) solutions like Microsoft Intune. Refer to the screenshot below for more details on the policy CSP configuration.
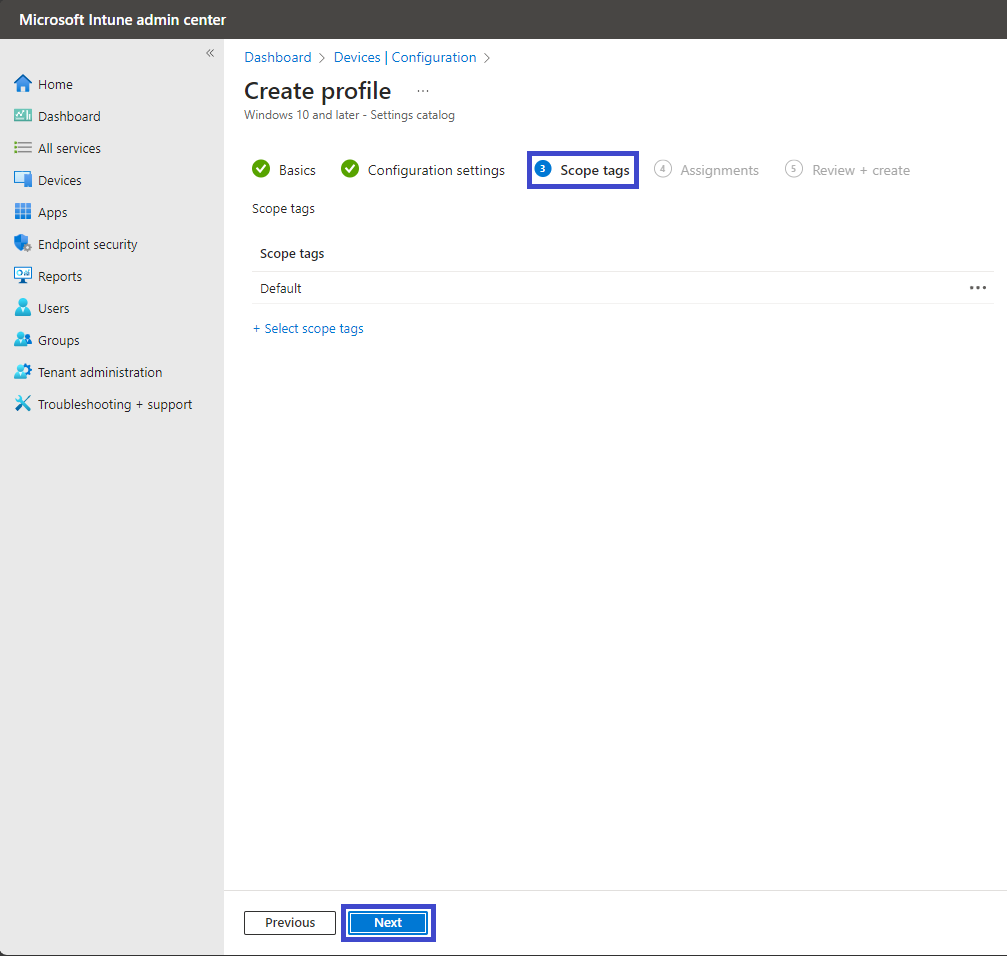
Scope Tags
In this step, we encounter the Scope Tags section. This feature is primarily used to categorize and organize policies for easier management, especially in larger environments.
Since this section is typically optional, you can choose to skip it if scope tags are not necessary for your current policy.
If you decide to utilize scope tags, select the appropriate tags to help identify and segment the policy for specific groups or administrative boundaries.
After reviewing or skipping this section, click Next to proceed with the policy configuration. This ensures a smooth workflow while maintaining flexibility for future management needs.
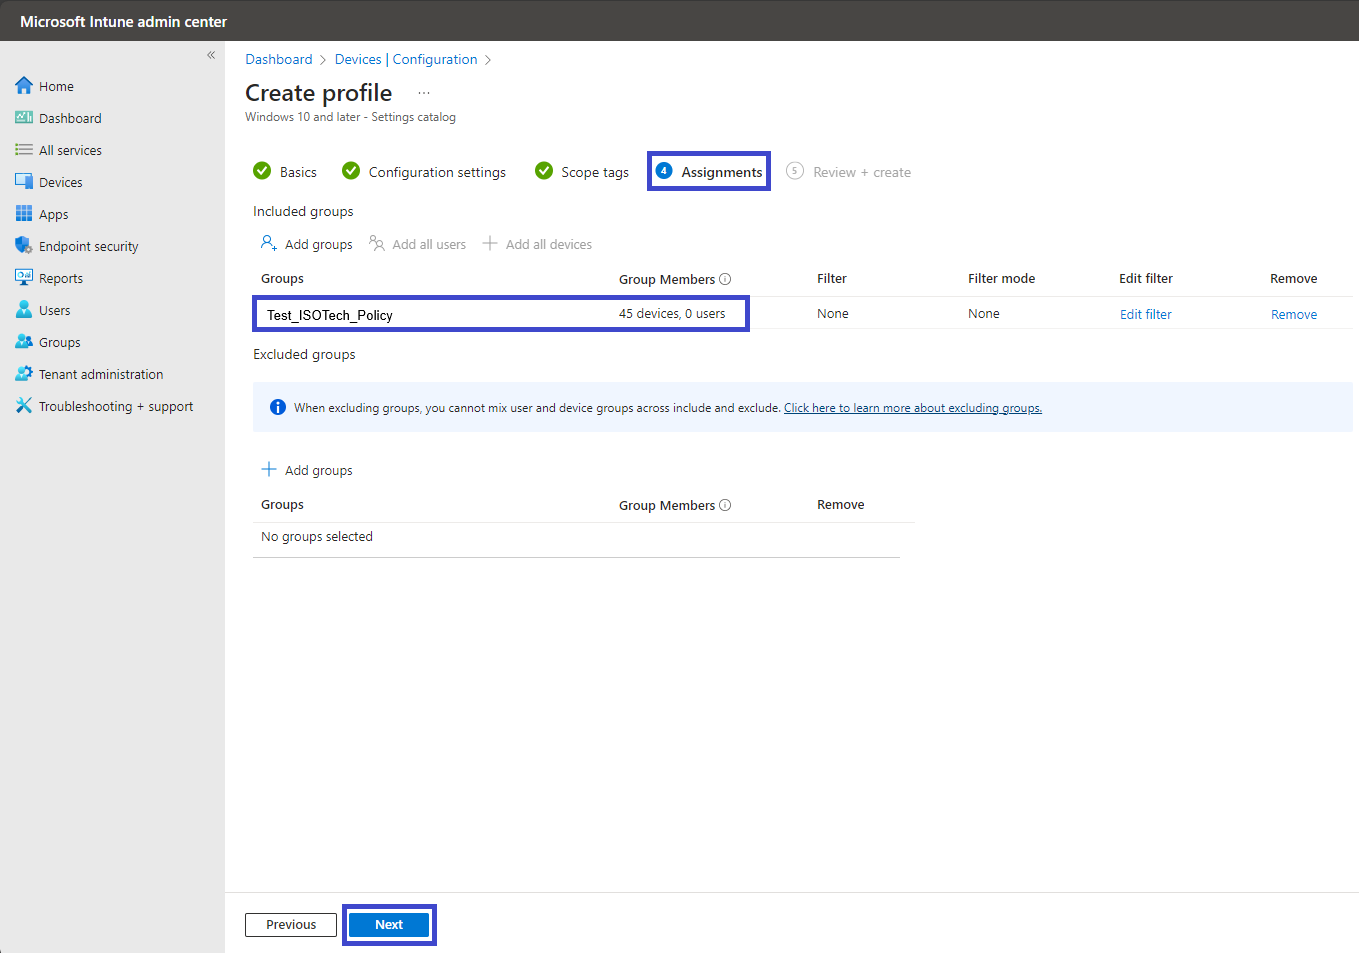
Assignments: Applying Policies in Microsoft Intune
The Assignments section is a crucial step in any policy configuration within Microsoft Intune. This section allows you to specify which users or devices the policy will apply to, ensuring targeted and effective management.
Key Features of the Assignments Section:
Include and Exclude Options: The Assignments tab is divided into two parts:
Adding Groups:
Proceed to the Next Step:
This structured approach ensures that policies are applied to the right audiences, minimizing the risk of misconfiguration and enhancing overall policy management efficiency.
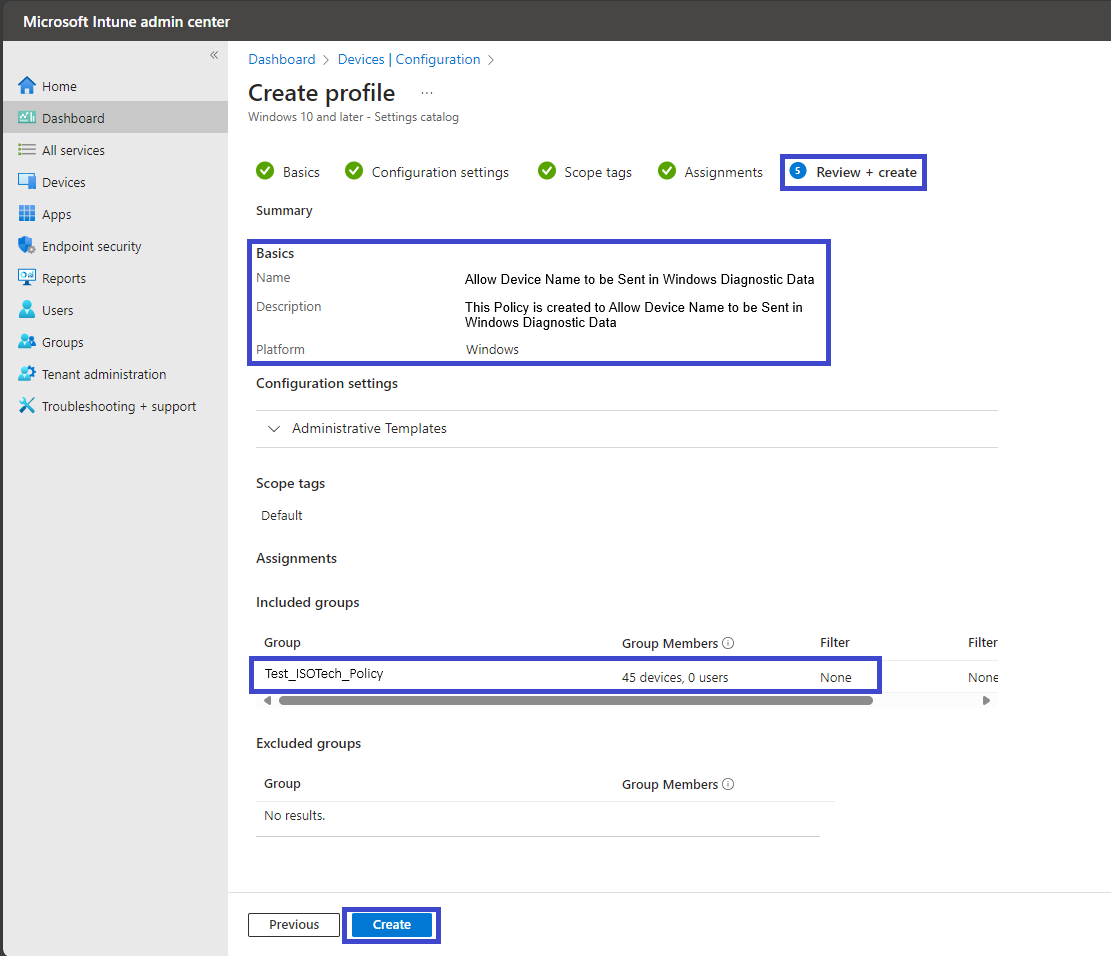
Review and Create: Finalizing Your Policy
The Review and Create step marks the final stage in the policy creation process. This step provides an opportunity to thoroughly review all the details and settings configured for the policy, ensuring accuracy before finalization.
Final Review: Carefully check all the policy details, including the name, description, platform, assignments, and configuration settings.
Create the Policy: Once you are confident that everything is correct, click the Create button to finalize the policy.
Post-Creation Confirmation
After the policy is successfully created, you will receive a confirmation notification.
At this point, you can close the Create Profile section and begin monitoring or managing the policy as needed.
This step ensures that your policy is ready for deployment without any errors, serving as a critical checkpoint in the creation process.
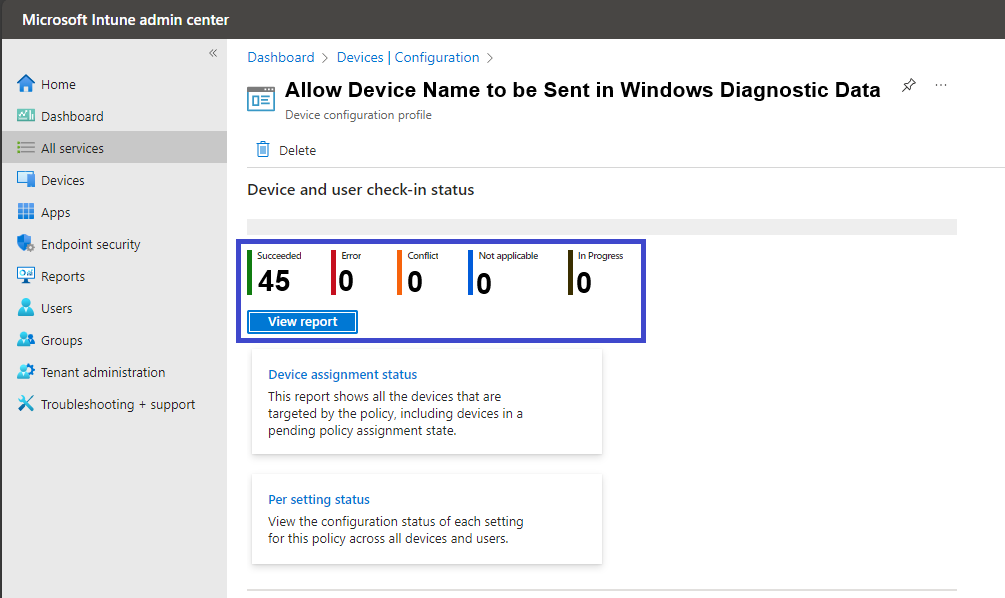
Device Configuration Profile: Success Report
The Allow Device Name to be Sent in Windows Diagnostic Data policy has been successfully deployed to 45 devices. You can verify this by reviewing the status, where the devices are marked as successful.
To access detailed information about the policy deployment, click on “View Report”. This report provides insights into the policy's application, including any potential issues or additional device-specific details.
Refer to the screenshot below for a visual representation of the deployment status, confirming the successful configuration of the policy.
Client-Side Verification
The MDM Policy Manager applies the Allow Device Name to be Sent in Windows Diagnostic Data policy under the System category. Key parameters such as Enrollment ID, Int Value, Enrollment Type, and Scope may vary for each device, reflecting its unique configuration and policy assignment.
Example Parameters (May Vary):
Enrollment ID: A unique identifier for the device's enrollment (e.g., B1E9301C-8666-412A-BA2F-3BF8A55BFA62). This value is specific to each enrolled device.
Int Value: Represents the applied policy’s status or configuration (e.g., 0x0). Check for deviations that might indicate an issue.
Enrollment Type: Indicates the type of enrollment used (e.g., 0x6 for MDM-managed devices).
Scope: Defines the policy's application scope (e.g., 0x0 for device-level policies).
Verification and Troubleshooting
To confirm that the policy is correctly applied:
Open the Event Viewer on the target device.
Navigate to: Applications and Services Logs > Microsoft > Windows > DeviceManagement-Enterprise-Diagnostics-Provider > Admin.
Look for event details associated with the policy application.Cross-check key parameters to ensure they align with the expected configuration.Event IDs such as 814 may indicate success, but the ID could vary depending on the policy.
If Discrepancies Are Observed:
Compare the parameters in the log to the expected values for the policy.
Verify that the device has successfully synced with Intune.
Check the Intune Admin Center for correct assignments and configuration scope.
Consult official Microsoft documentation for further guidance on interpreting logs from the DeviceManagement-Enterprise-Diagnostics-Provider.
This method ensures accurate validation of the Allow Device Name to be Sent in Windows Diagnostic Data policy across devices, while accounting for variations in parameters and configurations.
More Information
For additional guidance on configuring the "Allow Device Name to be Sent in Windows Diagnostic Data" policy using Microsoft Intune, refer to the following resources on Microsoft Learn:
These resources provide comprehensive instructions on setting up, managing, and optimizing device configurations with Microsoft Intune, ensuring that device names are appropriately included in Windows diagnostic data.
Thank you!
🖥️ Ricardo Barbosa
📘 MCT Microsoft Certified Trainer | ☁️ Cloud Architect
🌐 Technology Director - https://altelix.com