

🧭 Overview
Mapping a SharePoint Online document library as a network folder is a practical way to bridge modern cloud storage with familiar navigation experiences — especially for users who prefer working with File Explorer over the browser interface.
By making a SharePoint library appear as a network folder (drive mapping), you:
Provide a seamless, local-folder-like experience
Eliminate the need to manually access SharePoint via browser
Improve file discoverability, usability, and adoption of cloud storage
Enable drag-and-drop, right-click menus, and offline availability (if configured)
From an IT admin’s perspective, using Microsoft Intune to automate this process ensures centralized deployment, user consistency, and security control, all without requiring manual configuration on each machine.
In this article, I’ll walk you through how to deploy a SharePoint Library mapping via Microsoft Intune, in a secure and scalable way.
✅ Why this approach is secure and efficient
Unlike legacy mapped drives via GPO and VPN, this solution:
Leverages modern authentication via Azure AD and OneDrive
Requires no persistent credentials stored locally
Supports MFA (Multi-Factor Authentication) natively
Can be centrally managed and revoked via Intune and Entra ID
This provides a modern, cloud-native alternative to traditional on-prem file shares — improving both security and user satisfaction.
🔧 Step 1 – Prerequisites
Before deploying the policy, make sure the following conditions are met:
Devices are Azure AD Joined or Hybrid Azure AD Joined
Users already have access permissions to the target SharePoint document library
OneDrive is installed and configured on the device → OneDrive handles authentication and redirection in the background
🔧 2 – Configuration Steps
📁 Step 1: Retrieve SharePoint Library Details
To successfully map the SharePoint library as a network folder, you first need to collect specific details about the library’s path.
Open the target SharePoint document library in your browser.
Click on the gear icon (⚙️) in the top-right corner.
Select “Library settings” or “More library settings” depending on your view.
Copy the library URL — you’ll use it later when configuring the script.
💡 Tip: The path should look like this: https://yourtenant.sharepoint.com/sites/sitename/Shared Documents
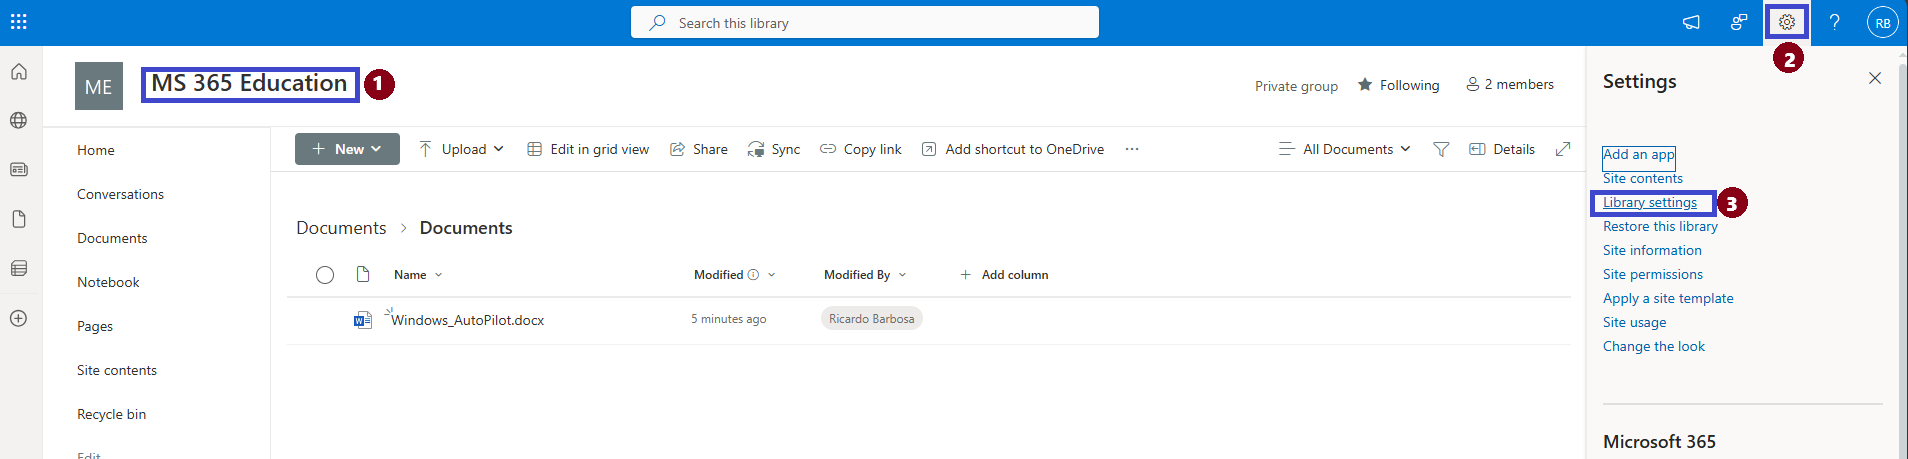
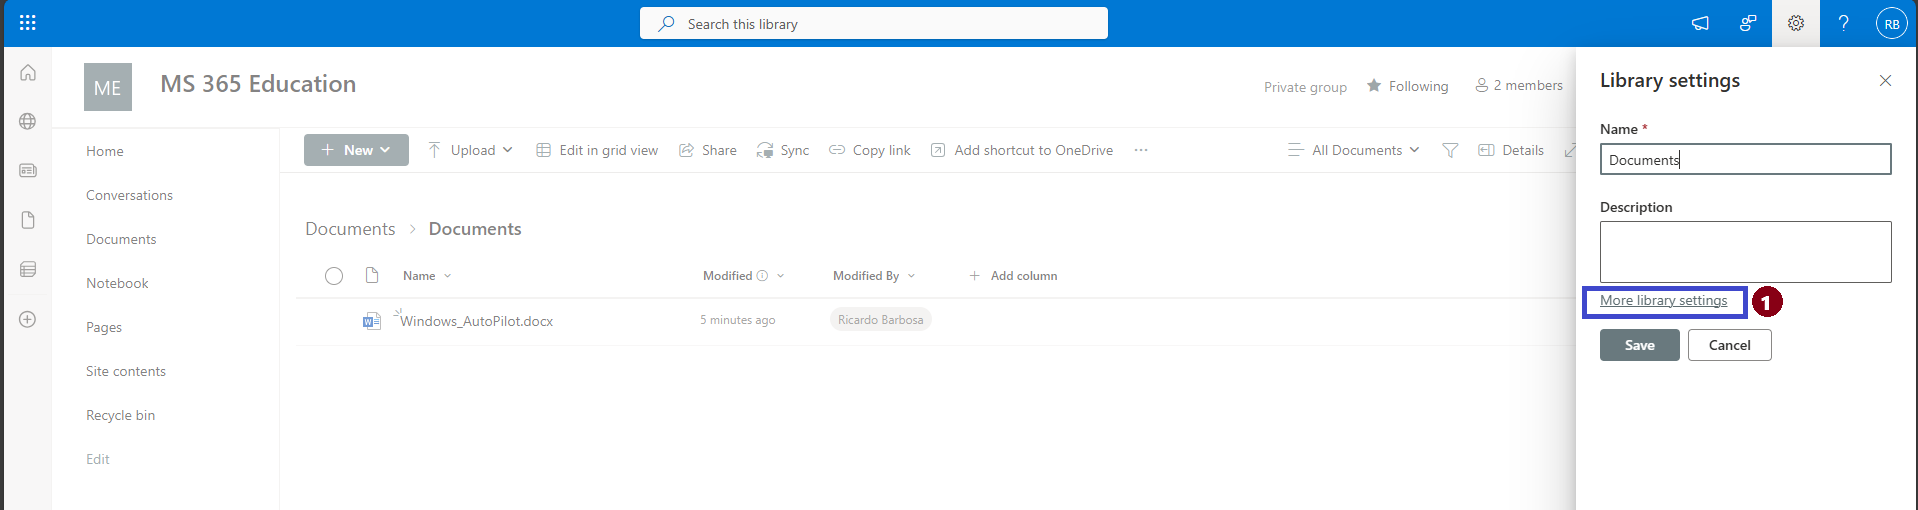
Copy the SharePoint library URL from the browser’s address bar for later use in the mapping script.

🧪 Step 2: Convert the SharePoint Library ID to ASCII
At this stage, you’ve successfully copied the library ID — but here’s the catch: The ID includes special Unicode characters that can’t be used directly in Intune scripts.
To make it usable, you’ll need to convert it into a proper ASCII format. Fortunately, this process is quick and simple using PowerShell.
💻 Here’s how to do it:
Open PowerShell on your device.
Run the following command — just replace the placeholder text with your actual library ID:

This will output a clean ASCII-formatted string that’s compatible with your Intune deployment script.
💡 Tip: Save this converted value — it will be used when mapping the network folder in the next steps.
As a result, you get a library ID in ASCII format that you can use directly in Microsoft Intune :
⚙️ Step 3: Create the Intune Configuration Profile
Now that you’ve prepared the necessary SharePoint library details, it’s time to create a configuration profile in Microsoft Intune. This profile will be used to deploy the drive mapping script to your target devices.
Follow the steps below:
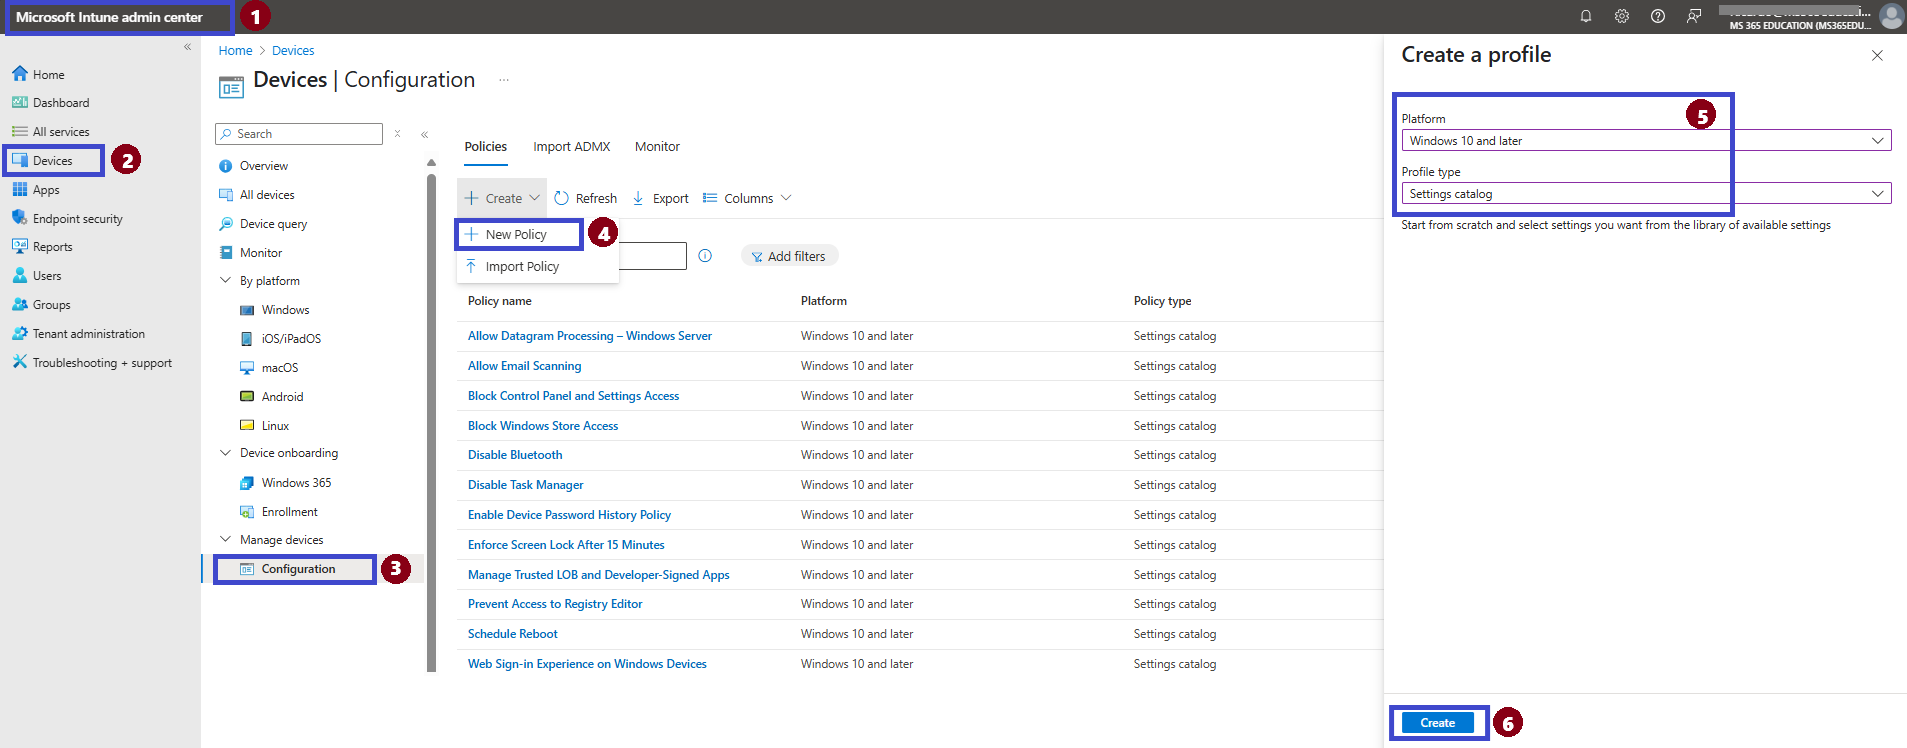
Go to the Microsoft Intune Admin Center
In the left-hand menu, click on “Devices” to access device management
Select "Configuration" under the "Manage devices" section
Click on "+ Create" → then select "New Policy" This opens a new blade to create a configuration profile.
For the platform, choose: Windows 10 and later and Settings catalog
Click “Create” to begin configuring the deployment
🏷️ Step 4: Name and Describe Your Policy
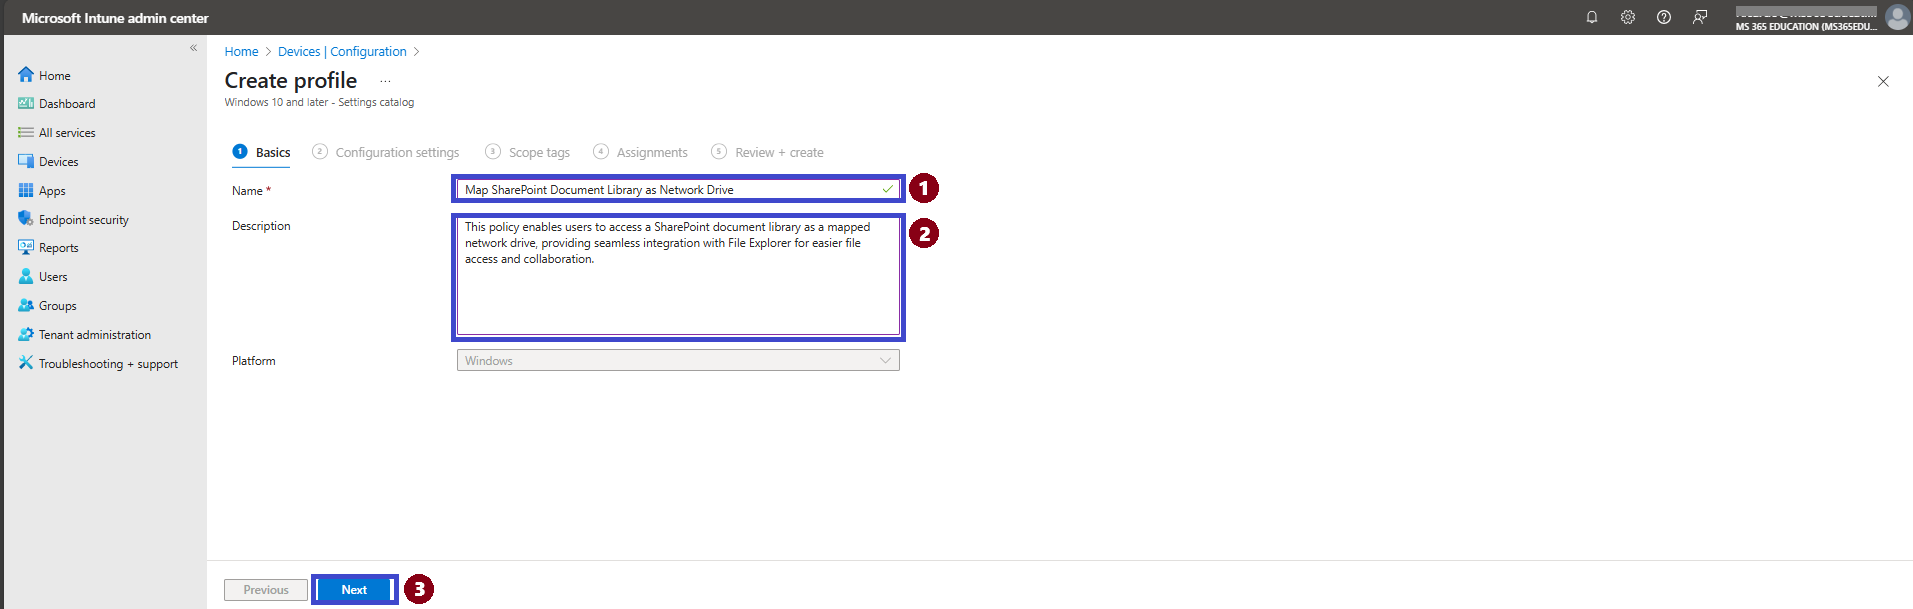
In the Basics section of the profile creation wizard, provide a clear and descriptive name for your policy. This helps with long-term manageability and identification within Intune.
Name: Map SharePoint Document Library as Network Drive
Description: This policy enables users to access a SharePoint document library as a mapped network drive, providing seamless integration with File Explorer for easier file access and collaboration.
Once you’ve entered the name and description, click Next to proceed to the configuration settings.
💡 Tip: Use consistent naming conventions across your policies to simplify policy tracking and maintenance.
🔄 Continuing from Profile Creation: Configure Library Sync Settings
After creating the configuration profile, follow these steps to enable automatic synchronization of a specific SharePoint library using OneDrive:
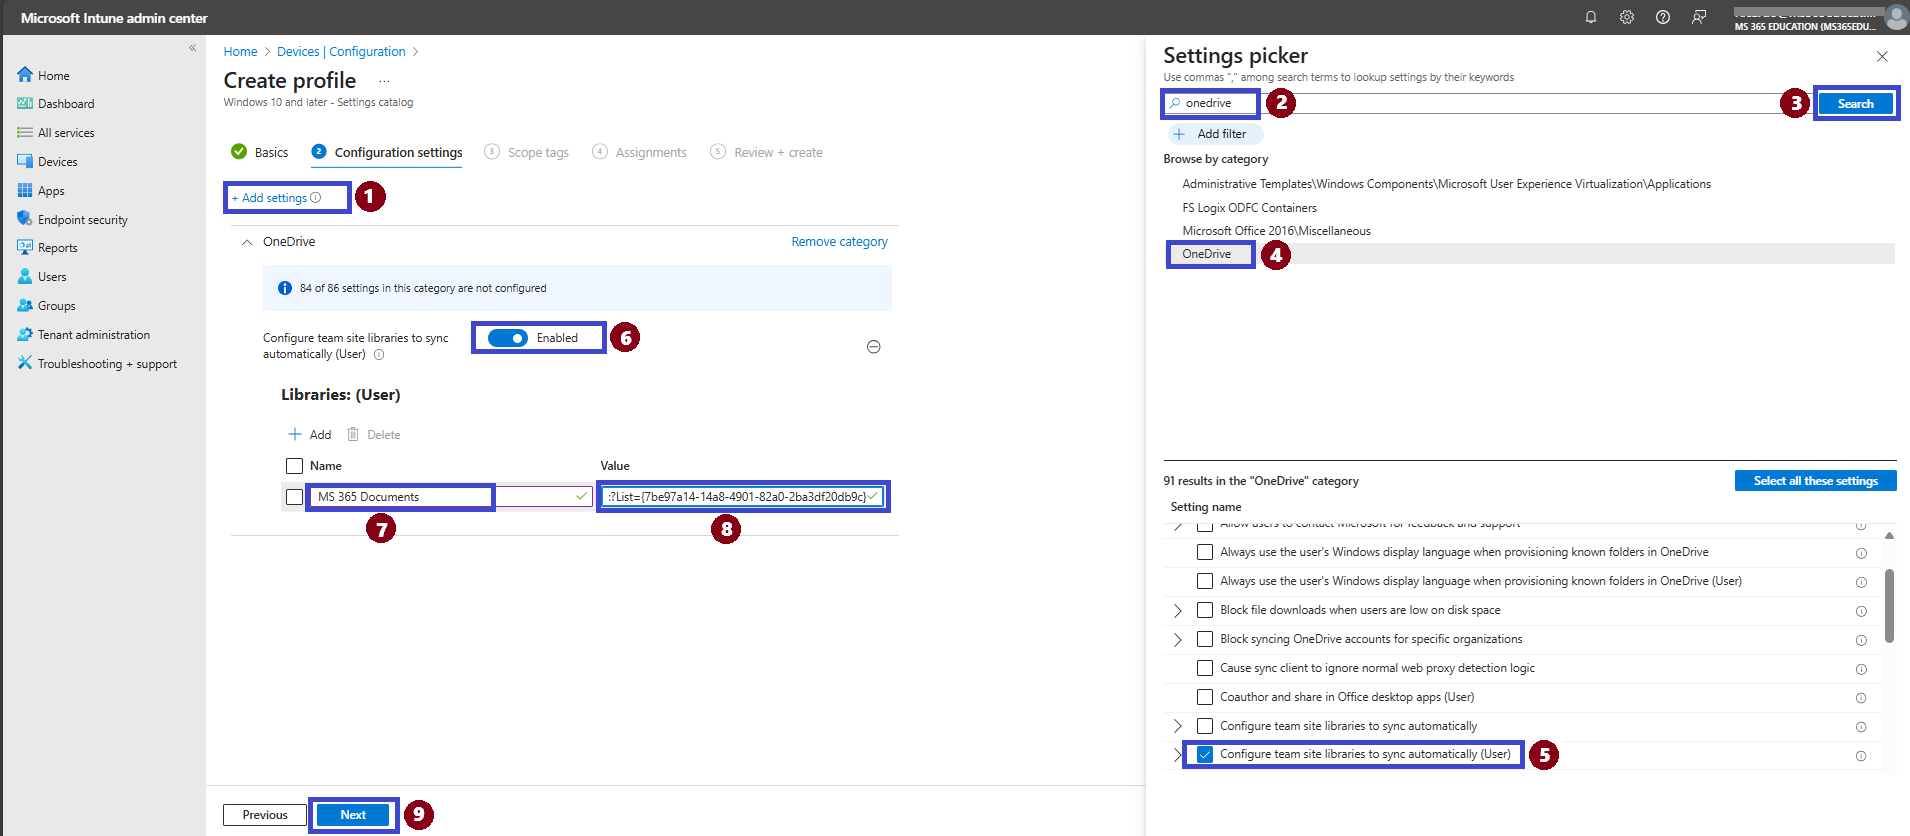
Click “+ Add settings” – this will open the Settings picker panel on the right side.
In the search bar, type "OneDrive".
Press Enter to search.
From the search results, expand the OneDrive category.
Select the setting: "Configure team site libraries to sync automatically (User)" → This allows you to pre-configure specific SharePoint libraries to be automatically synced for users.
Set the configuration to Enabled.
Under Library Name, provide a descriptive name for the library (e.g., MS365 Education Documents).
Under Value, paste the full SharePoint library URL: Example: https://yourdomain.sharepoint.com/sites/MS365 Documents/Shared Documents
Click “Next” to continue through Scope tags, Assignments, and final Review + Create.
💡 Note: Ensure users have access permissions to the specified library, or the sync will silently fail.
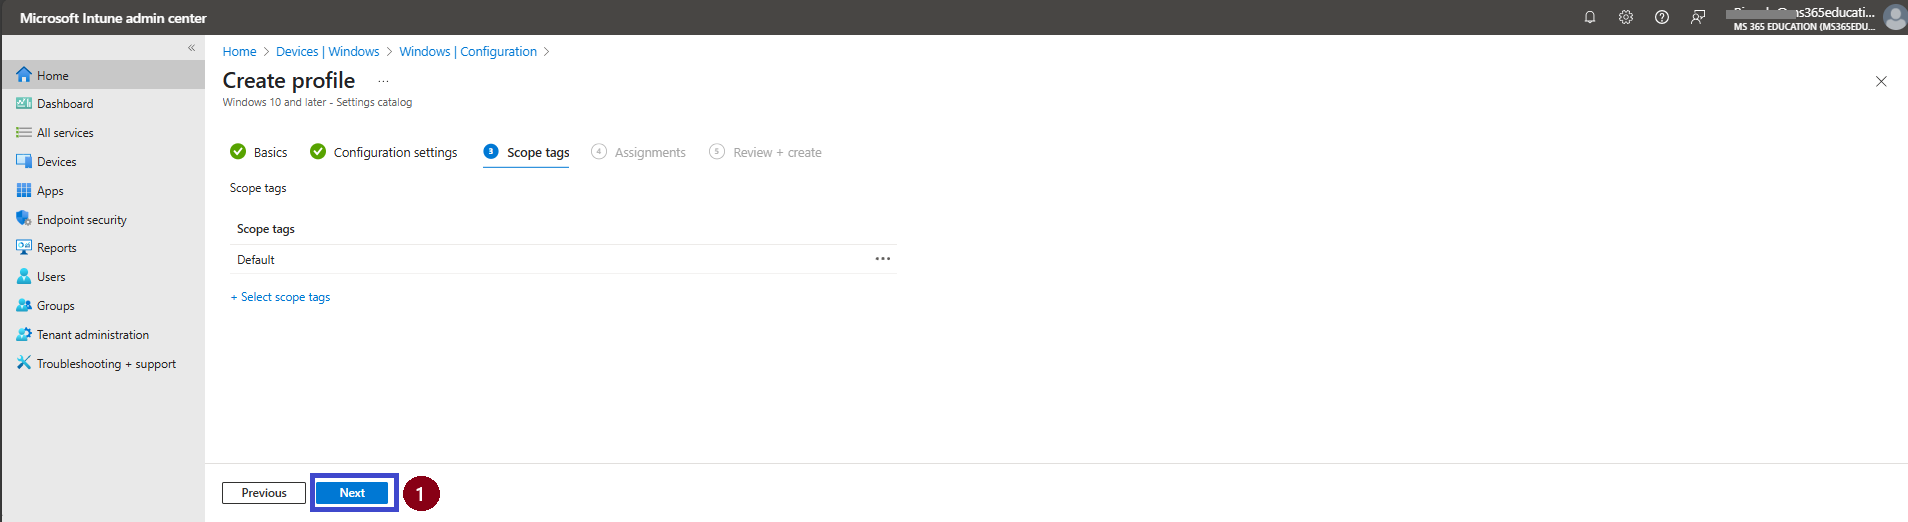
On the Scope tags page, you can leave the setting as Default if no custom tags are required. If your organization uses custom scope tags to segment administrative access, select the appropriate tags based on your policy requirements.
Click Next to proceed.
👥 Assignments: Target the Right Users
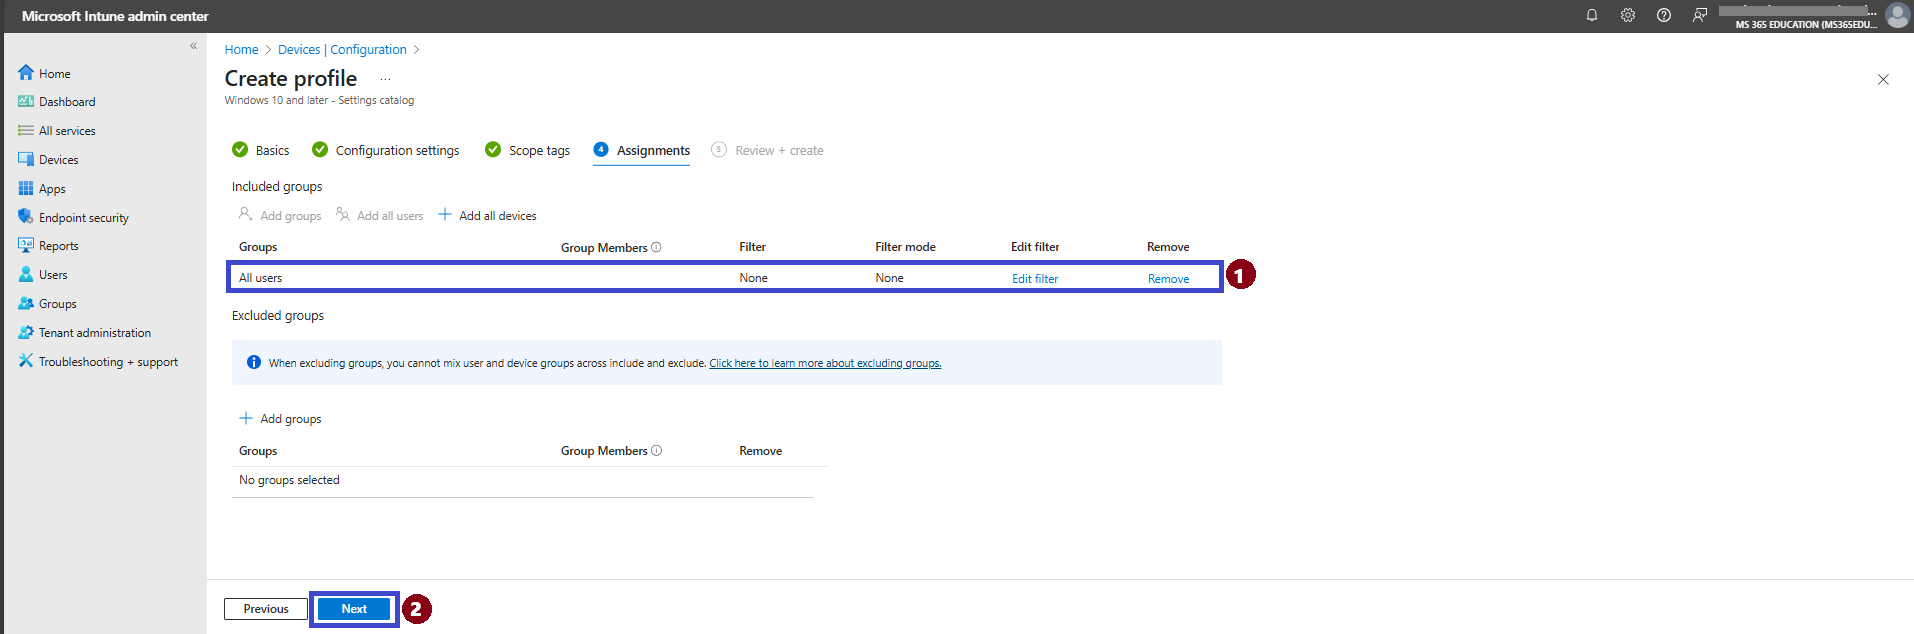
In the Assignments tab, define who should receive this policy.
Select “All Users” or a specific Azure AD group based on your organization’s needs.
🔒 Note: Assigning to "All devices" is not supported for this policy — targeting must be done per user.
Once the assignment is configured, click “Next” to continue to the Review + Create step.
✅ Review + Create: Finalize and Deploy the Policy
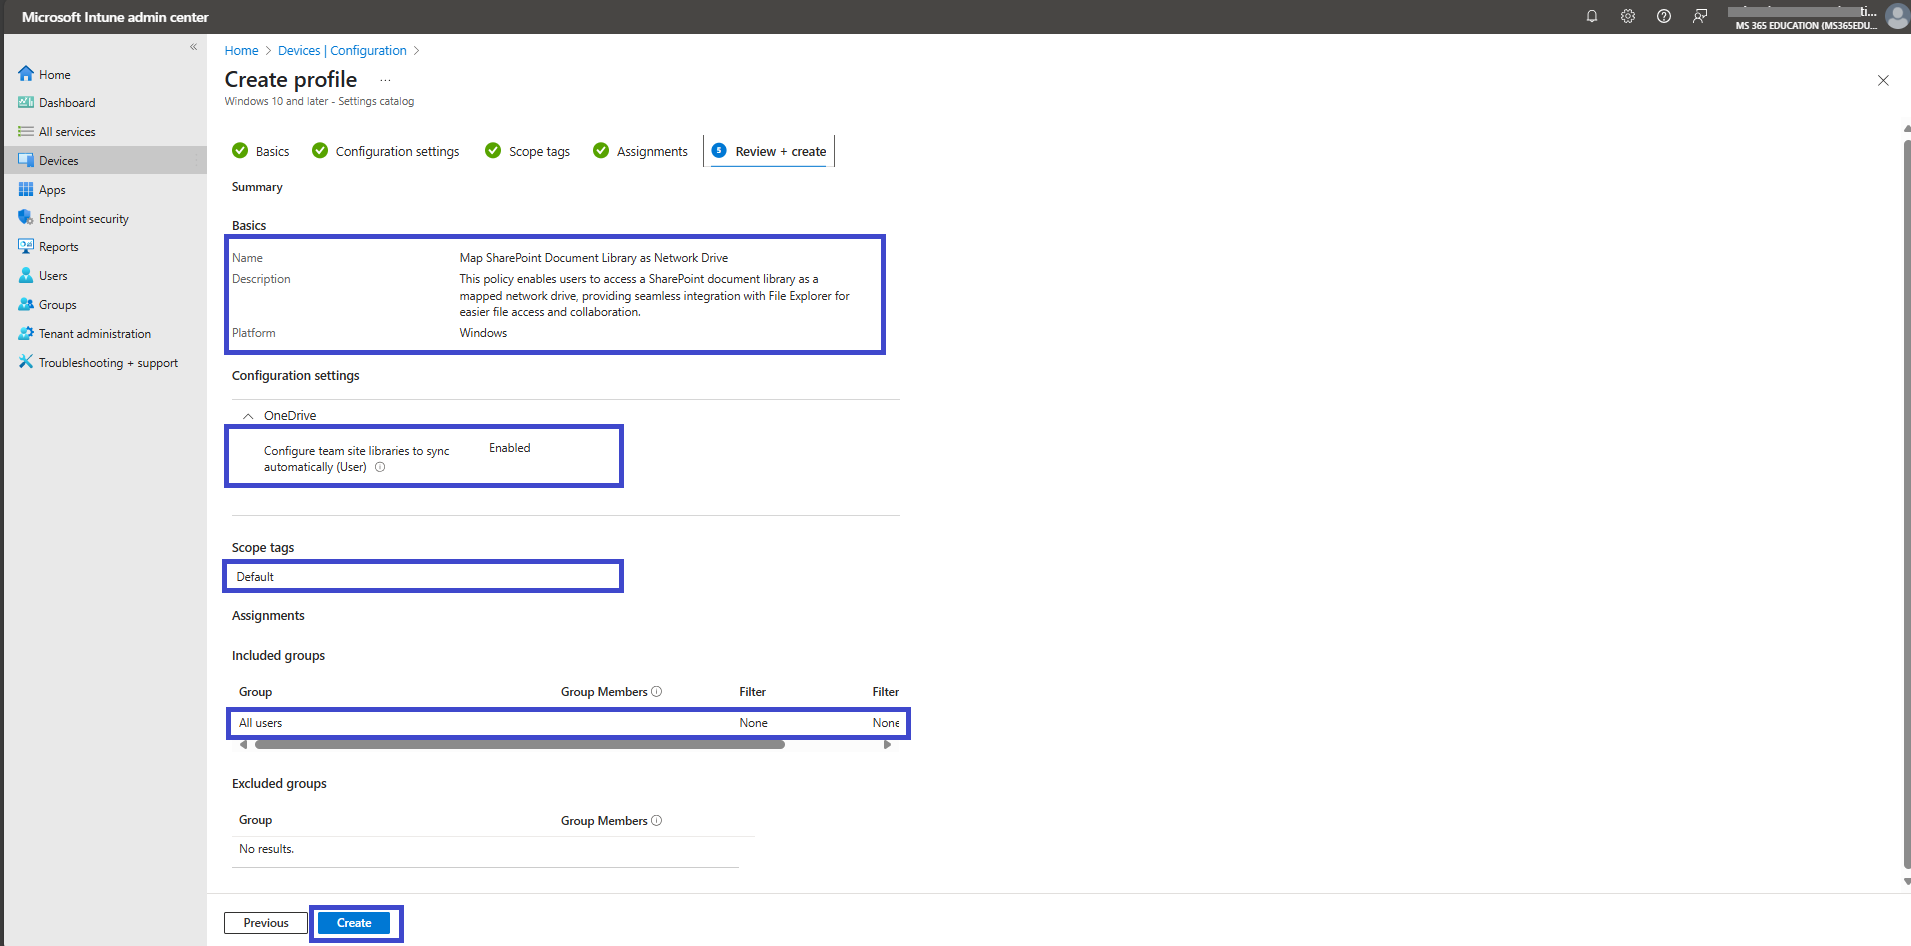
On the Review + Create page, carefully review all the configurations defined for the “Map SharePoint Document Library as Network Drive” policy.
Ensure that all settings — including the OneDrive sync configuration and user assignments — are accurate and aligned with your deployment goals.
If everything looks correct, click “Create” to deploy the policy to the assigned users.
📦 Once deployed, users will automatically see the specified SharePoint document library mapped in File Explorer, improving accessibility and collaboration.
📊 Monitor the Deployment of the "Map SharePoint Document Library as Network Drive" Policy
After deploying the "Map SharePoint Document Library as Network Drive" policy to your target user group, it will be applied once the assigned users' devices successfully complete a sync with Microsoft Intune.
To monitor the deployment status, follow these steps:
In the Microsoft Intune Admin Center, navigate to: Devices > Windows > Configuration profiles
Use the search bar to locate the profile named: “Map SharePoint Document Library as Network Drive”
Click on the profile to open it, then review the Device and user check-in status section. This section will display deployment progress, success/failure counts, and current compliance status across targeted users.
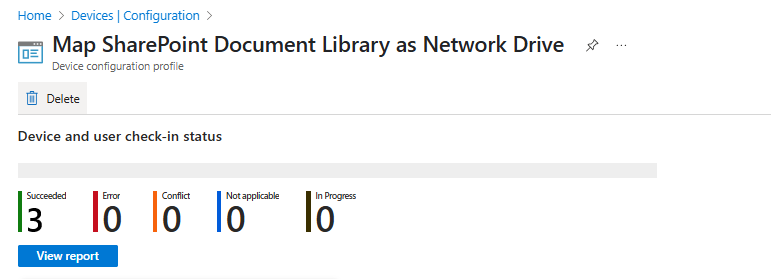
🔄 Tip: If the policy hasn’t applied yet, you can trigger a manual sync from the user’s device via Settings > Accounts > Access work or school > Info > Sync.
🖥️ How to Verify the Mapped SharePoint Library on the User’s Device
After the policy has been successfully applied and the device has synced with Intune, users can easily verify if the SharePoint library was mapped correctly:
Open File Explorer on the device.
On the left-hand navigation pane, locate and click on OneDrive – [Your Organization Name].
Inside the OneDrive folder, the shared document library will appear as a subfolder, using the name configured in the policy.
The user will be able to access, open, edit, and save documents directly — just like working with a traditional network drive.
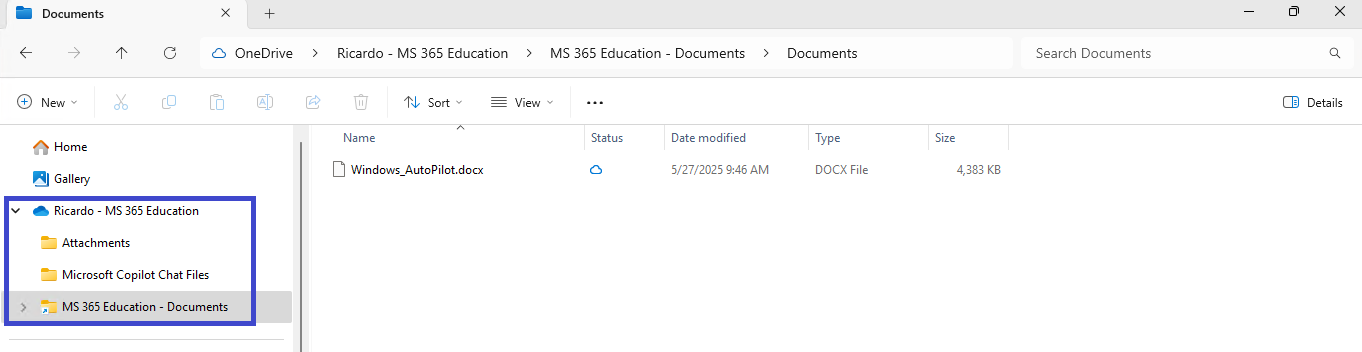
💡 Tip: If the folder doesn’t appear immediately, the user can manually sync their device by going to: Settings > Accounts > Access work or school > Info > Sync
This integration provides a familiar experience for users who are used to working with mapped drives, while still leveraging the power and security of Microsoft 365 and SharePoint Online.
✅ Conclusion
Mapping a SharePoint Online document library as a network drive using Intune not only simplifies access to shared content, but also delivers a familiar experience for end users — all while maintaining the security and control of the Microsoft 365 ecosystem.
By automating this process, IT admins reduce manual configuration, ensure consistency across devices, and improve overall user productivity. This approach bridges the gap between modern cloud storage and traditional file management, making collaboration smoother and smarter.
Thank you!
🖥️ Ricardo Barbosa
📘 MCT Microsoft Certified Trainer | ☁️ Cloud Architect
🌐 Technology Director - https://altelix.com