

Managing Web Sign-in Policy for Windows with Intune
In this post, we’ll explore how to enable or disable the Web Sign-in policy for Windows using Intune. Microsoft has introduced several built-in policies in the Intune portal to help organizations securely manage user access to devices and resources. To configure these policies, you can use the Settings Catalog within Intune.
Today, we’re focusing on a policy related to authentication, which applies specifically to Windows devices. In this case, we’ll be configuring the Web Sign-in policy, which controls whether users are allowed to sign in to Windows using a web-based sign-in experience.
Web Sign-in is a credential provider that enables users to sign in through a web-based interface on the Windows lock screen. This feature is designed to support passwordless authentication methods, providing a more modern and streamlined experience across the organization.
The policy supports various authentication options, including Temporary Access Pass (TAP), Microsoft Authenticator, and federated identity providers. In this blog post, I’ll walk you through how to enable or disable the Web Sign-in policy using Intune.
🖥️ When Was Web Sign-in Introduced?
Web Sign-in was first introduced in Windows 10, with limited support — only Temporary Access Pass (TAP) was available at the time. With Windows 11 version 22H2 and update KB5030310, its capabilities were significantly expanded to support additional modern authentication scenarios.
⚙️ Configuring the Web Sign-in Policy with Intune
By configuring this policy, organizations can improve security, simplify the sign-in experience, and adopt modern identity solutions. This policy is especially useful for:
Shared device environments
Temporary access scenarios
Passwordless strategies
📄 CSP Policy Details
The Web Sign-in policy enables new authentication flows and expands support for modern identity providers. With the updates in Windows 11, users can now authenticate using tools like the Microsoft Authenticator app or via SAML-P federated identity.
This policy is available on the following Windows editions:
Pro
Enterprise
Education
IoT Enterprise
IoT Enterprise LTSC

🧾 Description Framework Properties
The table below outlines the technical attributes of the Web Sign-in policy, including property name and corresponding values used when configuring it via CSP.
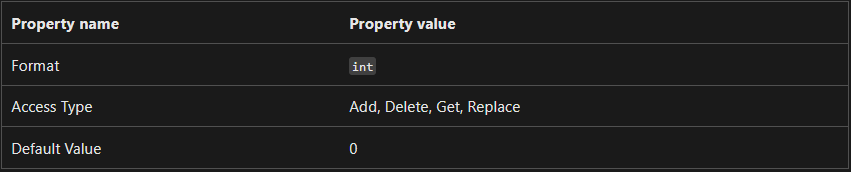
Allowed Values
These values help organisations determine which value is suitable for each device. You can refer to he following table to understand the values.

./Device/Vendor/MSFT/Policy/Config/Authentication/EnableWebSignIn
Managing Web Sign-in Policy for Windows with Intune
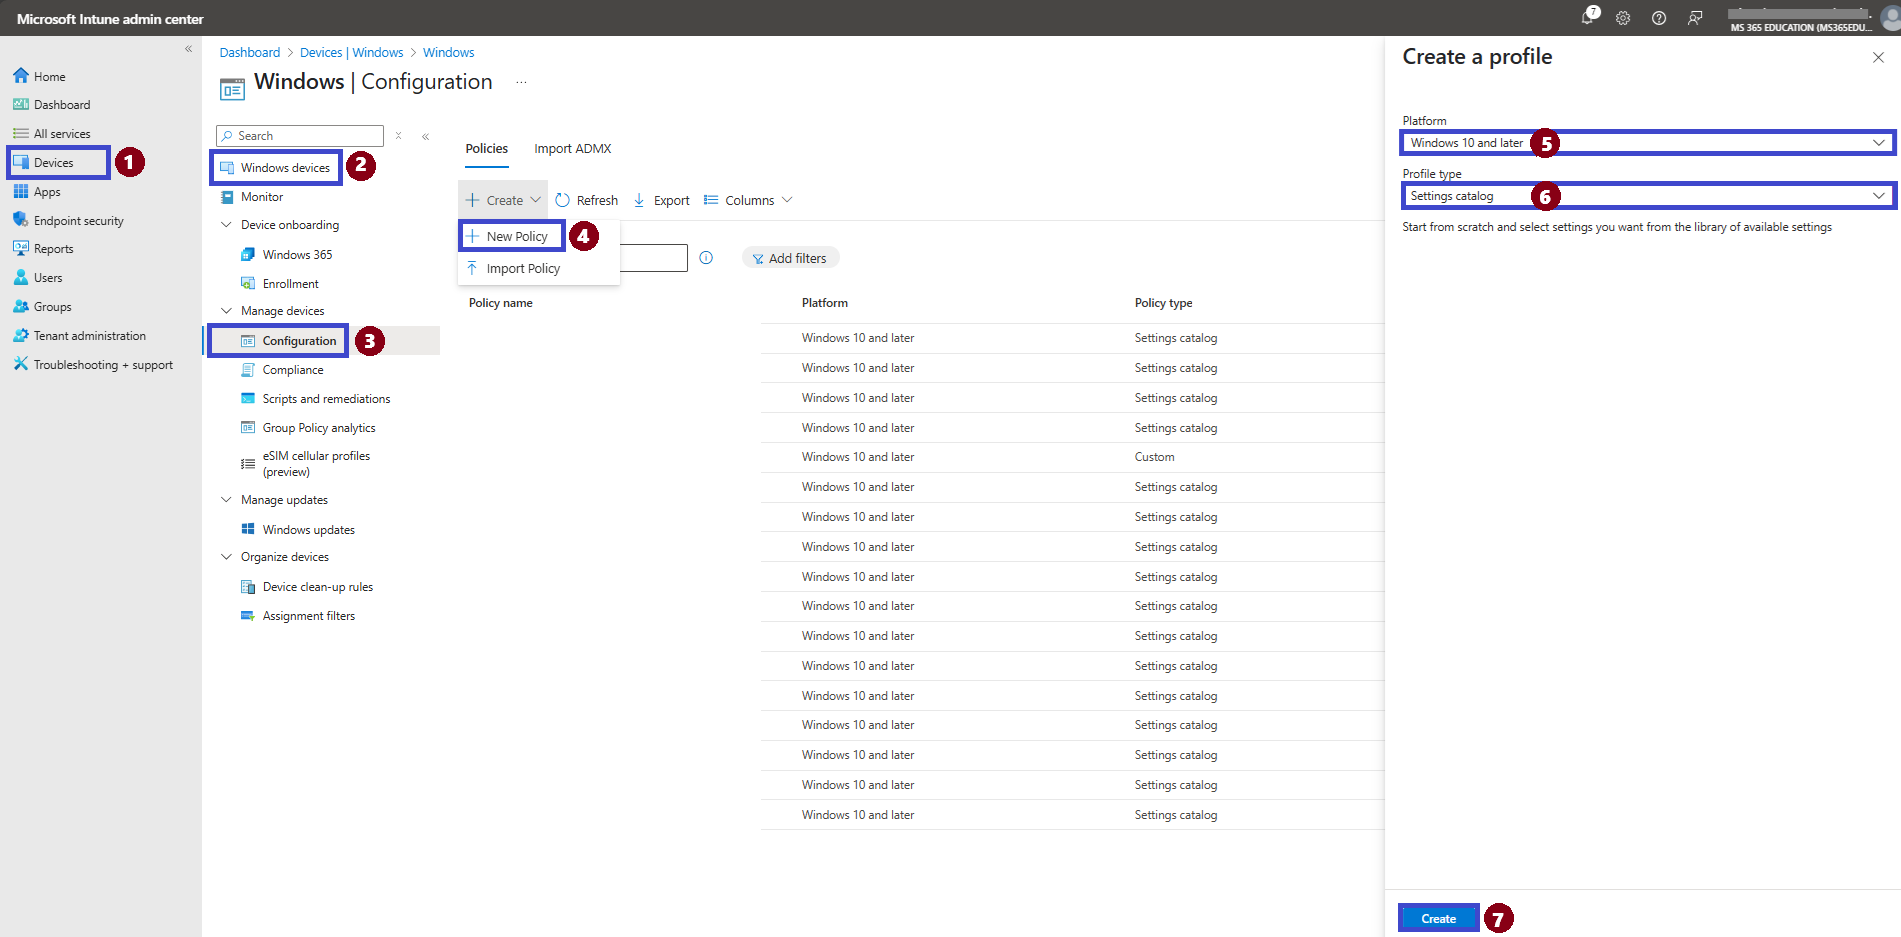
To begin deploying a policy in Intune, sign in to the Microsoft Intune admin center. Then navigate to:
In the left-hand menu, select Devices
Click on Windows Devices under the “By platform” section
Select Configuration
Click + New Policy to begin configuring your policy
Under Platform, select Windows 10 and later
For Profile type, choose Settings catalog
Click Create to proceed
Basics
The Basics step is essential for defining the core details of your policy. In this section, you’ll provide a meaningful Name and Description to help identify the policy later.
Policy Name: Web Sign-in Experience on Windows Devices
Description: This policy manages whether users are allowed to sign in to Windows using a web-based interface.
Platform: Windows 10 and later (pre-selected)
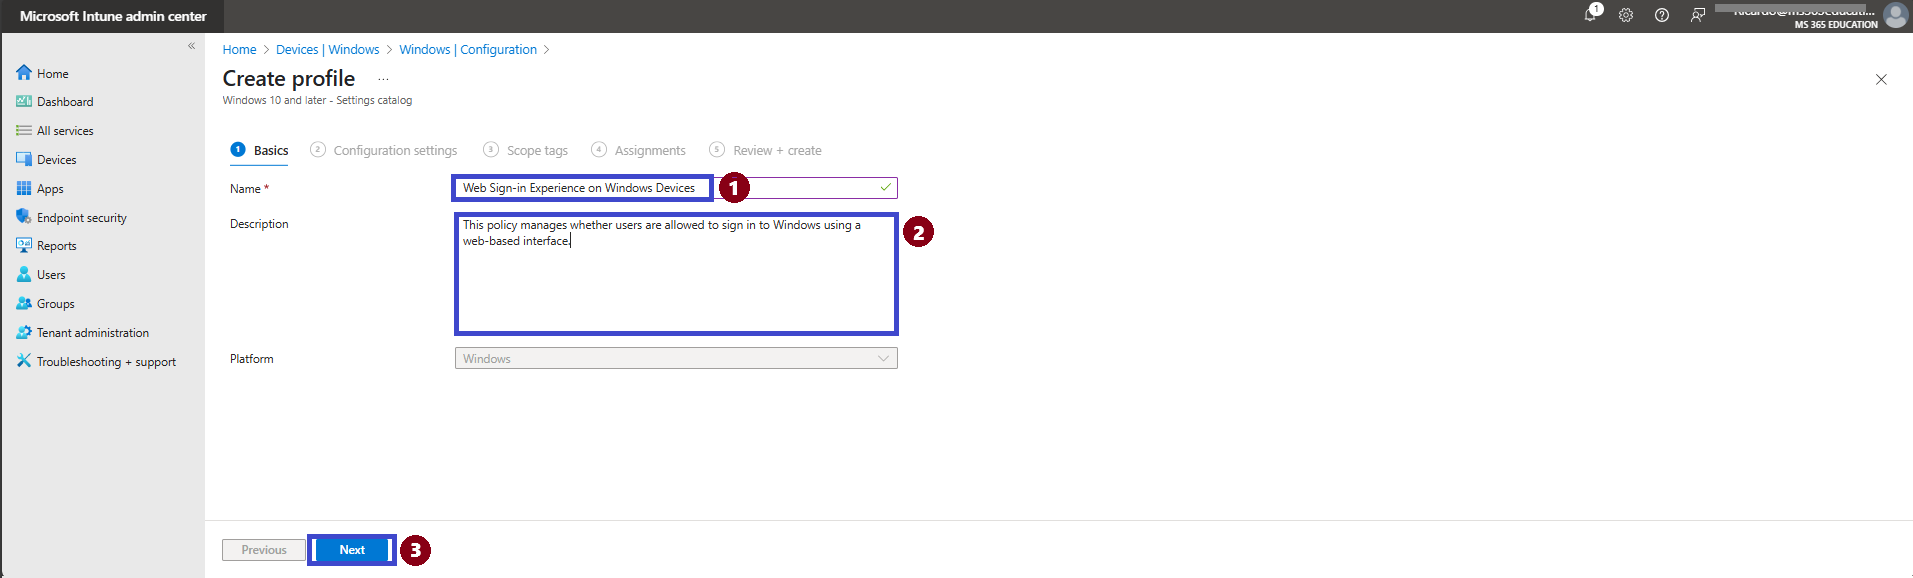
Providing a clear name and concise description will make it easier to manage and maintain your configuration profiles over time.
Configuration Settings
Now, let’s move on to Configuration Settings. This is a key step where you will define the specific behaviors and options this policy will enforce. Click Add Settings to bring up the Settings Picker.
Configuring the “Enable Web Sign-in” Policy in Intune
Follow the steps below to configure the Web Sign-in policy for Windows devices using Microsoft Intune.
In the Settings picker, go to the Authentication category.
Scroll through the list and check the box for Enable Web Sign In.
Once the setting appears under Configuration settings, click the dropdown menu and select the desired configuration:
✅ Enabled (1): Allows web-based sign-in at the Windows lock screen. Enables support for authentication methods like Temporary Access Pass (TAP), Microsoft Authenticator, and federated identity providers.
❌ Disabled (0): Prevents users from signing in through the web-based interface.
In this example, we select Enabled to allow web-based sign-in and support modern, passwordless authentication methods.
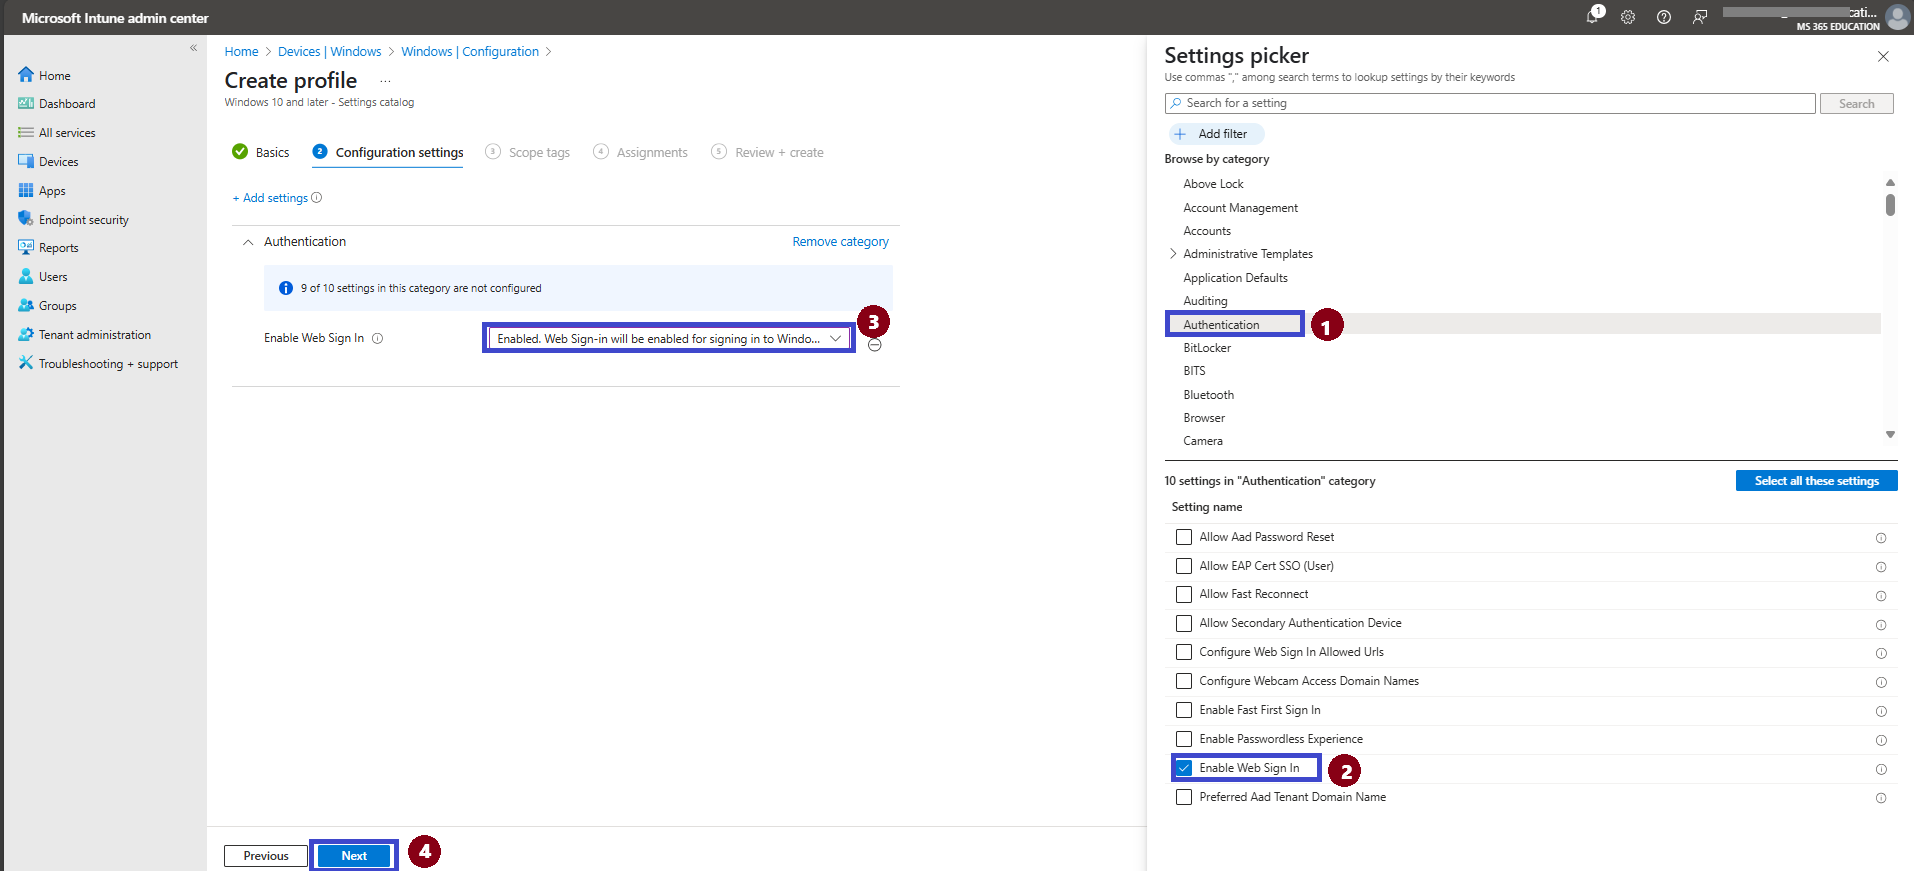
4. Click Next to proceed to the Scope section.
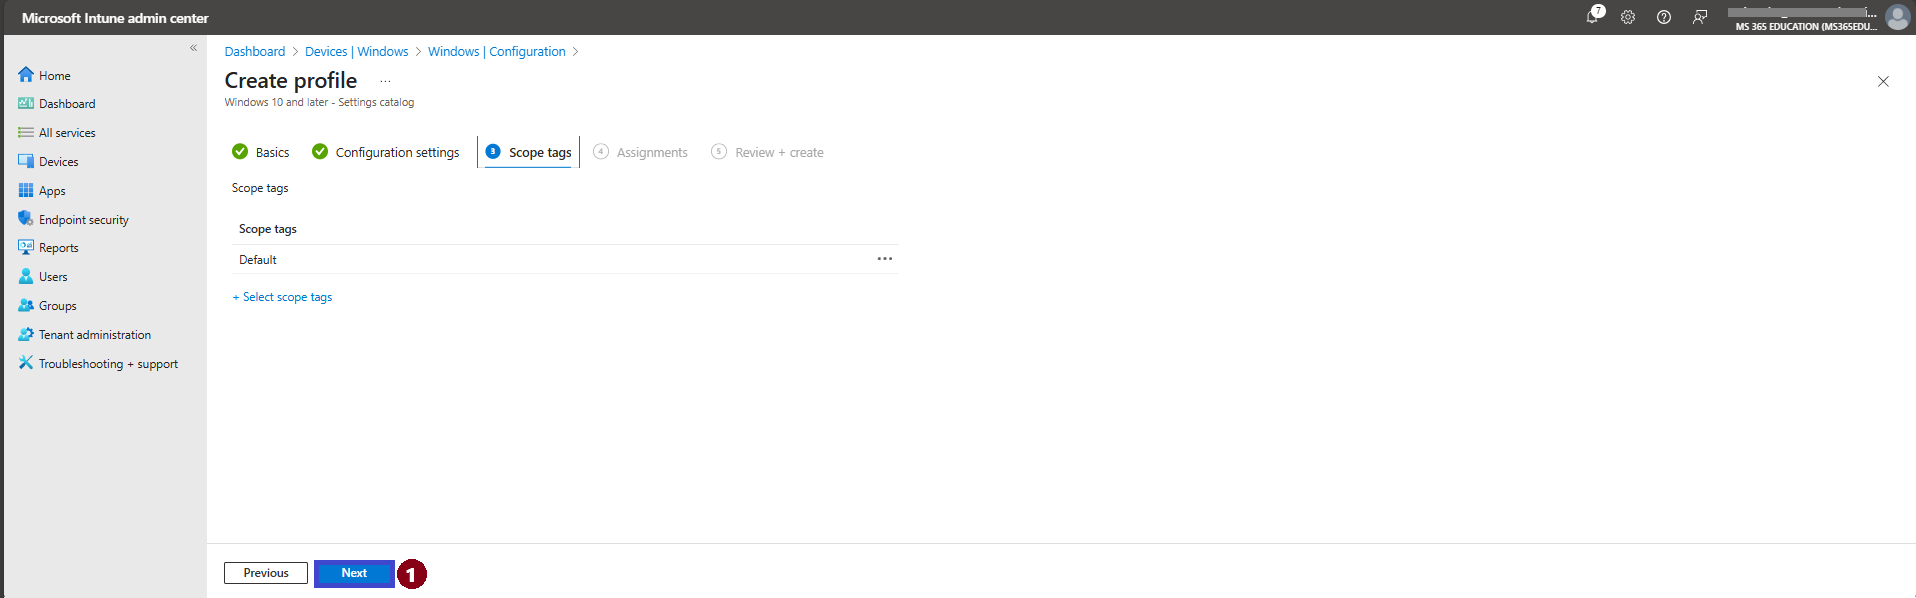
Scope Tags
In Intune, Scope Tags are there to help you manage who can see and edit this policy. They help keep things organized and manage who has access. However, it is optional, so you can hit Next if you don’t need to assign them.
Assignments
The Assignments section is where you define which users or devices will receive the policy.
Under Include Groups, click + Add Groups
A list of available groups will appear. Select the group(s) to which this policy should apply
Once selected, the group will be listed under Included Groups.
Click Next to continue to the Review + Create step.
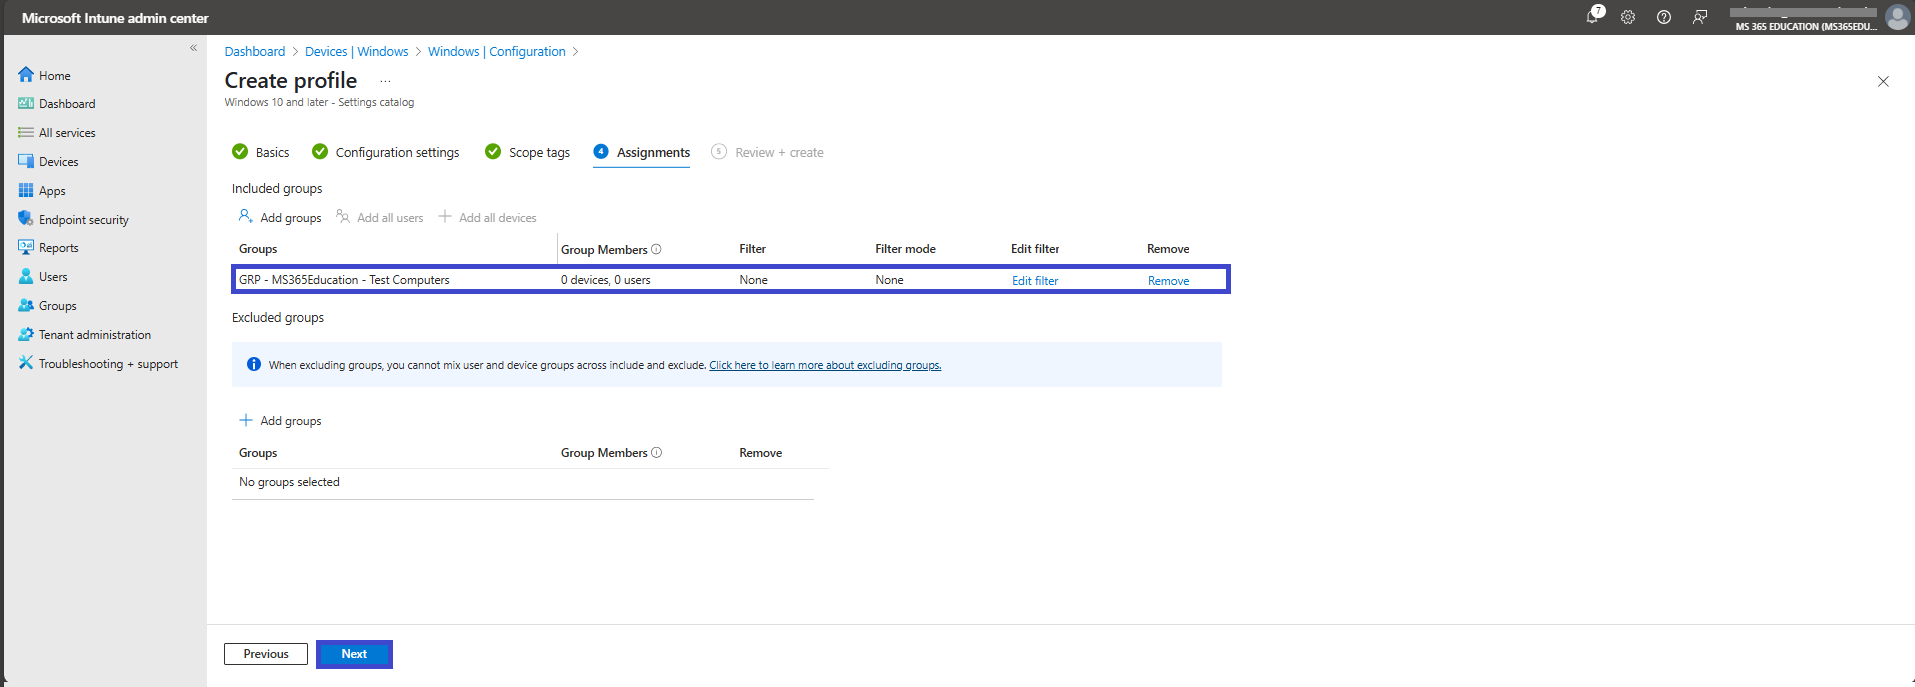
In this example, we select: GRP - MS365Education - Test Computers
✅ Review + Create
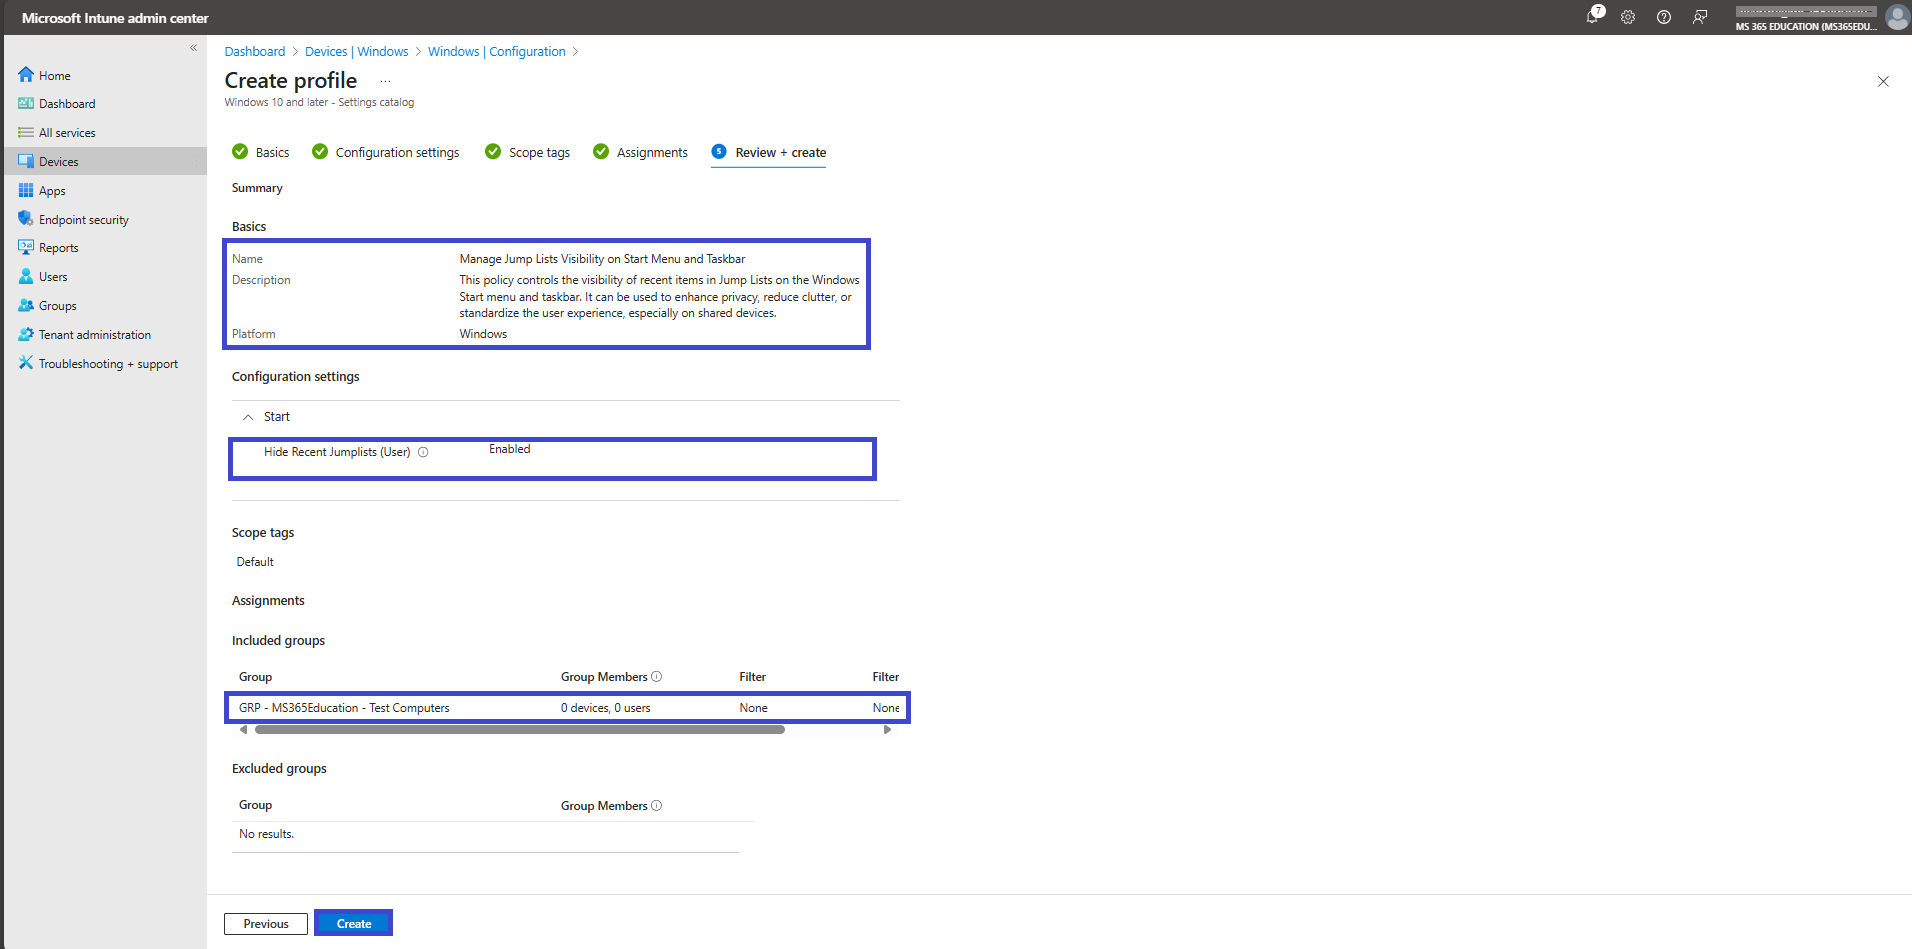
You’ve reached the final step: Review + Create. This section provides a full summary of your configuration, allowing you to carefully verify all the details before deploying the policy.
Take a moment to review the following:
📌 Policy Name – Ensure it’s clear and descriptive
👥 Assigned Groups – Confirm the correct user or device groups are selected
🏷️ Scope Tags – Verify that any required administrative scope tags are properly applied
⚙️ Configuration Settings – Double-check the selected values and behavior of the policy
If anything needs to be adjusted, click Previous to go back and make changes.
Once everything looks correct, click Create to finalize and deploy the profile.
✅ After clicking Create, a confirmation notification will appear, indicating that the Web Sign-in Experience on Windows Devices policy was successfully created.
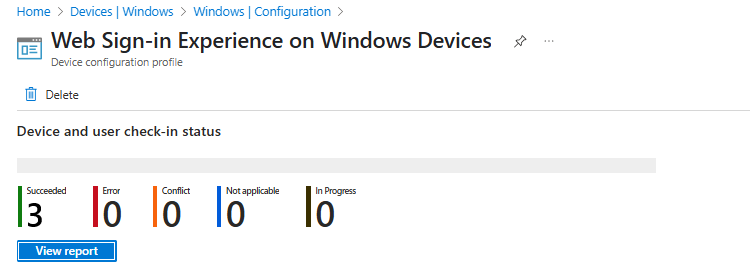
Device and User Check-in Status
You can check the policy in the Intune Portal. It usually takes about 8 hours to create a policy. If it’s taking too long, use the manual syncing option (Sync) in the Company Portal app on your device. After syncing, check the status again.
Go to Devices, then Configuration.
Click on the policy to view its details.
For instance, here the Web Sign-in Experience on Windows Devices policy status is succeeded(3).
🖥️ Client-Side Verification – Enable Web Sign-in Policy
The Enable Web Sign-in policy is enforced by the MDM PolicyManager under the Authentication category. After the policy is deployed via Intune, you can verify its application directly on a client Windows device using the Event Viewer.
🛠️ How to Verify on the Client:
Open Event Viewer on the Windows device where the policy was targeted.
Navigate to: Applications and Services Logs > Microsoft > Windows > DeviceManagement-Enterprise-Diagnostics-Provider > Admin
In the right-hand panel, click Filter Current Log.
Filter for Event ID 813, which indicates that a device-side policy was successfully applied.
Open the event details to confirm the EnableWebSignIn policy is listed and reflects the intended configuration.
📋 Example Log Output (Descriptive Format):
When the policy is applied, a typical Event ID 813 entry will display the following information:
Policy Name: The event will reference EnableWebSignIn, which is the exact identifier of the policy.
Policy Area: This will appear as Authentication, indicating the policy category.
Enrollment ID: A unique identifier assigned during MDM enrollment, for example: B1E9301C-8666-412A-BA2F-3BF8A55BFA62.
Current User: Usually set as Device, meaning the policy applies at the system level.
Integer Value (Int Value): The setting value. For example, 0x1 means the policy is Enabled, while 0x0 means it is Disabled.
Enrollment Type: Commonly shown as 0x6, which indicates an MDM-managed device.
Scope: Typically 0x0, indicating that the setting is applied at the device level.
💡 Important Tip
⚠️ Note: Values such as the Enrollment ID and scope may differ between devices and deployment contexts. These values are specific to the session and machine. Always validate that the policy name is correct (EnableWebSignIn) and that the configuration value (enabled or disabled) matches what was set in Intune.
⚠️ Troubleshooting Tips:
Ensure the device has recently synced with Microsoft Intune.
Confirm that the device is assigned to the correct group for the policy deployment.
Check for conflicting settings in other configuration profiles that could override this one.
Trigger a manual sync using the Company Portal app or via the Intune Admin Center.
For deeper analysis, refer to the official Microsoft Learn documentation or enable advanced diagnostic logs if needed.
📚 More Information
To deepen your understanding of configuring and managing the Web Sign-in policy using Microsoft Intune, refer to the following official Microsoft resources:
Thank you!
🖥️ Ricardo Barbosa
📘 MCT Microsoft Certified Trainer | ☁️ Cloud Architect
🌐 Technology Director - https://altelix.com