

In this article, we’ll explore how to configure Enhanced Phishing Protection with Microsoft Defender Smart Screen using Microsoft Intune to strengthen your organization’s security posture on Windows 11 devices.
This feature, part of Microsoft Defender SmartScreen, provides real-time protection by detecting and warning users about phishing attempts, credential reuse, and insecure password storage.
By leveraging Intune’s configuration profiles, IT administrators can centrally manage and enforce these protections across all enrolled devices. To deploy the policy, create a Settings Catalog profile in Intune targeting Windows 10 and later. Within the configuration settings, enable “Microsoft Defender SmartScreen”, and configure the Enhanced Phishing Protection options, such as:
“Notify Malicious”
“Notify Password Reuse”
“Notify Unsafe App” Set each of these options to “Enabled”.
These configurations ensure users are alerted when they attempt to enter credentials on suspicious websites, reuse passwords, or store them in unsafe applications like Notepad. Once the profile is created and assigned to the appropriate device groups, Intune will push the settings to the endpoints, allowing you to monitor deployment status and compliance through the Microsoft Intune Admin Center.
This proactive security approach significantly reduces the risk of credential theft and phishing attacks by warning users at the moment of risk and guiding them away from unsafe behaviors. Enhanced Phishing Protection is included in the Windows 11 Security Baseline starting with version 22H2, providing a recommended foundation for endpoint protection.
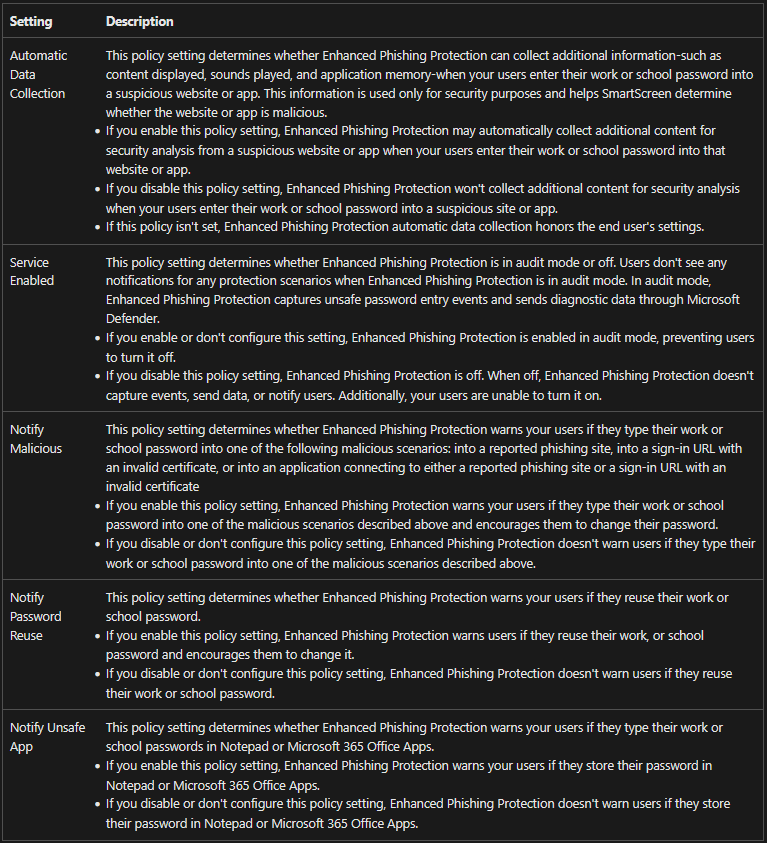
SmartScreen Enhanced Phishing Protection Settings
The table below outlines the available configuration options within the Intune Settings Catalog for SmartScreen Enhanced Phishing Protection, along with a brief description of each setting.
Creating a Configuration Profile for SmartScreen Enhanced Phishing Protection
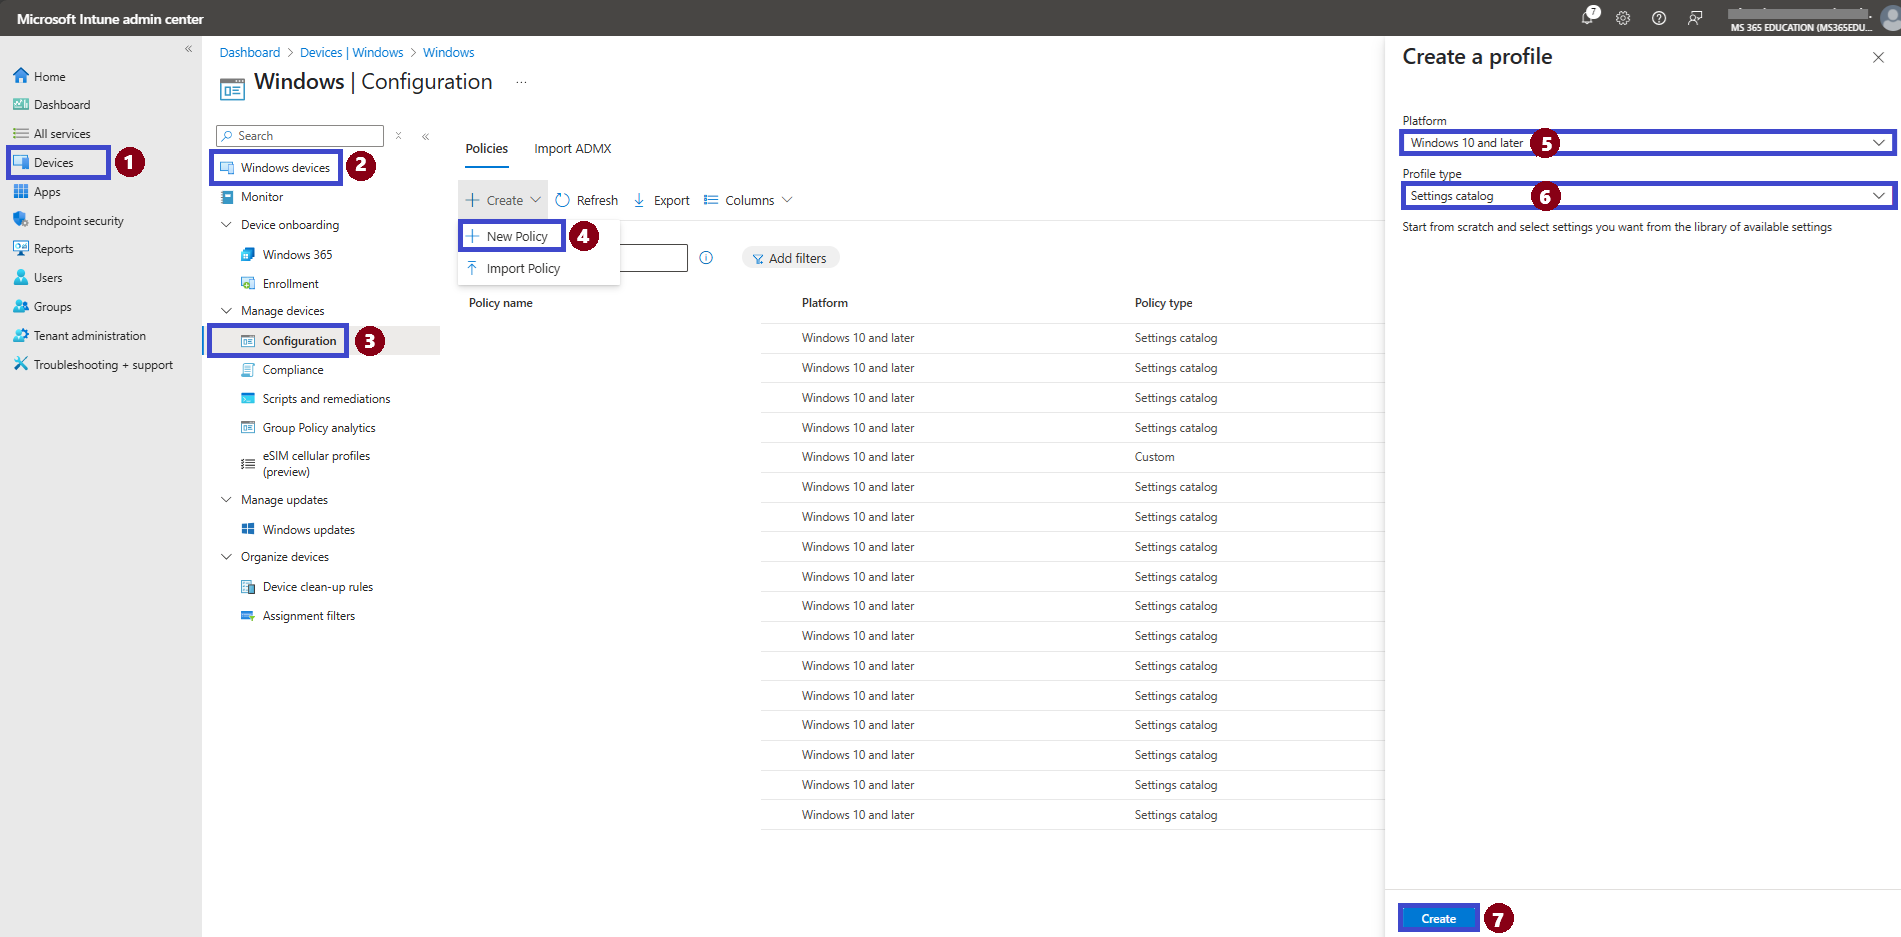
To configure Smart Screen Enhanced Phishing Protection using Microsoft Intune, follow the steps below:
Sign in to the Microsoft Intune Admin Center with your administrator credentials.
In the left-hand menu, click on Devices.
Windows Devices,
Manage Devices Configuration.
Click + Create and choose + New Policy.
In the Create a profile pane, set the Platform to Windows 10 and later.
Set the Profile type to Settings catalog.
Click Create to begin configuring the policy.
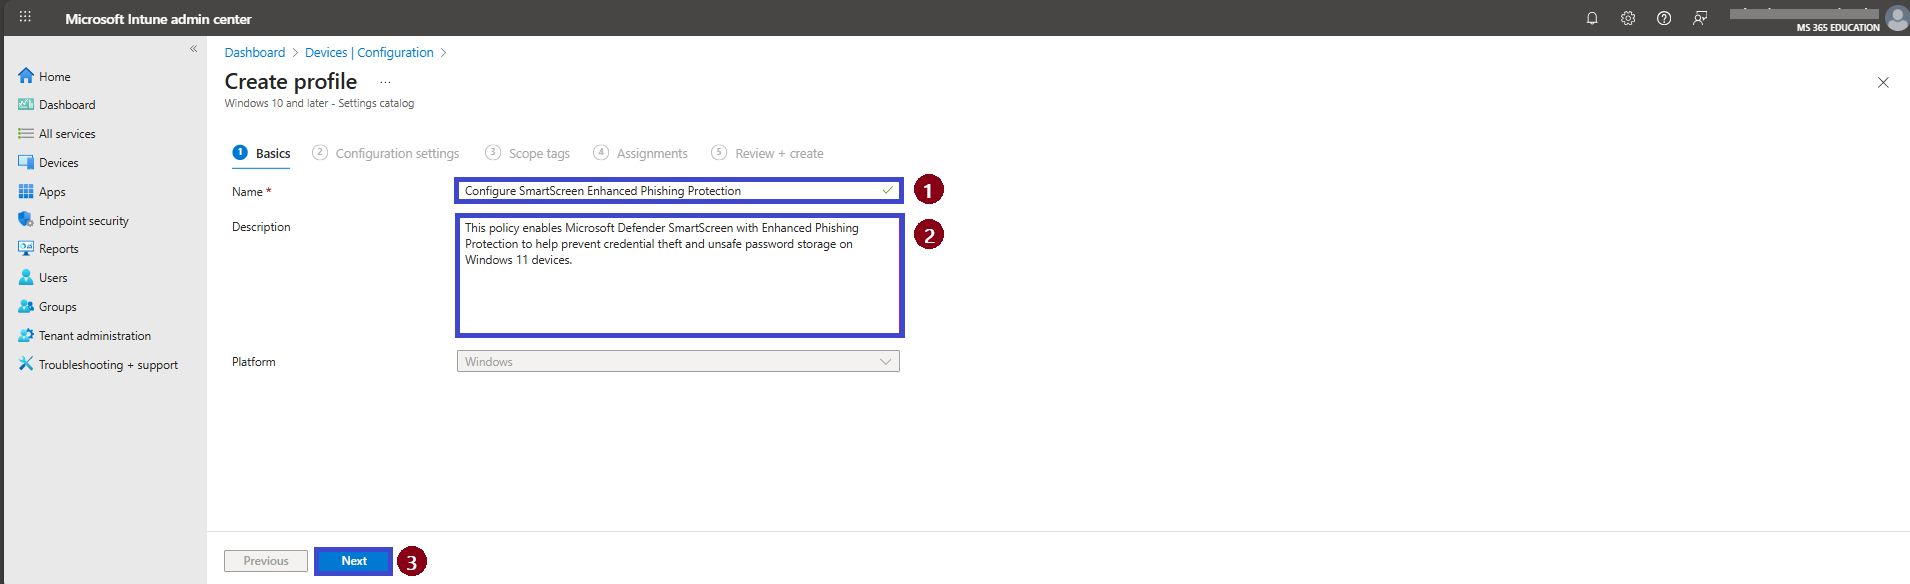
Basics
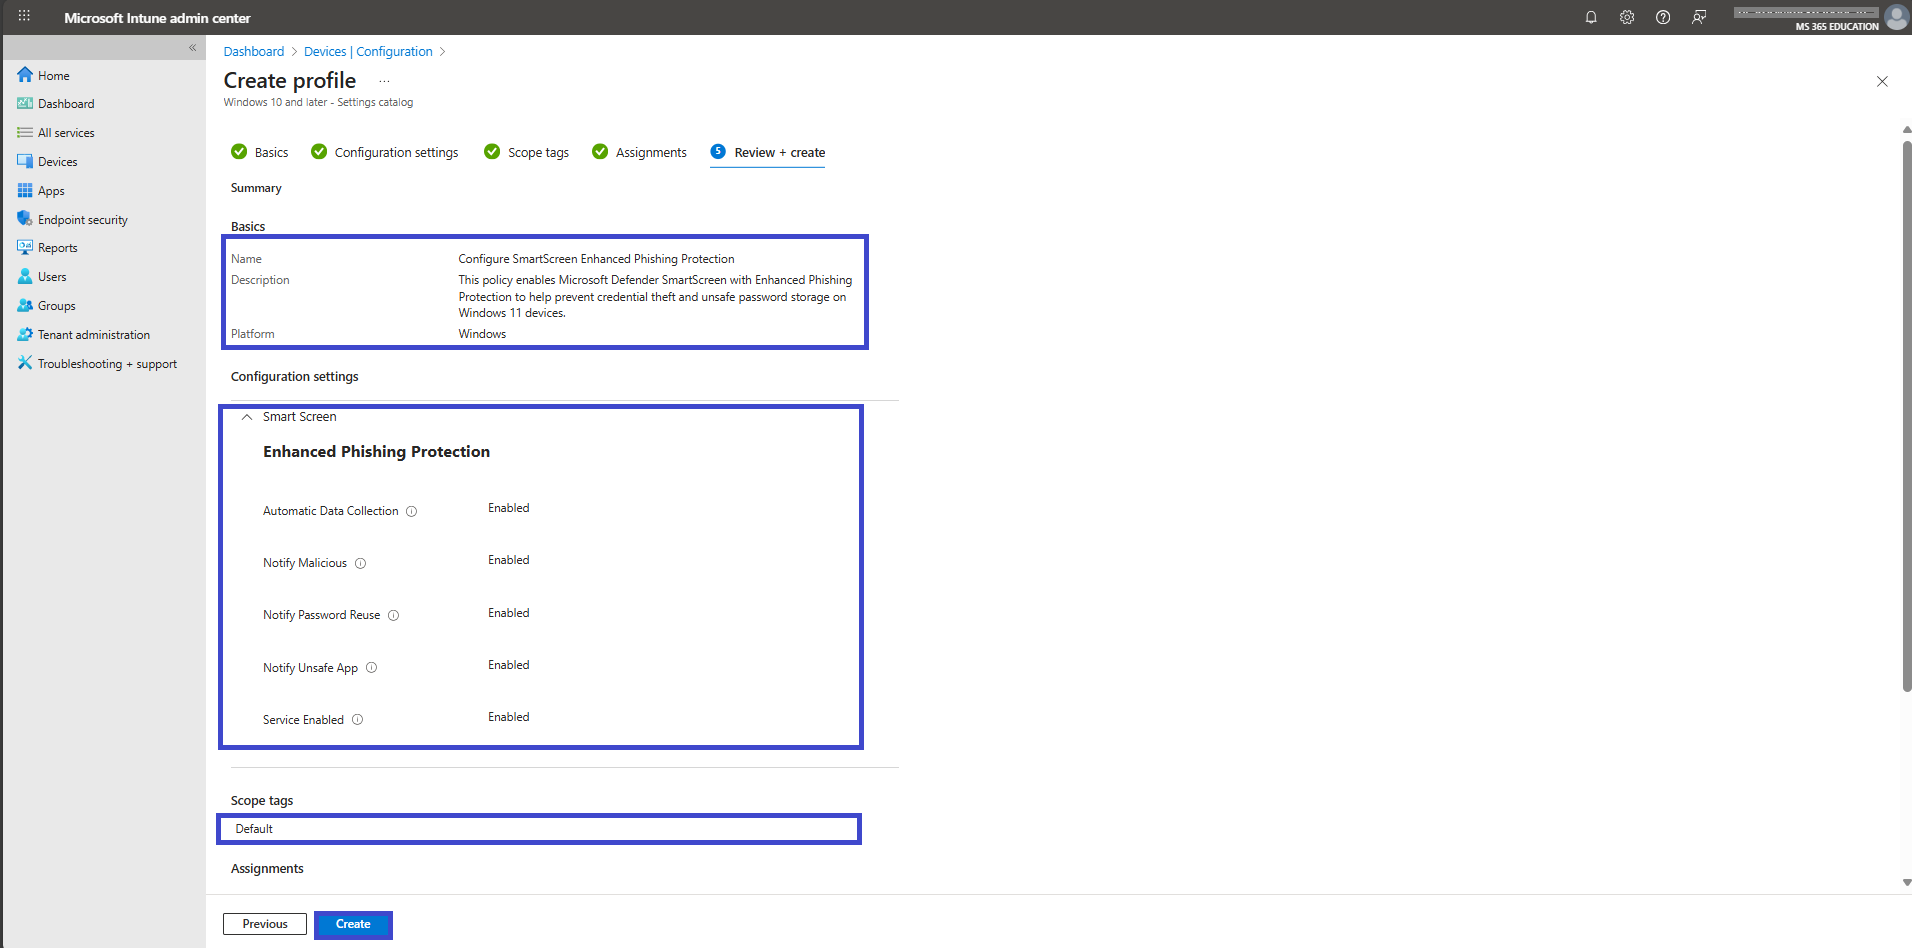
In the Basics pane, enter a clear and descriptive name for the policy — for example: Name: Configure SmartScreen Enhanced Phishing Protection
Optionally, provide a brief description to clarify the policy's purpose. For instance: Description: This policy enables Microsoft Defender SmartScreen with Enhanced Phishing Protection to help prevent credential theft and unsafe password storage on Windows 11 devices.
Once completed, click Next to proceed.
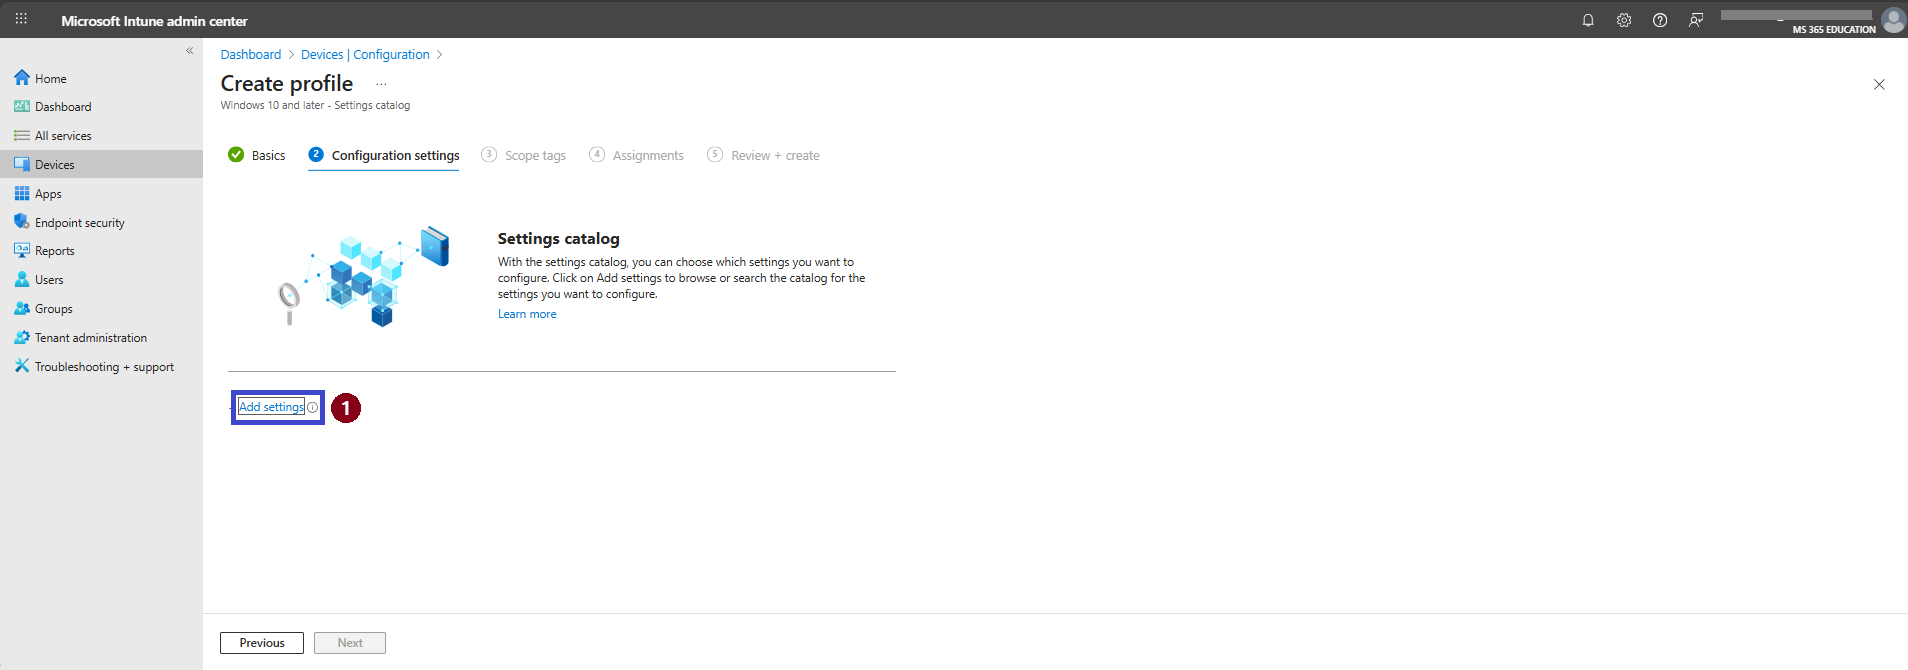
Now, proceed to add the required settings in the Configuration settings pane by clicking + Add settings located in the bottom-left corner of the page.
Selecting Enhanced Phishing Protection Settings
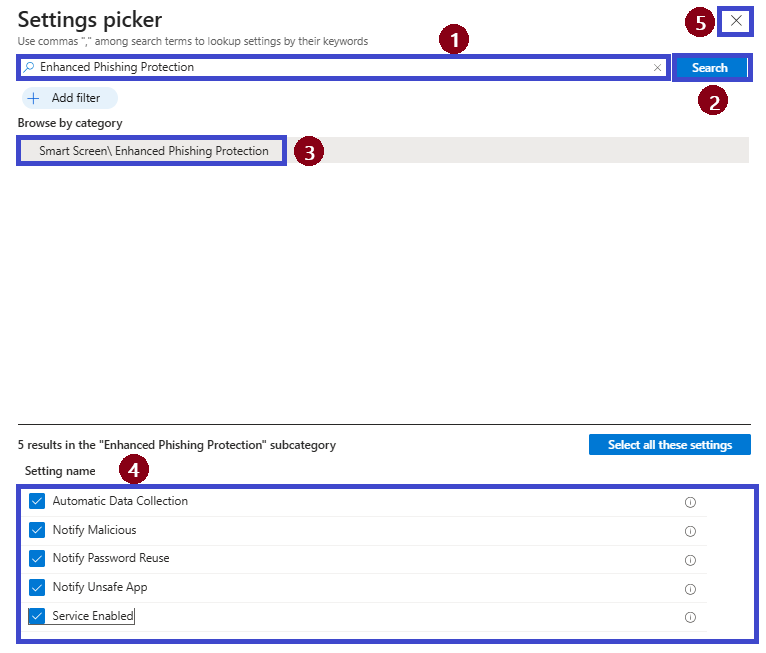
In the Settings picker search bar, type Enhanced Phishing Protection.
Click Search to display the available configuration categories.
From the search results, expand the category Smart Screen \ Enhanced Phishing Protection.
Select the following settings by checking each box:
After selecting all the settings, click the X in the upper-right corner to close the Settings picker panel and return to the main configuration screen.
These settings allow you to define how Microsoft Defender Smart Screen will detect and alert users about risky behavior including phishing attempts, unsafe app usage, and insecure password handling helping to strengthen your organization’s endpoint protection strategy.
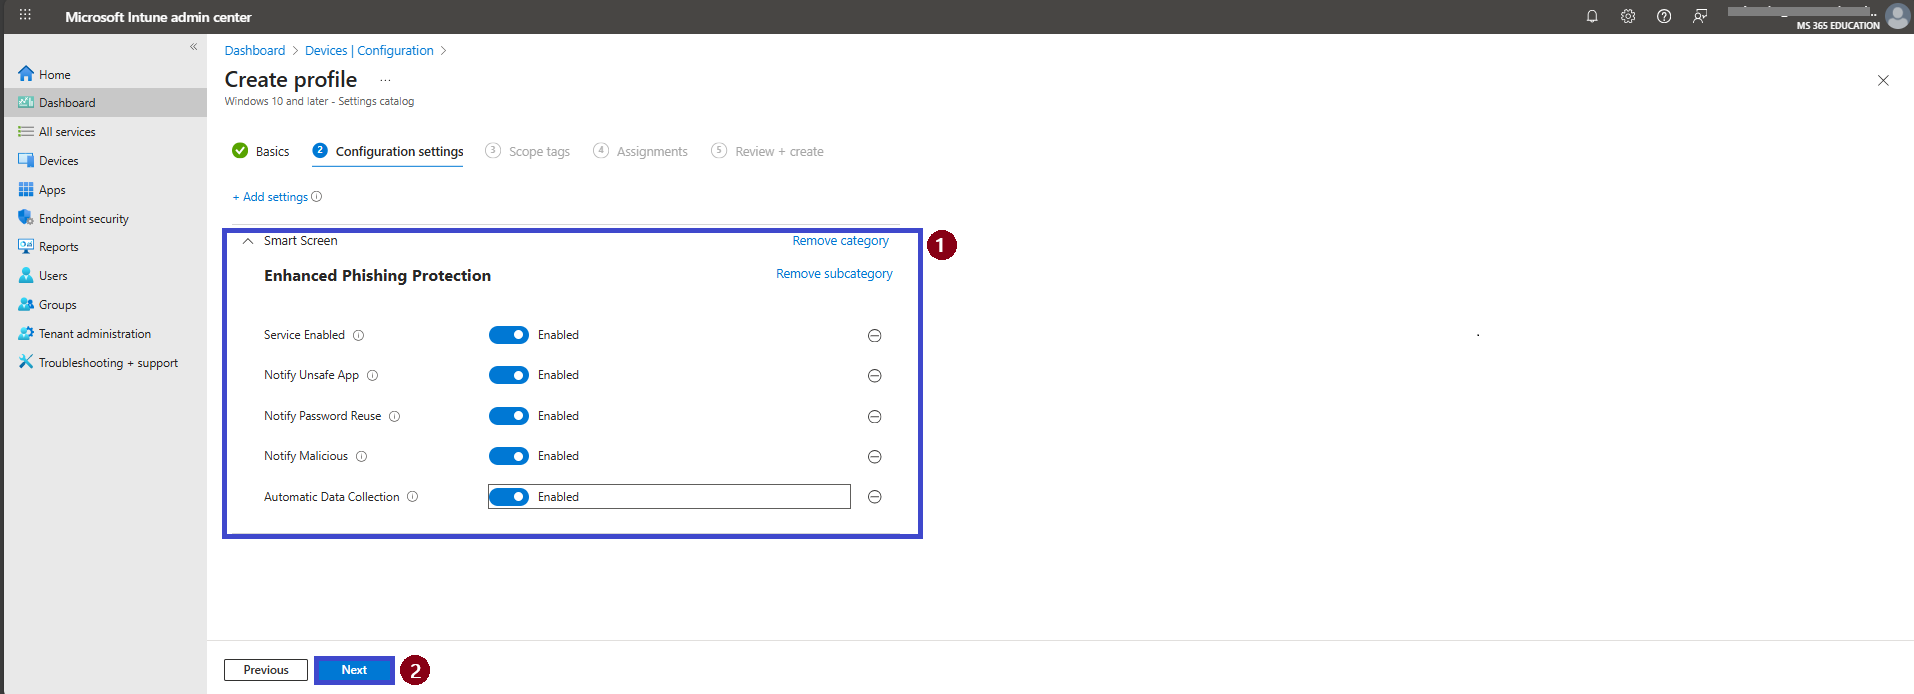
On the current page, set all the selected Smart Screen Enhanced Phishing Protection options to Enabled.
This ensures that devices will actively detect and notify users about unsafe behaviors such as password reuse, access to malicious websites, and storing credentials in insecure locations. These proactive alerts are key to reducing the risk of phishing and credential compromise across your organization.
Once all options are configured, click Next to proceed.
Scope Tags
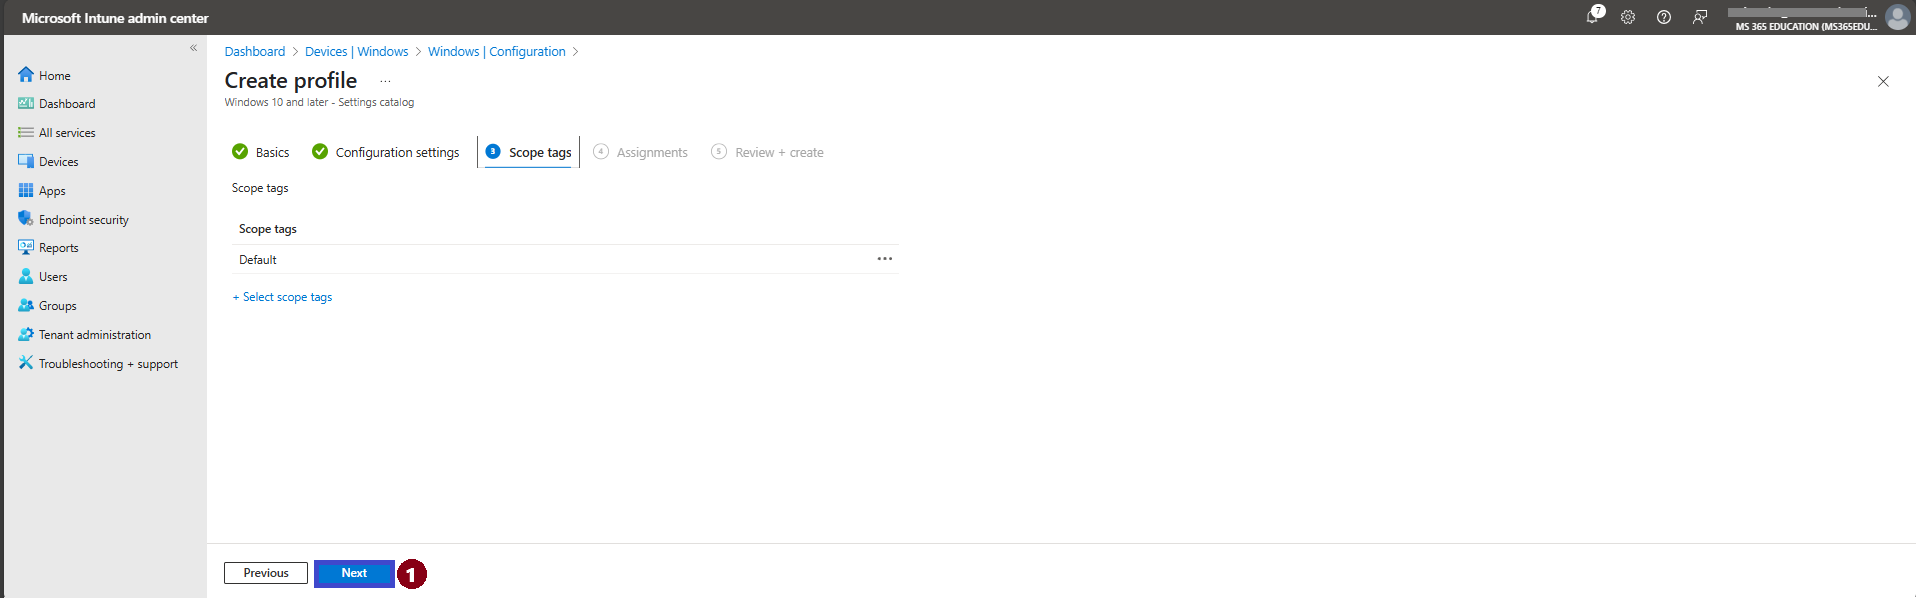
In Intune, Scope Tags are there to help you manage who can see and edit this policy. They help keep things organized and manage who has access. However, it is optional, so you can hit Next if you don’t need to assign them.
Assignments
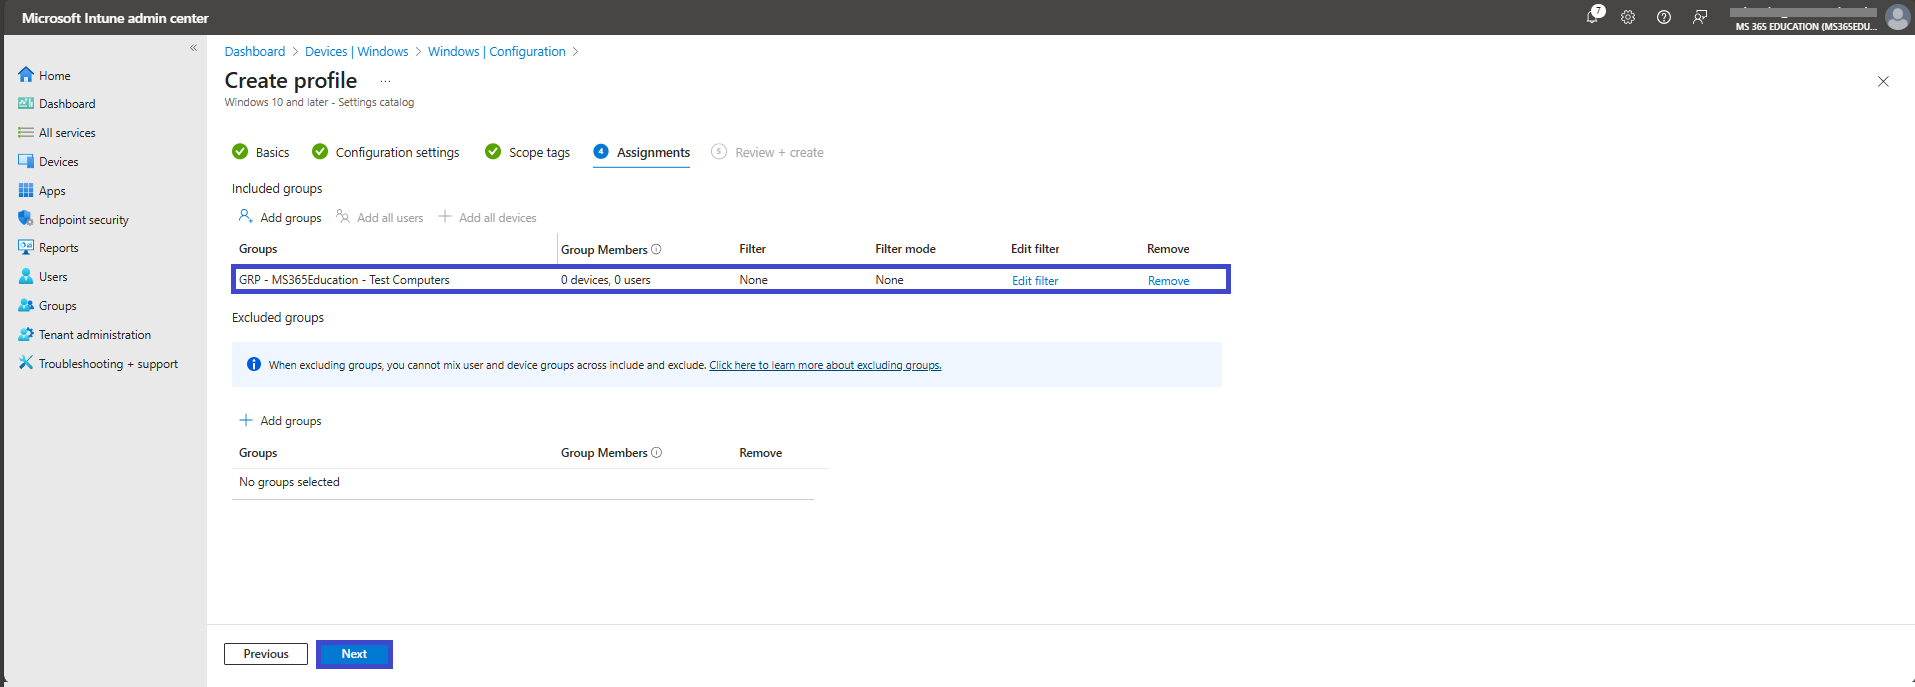
The Assignments section is where you define which users or devices will receive the policy.
Under Include Groups, click + Add Groups
A list of available groups will appear. Select the group(s) to which this policy should apply
In this example, we select: GRP - MS365Education - Test Computers
Once selected, the group will be listed under Included Groups.
Click Next to continue to the Review + Create step.
Review + Create
You’ve reached the final step: Review + Create. This section provides a full summary of your configuration, allowing you to carefully verify all the details before deploying the policy.
Take a moment to review the following:
Policy Name – Ensure it’s clear and descriptive
Assigned Groups – Confirm the correct user or device groups are selected
Scope Tags – Verify that any required administrative scope tags are properly applied
Configuration Settings – Double-check the selected values and behavior of the policy
If anything needs to be adjusted, click Previous to go back and make changes.
Once everything looks correct, click Create to finalize and deploy the profile.
✅ After clicking Create, a confirmation notification will appear, indicating that the Configure Smart Screen Enhanced Phishing Protection policy was successfully created.
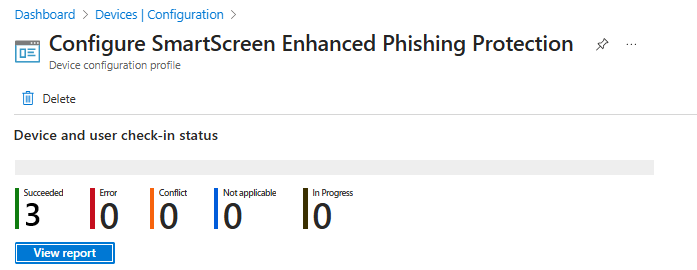
Device and User Check-in Status
You can check the policy in the Intune Portal. It usually takes about 8 hours to create a policy. If it’s taking too long, use the manual syncing option (Sync) in the Company Portal app on your device. After syncing, check the status again.
Go to Devices, then Configuration.
Click on the policy to view its details.
For instance, here the Configure SmartScreen Enhanced Phishing Protection policy status is succeeded(3).
End-User Experience
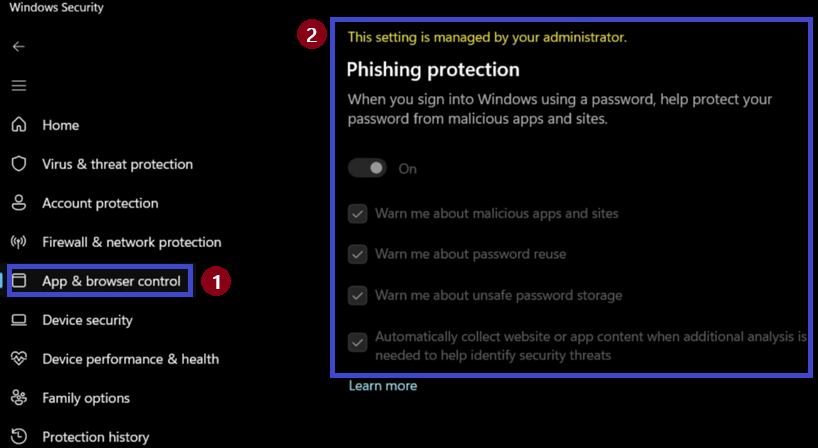
To confirm that the Enhanced Phishing Protection policy is applied successfully, begin by signing in to a device targeted by the policy.
Once logged in, open the Start Menu and navigate to: Windows Security > App & browser control > Reputation-based protection.
On this page, you should see a message indicating that “This setting is managed by your administrator” — confirming that the policy is in effect. The following options will be enabled but grayed out, indicating they are enforced via Intune:
Warn me about malicious apps and sites
Warn me about password reuse
Warn me about unsafe password storage
Automatically collect website or app content when additional analysis is needed to help identify security threats
This user experience ensures that security settings are applied consistently and cannot be modified by end users, reinforcing protection against phishing and credential-based attacks.
More Information
To deepen your understanding of configuring and managing Smart Screen Enhanced Phishing Protection using Microsoft Intune, refer to the following official Microsoft resources:
Enhanced Phishing Protection in Microsoft Defender SmartScreen https://learn.microsoft.com/en-us/windows/security/operating-system-security/virus-and-threat-protection/microsoft-defender-smartscreen/enhanced-phishing-protection
Policy CSP – WebThreatDefense https://learn.microsoft.com/en-us/windows/client-management/mdm/policy-csp-webthreatdefense
Microsoft Defender SmartScreen overview https://learn.microsoft.com/en-us/windows/security/operating-system-security/virus-and-threat-protection/microsoft-defender-smartscreen
Thank you!
🖥️ Ricardo Barbosa
📘 MCT Microsoft Certified Trainer | ☁️ Cloud Architect
🌐 Technology Director - https://altelix.com