

When it comes to endpoint security, visibility matters but control matters even more.
In modern managed environments, exposing security areas that end users are not expected to manage can lead to confusion, unnecessary questions, and operational noise. While transparency is important, not every security control should be visible or interactive for end users.
The Device Security area in Windows Security is one of those sections. It provides hardware-based security information such as TPM, Secure Boot, and Core Isolation features that are typically centrally enforced and managed by IT through Intune.
With Microsoft Intune, administrators can precisely control whether the Device Security area is visible in the Windows Security app. This allows organizations to strike the right balance between transparency and governance, ensuring users see only what they are expected to interact with and nothing more.
By hiding the Device Security section, organizations maintain a consistent, governed, and predictable security experience across managed devices. Security controls remain active, enforced by policy, and aligned with corporate standards without relying on user behavior.
At the same time, this approach improves the end-user experience. A cleaner Windows Security interface reduces confusion, establishes clear boundaries around security responsibilities, and helps minimize unnecessary help desk tickets related to settings users are not authorized to change.
Why This Policy Matters
In security-focused and managed environments, consistency and centralized control are critical.
Allowing end users to view or interact with low-level, device-based security settings can introduce confusion, misinterpretation, and support overhead even when those settings are fully managed by IT.
This policy ensures that security decisions remain centralized with IT, not exposed to end users. By controlling the visibility of the Device Security area, organizations reduce the likelihood of users questioning, attempting to troubleshoot, or misinterpreting security configurations that are already enforced through Intune.
From an operational perspective, this results in:
A consistent security posture across all managed devices
Reduced risk of accidental changes or misinterpretation
Fewer help desk tickets related to device-level security settings
Clear ownership of security controls by IT and security teams
Ultimately, this policy supports a standardized, predictable, and governed endpoint security model.
Why Hiding the Device Security UI Improves Security Governance
Hiding the Device Security UI is not about limiting transparency, it’s about enforcing governance.
In modern endpoint management, users are not expected to manage or modify hardware-based security controls such as TPM, Secure Boot, or Core Isolation. These settings should be defined, enforced, and monitored centrally using tools like Microsoft Intune and Microsoft Defender.
By removing the Device Security section from Windows Security:
Users can no longer view or attempt to interact with protected device-level security settings
There is no ambiguity about who controls security decisions
The risk of users searching for workarounds or exceptions is significantly reduced
At the same time, this improves the end-user experience. A simplified Windows Security interface removes options users are not authorized to change, reducing confusion and increasing trust in the organization’s security model.
This approach aligns directly with Zero Trust principles, where security is enforced by design, continuously validated, and never dependent on user behavior.
Windows CSP Details
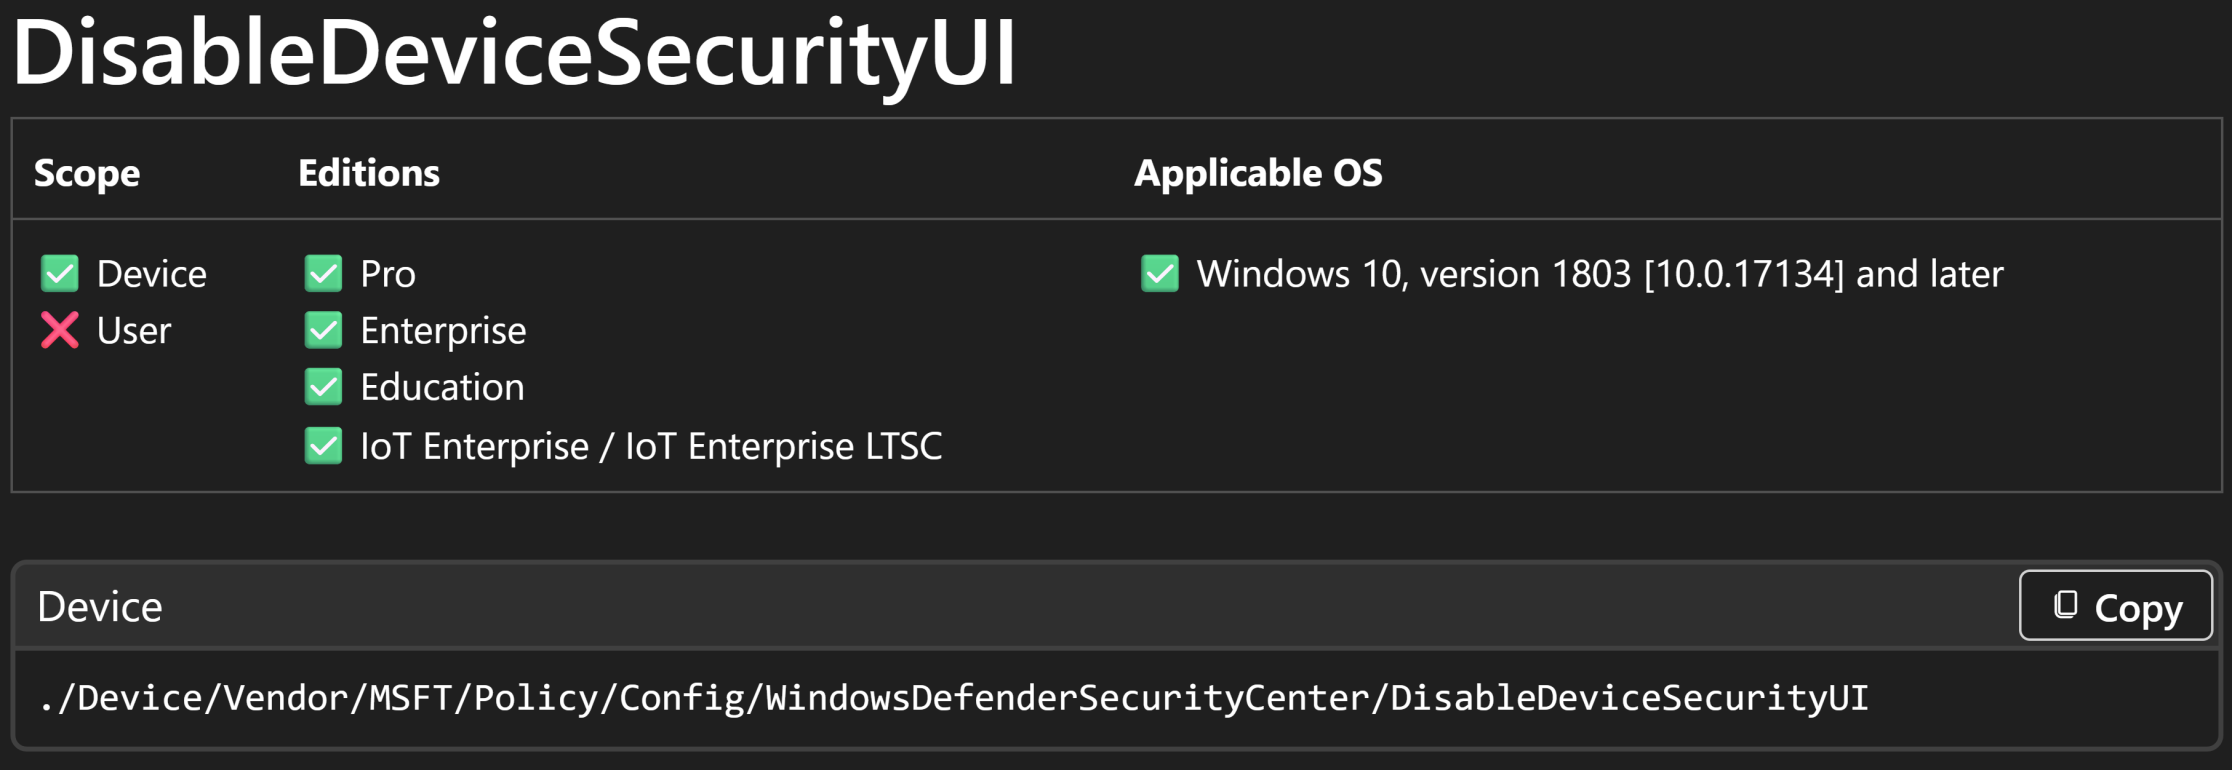
This policy is applied at the device scope, not the user scope. This means it affects the entire device regardless of which user signs in, ensuring consistent enforcement across all managed endpoints.
Supported Windows Editions
Windows 10 Pro
Windows 10 Enterprise
Windows 10 Education
IoT Enterprise / IoT Enterprise LTSC
Supported OS Version
Windows 10 version 1803 (10.0.17134) and later
Fully compatible with modern Windows 10 and Windows 11 devices managed with Intune
This CSP allows administrators to centrally control whether the Device Security area is visible in the Windows Security app, without disabling any underlying security features.
Policy Properties
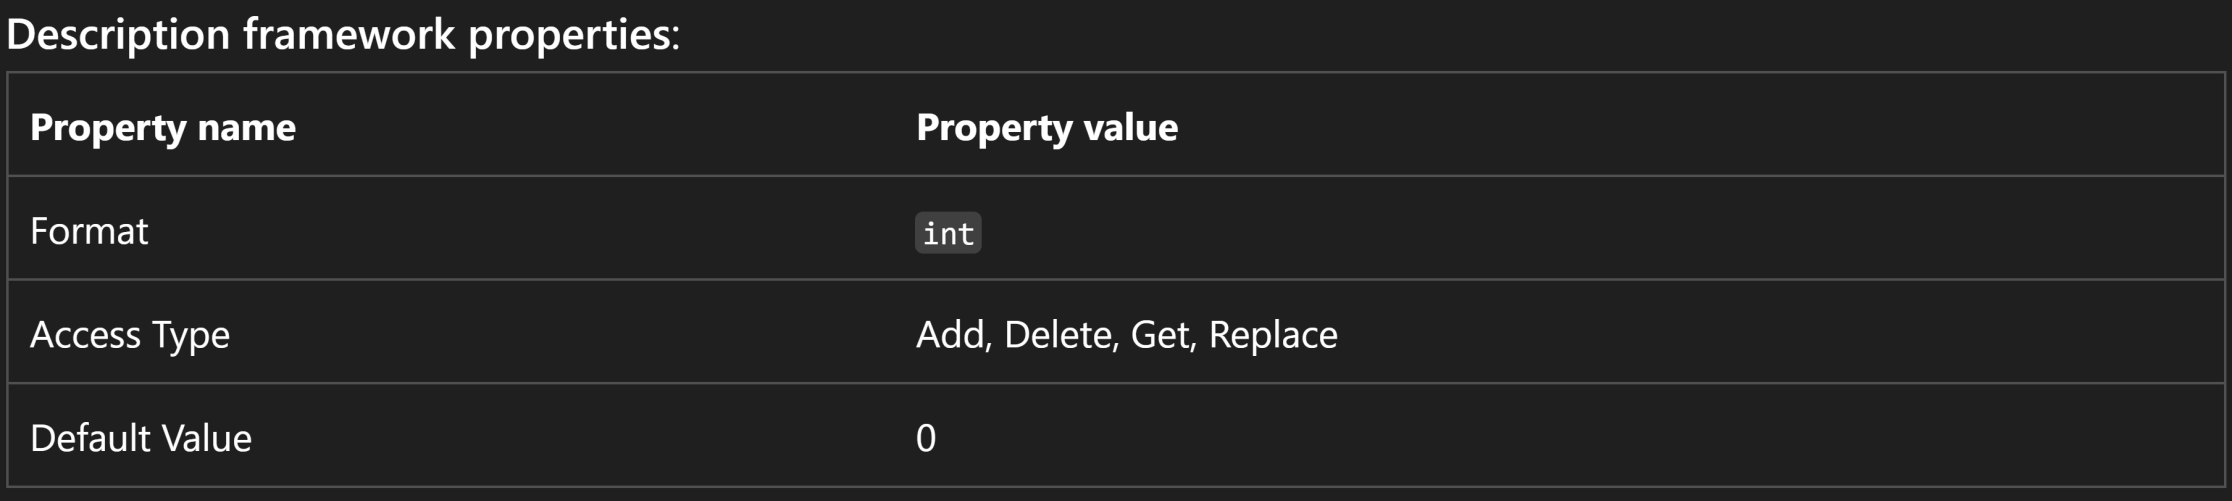
The configuration framework for this policy defines the following properties:
Format: Integer (int)
Access Type: Add, Delete, Get, Replace
Default Value: 0
This structure ensures the policy can be consistently deployed, updated, or replaced across managed devices using Intune configuration profiles.
Allowed Values
This policy supports two possible values:
0 (Default – Disabled) Users can see the Device Security area in the Windows Security app.
1 (Enabled) The Device Security area is hidden from users in Windows Security.
When the value is set to 1, the UI is completely removed, preventing users from viewing or attempting to interact with device-level security settings that are centrally enforced by IT.

Group Policy Mapping (Reference)
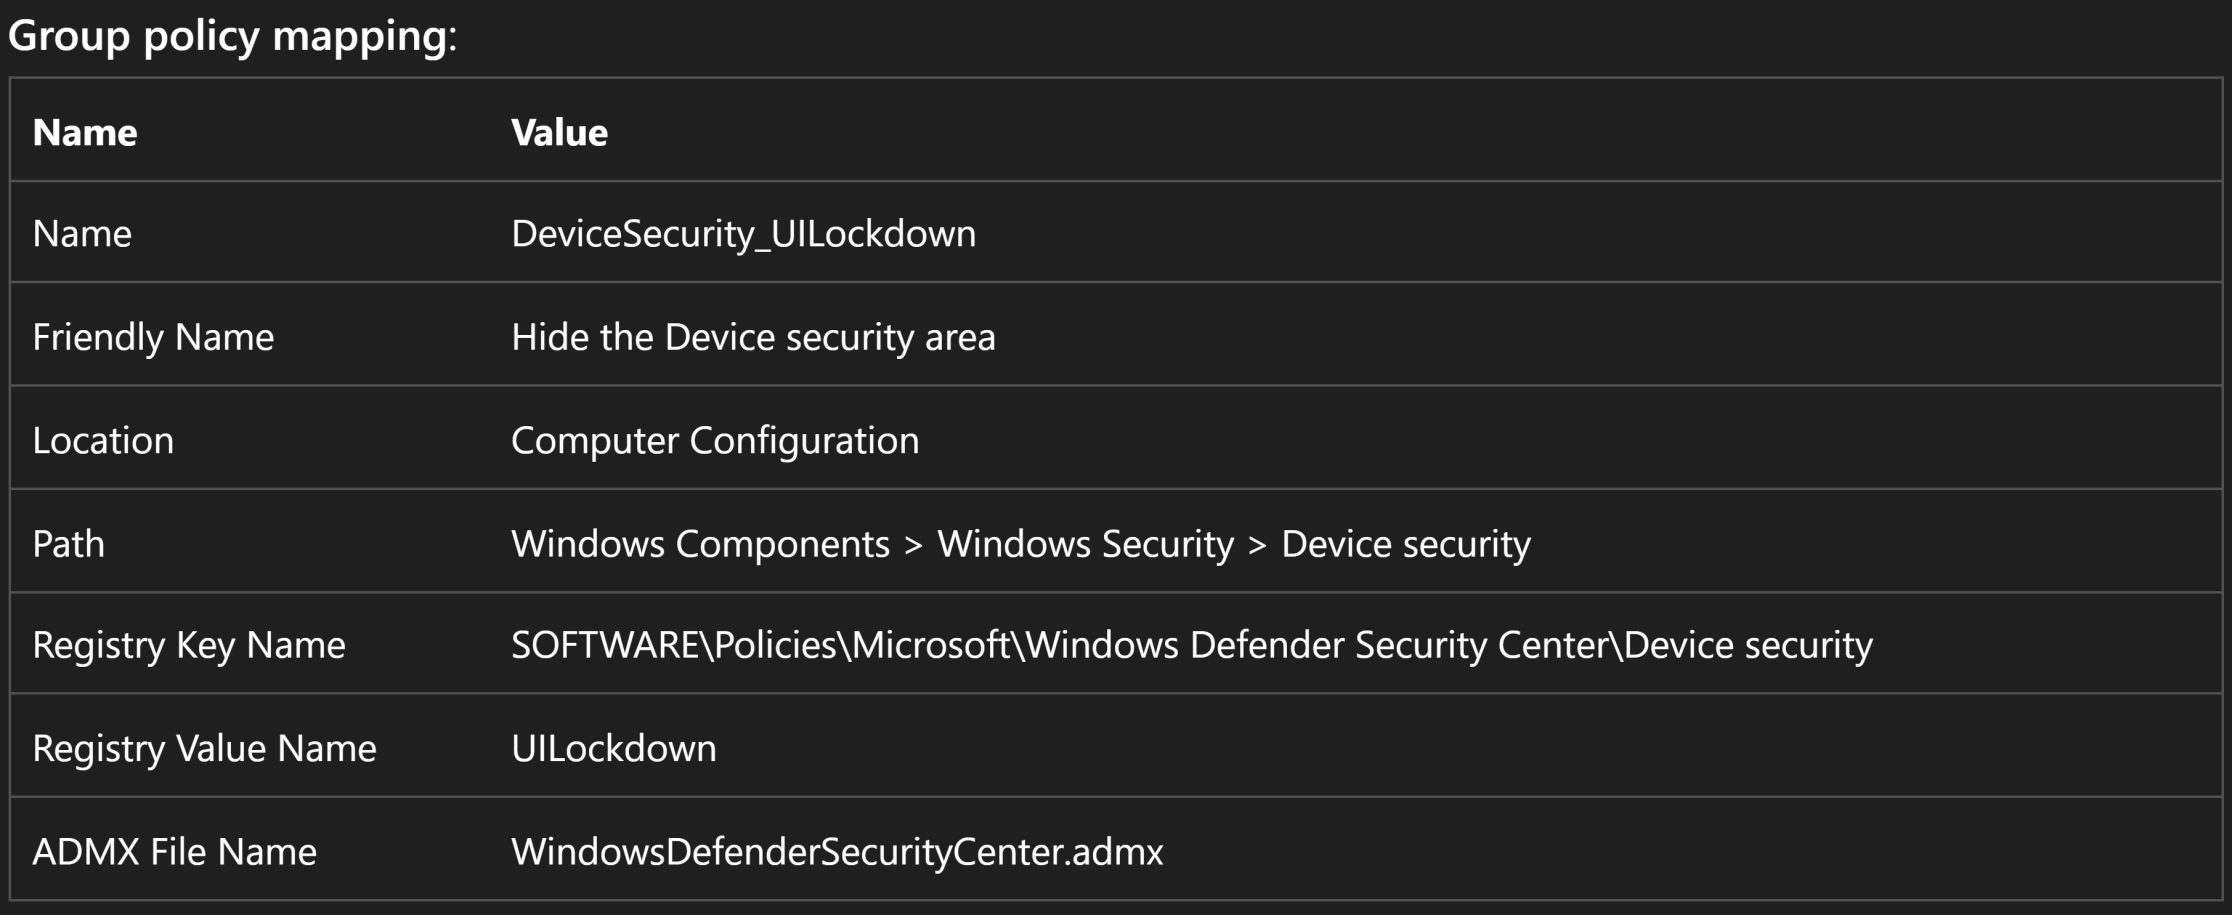
For organizations that still use Group Policy or operate in hybrid environments, this Intune CSP maps directly to the following Group Policy setting:
Policy Name: DeviceSecurity_UILockdown
Friendly Name: Hide the Device security area
Location: Computer Configuration
Path: Windows Components > Windows Security > Device security
Registry Key: SOFTWARE\Policies\Microsoft\Windows Defender Security Center\Device security
Registry Value Name: UILockdown
ADMX File: WindowsDefenderSecurityCenter.admx
This mapping ensures functional parity between traditional Group Policy and modern Intune-based management.
Key Takeaways
This Intune policy hides the Device Security area without disabling any security features
Users cannot view hardware-based security details such as TPM, Secure Boot, or Core Isolation
Security controls remain fully enforced and managed by IT
Reduces user confusion and unnecessary troubleshooting
Improves security governance and operational efficiency
Supports a Zero Trust-aligned endpoint management strategy
Enforce Consistent Security: Control the Device Security UI in Windows Security via Intune
How to Control Device Security Area Visibility using Intune
You can centrally control the visibility of the Device Security area in the Windows Security app using Microsoft Intune keeping the user experience clean and ensuring this setting is applied consistently across all managed devices (instead of being left to user interpretation).
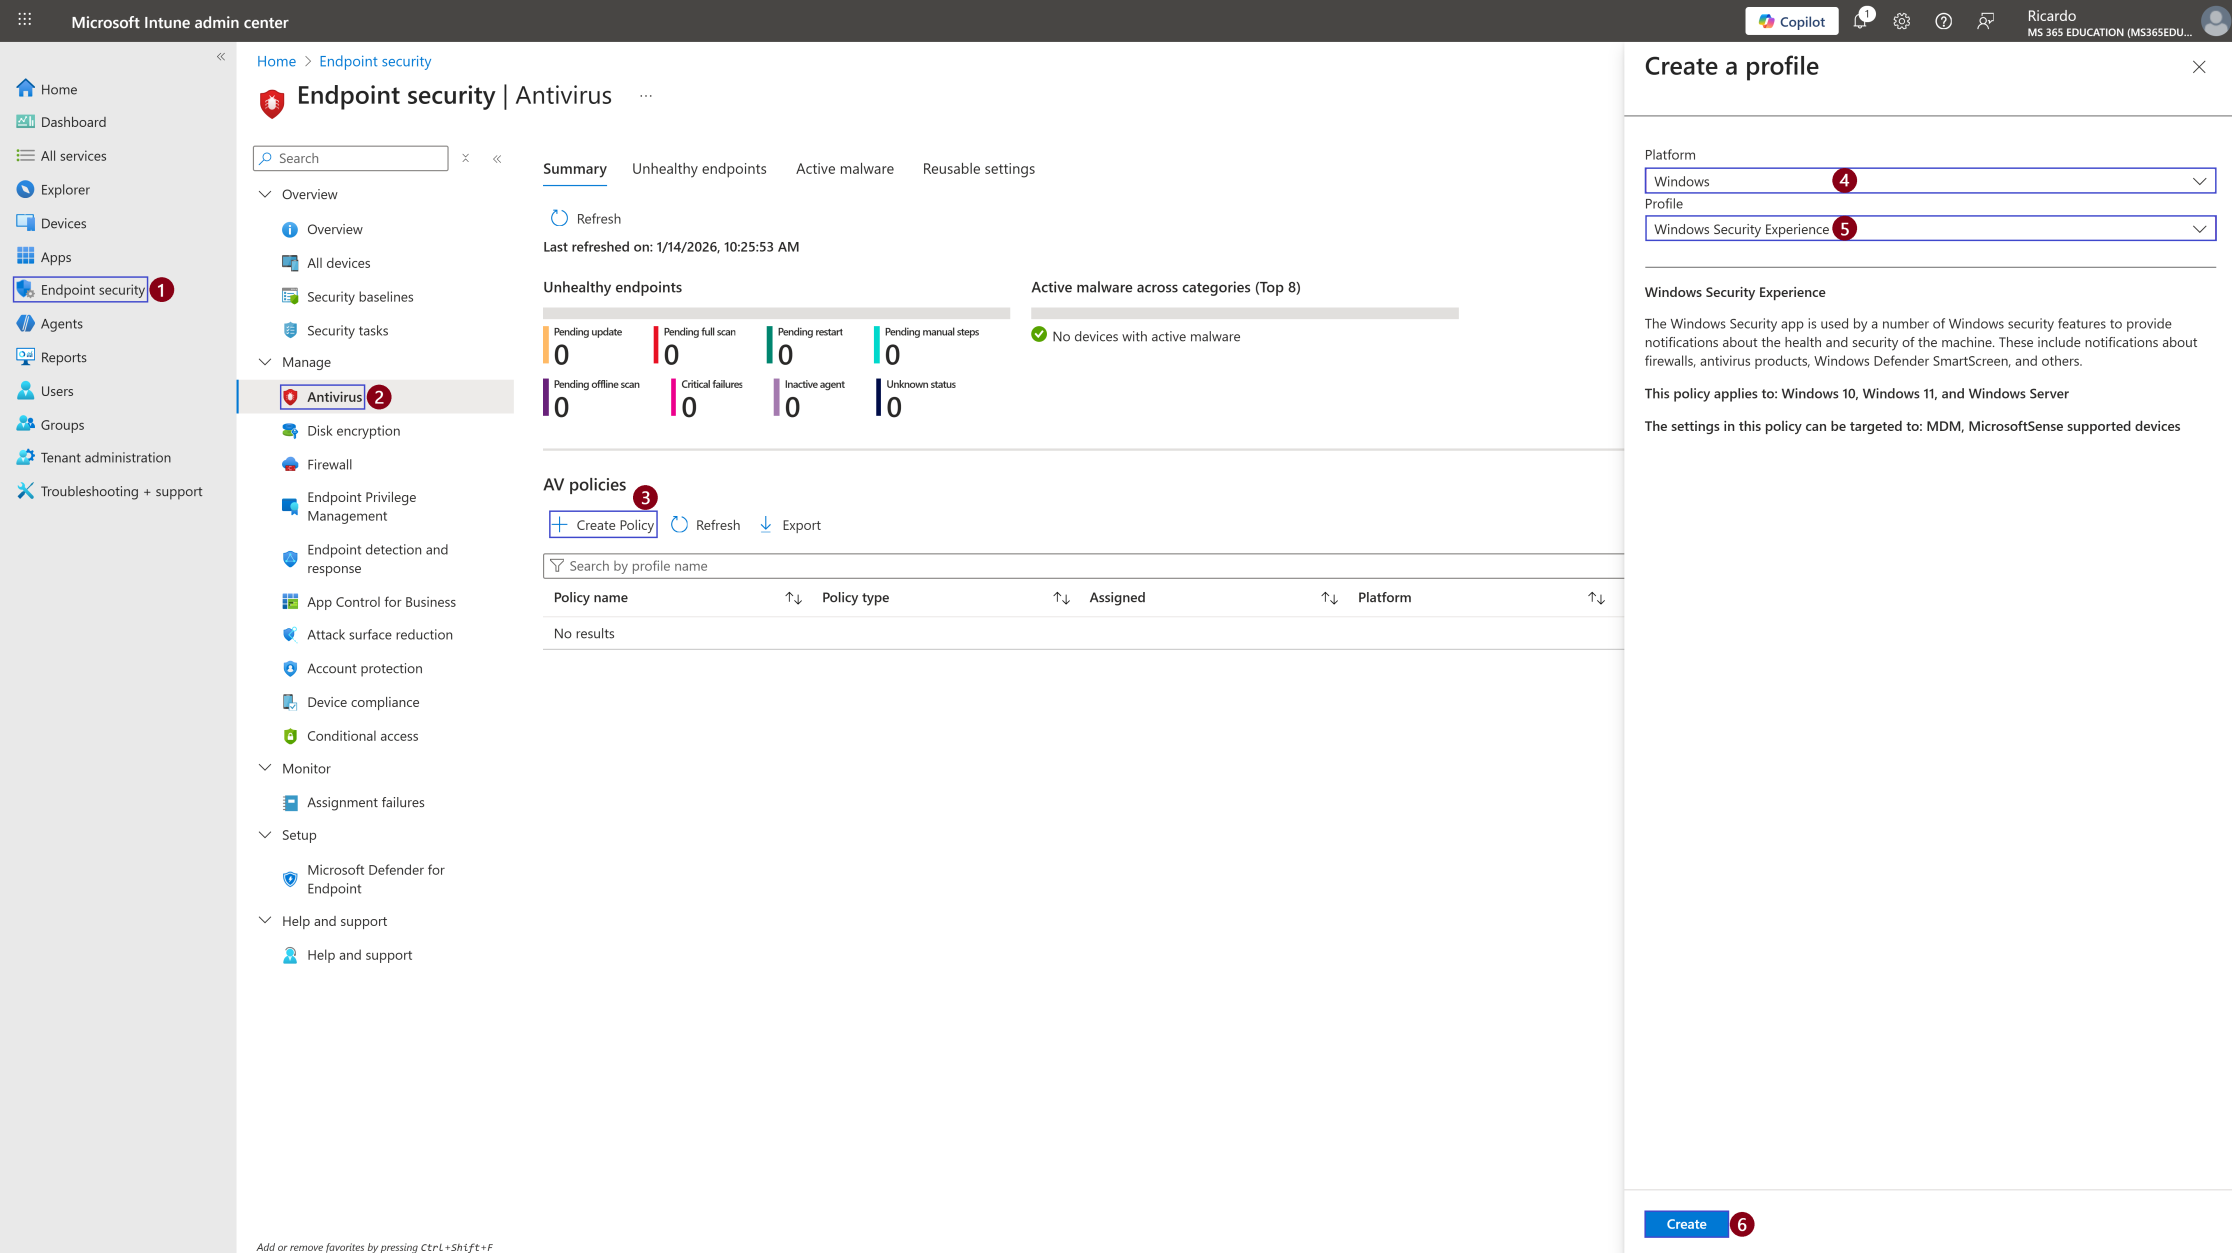
To begin configuring the policy, sign in to the Microsoft Intune admin center and follow the steps below, as shown in the screenshot:
In the left navigation pane, select Endpoint security.
Under Endpoint security, choose Antivirus.
Click + Create Policy to start creating a new configuration profile.
On the Create a profile pane, confirm the Platform as Windows.
For Profile, select Windows Security Experience.
Click Create to move to the next step and define the policy settings.
Define Basic Profile Details
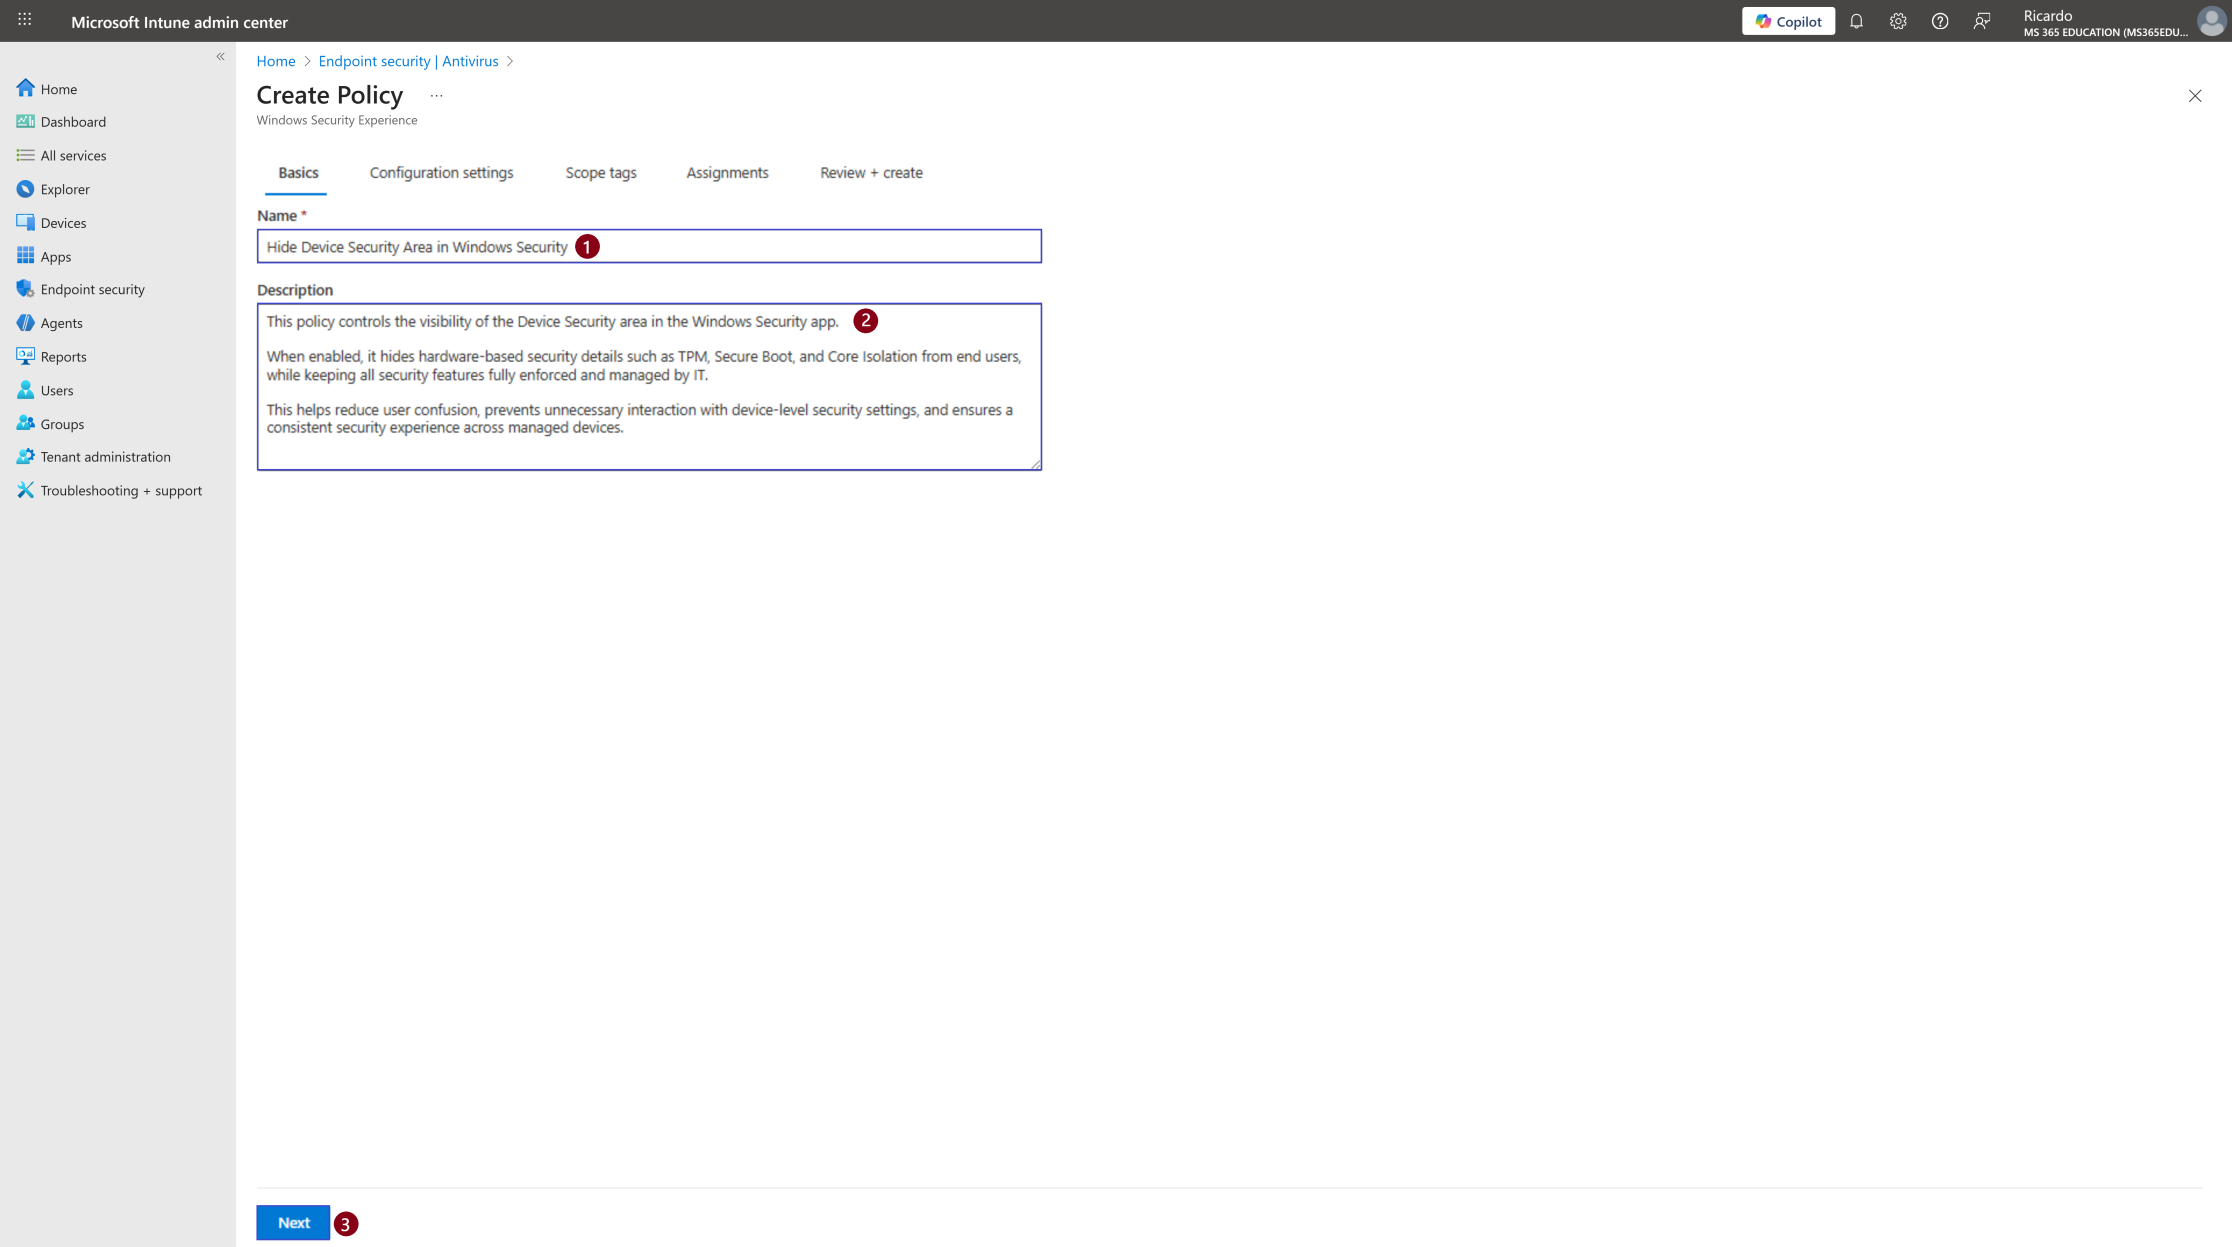
After clicking Create, the next step is to define the basic details of your Windows Security Experience policy. This includes providing a clear Name and a concise but meaningful Description, which are essential for long-term manageability and operational clarity in Microsoft Intune.
Well-defined policy names and descriptions make it significantly easier to understand the intent of each configuration later especially in environments with multiple security profiles or mature endpoint management practices.
As shown in the screenshot, configure the fields as follows:
Suggested Name and Description
Name: Hide Device Security Area in Windows Security
Description: This policy controls the visibility of the Device Security area in the Windows Security app. When enabled, it hides hardware-based security details such as TPM, Secure Boot, and Core Isolation from end users, while keeping all security features fully enforced and managed by IT.
This configuration helps reduce user confusion, prevents unnecessary interaction with device-level security settings, and ensures a consistent and governed security experience across managed devices.
No changes are required for the Platform, as it is already pre-selected. Once the name and description are defined, click Next to continue to the configuration settings.
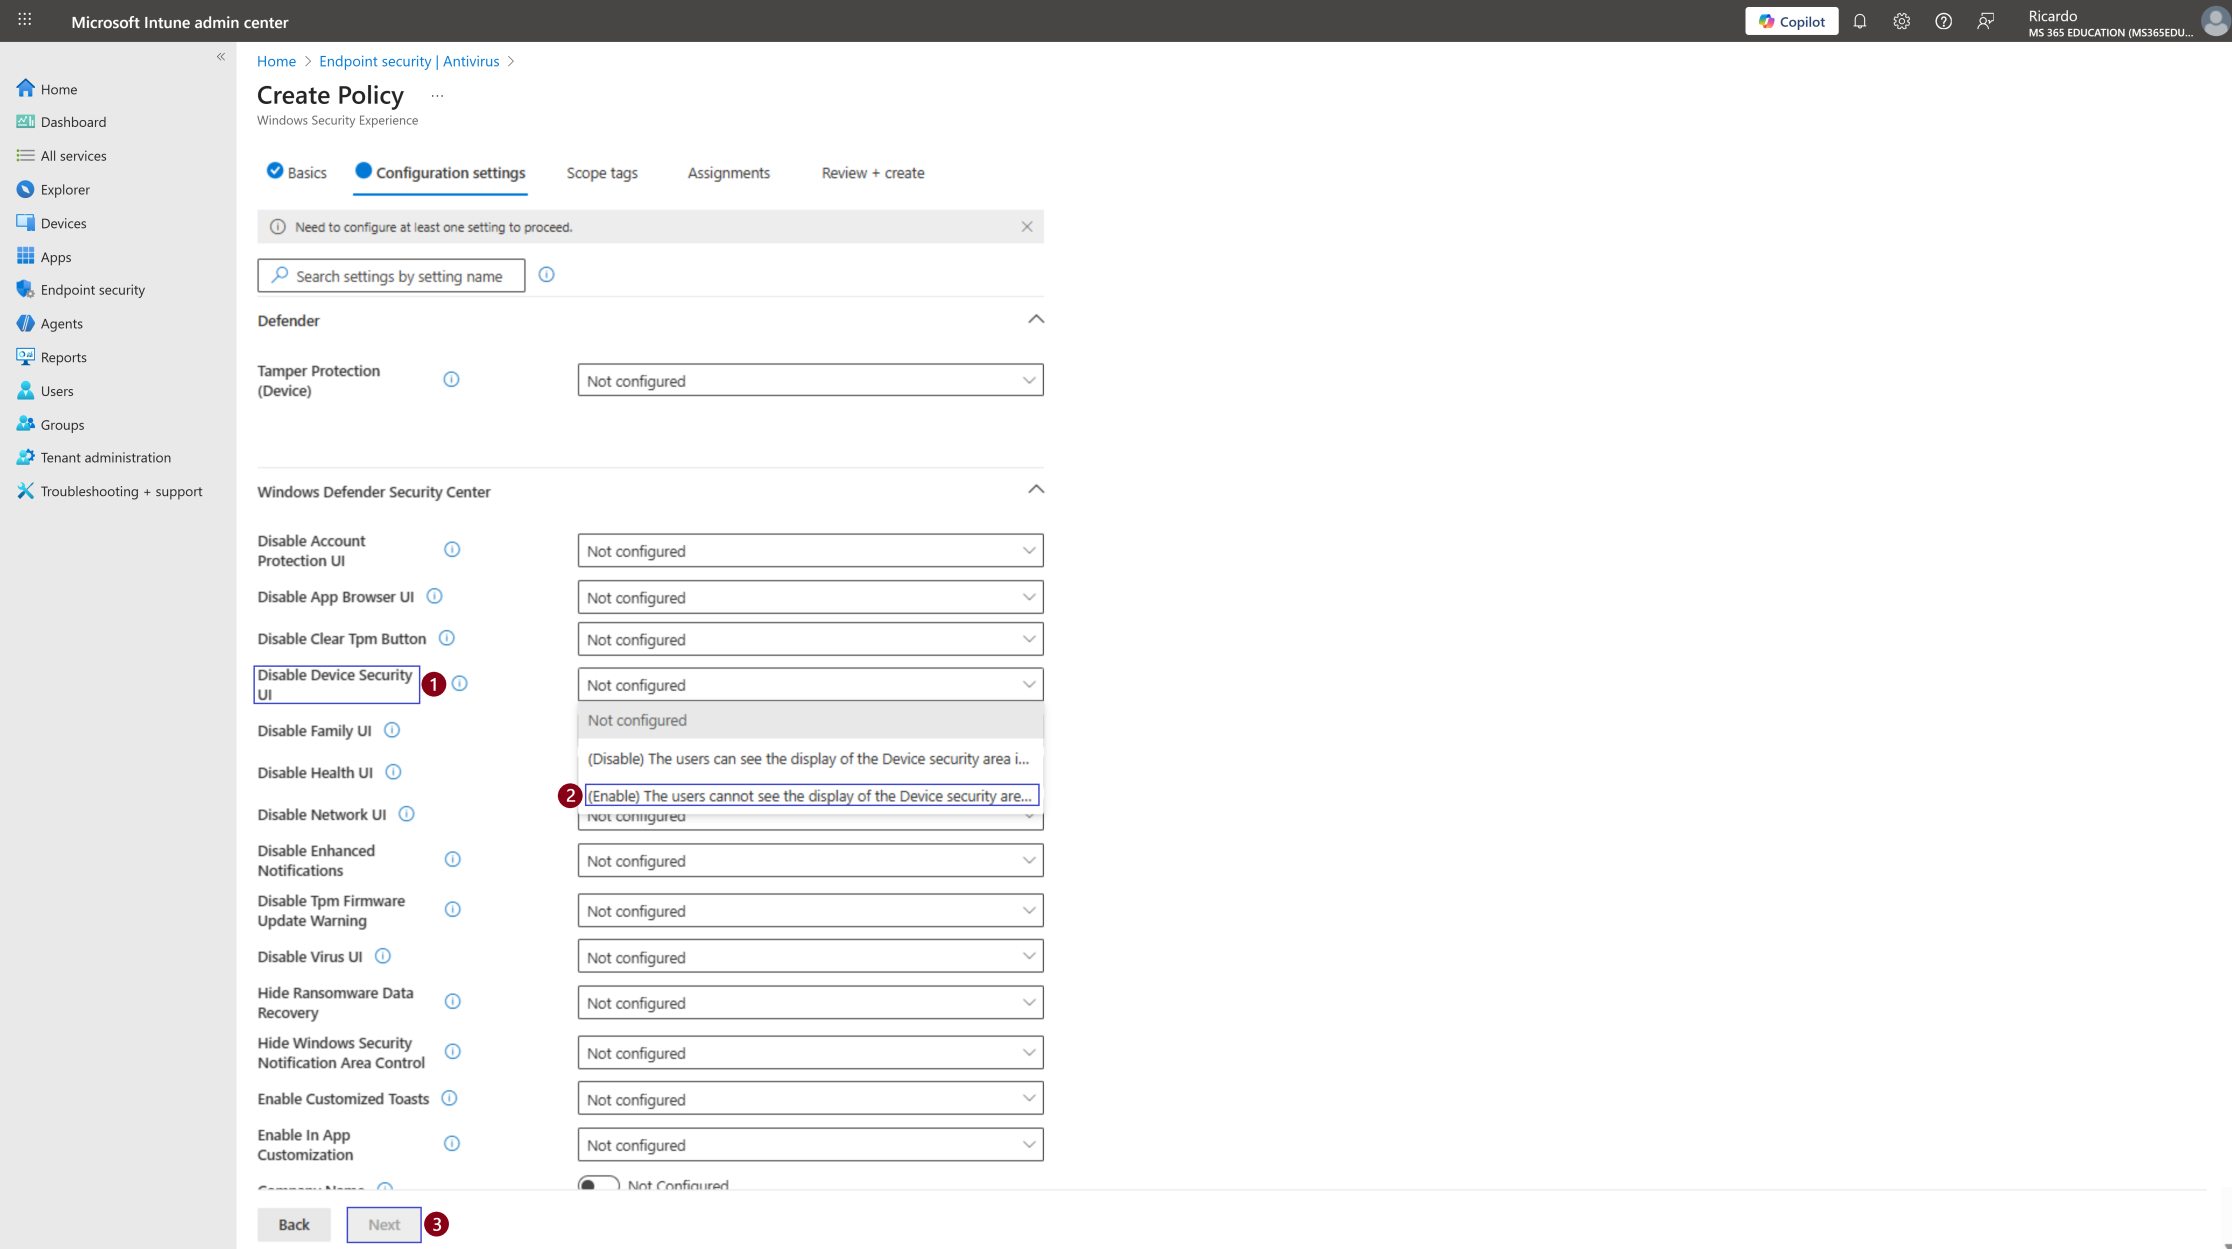
Configure the Disable Device Security UI Policy (Default Behavior)
By default, the Disable Device Security UI setting is configured as Not configured, as shown in the screenshot.
When this policy remains Not configured or is explicitly set to Disabled, the Device Security area stays visible in the Windows Security app. In this state, end users can view hardware-based security information such as TPM, Secure Boot, and Core Isolation, even though these features are already enforced and managed centrally by IT through Intune.
At this stage:
The Device Security UI remains visible to users
No changes are made to security enforcement
Users can still view device-level security information
This default behavior may be acceptable in environments that favor full transparency. However, it is often not ideal for organizations that require strict security governance, reduced user interaction, and centralized control over device security settings.
Enable the Policy to Hide the Device Security Area
To hide the Device Security area from end users, the policy must be explicitly enabled.
As illustrated in the screenshot, locate Disable Device Security UI and select:
Enable – The users cannot see the display of the Device security area in Windows Defender Security Center
This policy uses simple values to control visibility:
0 (Default / Disabled): The Device Security area is visible
1 (Enabled): The Device Security area is hidden
When the Enable option is selected:
Users can no longer see the Device Security section in Windows Security
Hardware-based protections such as TPM, Secure Boot, and Core Isolation remain fully active
All security controls continue to be centrally enforced by Intune
This configuration removes the Device Security UI from view without disabling or weakening any security features. Everything continues to run in the background exactly as defined by IT policies.
Enabling this setting is recommended for organizations that want to:
Enforce centralized security governance
Reduce user confusion and unnecessary questions
Prevent interaction with IT-managed security settings
Maintain a clean, controlled, and consistent Windows Security experience
Once the setting is configured, click Next to continue with Scope tags and policy assignment.
Configure Scope Tags (Optional)
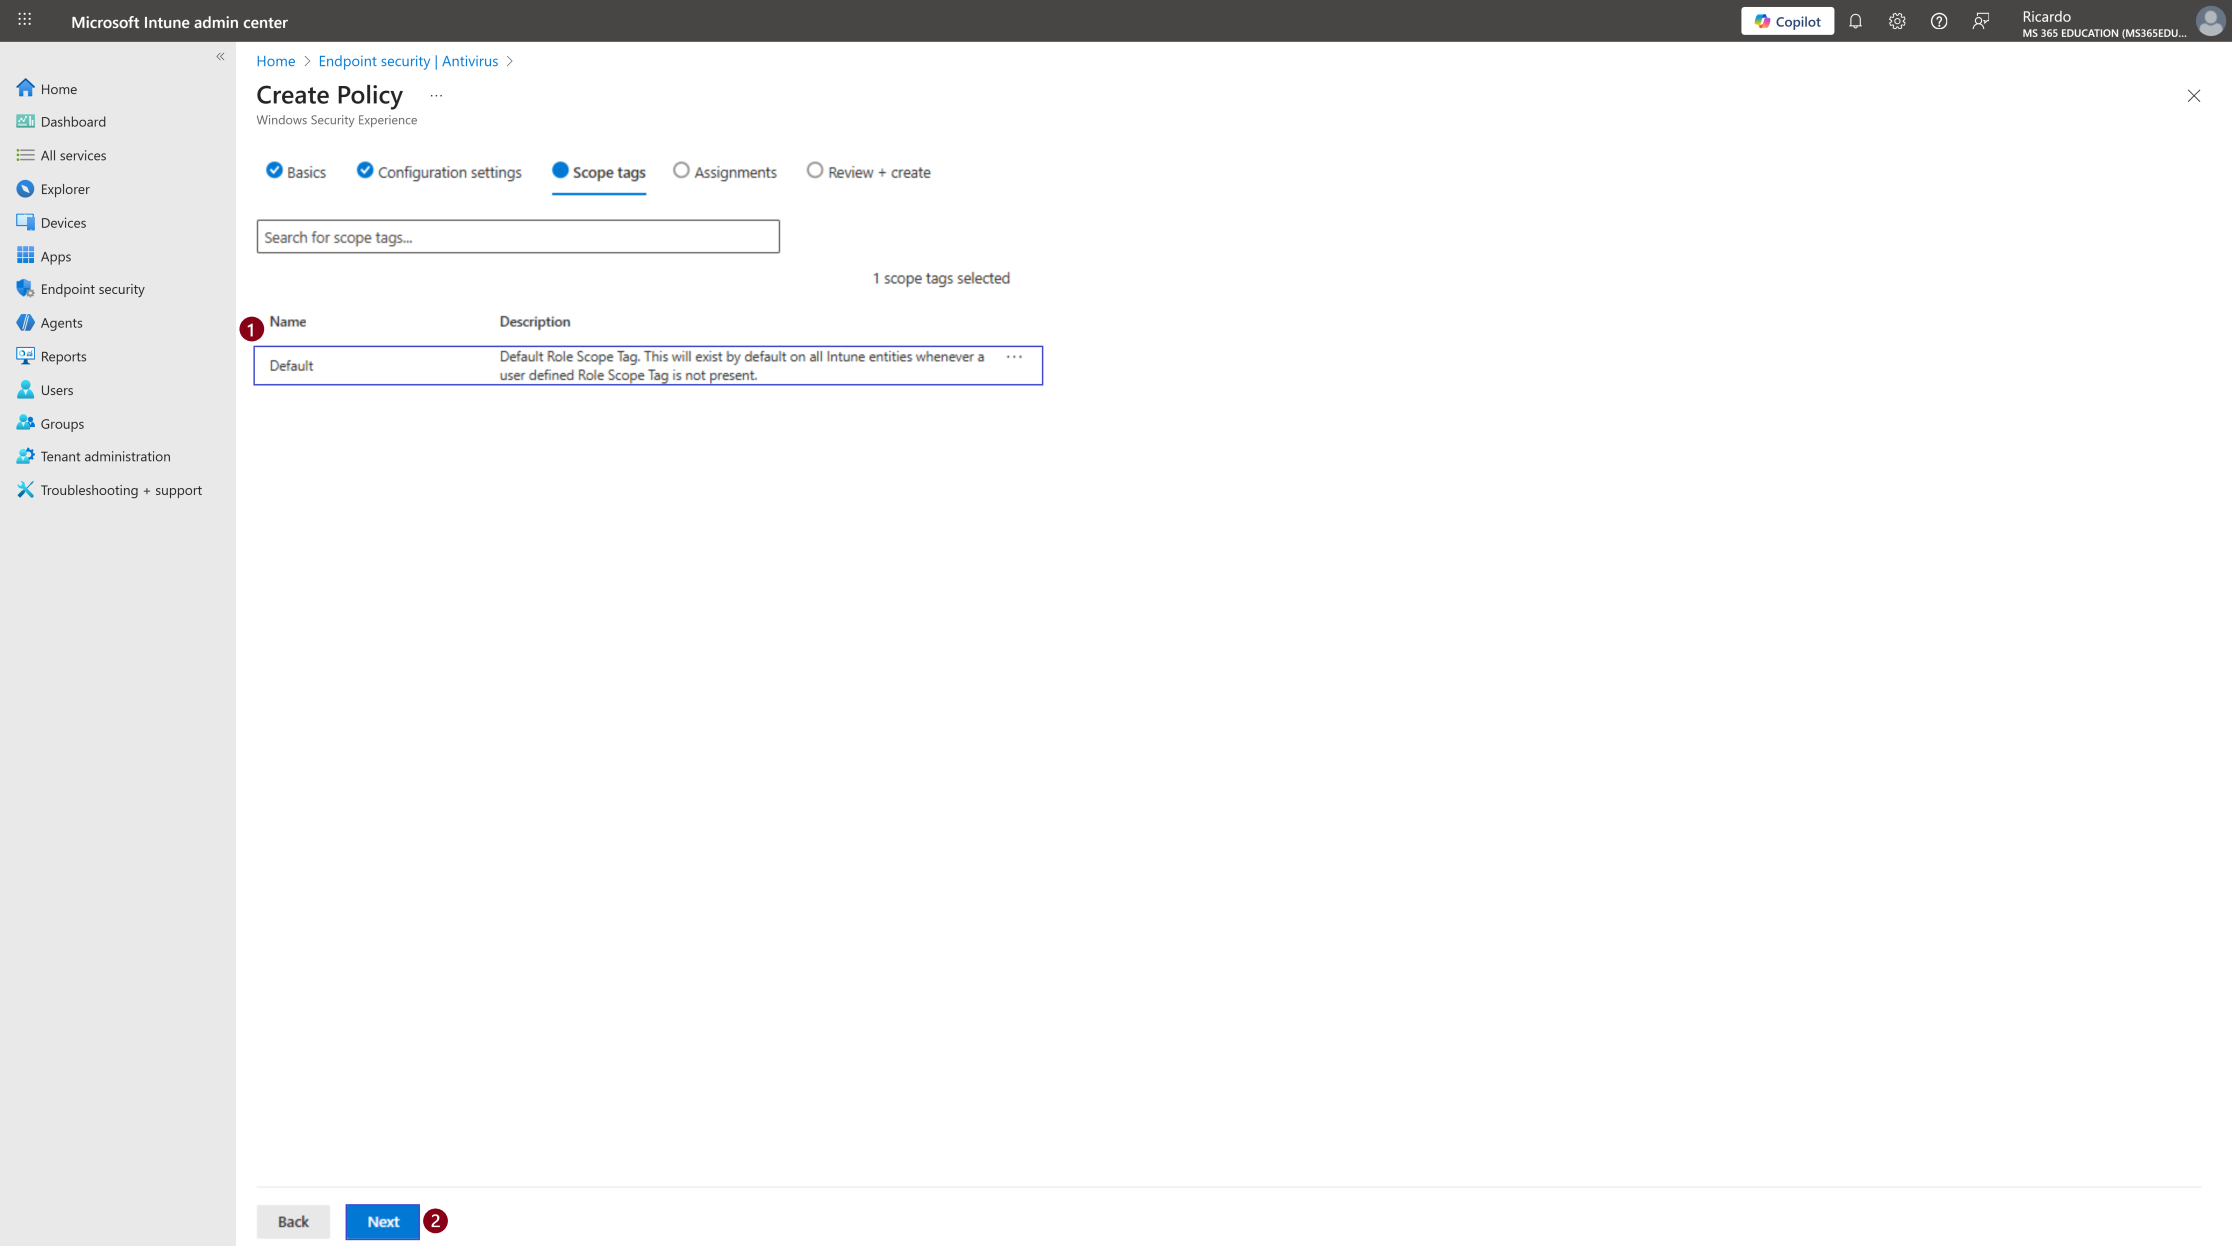
Scope tags are used to control who can view and manage this policy within the Microsoft Intune admin center. They are especially useful in larger or delegated environments where administrative responsibilities are separated across different IT teams or regions.
As shown in the screenshot, the Default scope tag is selected. This is the standard behavior and is sufficient for most environments, as it allows the policy to be visible to all administrators who have access to Intune.
You can optionally assign custom scope tags if you need to:
Limit policy visibility to specific IT roles or teams
Enforce administrative separation
Support delegated or regional management models
If no additional scope tags are required, simply keep the Default selection and click Next to proceed.
Assignments – Device Security Area Visibility Policy
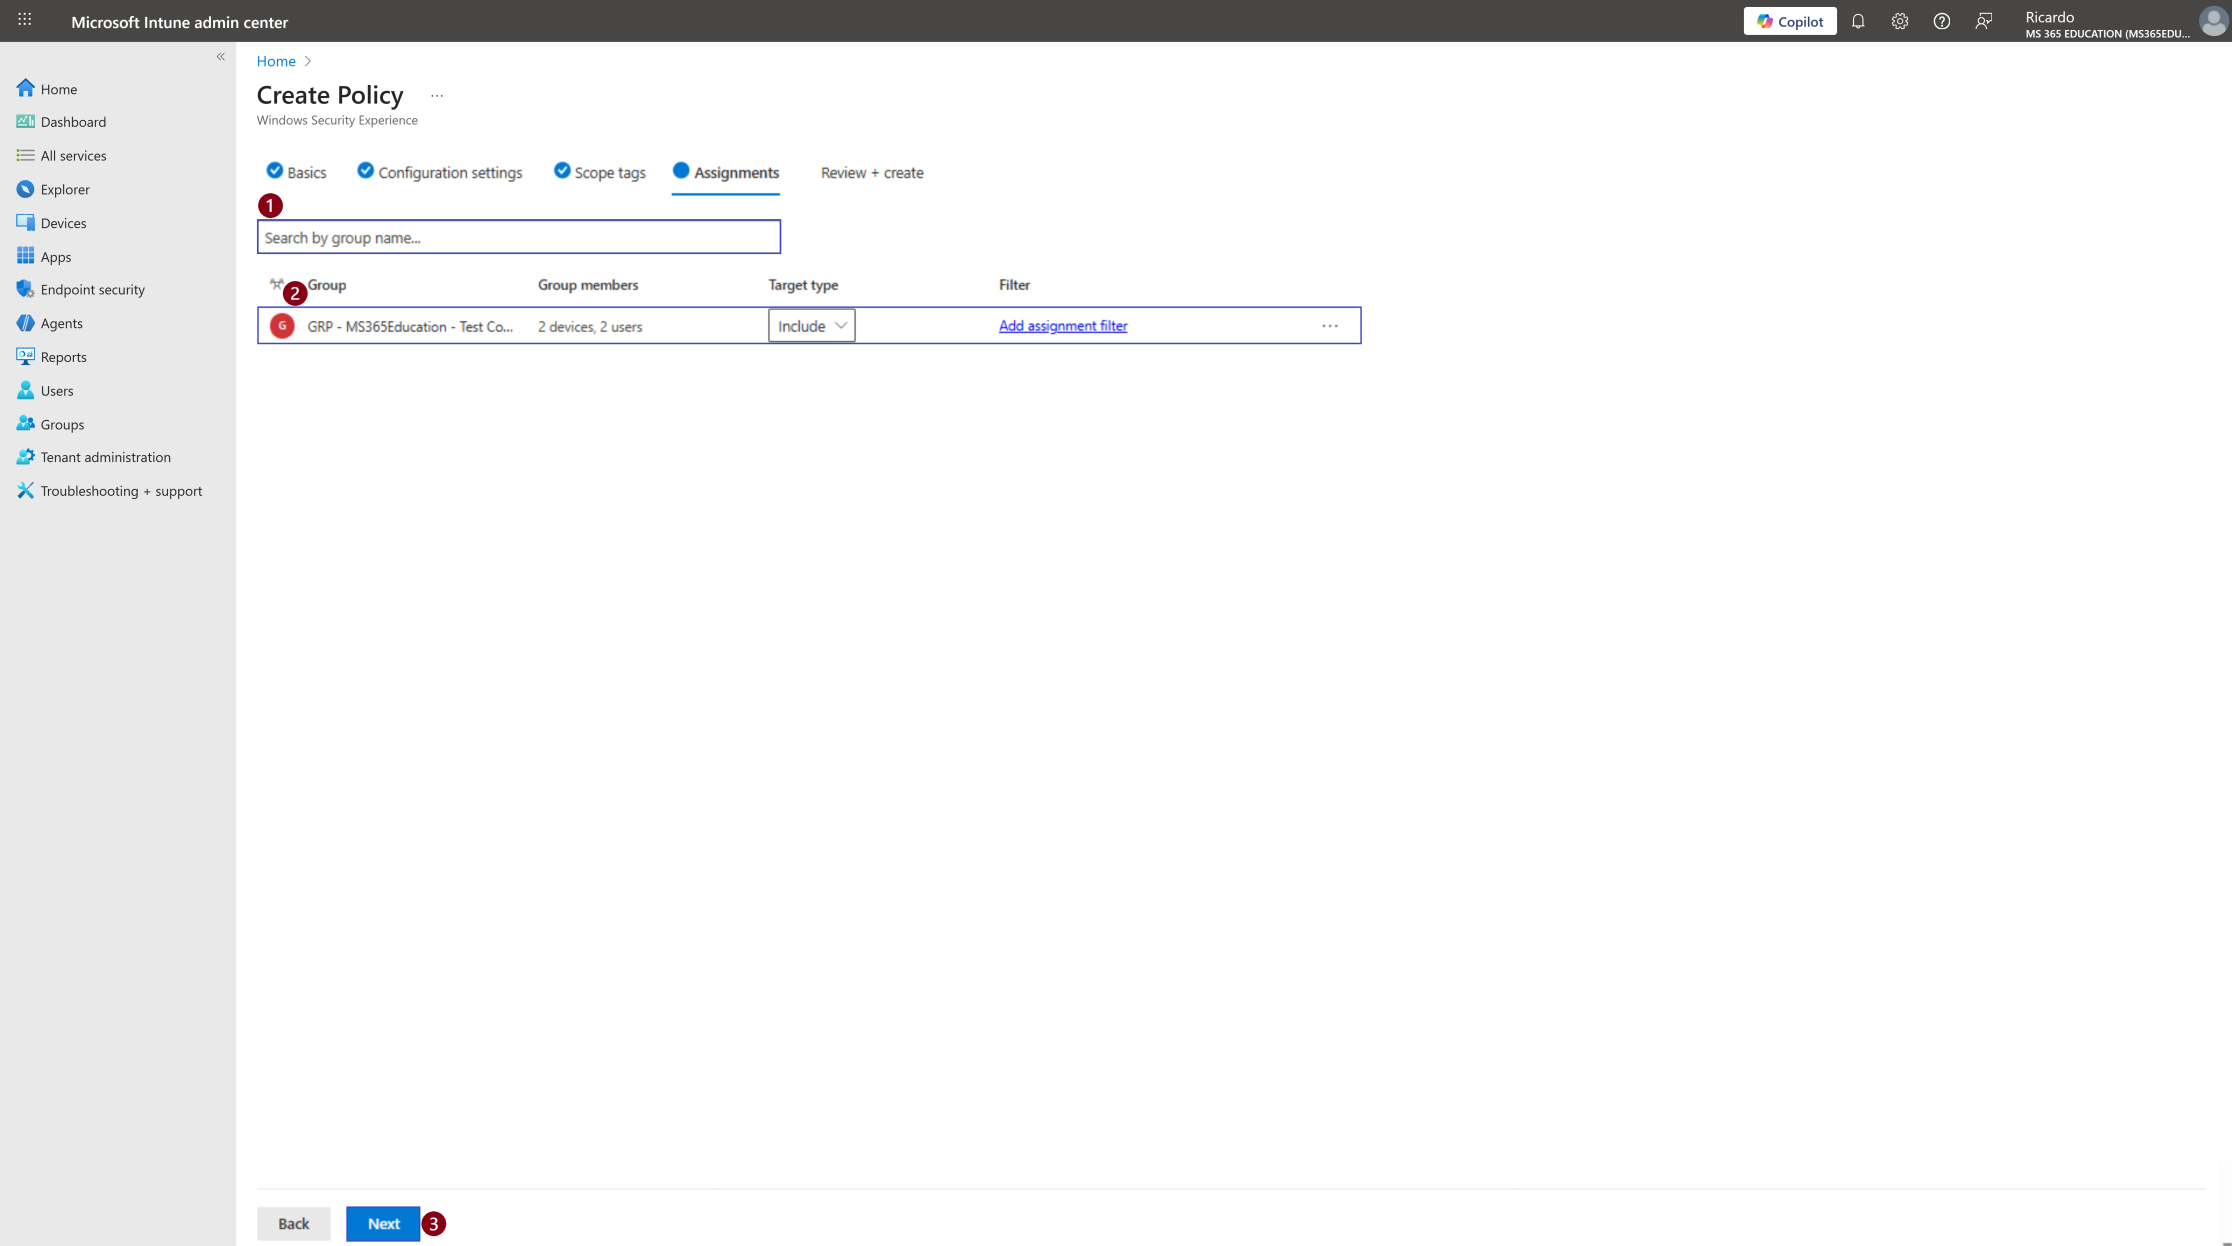
After configuring the policy settings and scope tags, the next step is to assign the Device Security Area Visibility policy to the appropriate target group. Assignments determine which devices will receive and enforce this configuration, ensuring the policy is applied only where intended.
In the Assignments tab, use the Search by group name field to quickly locate the group you want to target. This approach makes it easy to deploy the policy in controlled phases, such as testing environments before moving to production.
As shown in the screenshot, select the desired group. In this example, the policy is assigned to:
GRP – MS365Education – Test Computers
Once the group is selected:
Ensure the Target type is set to Include
Confirm the correct group appears in the assignment list
After selecting the group, click Next to proceed to the Review + Create step.
Review + Create – Final Validation
In the Review + Create step, take a moment to validate all configurations before deploying the policy to production.
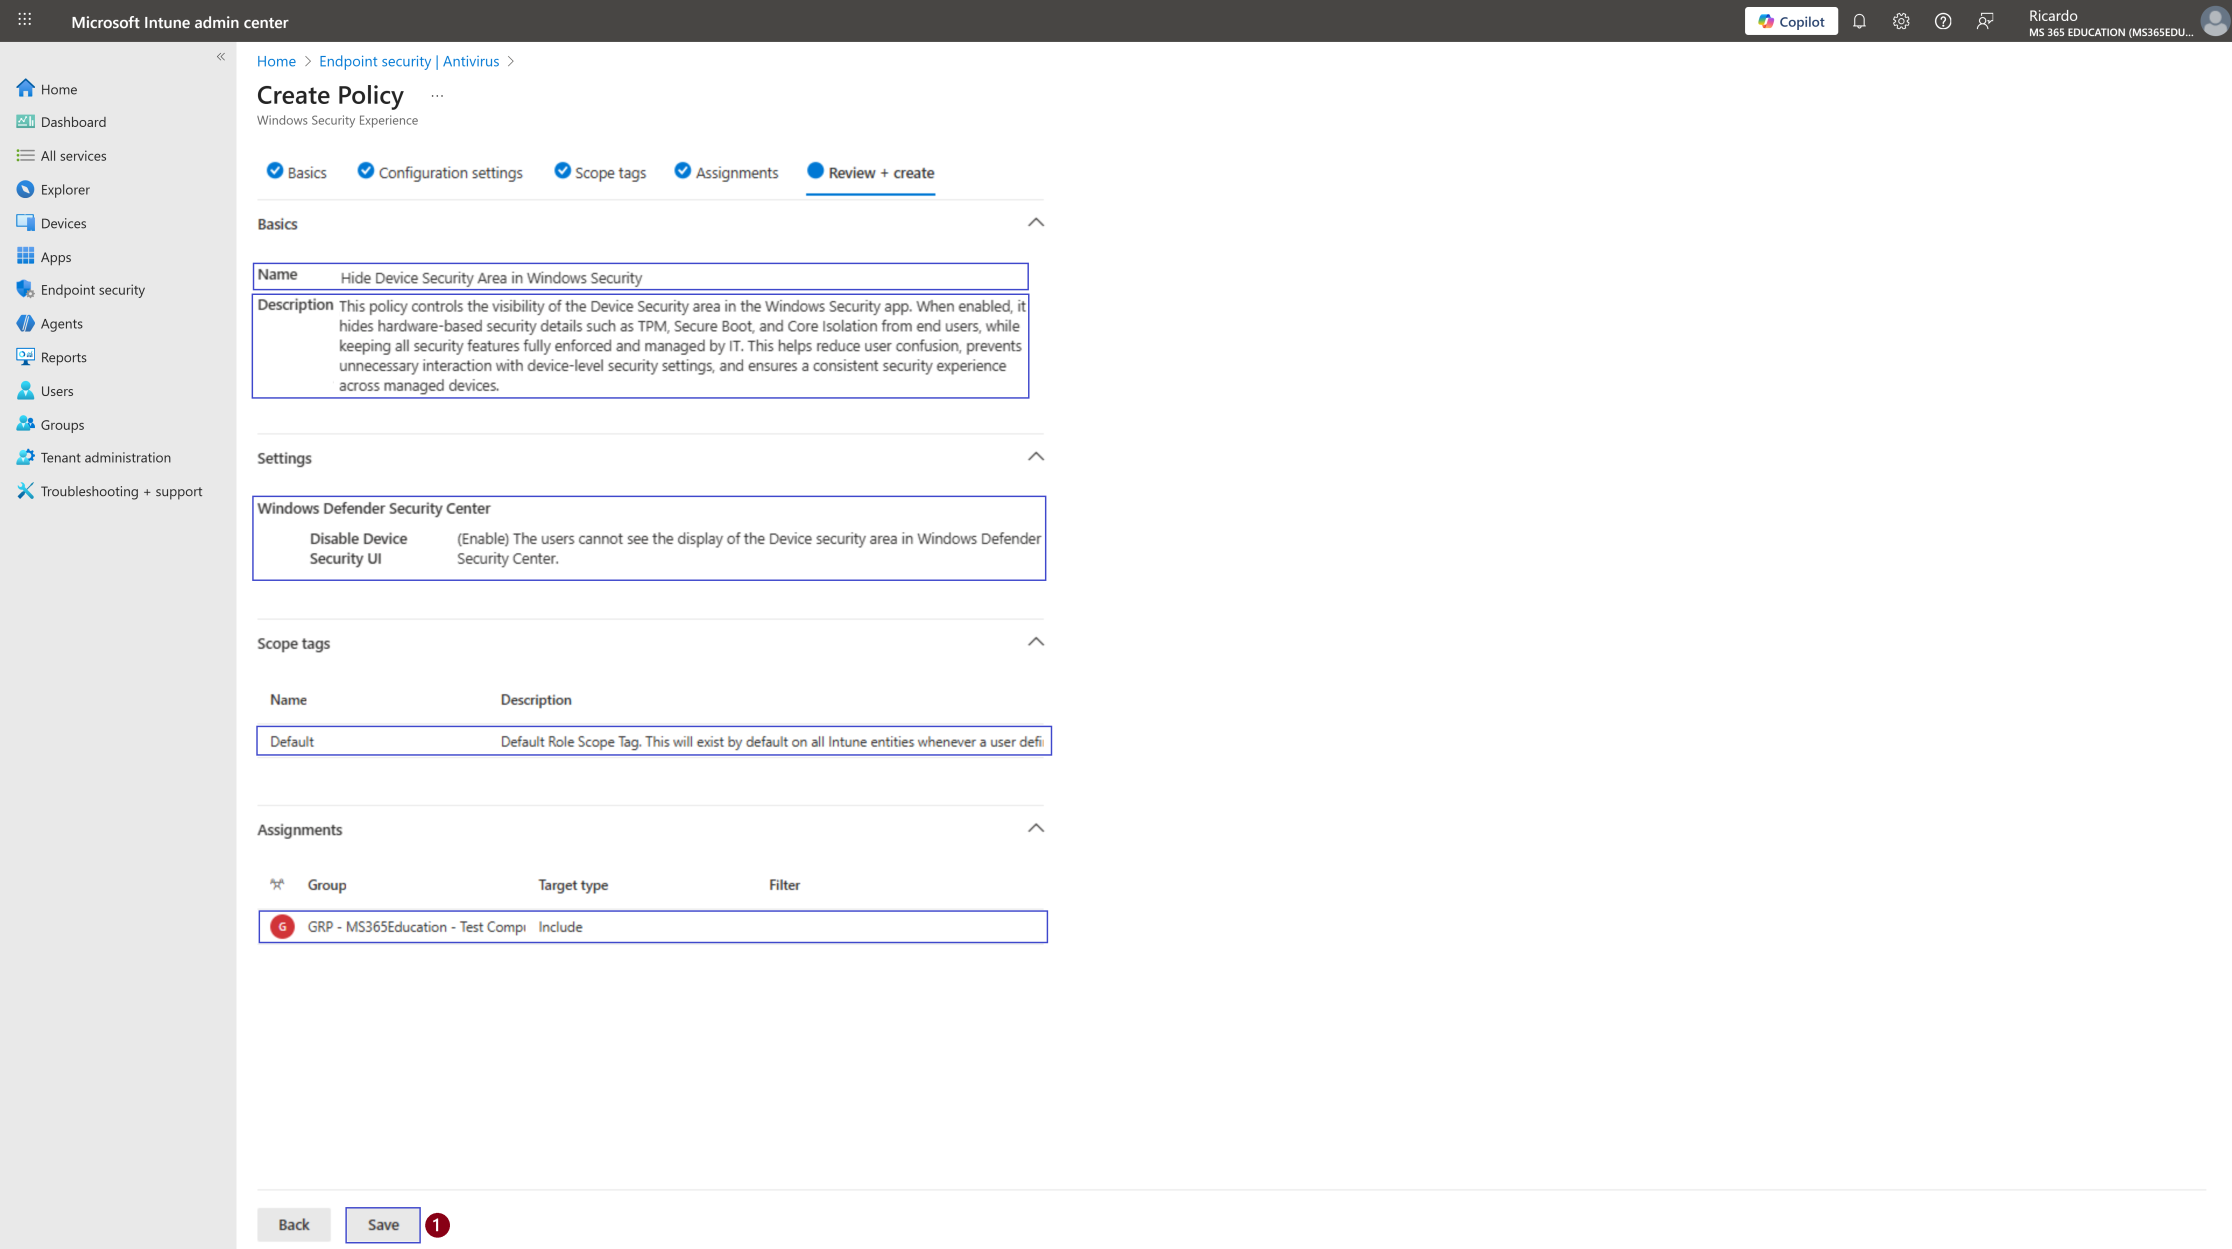
By default, this page is shown in a collapsed view, as illustrated in the first screenshot. To review the full configuration, expand each section as shown in the second screenshot.
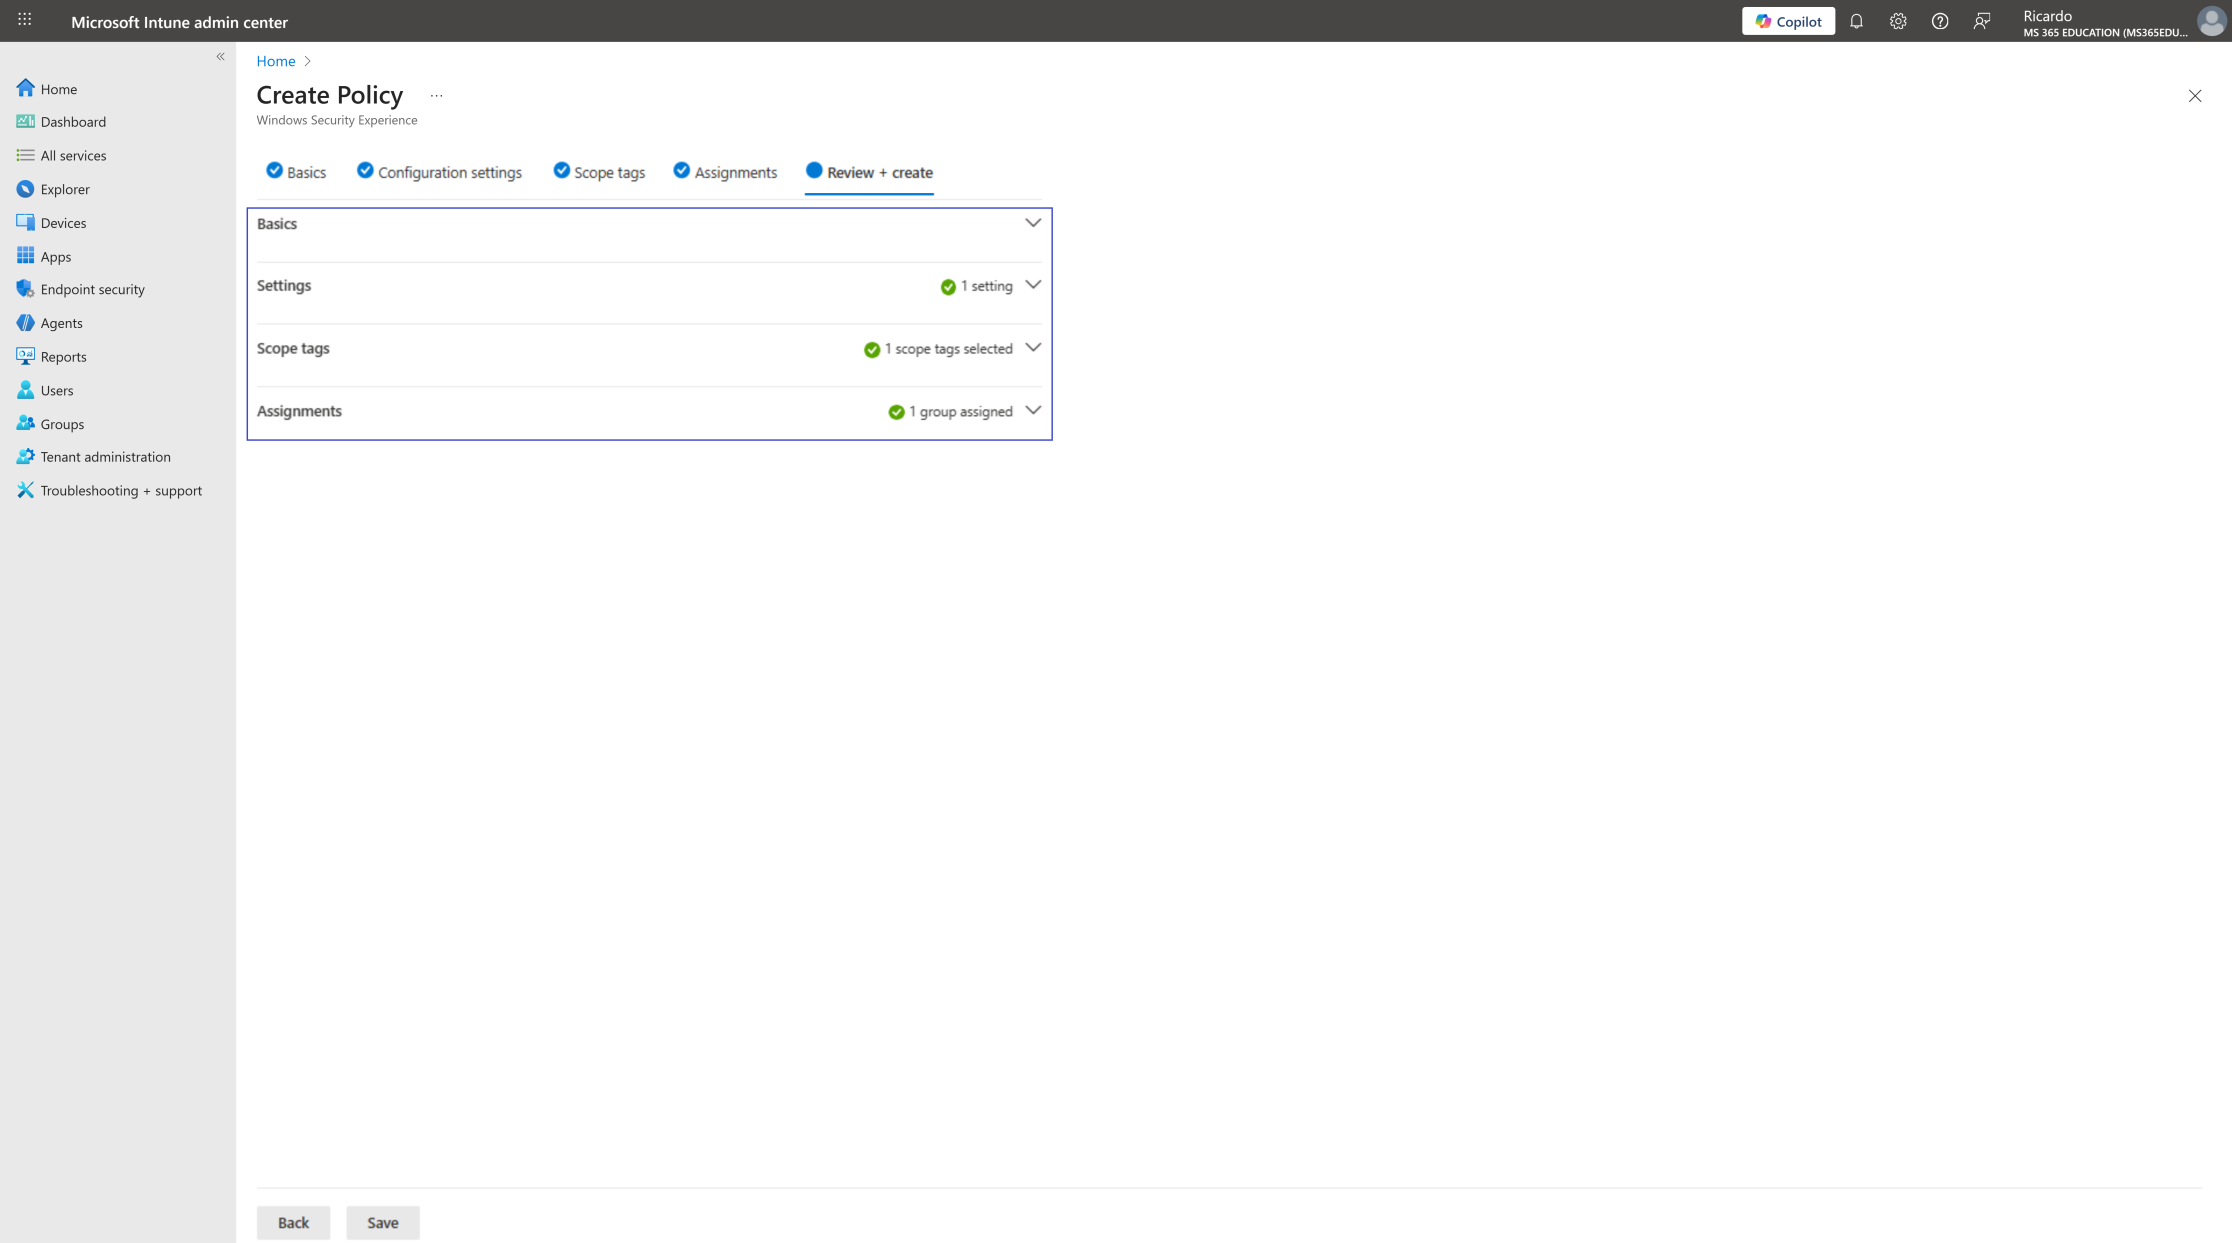
At this stage, carefully verify the following items:
Policy name and description Confirm that the policy clearly reflects its purpose (e.g., Hide Device Security Area in Windows Security).
Configured settings Ensure that Disable Device Security UI is set to Enabled, which hides the Device Security area from end users.
Scope tags Validate that the appropriate scope tag (for example, Default) is applied according to your RBAC and administrative model.
Assignments Confirm that the correct target group is assigned. In this example, the policy is deployed to: GRP – MS365Education – Test Computers
This final review step is critical to ensure the policy is accurately configured, aligned with your security strategy, and targeted to the intended devices.
Once everything has been reviewed and validated, click Create (or Save) to finalize the policy and deploy it to the assigned Windows devices.
Monitor Policy Deployment Status
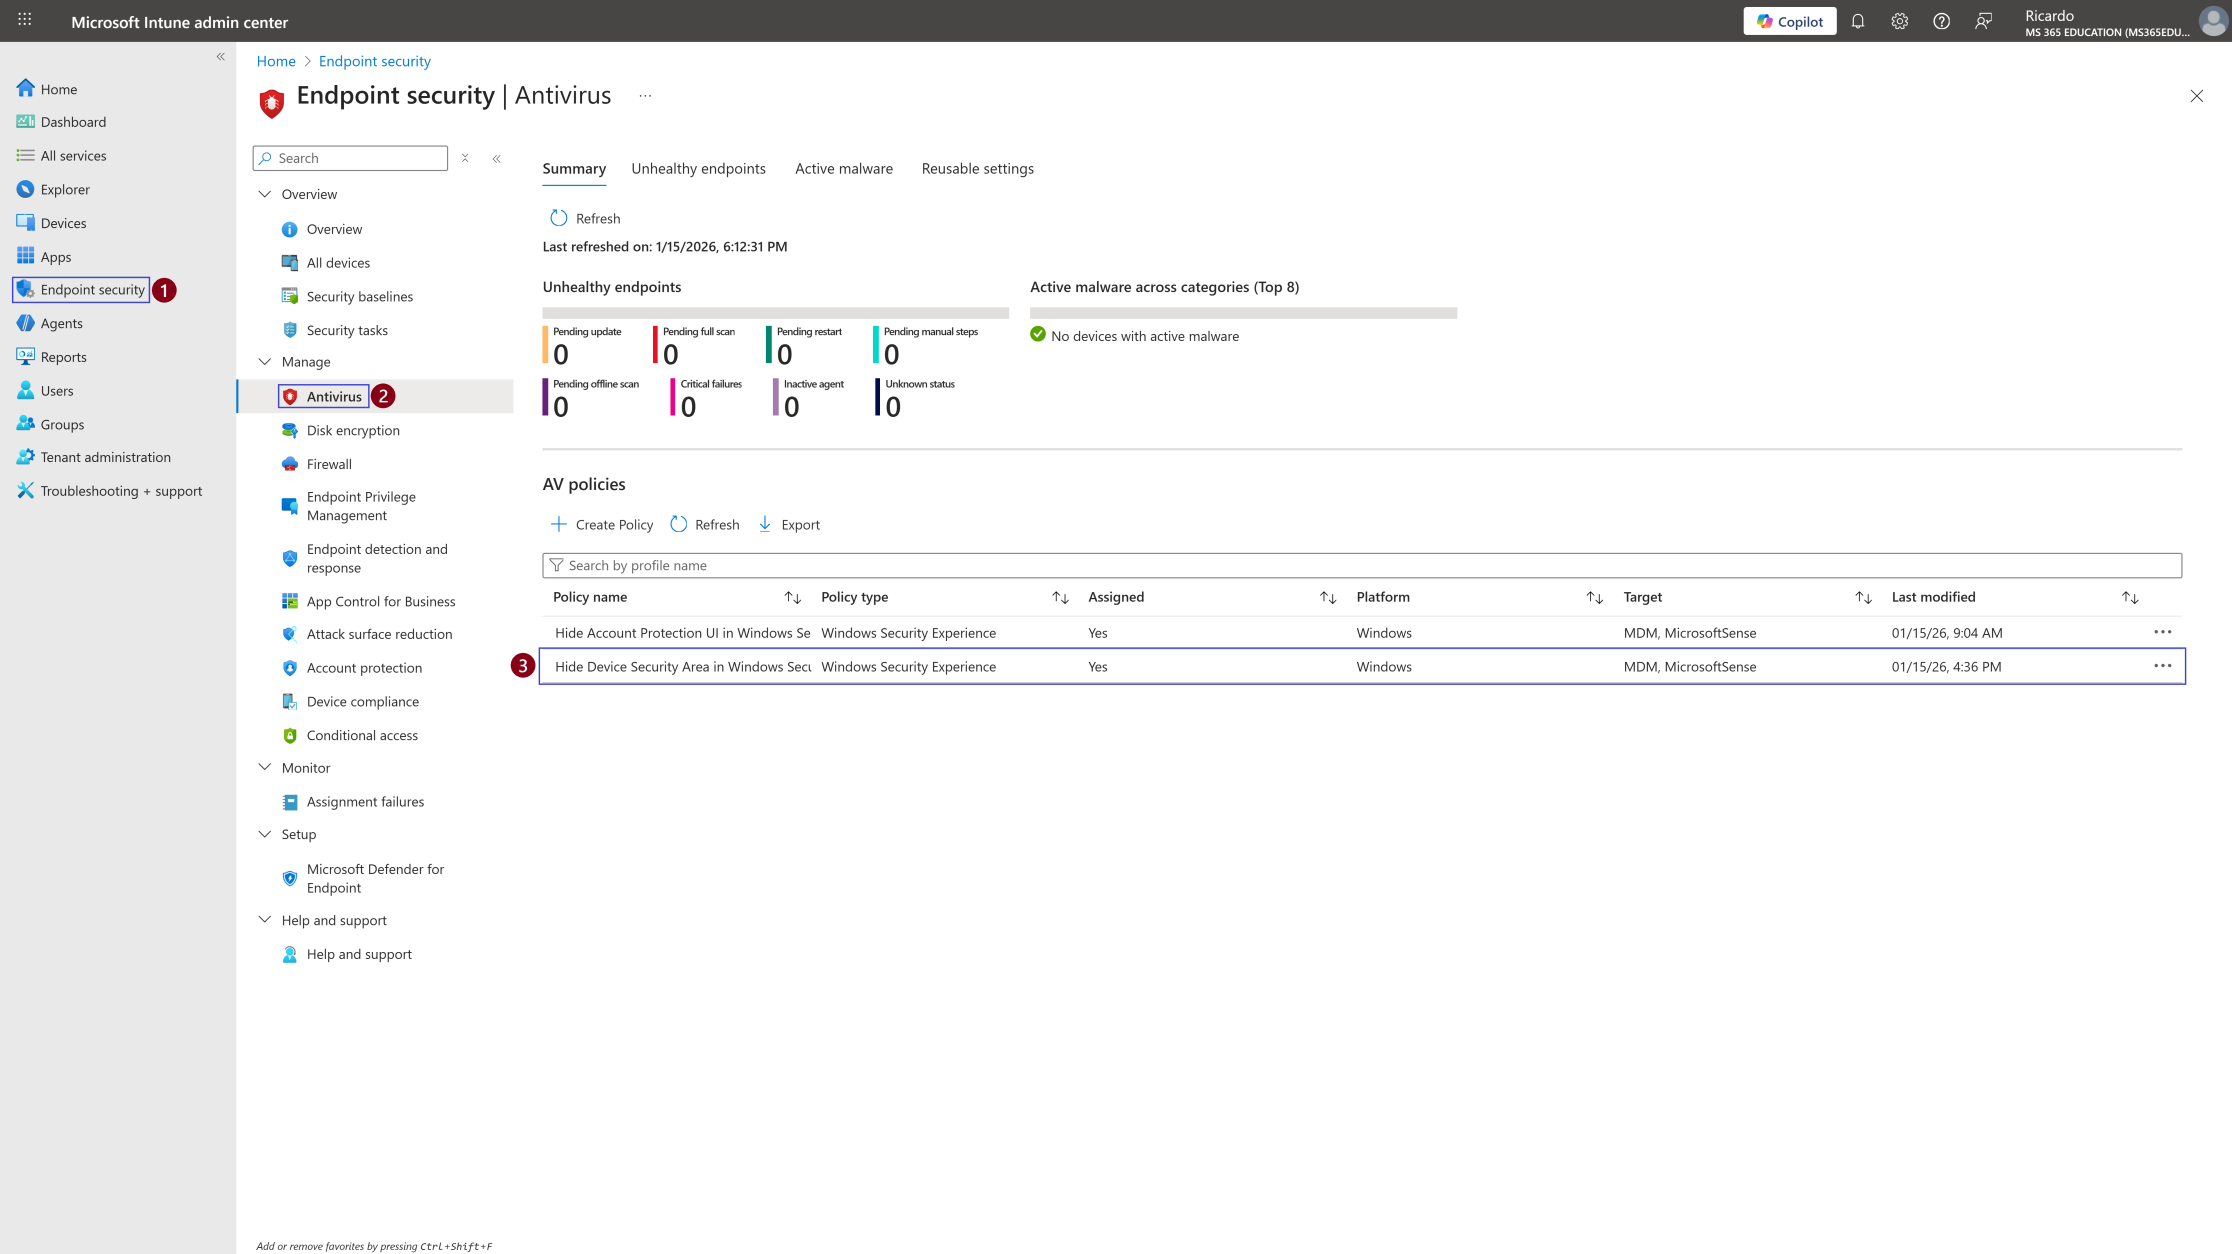
After creating and assigning the Hide Device Security Area in Windows Security policy, the final step is to monitor its deployment and confirm that the configuration has been successfully applied to the targeted devices.
Intune policy deployment typically occurs automatically during the device check-in cycle and may take some time to propagate. If necessary, you can accelerate this process by triggering a manual sync from the device (via the Company Portal) or initiating a sync directly from the Microsoft Intune admin center.
How to Verify Deployment Status
To validate that the policy has been successfully deployed, follow the steps below:
Navigate to Endpoint security ➝ Antivirus
Locate the policy Hide Device Security Area in Windows Security
Click the policy name to open its overview page
Review the Device and user check-in status section
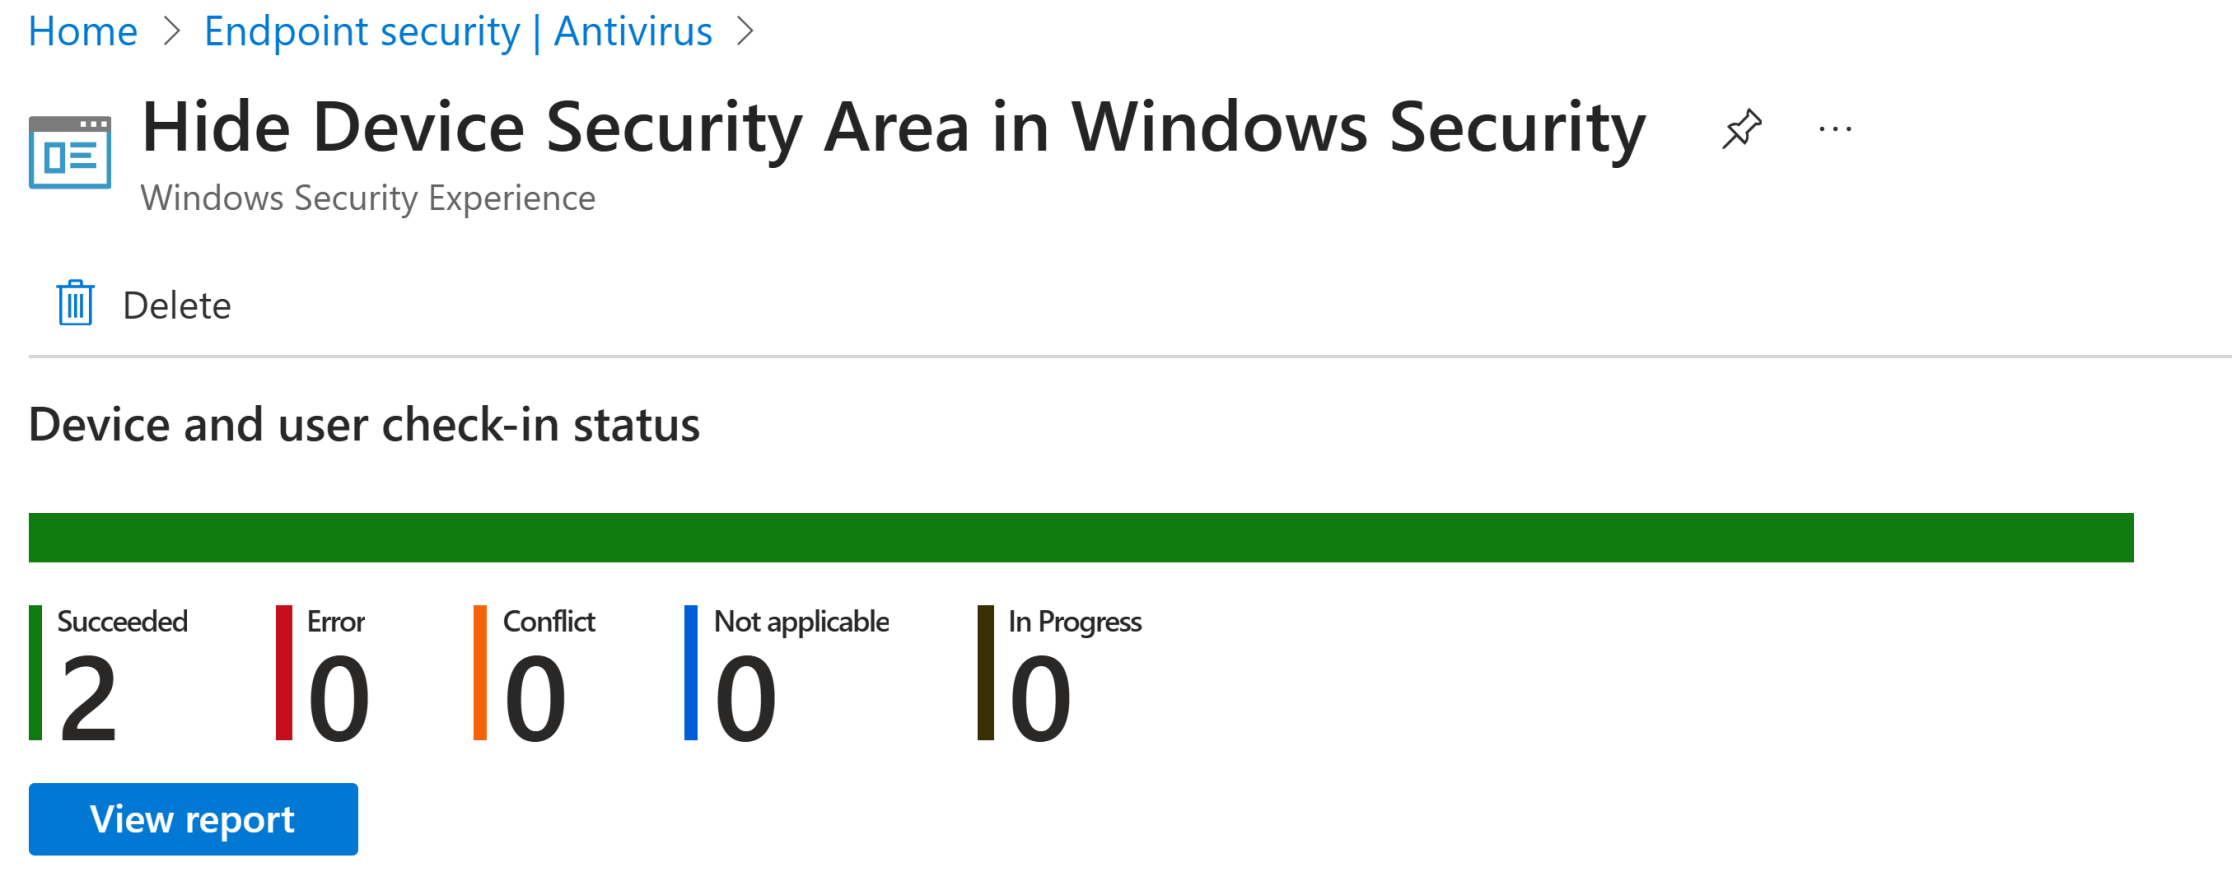
As shown in the screenshot, the policy deployment status provides a clear summary of its enforcement across the targeted devices:
Succeeded: 2
Error: 0
Conflict: 0
Not applicable: 0
In progress: 0
This confirms that the policy has been successfully applied without any errors or conflicts and is being enforced correctly on all assigned devices.
Monitoring this section is a best practice to ensure policy health, quickly identify potential issues, and validate that your security configuration is consistently enforced across your managed Windows environment.
Why This Matters
Monitoring the policy deployment status is a critical step to ensure that your Device Security Area visibility configuration is applied correctly and consistently across managed devices.
By tracking policy status, administrators can:
Quickly confirm successful deployment
Identify and troubleshoot errors or conflicts early
Ensure a consistent and predictable security experience across all Windows devices
This visibility helps maintain confidence in your Intune security posture and allows IT teams to take immediate action if any device falls out of compliance or fails to receive the policy.
Client-Side Verification via Event Viewer
After the device syncs with Microsoft Intune either automatically or through a manual sync you can verify that the Disable Device Security UI policy has been successfully applied directly on the client device using Event Viewer.
This client-side validation method is extremely valuable for troubleshooting, auditing, and compliance verification, especially in enterprise or regulated environments.
How to Verify Policy Application
Open Event Viewer on the target Windows device
Navigate to: Applications and Services Logs ➝ Microsoft ➝ Windows ➝ DeviceManagement-Enterprise-Diagnostics-Provider ➝ Admin
In the right-hand pane, select Filter Current Log
Look for Event ID 813 or 814, which typically indicates successful processing of Intune configuration policies
Open the event details and review the policy information
When the policy is applied successfully, you will see an Int value of (0x1), confirming that the Device Security area is hidden in the Windows Security app.
This means:
The Device Security UI is no longer visible to end users
Hardware-based protections such as TPM, Secure Boot, and Core Isolation remain fully enabled
All security controls continue to be centrally managed by Intune
You may also see additional metadata such as Enrollment ID, User SID, and Scope, depending on how the device was enrolled and how the policy was assigned.
Pro Tip
Always ensure the event timestamp aligns with the most recent device sync. Client-side verification via Event Viewer is one of the most reliable ways to confirm Intune policy enforcement especially when troubleshooting delayed deployments or unexpected behavior.
More Information
For additional technical details, official documentation, and deeper insights into controlling Windows Security UI visibility and managing endpoint security through Microsoft Intune, refer to the Microsoft Learn resources below:
Policy CSP – Windows Defender Security Center (DisableDeviceSecurityUI) https://learn.microsoft.com/en-us/windows/client-management/mdm/policy-csp-windowsdefendersecuritycenter
Create and Manage Windows Security Experience Policies in Intune https://learn.microsoft.com/en-us/mem/intune/protect/endpoint-security-antivirus-policy
Create Configuration Profiles Using the Intune Settings Catalog https://learn.microsoft.com/en-us/mem/intune/configuration/settings-catalog
Monitor Intune Policy Deployment and Troubleshoot Profiles https://learn.microsoft.com/en-us/mem/intune/configuration/device-profile-troubleshoot
Event Viewer Logs for MDM and Intune Diagnostics https://learn.microsoft.com/en-us/mem/intune/configuration/device-profile-troubleshoot#event-viewer-logs
Thank you!
🖥️ Ricardo Barbosa
🎖️ Microsoft MVP | 📘 Microsoft Certified Trainer (MCT)
☁️ Intune & Cloud Architect |💼 Technology Director at Altelix.com