

Configuring Google Chrome for usage with device-based Conditional Access
In this article, I will focus on configuring automatic sign-in for user accounts backed by a Microsoft Cloud identity provider—without the need to install a specific browser extension. Today, there’s a convenient setting that simplifies this process, making it even easier to implement.
What’s particularly helpful is that Microsoft Intune provides configuration options for Google Chrome directly through the Settings Catalog. However, it’s important to note that not all settings are currently available within this catalog. To address this, it’s still necessary to use the available Group Policy templates to facilitate the required configuration.
This blog post will offer a concise overview of importing these settings, followed by a step-by-step guide to implementing the configuration. It will conclude with an overview of the user experience.
Note: There are alternative methods for using third-party ADMX-files. Those methods are referenced in this post.
Importing the Google Chrome ADMX-files
Managing the required settings for Google Chrome begins with importing the necessary third-party ADMX and ADML files. Since this feature is still in public preview, it’s crucial to understand its current limitations. These limitations provide valuable insight into how best to utilize the feature effectively.
For more information about the public preview, visit the official Microsoft documentation: Administrative templates - Import custom ADMX and ADML files.
A maximum of 20 ADMX-files can be imported (each being 1MB or smaller)
Each ADMX-file only supports a single language (each can also only be combined with a single ADML-file)
Important: At the moment of writing, only en-us ADML-files are supported.
After understanding the current limitations of importing third-party ADMX files, the next step is to explore the process of importing these files. It’s essential to be aware of their dependencies, as those must be imported first to ensure proper functionality. This is particularly relevant for configuring Google Chrome. The configuration requires the chrome.admx file, which depends on both the google.admx and windows.admx files.
The following seven steps outline the process of importing the necessary ADMX and corresponding ADML files, ensuring a smooth and efficient setup.
Important: At the moment of writing, the combo box setting type is still not supported.
1. Download the ADMX and ADML-files for Google Chrome here
2. Open the Microsoft Intune admin center portal and navigate to Devices > Configuration
3. On the Import ADMX tab, select Import to start the process of importing the ADMX-file and ADML-file
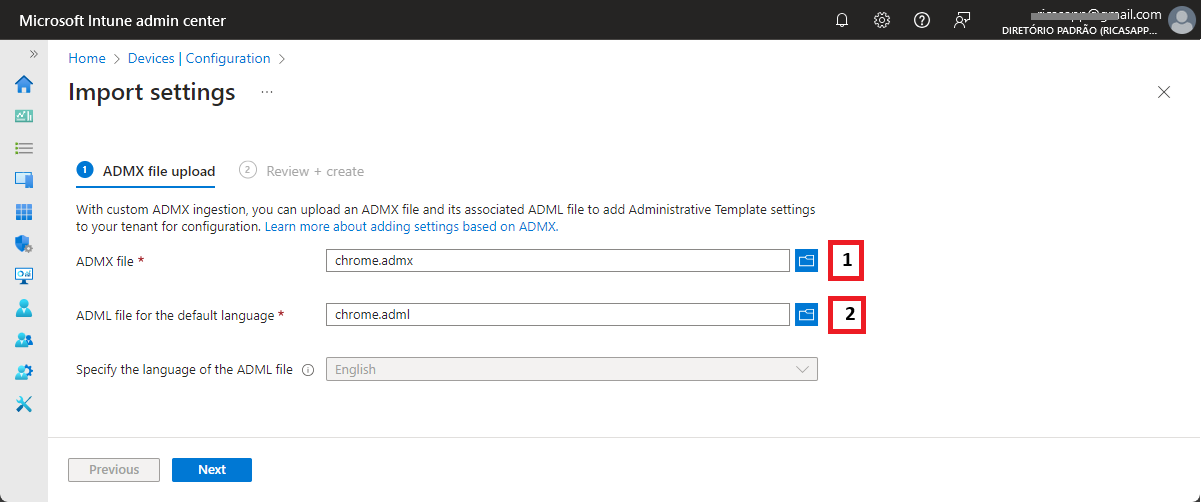
4. On the ADMX file upload page, as shown in Figure 1, provide the following information and click Next
ADMX file (1): Select the google.admx file to import
ADML file for the default language (2): Select the google.adml file to import
Specify the language of the ADML file: At this moment English is selected and grayed out
5. On the Review + create page, click Create
6. Once the Status is Available, walk through step 2-4 for the windows.admx file and the windows.adml file
7. Once the Status is Available, walk through step 2-4 for the chrome.admx file and the chrome.adml file
It's important to note that managing updates for ADMX and ADML files can be challenging. Attempting to upload an updated ADMX file with settings already imported will result in a namespace error, as duplicates are not allowed—even for new versions containing the same settings. Additionally, ADMX files cannot be removed if they are still referenced in a configuration profile.
When working with third-party ADMX files, it's crucial to plan ahead for handling updates, ensuring a strategy is in place for managing both the files and their related settings effectively.
Configuring the required settings in Google Chrome
After importing the required ADMX and ADML files, the settings within those ADMX files become available for configuration in Microsoft Intune. This can be done using the Imported Administrative Templates configuration template, which provides an easy way to browse and manage the imported settings.
For managing Google Chrome configurations, this includes the essential setting required for device-based Conditional Access. The friendly name for this setting is Allow automatic sign-in to Microsoft® cloud identity providers, corresponding to the policy name CloudAPAuthEnabled.
The following eight steps detail the process of configuring this specific setting in Google Chrome.
1. Open the Microsoft Intune admin center portal and navigate to Devices > Configuration
2. On the Devices | Configuration profiles page, click Create profile
3. On the Create a profile blade, provide the following information and click Create
Platform: Select Windows 10 and later as platform
Profile type: Select Templates > Imported Administrative templates as profile type
4. On the Basics page, provide at least a unique name and click Next
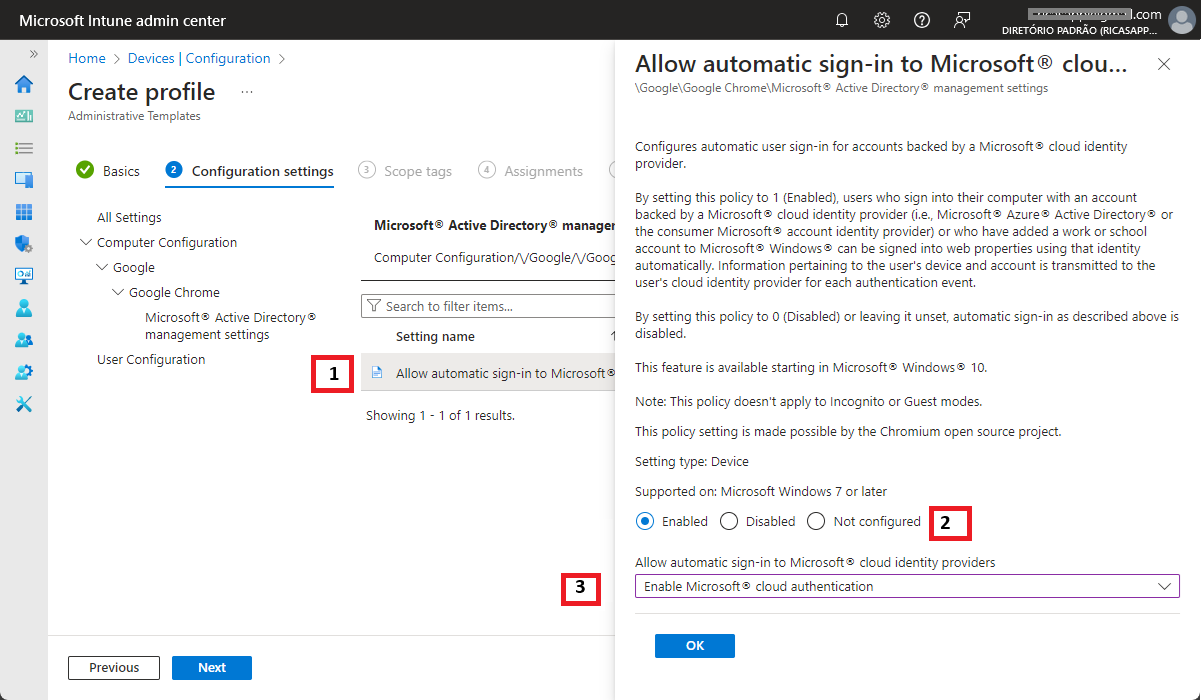
5. On the Configuration settings page, as shown in Figure 2, configure the following setting and click Next
Navigate to Computer Settings > Google > Google Chrome > Microsoft® Active Directory® management settings, select Allow automatic sign-in to Microsoft® cloud identity providers (1), and select Enabled (2) > Enable Microsoft® cloud authentication (3)
6. On the Scope tags page, configure the require scope tags and click Next
7. On the Assignments page, configure the required assignment and click Next
8. On the Review + create page, verify the configuration and click Create
Important: Keep in mind that updating the imported ADMX-file can be a challenging process.
In this scenario, importing the ADMX file serves as a valid method to temporarily configure this specific setting, especially since most other settings are already directly available within Microsoft Intune. However, if the goal is to import an ADMX file solely for a single setting, it may be more efficient to consider using custom OMA-URIs instead.
Experiencing the new configuration
Once the configuration of Google Chrome is complete, the next step is to verify that it has been applied correctly. This can be accomplished through various methods. Since the configuration is ADMX-backed, verification can be performed by checking the registry, the Windows Settings app, or directly within the browser itself.
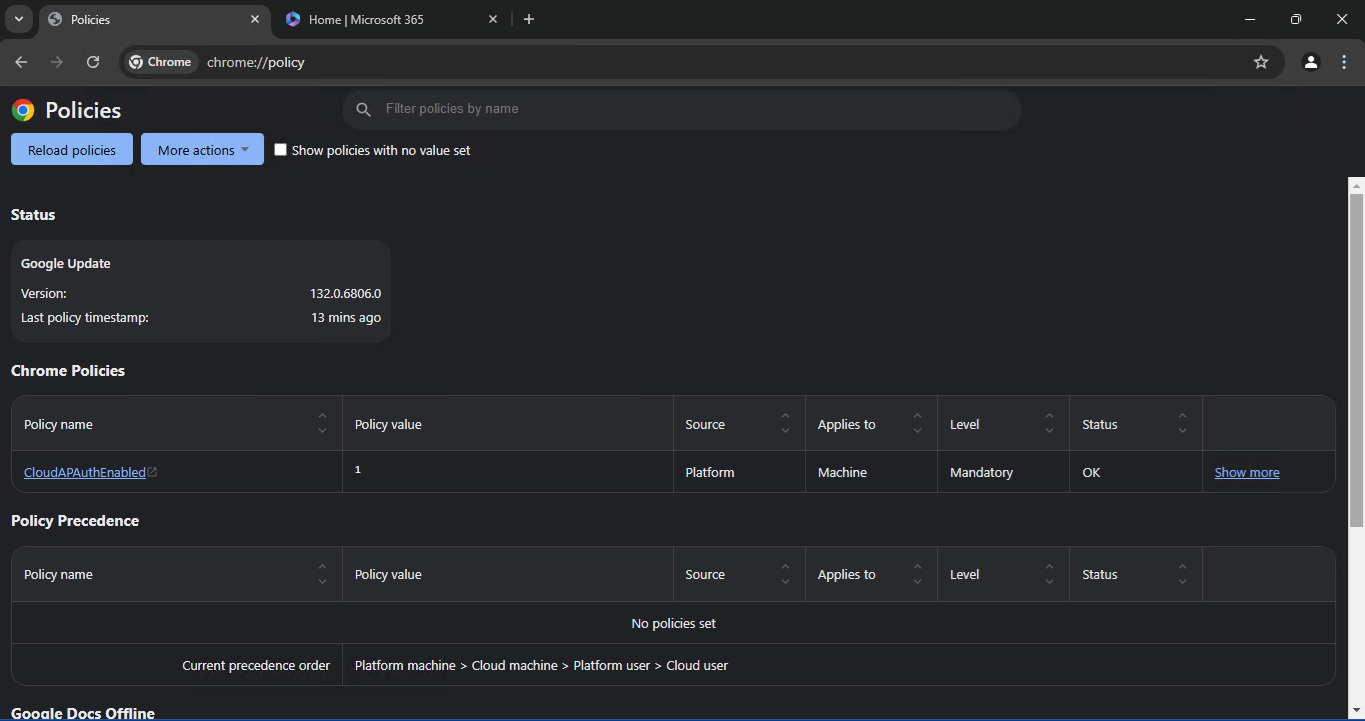
The browser offers the most concrete and user-friendly method of verification, as it provides direct access to all available and applied configurations (similar to Microsoft Edge). To do this, simply open Google Chrome, navigate to chrome://policy, and scroll down to the Chrome Policies section.
In this section, you should see at least the policy CloudAPAuthEnabled listed as a configured policy, as shown in Figure 3. This view also includes information about the configured value, allowing you to confirm that the setting has been correctly applied and is active.
More information
For more information about managing third-party ADMX-files, and Google Chrome ADMX-files, refer to the following docs.
Conditions in Conditional Access policy – Microsoft Entra ID | Microsoft Learn
Import custom and third-party partner ADMX templates in Microsoft Intune | Microsoft Learn
Download de Chrome-browser voor je bedrijf: Chrome Enterprise
Thank you!
🖥️ Ricardo Barbosa
📘 MCT Microsoft Certified Trainer | ☁️ Cloud Architect
🌐 Technology Director - https://altelix.com