

In this post, we’ll explore how to enable or disable Hotspot Authentication using a policy deployed through Microsoft Intune — a powerful and flexible platform for modern device management.
As many of you know, the Settings Catalog in Intune is one of the most efficient ways to configure and deploy policies at scale. Among the key wireless settings is Hotspot Authentication, which plays an important role in ensuring secure connectivity in public environments such as airports, hotels, and educational institutions.
Why Hotspot Authentication Matters
Hotspot authentication enables seamless and secure connections to public Wi-Fi networks by leveraging the WISPr (Wireless Internet Service Provider roaming) protocol. When enabled, this feature allows users to automatically connect to supported Wi-Fi networks without needing to manually log in via a browser each time — greatly improving user experience and productivity.
However, if this setting is disabled, users must manually authenticate every time they connect, increasing friction and potentially exposing them to unsecured networks or rogue access points.
By enabling this feature via Intune, organizations help ensure that only authorized users can connect to wireless networks — a key step toward enforcing Zero Trust principles.
WISPr Protocol Policy Behavior
If Enabled or Not Configured: Windows will automatically probe for WISPr support and allow seamless authentication when available.
If Disabled: Users must authenticate manually through a web browser, which may reduce efficiency and increase risk.
CSP Details and Deployment Notes
When configuring this policy in Intune, it’s important to review the Configuration Service Provider (CSP) details to ensure compatibility with the target OS and version. These technical details define how and where the policy is applied within the system.
⚠️ Note: Some CSP-based settings may appear as placeholders and might not be fully supported in production environments. Always test configurations in a pilot group before deploying broadly.

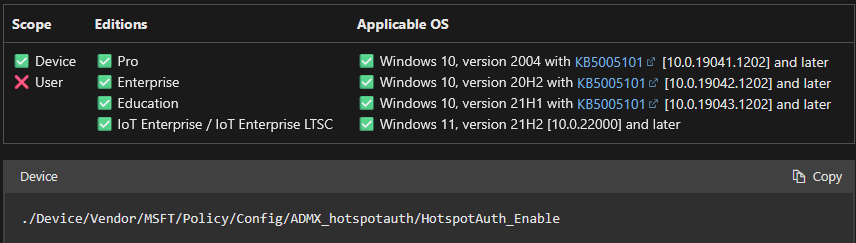
How to Create the Policy in Microsoft Intune
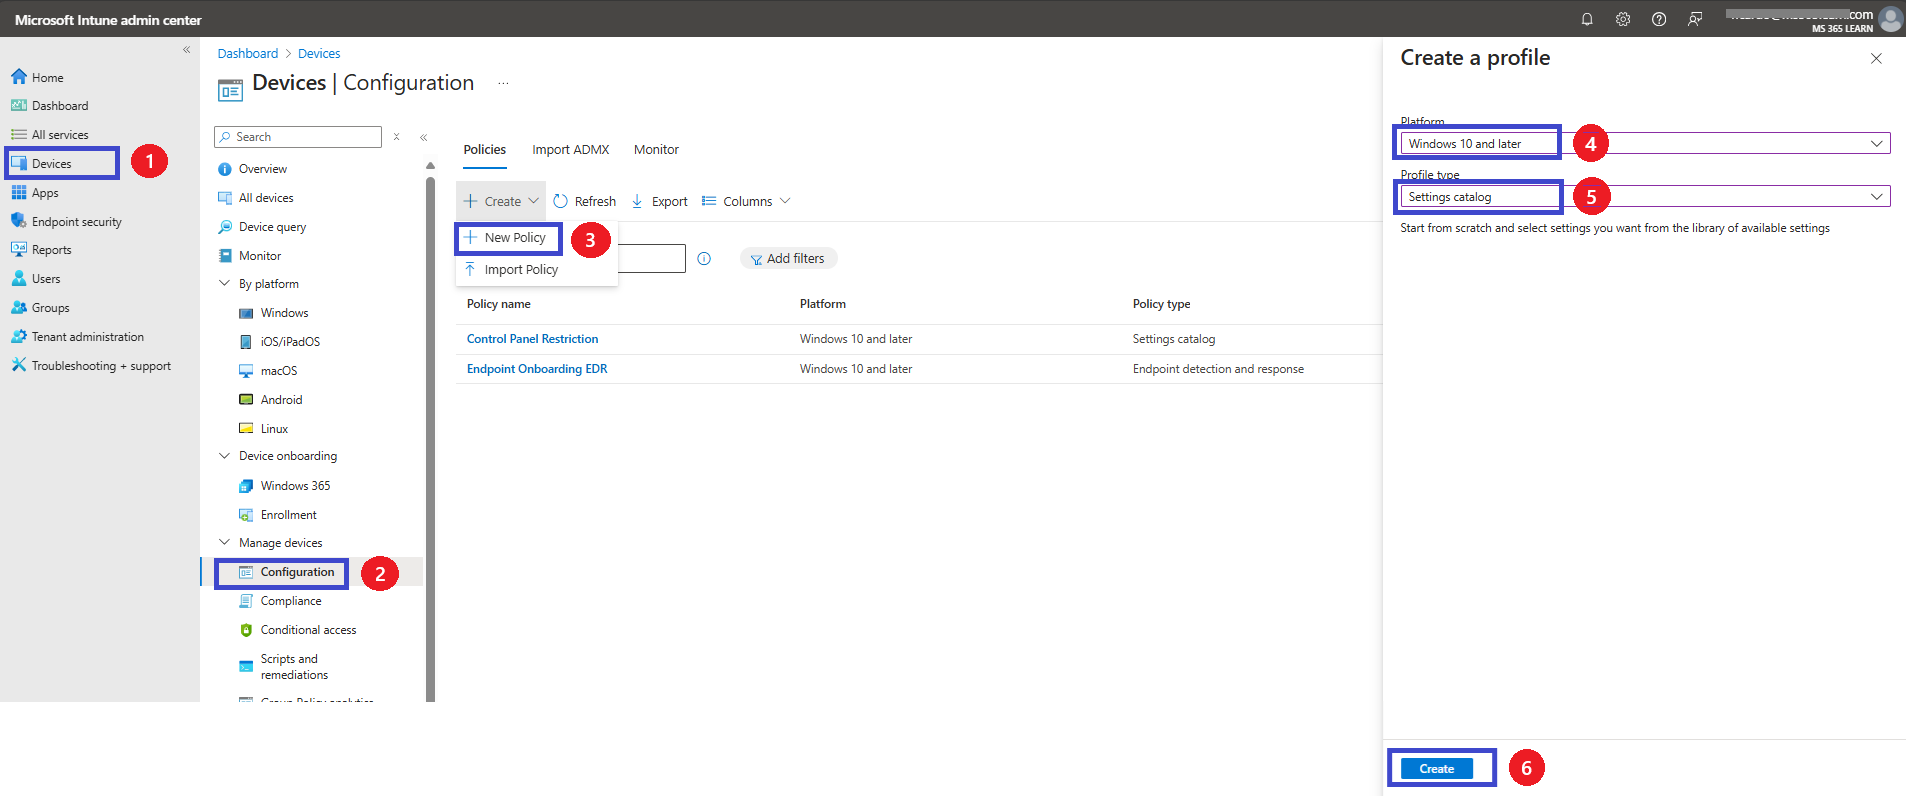
To deploy the Hotspot Authentication policy using Microsoft Intune, follow these steps:
Sign in to the Microsoft Intune admin center.
Navigate to Devices > Configuration profiles.
Click on + Create profile.
In the creation wizard: Platform: Select Windows 10 and later Profile type: Choose Settings catalog
Click Create to proceed with the configuration.
Once created, you can search for the Hotspot Authentication setting within the catalog and define its behavior according to your requirements.
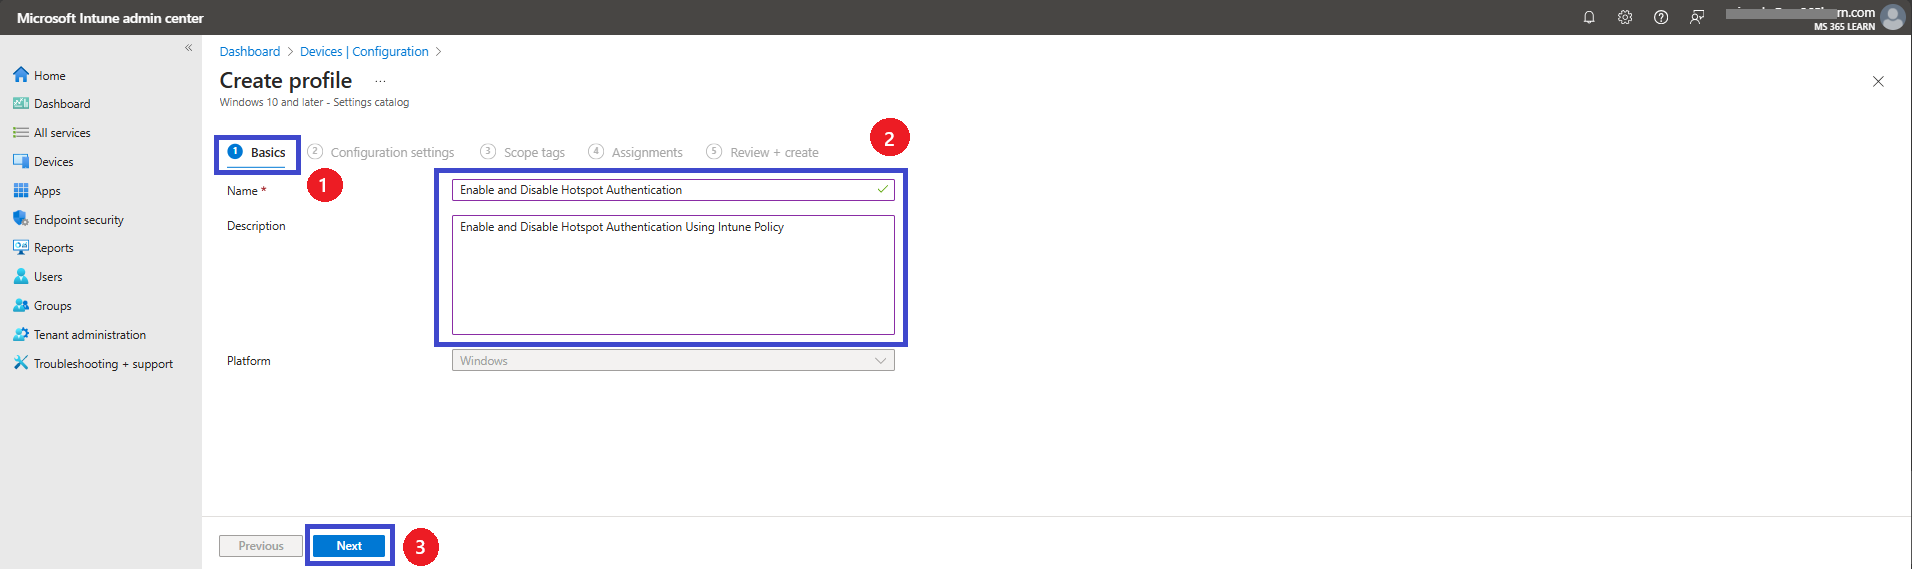
Basics
To deploy this policy using Microsoft Intune, follow these detailed steps: First, sign in to the Microsoft Intune admin center using your administrator credentials. Once logged in, navigate to the Devices section in the left-hand menu, then select Configurations.
This will take you to the configuration policies page. On the right side of the screen, click the + Create button, and from the available options, choose New Policy.
Select the platform as Windows 10 and later
Set the profile type to Settings catalog
Then, click Create to proceed
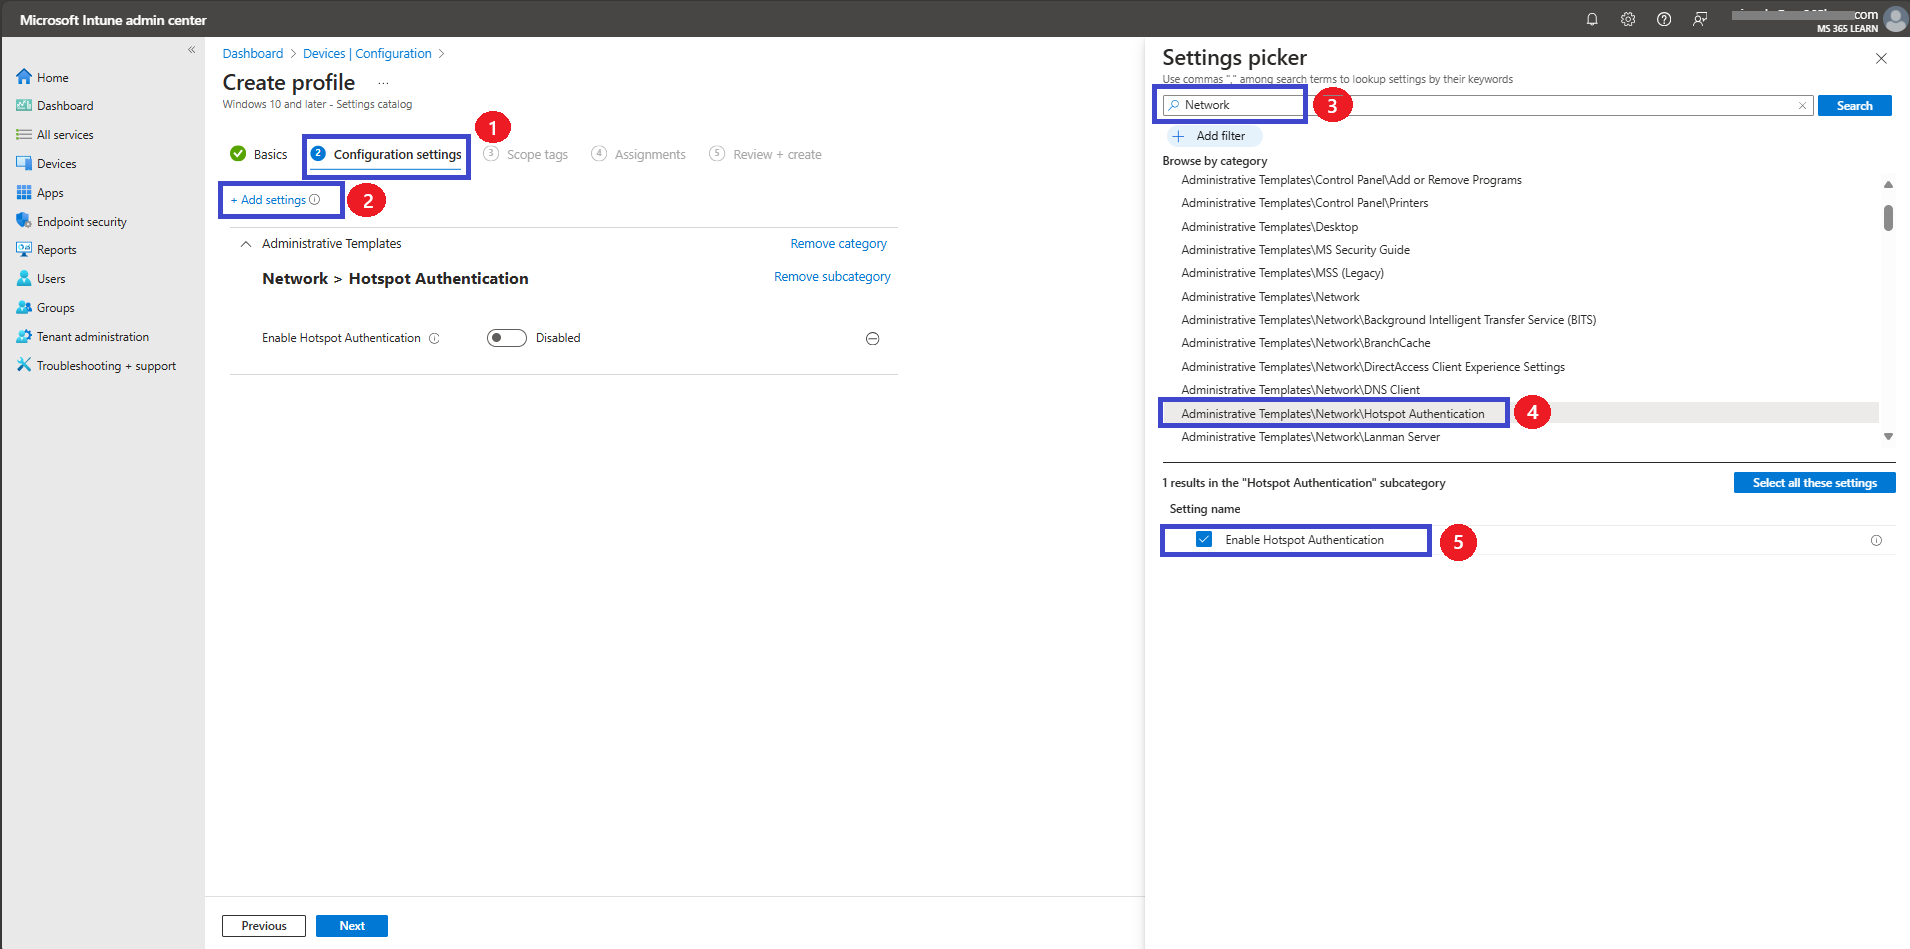
Configuration Settings – Using the Settings Picker
The next step is to configure the settings. In the Configuration settings section, click the + Add settings link to open the Settings Picker window.
From there, navigate to: Administrative Templates > Network > Hotspot Authentication
Once you select Hotspot Authentication, a setting called Enable Hotspot Authentication will appear.
After selecting the setting, you can close the Settings Picker window to proceed.
Disable Hotspot Authentication
When you close the settings picker, now you can see the Enable hotspot authentication in your configuration settings, page and that also in Disable mode by default, if you want to continue with that, click on the Next.
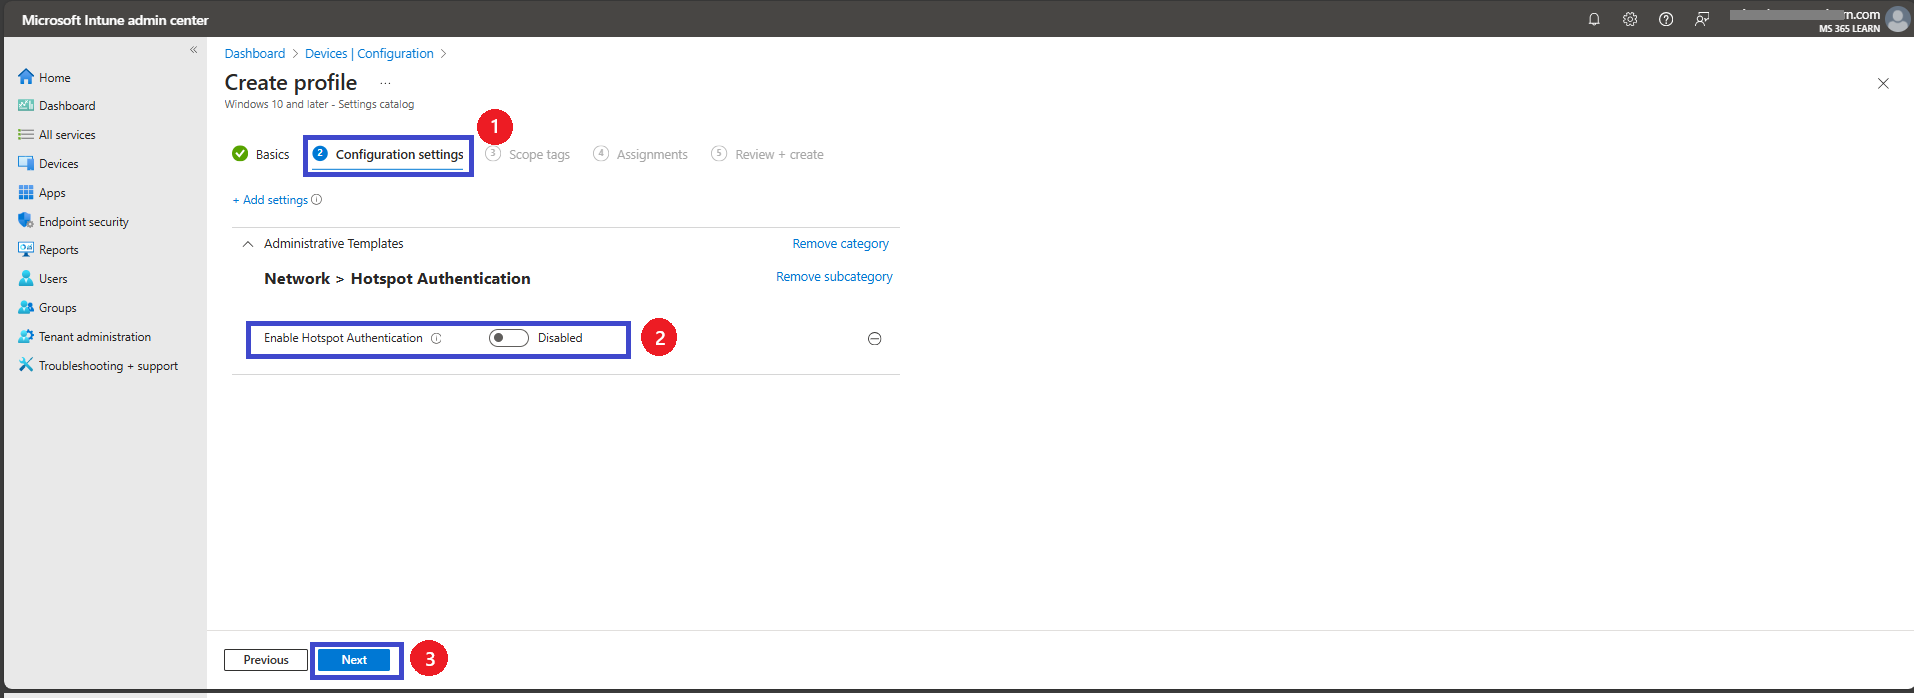
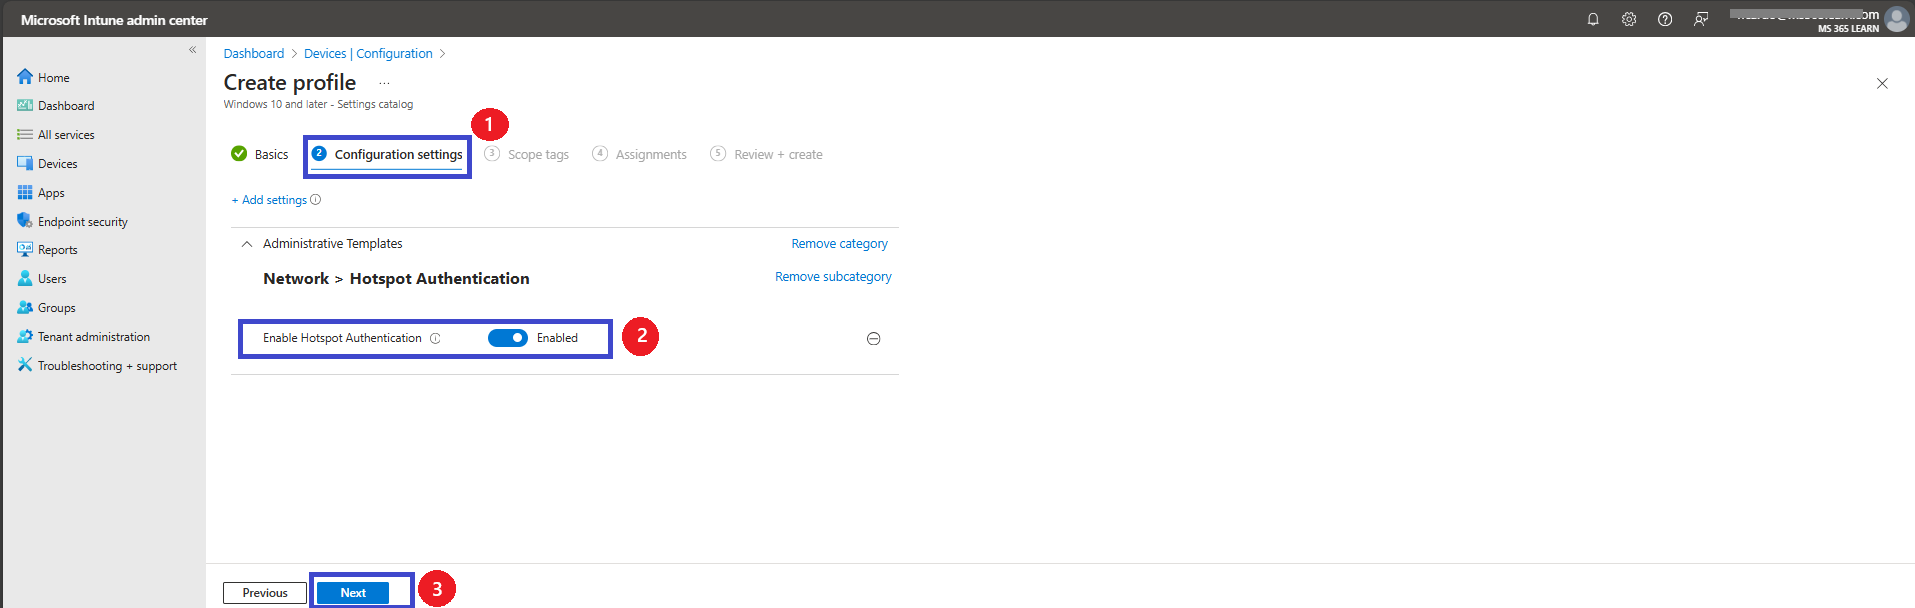
Enable Hotspot Authentication
If you want to enable Hotspot Authentication, you can toggle the option by moving the switch from the left to the right. You’ll notice that the toggle appears blue. After that, click on Next. You can proceed with the following steps. Whether you Enable or Disable the settings, the steps are the same for both options.
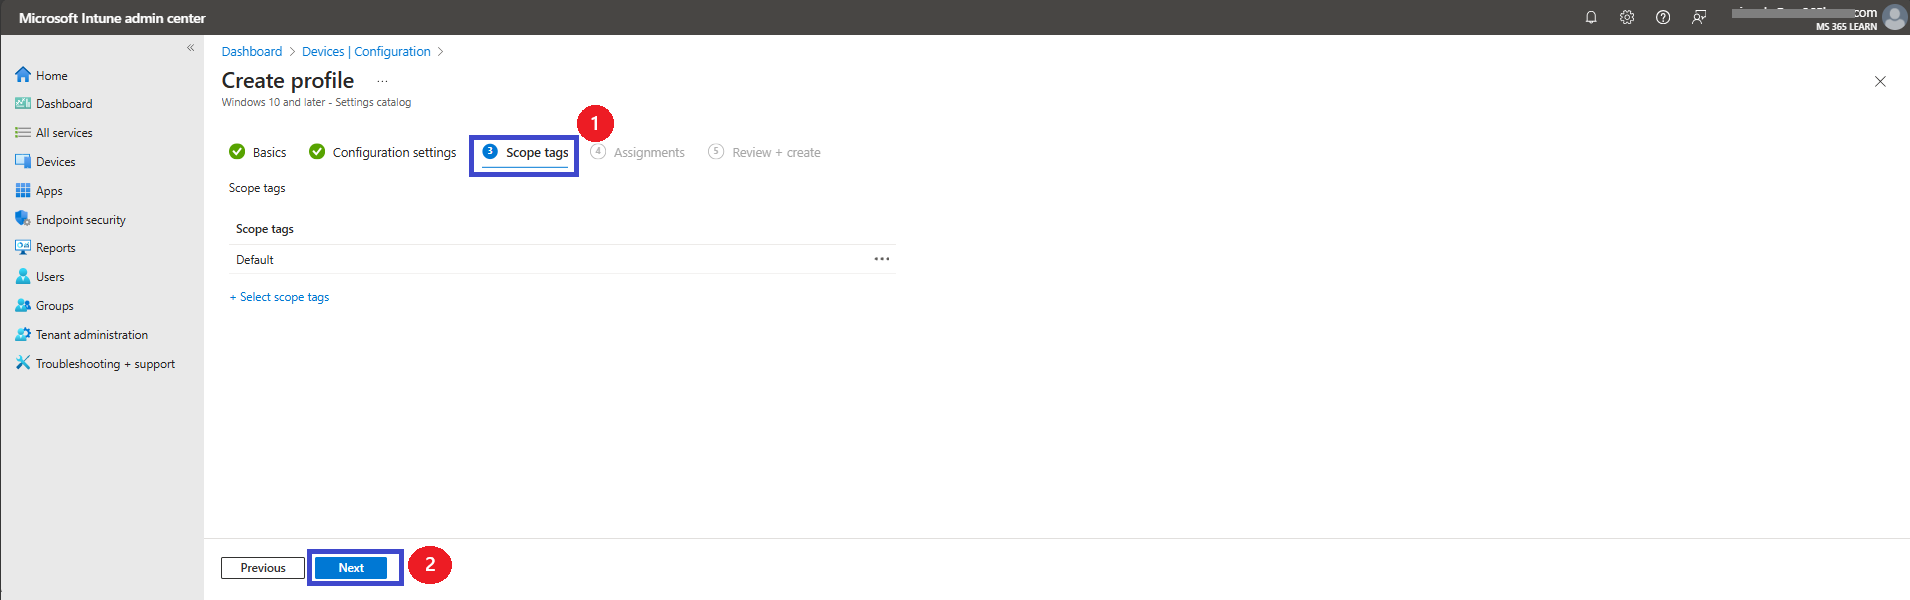
Scope Tags
The next step is the Scope tag. While adding a scope tag to your policy is useful for the organization, it is not a required step. If you choose not to use a scope tag, you can simply skip this step and proceed by clicking Next to move forward with the policy deployment process.
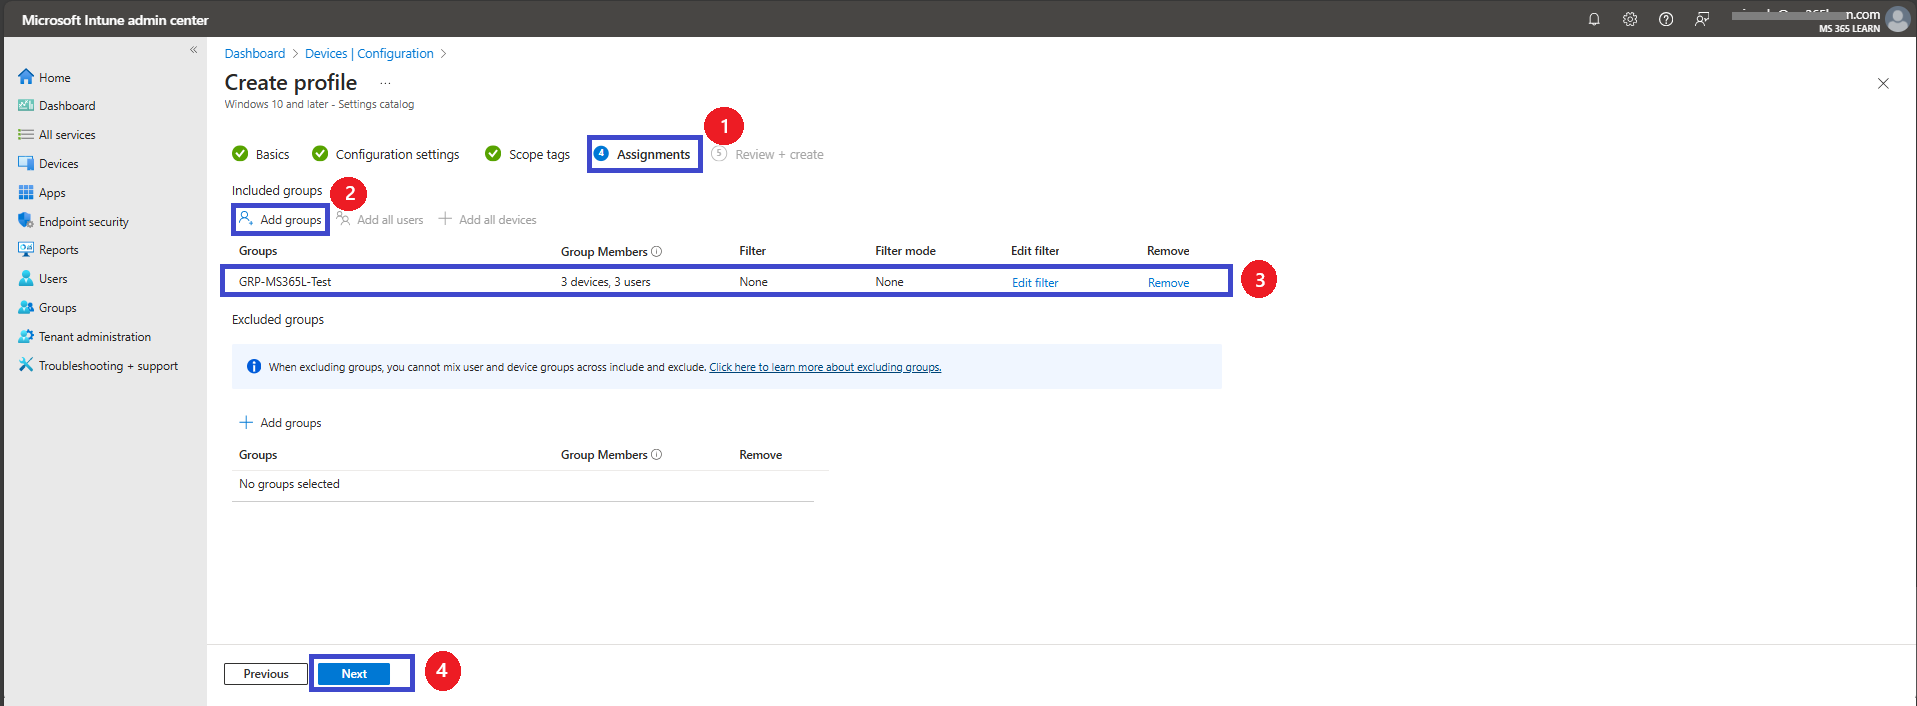
Assignments
The next step the is the Assignment tab, which plays a key role in deploying policies. In this section, you can define the specific group or groups to which you want the policy to be applied. To do this, I clicked on Add Groups under the Include Groups option.
This allowed me to select the desired group for the policy deployment.
Once I selected the appropriate group, I clicked Next to continue with the policy setup and move on to the next steps in the deployment process.
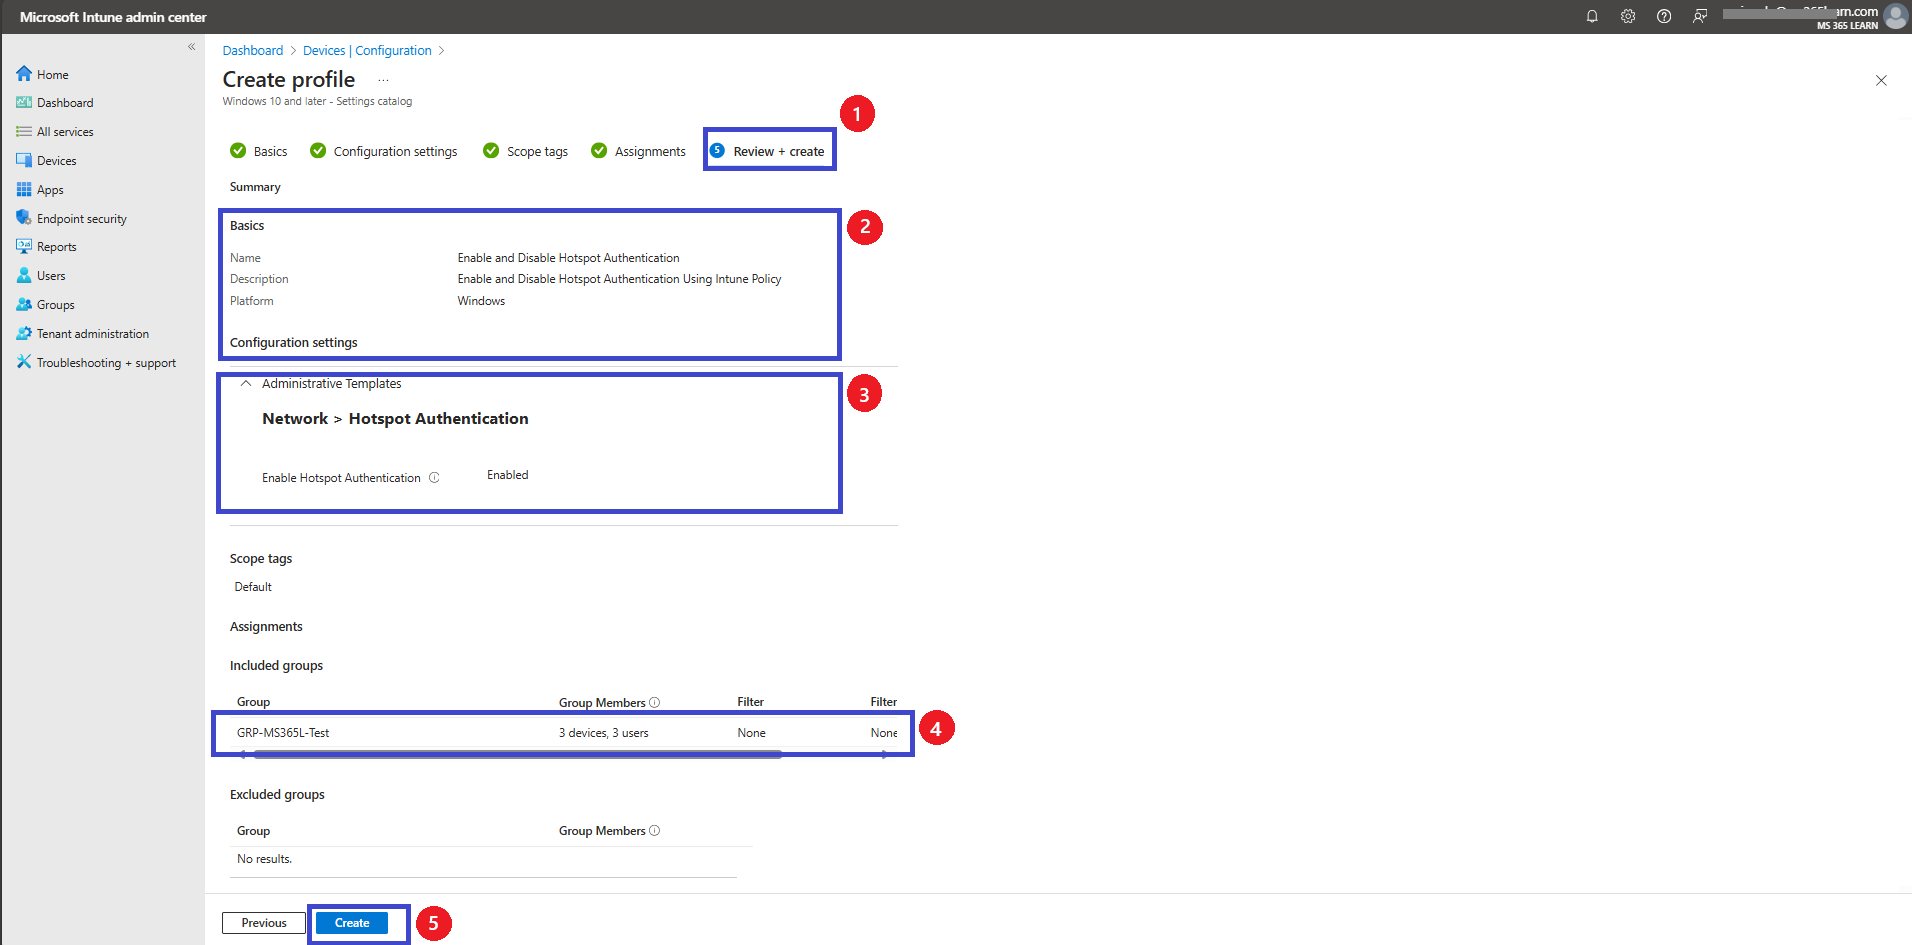
Review + Create
The Review + Create option is the final step in the policy creation process. In this section, you have the opportunity to review all the details you’ve entered for the policy, including settings, assignments, and configurations.
Now click on the create and now you will get a successful Notification.
Monitor Status
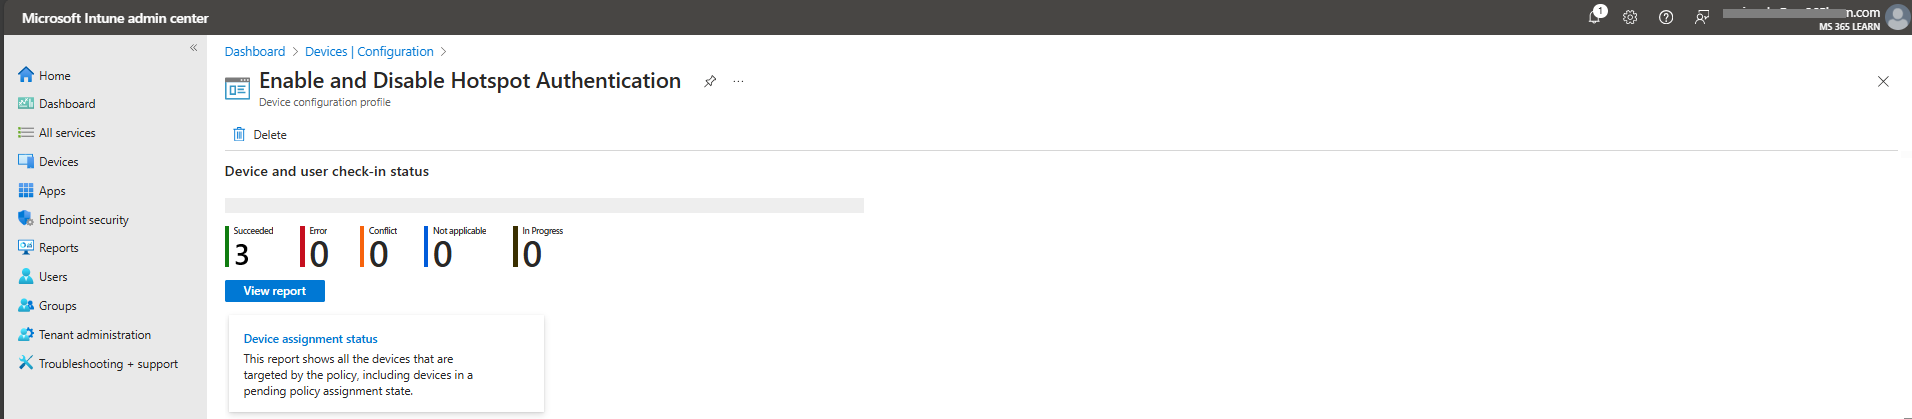
When you create a new policy for a device, it typically takes up to 8 hours for the policy to apply automatically. However, you can expedite this process by manually syncing the policy. After syncing, you can confirm that the policy has been successfully applied by checking it in Intune.
To do this, go to Devices > Configuration, and then select the policy.
Client-Side Verification
The MDM PolicyManager applies the HotspotAuth_Enable policy under the ADMX_hotspotauth area. Key parameters such as Enrollment ID, String Value, Enrollment Type, and Scope may vary depending on the device’s configuration and policy assignment.
Example Parameters (May Vary):
Policy: HotspotAuth_Enable
Area: ADMX_hotspotauth
Enrollment ID: A unique identifier for the device's enrollment (e.g., B1E9301C-8666-412A-BA2F-3BF8A55BFA62) – specific to each enrolled device
String: Value applied by the policy (may be empty depending on configuration)
Enrollment Type: Indicates the type of enrollment used (e.g., 0x6 for MDM-managed devices)
Scope: Defines the scope of the policy (e.g., 0x0 for device-level policies)
Current User: Typically set as (Device) for device-assigned policies
Verification and Troubleshooting
To confirm that the Hotspot Authentication policy is applied correctly:
Open Event Viewer on the client device
Navigate to: Applications and Services Logs > Microsoft > Windows > DeviceManagement-Enterprise-Diagnostics-Provider > Admin
Look for event entries related to policy application (e.g., Event ID 814)
Cross-check the parameters shown in the event details with the expected values from your Intune deployment
If Discrepancies Are Observed:
Compare the reported values with your intended configuration (e.g., Scope, Enrollment Type, Policy name)
Confirm the device has recently synced with Microsoft Intune
Verify policy assignment and targeting in the Intune admin center
Refer to official Microsoft documentation for further troubleshooting based on the log output
This approach ensures accurate validation of HotspotAuth_Enable across different devices, accounting for variability in how policies are applied client-side.
More Information
For additional guidance on configuring the Hotspot Authentication policy using Microsoft Intune, refer to the following resources from Microsoft Learn:
• Overview of Microsoft Intune
• Configuration Service Provider (CSP) Reference
• Use the Settings Catalog to configure devices in Intune
• Create and assign device profiles in Microsoft Intune
• Monitor policies and profiles in Intune
These resources provide in-depth information on setting up, managing, and validating device configurations through Microsoft Intune, including the use of ADMX-backed settings like HotspotAuth_Enable.
Thank you!
🖥️ Ricardo Barbosa
📘 MCT Microsoft Certified Trainer | ☁️ Cloud Architect
🌐 Technology Director - https://altelix.com