

In today’s security-first world, every setting matters — especially when it comes to data privacy and control. One often overlooked configuration in Windows is the ability for users to delete their device's diagnostic data. But what if your organization wants to prevent this action to maintain consistency and support troubleshooting?
With Microsoft Intune, we can manage this setting centrally using the System Configuration profile, offering organizations the ability to enable or disable the "Delete diagnostic data" option directly from Windows Settings.
What Is the Device Delete Policy?
The Device Delete Setting controls whether users can remove diagnostic data collected by Microsoft. This data helps improve Windows by identifying bugs, enhancing security, and optimizing performance.
✅ If enabled via policy: The Delete diagnostic data button is hidden, preventing users from manually erasing this information.
🔄 If disabled or not configured: Users will be able to manually delete all diagnostic data from their device.
📋 Why Disable the Delete Option?
Disabling the delete option through Intune brings several benefits:
🔒 Prevents accidental or intentional data loss
🧩 Ensures more accurate diagnostic information for troubleshooting
🛡️ Helps prevent gaps in telemetry that could aid security investigations
🏢 Maintains consistency across managed endpoints
💡 This policy is particularly important for organizations aiming to meet compliance requirements or those relying heavily on telemetry to monitor endpoint health.
How to Configure in Intune
In this article, I walk you through:
Creating a configuration profile using Intune Settings Catalog
Applying the System/AllowDeviceDelete policy
Verifying the policy on the client side
Monitoring the deployment status in the Intune Admin Center
Behind the Scenes: The CSP
This setting leverages the System Configuration Service Provider (CSP) in Windows 10/11, which outlines:
📘 Policy descriptions

✅ Allowed values

🔁 Mappings to legacy Group Policy settings
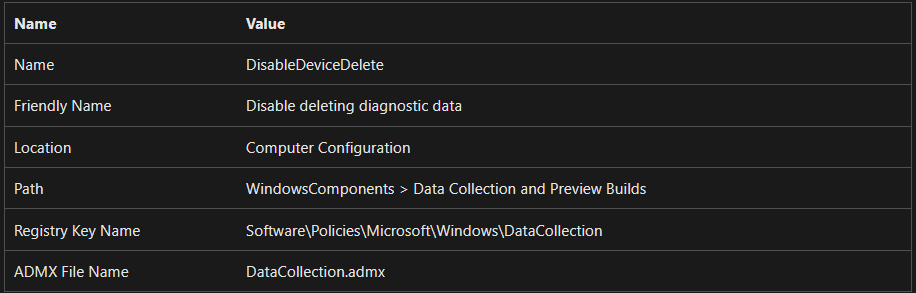
This helps IT admins understand how modern Intune policies align with traditional management strategies.
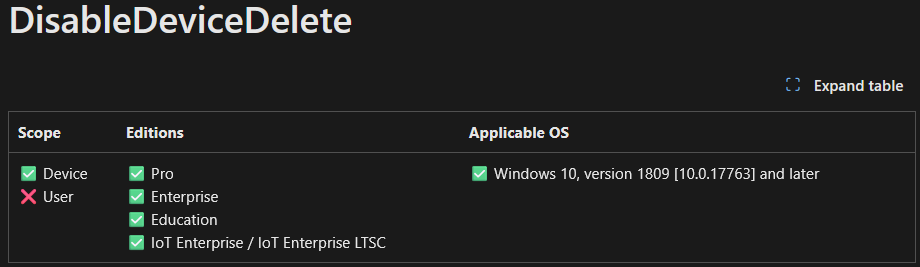
How to Enable or Disable the Device Delete Policy in Windows via Intune
Controlling how users interact with diagnostic data is a key step toward improving security, ensuring compliance, and maintaining reliable telemetry across your endpoints. One critical setting is the Device Delete Policy, which determines whether users can remove diagnostic data collected by Microsoft.
There are two ways to configure this policy in Windows 10/11 devices:
Using a Custom OMA-URI (Open Mobile Alliance – Uniform Resource Identifier)
Using Microsoft Intune
What’s an OMA-URI?
An OMA-URI is a unique path that maps directly to a setting managed by a Configuration Service Provider (CSP). These paths allow administrators to push custom configurations to Windows devices, even when settings are not available through the default Intune templates.
Step-by-Step: Configure Device Delete Policy via OMA-URI in Intune
Here’s how to deploy the policy using a custom OMA-URI:
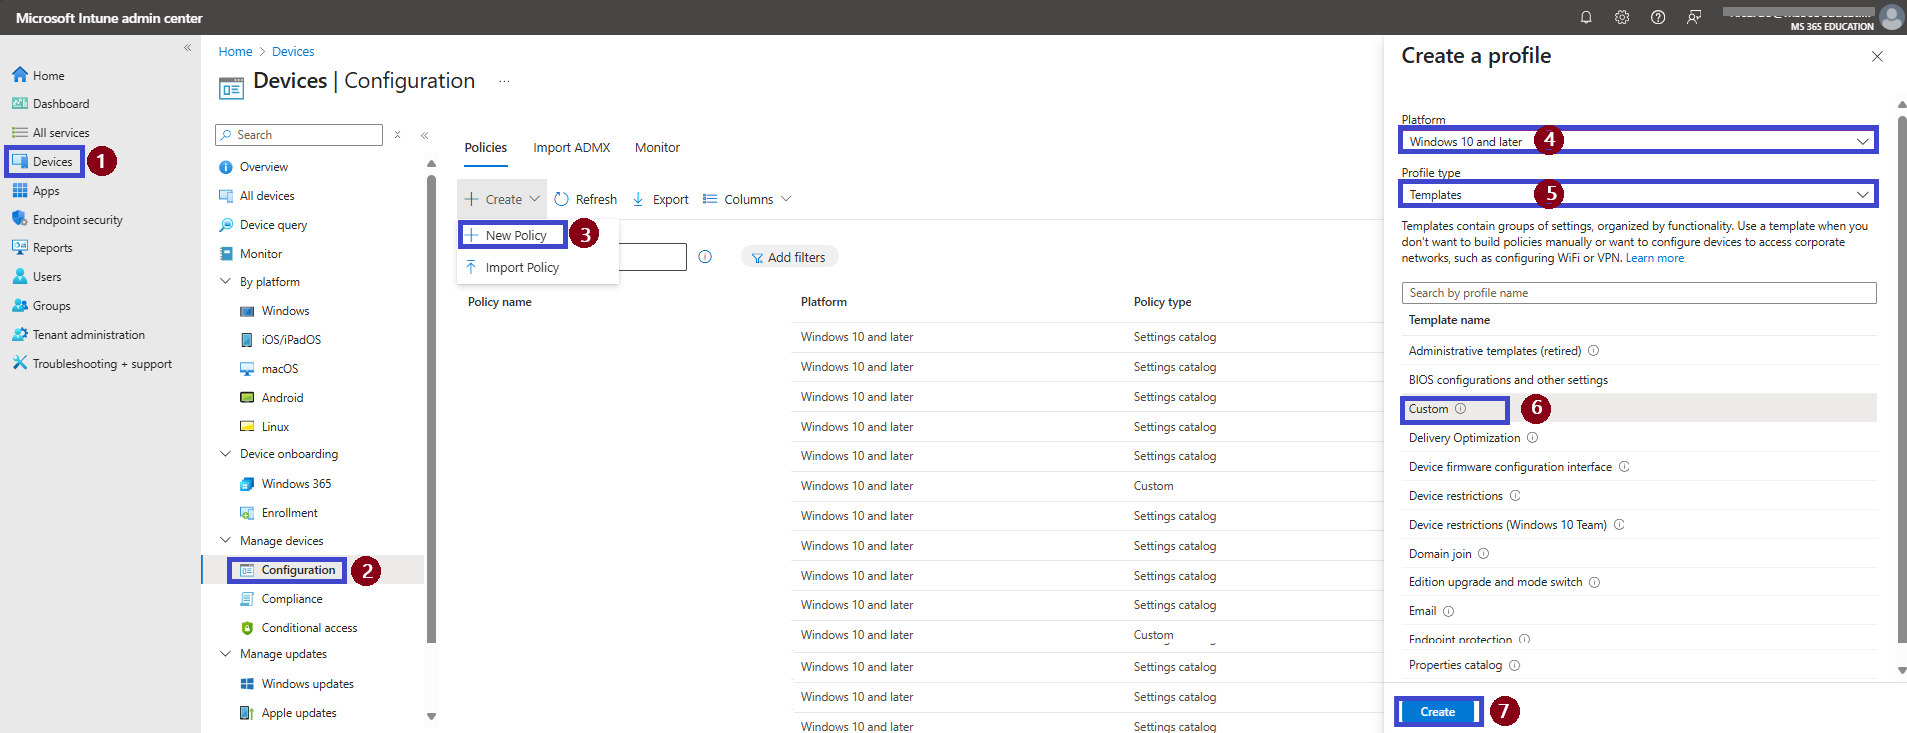
Sign in to the Microsoft Intune Admin Center
Navigate to: Devices → Configuration profiles
Click Create profile
Choose the platform: Windows 10 and later
Profile type: Select Templates → Custom
Click Create
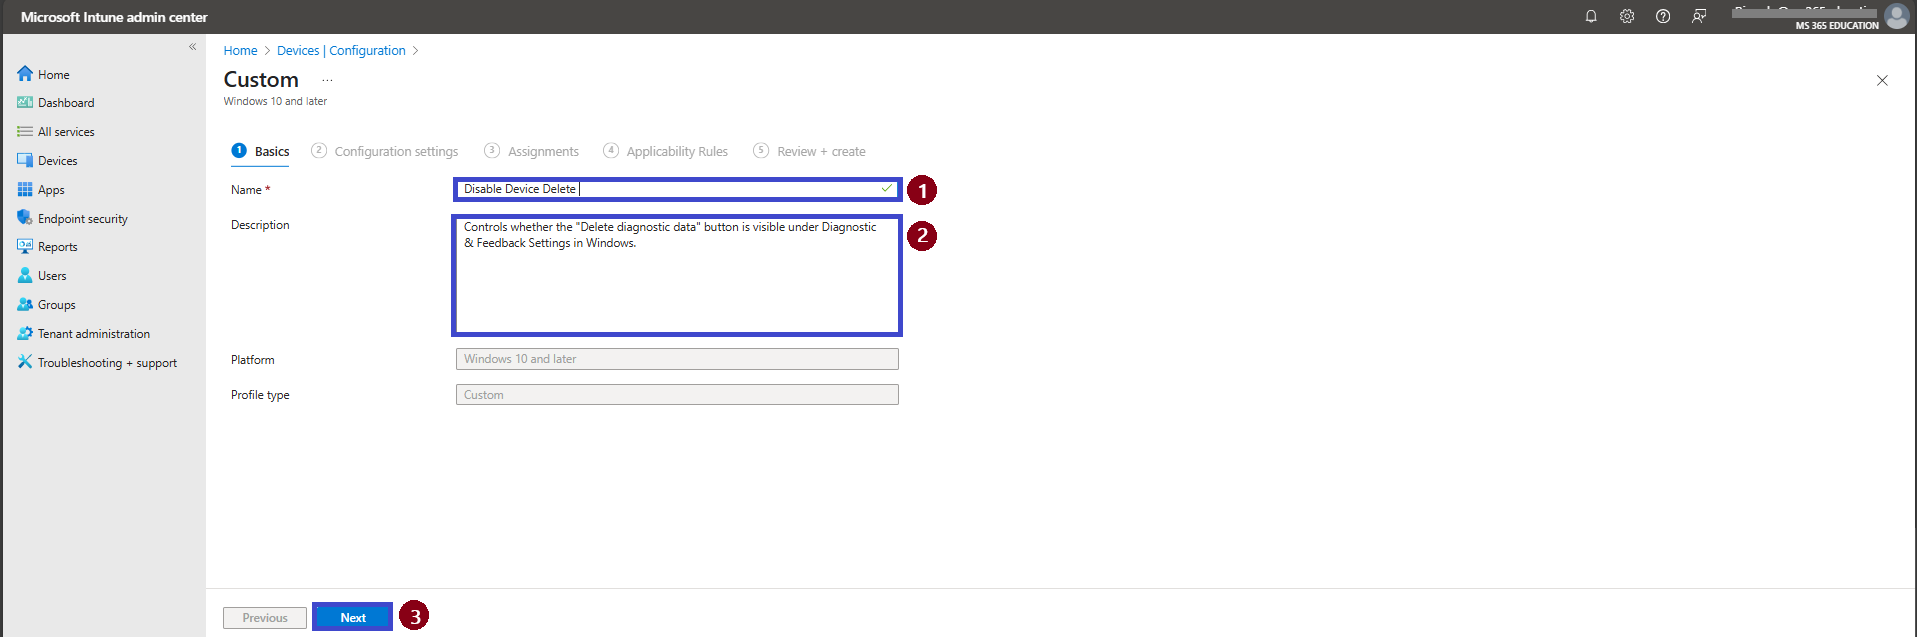
Enter a Name: Disable Device Delete (Optional: add a Description)
Click Next
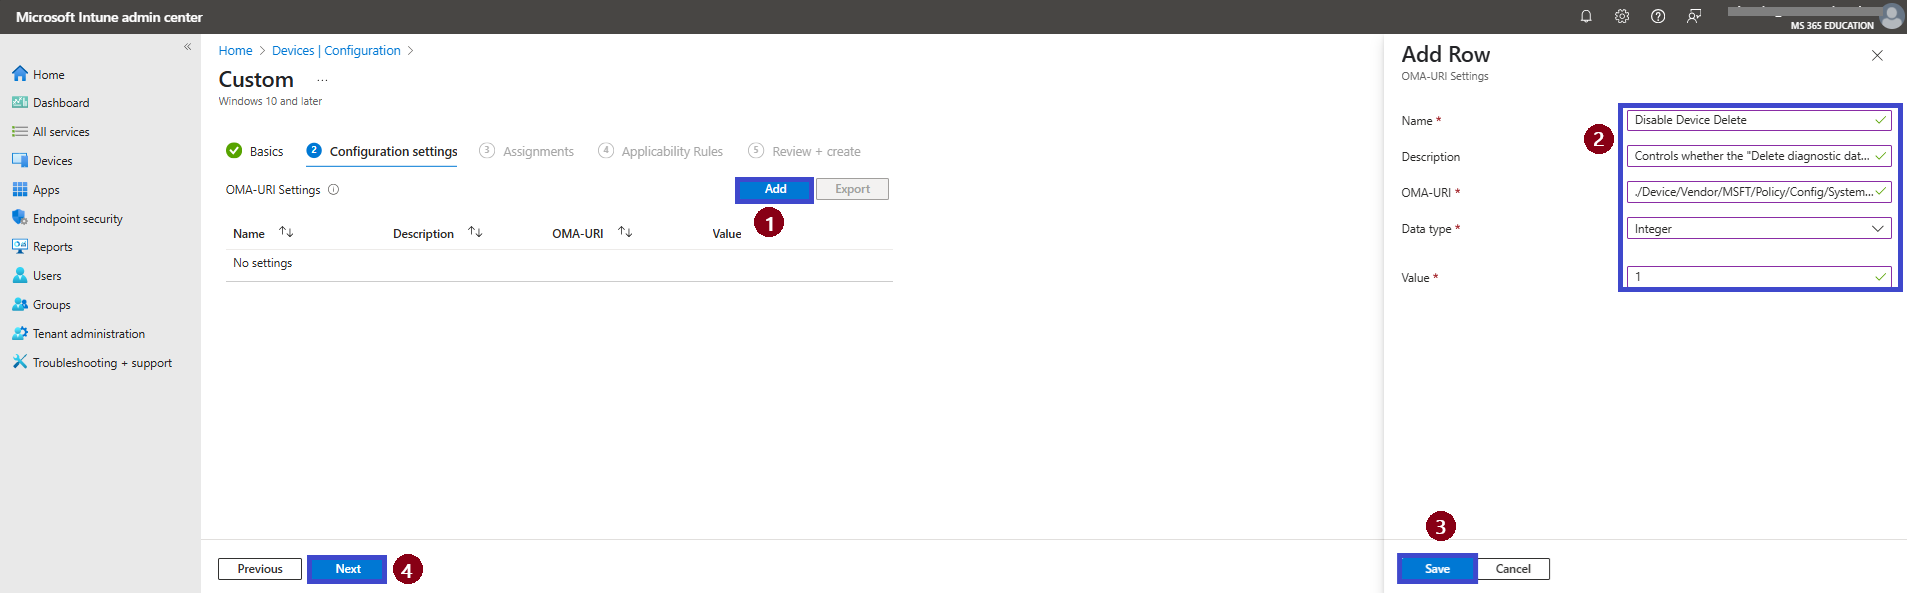
Under OMA-URI Settings, click + Add and fill in the following:
Name: Disable Device Delete
Description: Controls whether the "Delete diagnostic data" button is visible under Diagnostic & Feedback Settings in Windows.
OMA-URI: ./Device/Vendor/MSFT/Policy/Config/System/DisableDeviceDelete
Data type: Integer
Value: 1 = Disable the button (prevents user deletion) 0 = Enable the button (allows deletion)
8. Click Save, then assign and deploy the profile to your target device group.
Why Disable Device Delete?
Protects against loss of important diagnostic data
Enhances security posture by keeping telemetry intact
Supports compliance with data retention policies
Assists helpdesk and IT teams during troubleshooting
Enable or Disable Device Delete Policy in System Settings using Intune
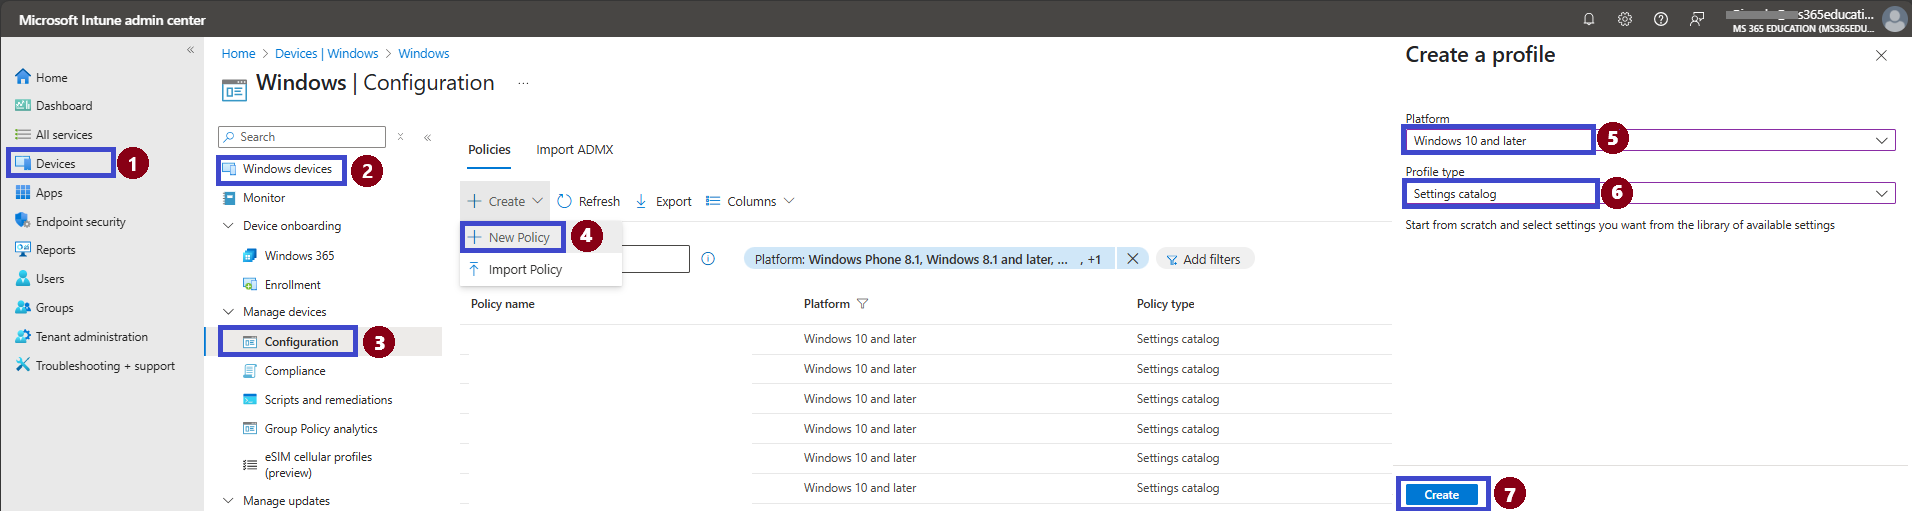
To start deploying a policy in Intune, sign in to the Microsoft Intune Admin Center. Then, go to
In the left-hand menu, select Devices
Click on Windows Devices under the “By platform” section
Select Configuration
Click + New Policy to begin configuring your policy
Under Platform, select Windows 10 and later
For Profile type, choose Settings catalog
Click Create to proceed
Basic Information of the Policy – Disable Device Delete
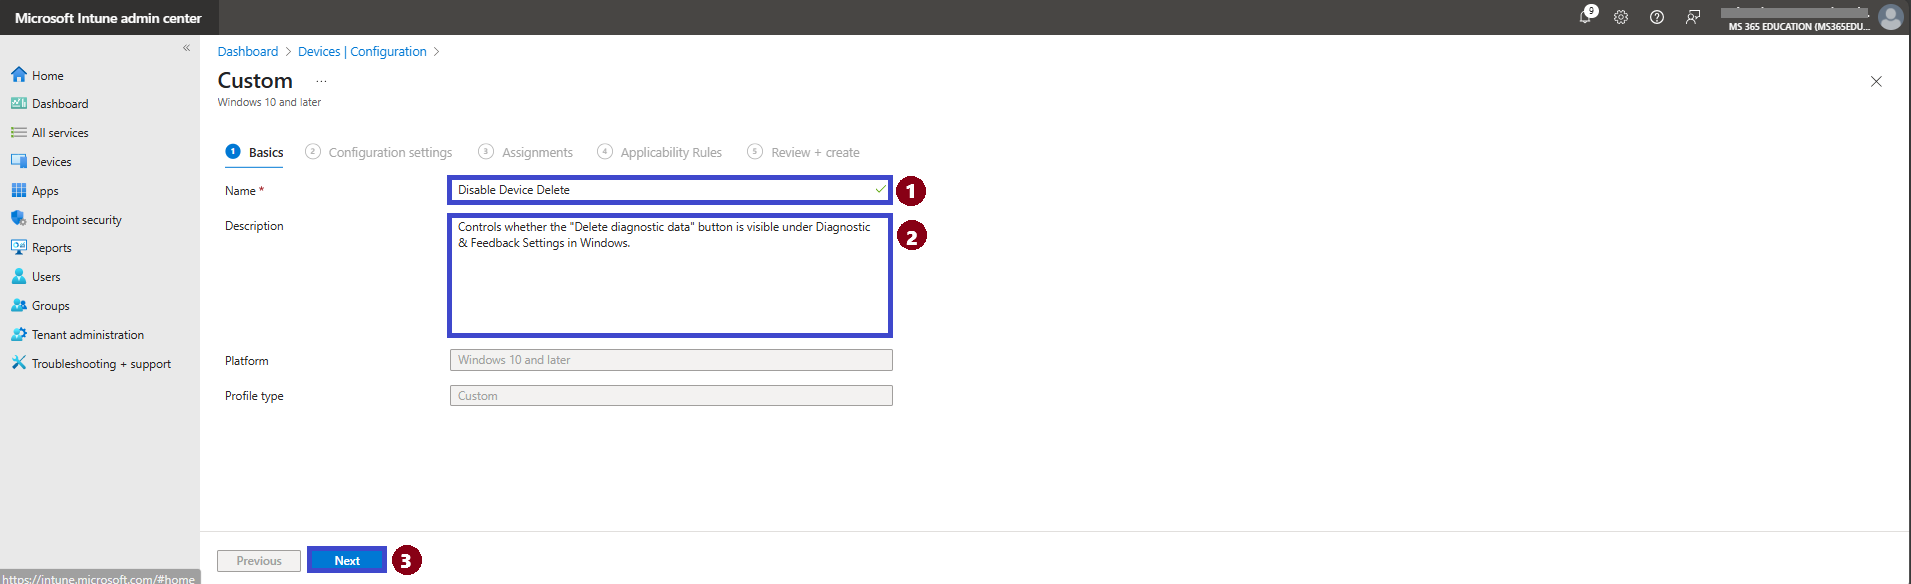
Once you begin creating the configuration profile, the first step is to complete the Basics section. This involves:
Defining a clear and descriptive name
Optionally adding a description
Reviewing the platform (which defaults to Windows 10 and later — no changes needed here)
Providing a meaningful name and description helps you and your team quickly identify the purpose of the policy, which is especially useful in environments managing multiple configurations via Intune.
Here’s an example:
Policy Name: Disable Device Delete
Description: This policy controls whether the Delete diagnostic data button is available in Windows Diagnostic and Feedback Settings. It allows organizations to restrict users from deleting telemetry data collected by Microsoft, helping maintain data integrity, support security investigations, and ensure consistent device monitoring.
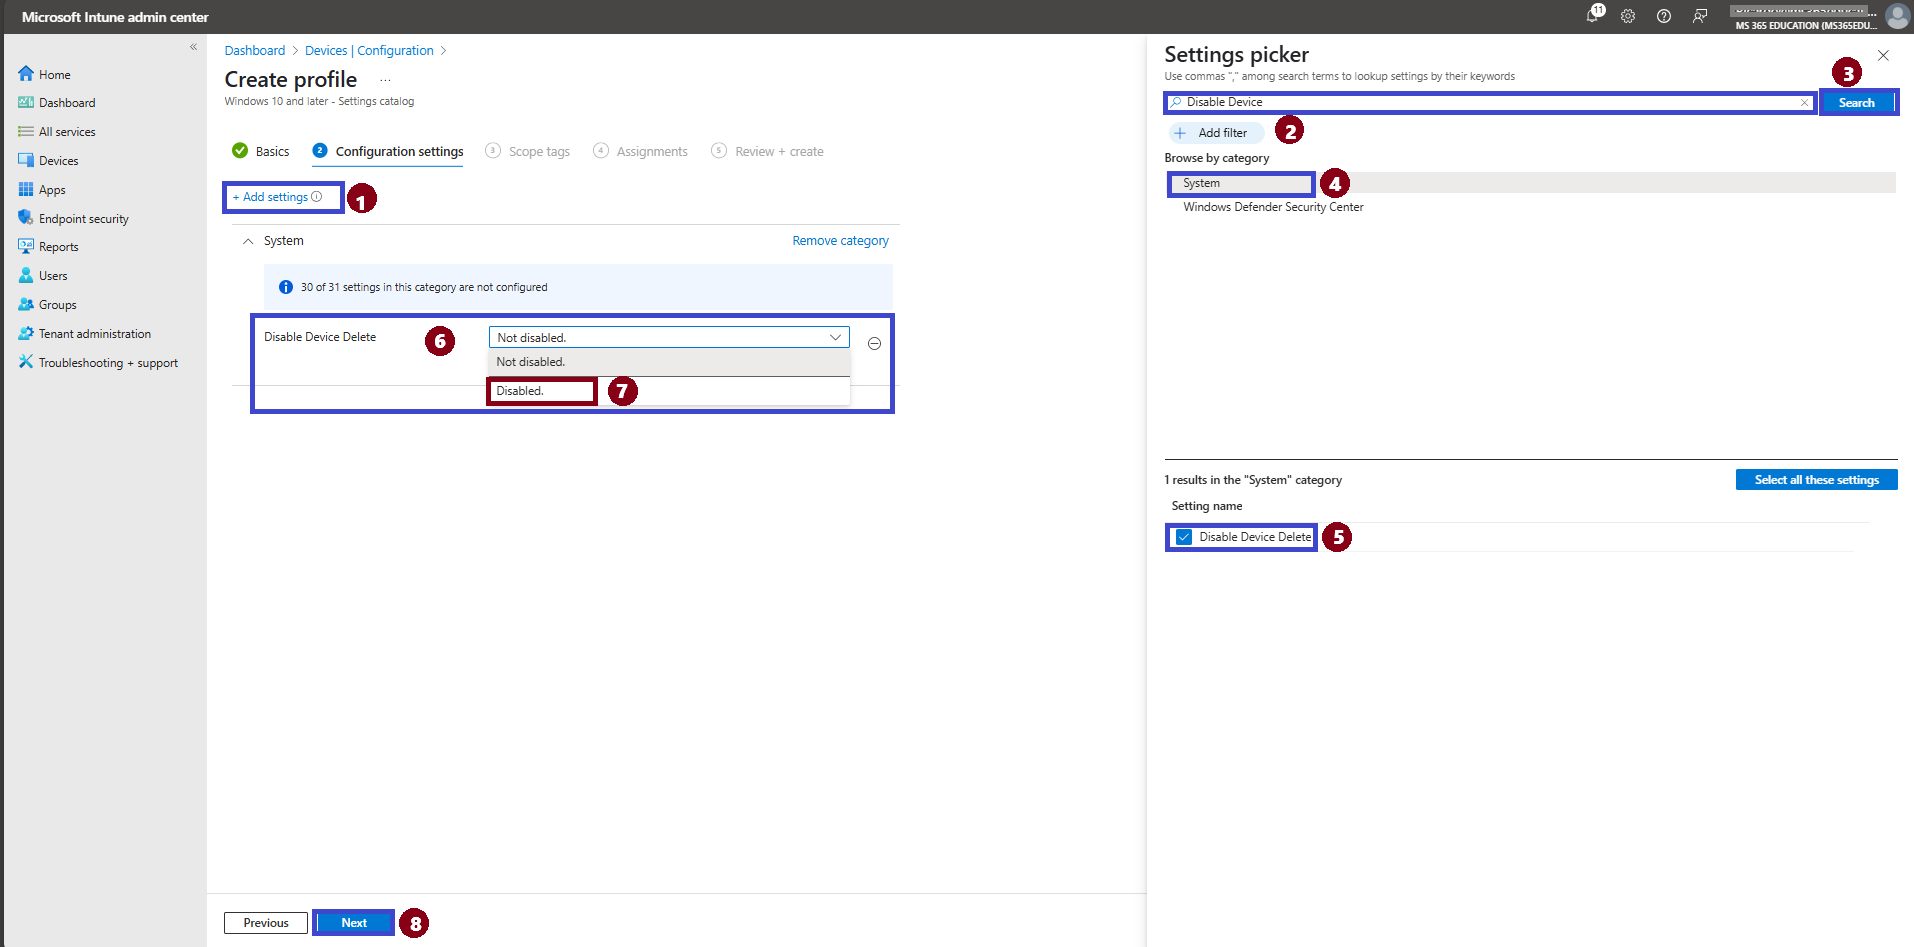
Now, for Configuration Settings, we can define this policy’s exact function. Click Add Settings to open the Settings Picker.
In the search bar, type Disable Device as a category
Select System to configure.
Select Disable Device Delete to configure.
Close the Settings Picker window.
After selecting Disable Device Delete from the Settings Picker and closing it, the setting will appear on the Configuration Settings page.
At this stage, you can fine-tune the behavior by selecting the appropriate value from the dropdown menu, based on your organization’s requirements.
You’ll have two options available:
Disabled – Prevents users from deleting diagnostic data.
Not configured (default) – Allows users to delete diagnostic data.
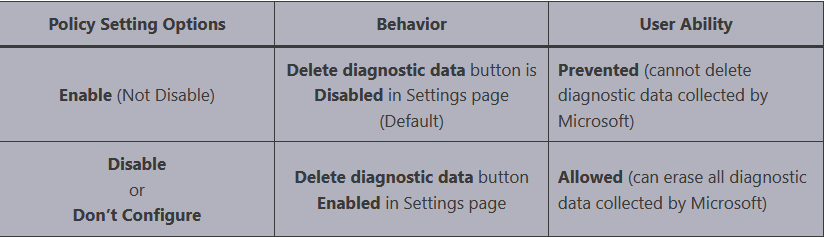
By default, the setting will be configured as Not configured, meaning the delete button remains visible to users unless explicitly disabled.
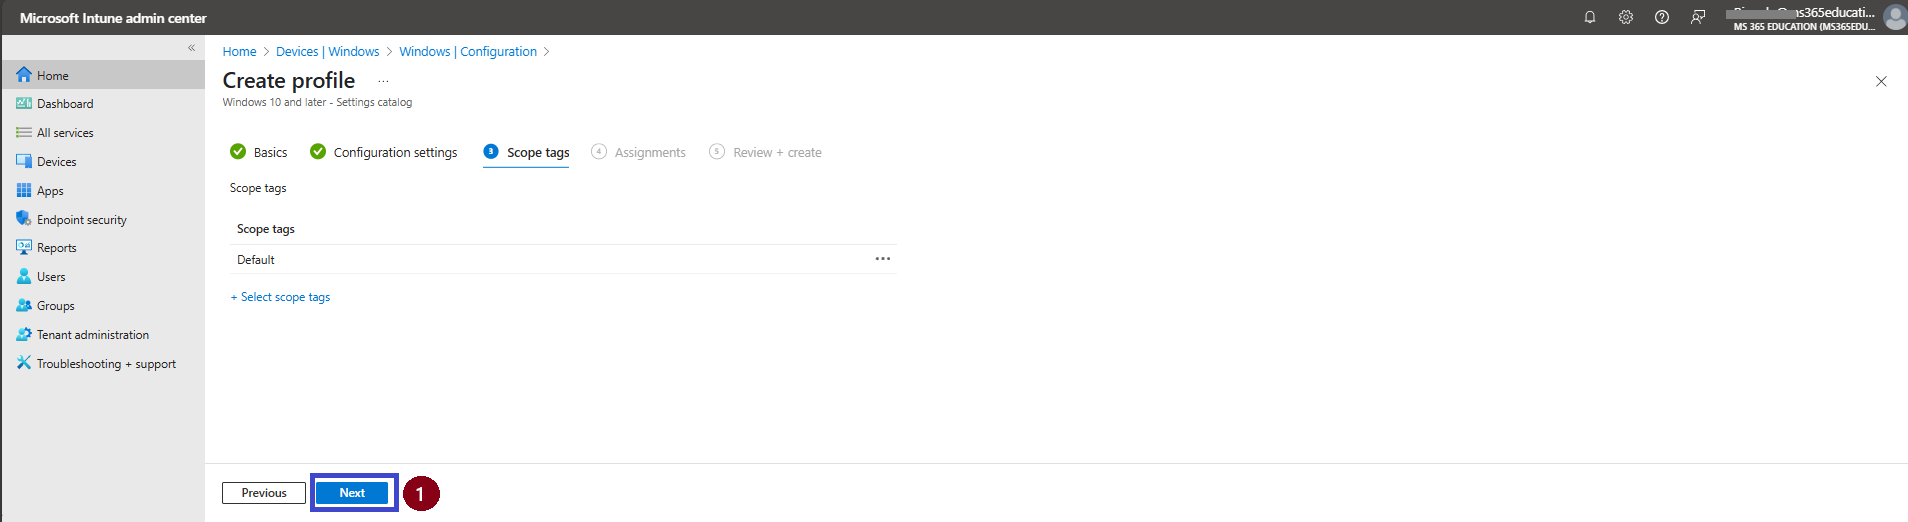
Add Scope Tags to a Policy
Now you are on the next step called Scope Tags. A scope tag is used to assign policies to specific groups within an organization. In this step, you can select a scope tag for the policy. However, I suggest skipping this section because it is not needed for this policy. So, I clicked Next to continue.
Assigning the Policy
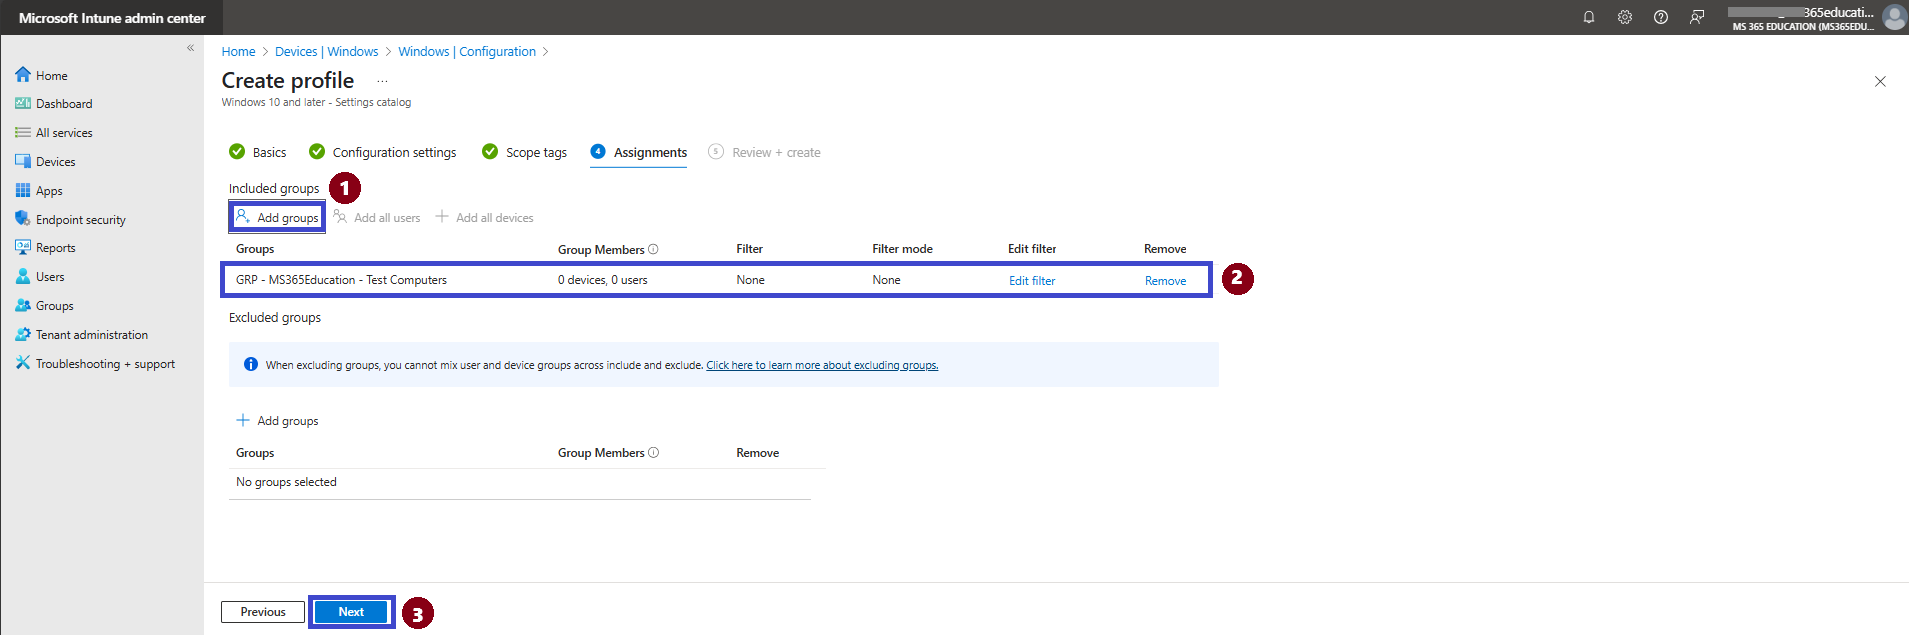
The next step is the Assignments section, where you define which user or device groups will receive the policy.
Since our goal is to target a specific group, this step is essential for proper deployment.
Under Include groups, click Add groups.
A window will appear showing available Azure AD groups.
Use the search bar to quickly locate the group you want to assign the policy to.
Select the desired group and confirm your choice.
Once the group is selected, click Next to proceed to the final step.
Review + Create – Finalizing the Policy
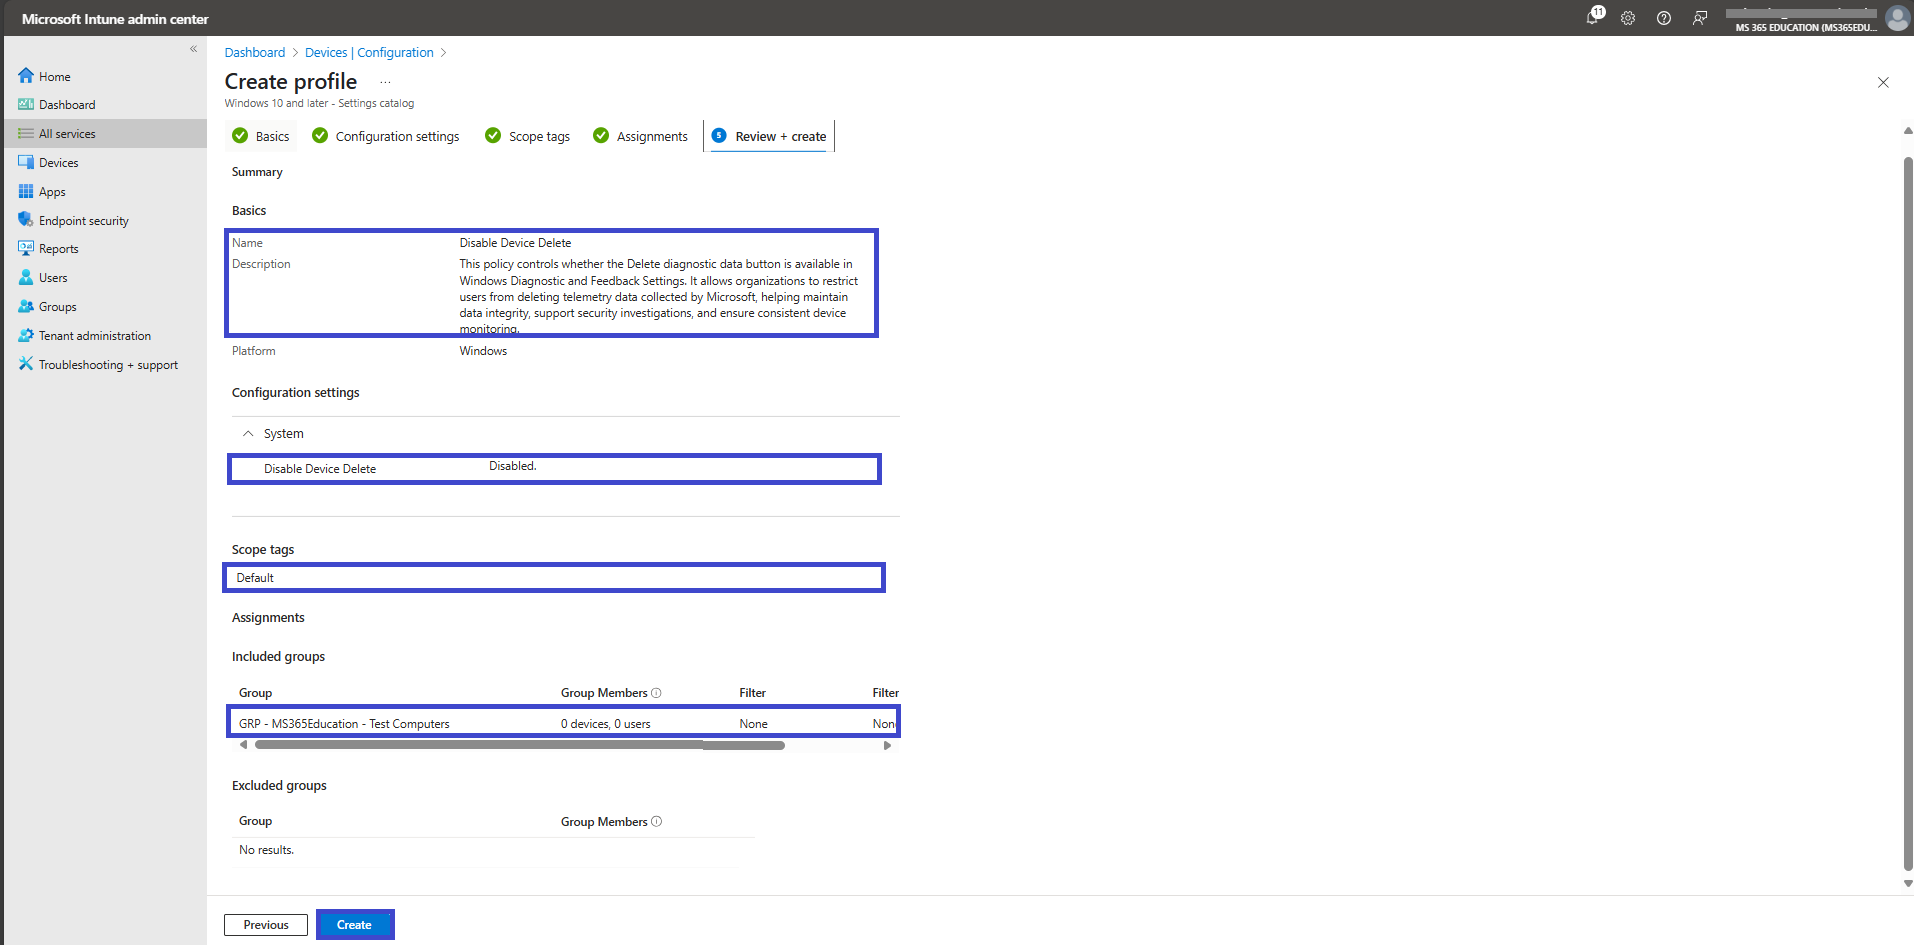
After completing the Assignments step, you'll reach the final stage: Review + Create.
This tab provides a full summary of all the information you've entered, including:
Basic details (name, description, platform)
Configuration settings you've defined
Targeted assignment groups
Carefully review each section to ensure everything is correct and aligned with your deployment goals.
Once everything looks good, click Create to finalize and deploy the policy.
Your configuration will now be applied based on the assignment scope you defined.
Monitoring Status – Verifying Policy Deployment
After creating and assigning the policy, it's important to monitor whether it has been successfully applied to the target devices.
You can wait for the automatic sync cycle (which may take up to 8 hours), or you can manually trigger a sync using the Company Portal app to accelerate the process.
Once the device has synced, follow these steps to verify the deployment status in the Intune admin center:
Navigate to Devices > Configuration Profiles.
In the list of configuration profiles, use the search bar to locate your policy by name. In this example, we named the policy: 👉 “Disable Device Delete”
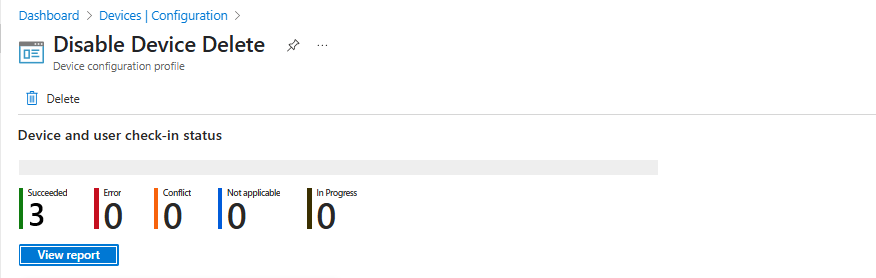
Click on the policy name to open its details.
Here, you'll see the deployment status, including how many devices have successfully received the policy, how many are pending, and any errors if applicable.
Monitoring ensures the configuration is working as expected and allows for quick troubleshooting if needed.
Client-Side Verification: Has the “Disable Device Delete” Policy Been Applied?
To confirm whether the Disable Device Delete policy was successfully applied to a device, you can use the Event Viewer on the client machine.
Navigate to: Event Viewer > Applications and Services Logs > Microsoft > Windows > DeviceManagement-Enterprise-Diagnostic-Provider > Admin
Then:
Click Filter Current Log
Search for Event ID 813, which indicates that a policy was processed and applied by the device.
📄 Example Log Output (Descriptive Format):
When the policy is correctly applied, you should see an event with details similar to the following:
Policy Name: DisableDeviceDelete
Policy Area: System (indicating the category within the CSP structure)
Enrollment ID: A unique identifier generated during MDM enrollment, for example, B1E9301C-8666-412A-BA2F-3BF8A55BFA62
Current User: Device (indicates device-level application; it may show “User” if applied at user level)
Integer Value (Int): 0x1 means the policy is enabled (i.e., the delete button is disabled); 0x0 means it is not enforced
Enrollment Type: 0x6 (indicating the device is MDM-managed)
Scope: 0x0 for device-level policies, 0x1 for user-level policies
💡 Pro Tip ⚠️ Values like Enrollment ID, Scope, and User Context may vary depending on your deployment. Always ensure the policy name and the configured value match what was defined in Microsoft Intune.
Troubleshooting Checklist:
✅ Ensure the device is included in the correct Azure AD group targeted by the policy
🔄 Confirm the device has recently synced with Intune
⚔️ Check for conflicts with other configuration profiles
🔧 You can trigger a manual sync via the Company Portal app or the Intune Admin Center
📚 For deeper analysis, consult the Microsoft Learn CSP documentation or enable advanced MDM diagnostic logs
📚 More Information
To deepen your understanding of how to configure and manage the Disable Device Delete policy using Microsoft Intune, refer to the following Microsoft Learn resources:
Policy CSP – System Learn more about the System CSP, including the DisableDeviceDelete setting used to control access to diagnostic data deletion. 🔗 https://learn.microsoft.com/en-us/windows/client-management/mdm/policy-csp-system
Windows device restriction settings in Microsoft Intune Review the available restriction settings for Windows 10/11 devices, including security, privacy, and diagnostic data controls. 🔗 https://learn.microsoft.com/en-us/mem/intune/configuration/device-restrictions-windows-10
Create a policy using the Settings Catalog in Intune Follow detailed guidance to create and assign configuration profiles using the Settings Catalog in Microsoft Intune. 🔗 https://learn.microsoft.com/en-us/mem/intune/configuration/settings-catalog
Monitor Intune policy deployment and status Understand how to monitor policy deployment, review success/failure reports, and troubleshoot common issues. 🔗 https://learn.microsoft.com/en-us/mem/intune/configuration/device-profile-troubleshoot
Thank you!
🖥️ Ricardo Barbosa
📘 MCT Microsoft Certified Trainer | ☁️ Cloud Architect
🌐 Technology Director - https://altelix.com