

Exploring Device Preparation (Autopilot v2) with Microsoft Intune
Microsoft Intune continues to evolve, making device management more seamless and efficient for IT admins. One of its latest advancements, Device Preparation (Autopilot v2), significantly improves upon the traditional Autopilot experience. This new approach enhances flexibility, reliability, and streamlines device provisioning for businesses of all sizes.
Table of Contents
What is Device Preparation?
Challenges and limitations I encountered
How to set up Device Preparation (Autopilot v2) with Microsoft Intune Step 1: Create a Security Group Step 2: Configure a Device Preparation policy
User workflow
Conclusion
What is Device Preparation?
Device Preparation (Autopilot v2) introduces a more modular and efficient deployment process, addressing key challenges faced with the original Autopilot. Instead of relying on the traditional deployment profile, it now uses configuration templates, offering greater customization and control.
The most exciting change? No more hardware hashes! Previously, IT admins had to manually collect and upload hardware hashes to register devices—a cumbersome and time-consuming task. With Autopilot v2, this step is eliminated, allowing devices to be automatically recognized and enrolled in Intune, streamlining the entire provisioning process and reducing administrative overhead.
Challenges and Limitations
Despite its improvements, Device Preparation (Autopilot v2) comes with some challenges. The biggest issue is the Out-of-Box Experience (OOBE)—since the device doesn’t pull tenant information until after the initial login, it is not immediately recognized as a corporate device. This means users could mistakenly or intentionally set it up as a personal device, which is not ideal for enterprise environments.
Another limitation is the lack of control over device naming conventions, requiring post-deployment scripts to standardize names. Additionally, deployment reliability feels inconsistent—users often reach the desktop before the process is fully completed, which can lead to unintended interference and increased IT support requests.
While Autopilot v2 introduces valuable enhancements, these challenges make it feel less structured and predictable compared to the original version.
How to setup Device Preparation (Autopilot v2) with Microsoft Intune
Step 1: Create a Security Group
To begin, we need to create a new Security Group. When a device enrolls, it will be automatically added to this group. Any policies, apps, and scripts intended for these devices should be assigned to this group.
We'll create the group using the Microsoft Intune Portal, but this can also be done through the Microsoft Entra Admin Center.
Instructions:
Go to Intune Portal
Navigate to "Groups"
Click on "New Group"
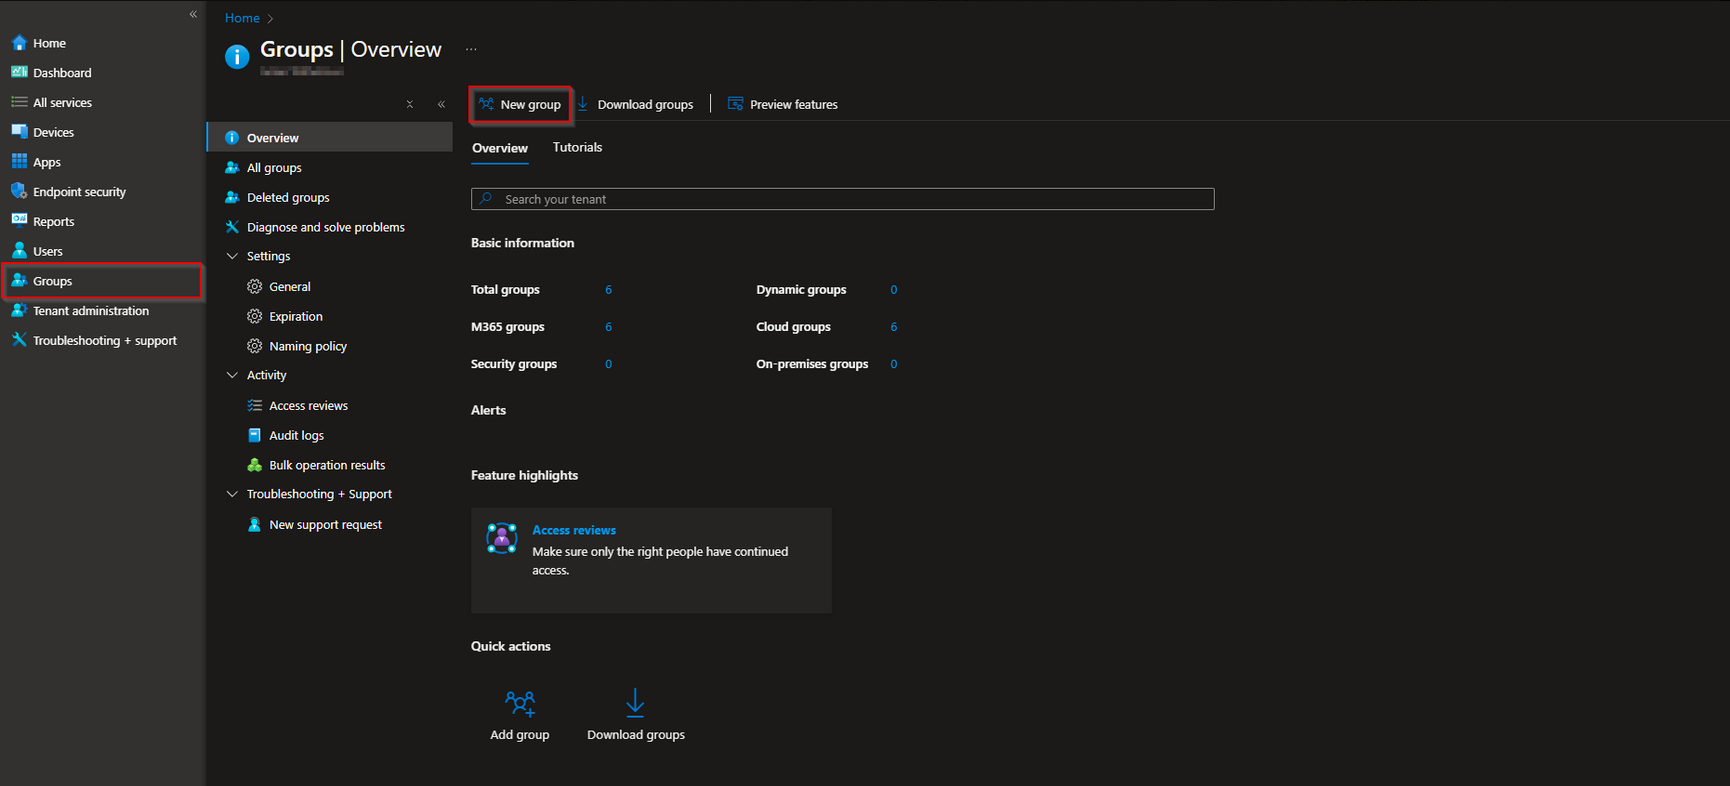
Creating a New Security Group
Now, we will create a new Security Group to manage device enrollment effectively.
Steps:
Select "Security" as the Group type.
Enter a Group Name, e.g., "Autopilot Device Preparation".
(Optional) Add a Group Description.
Set the Membership Type to Assigned.
Assign an Owner: Click on "No owners selected". Search for the ID: f1346770-5b25-470b-88bd-d5744ab7952c. Select the application (it may have a different name; in this case, it's "Intune DeviceCheckIn ConfidentialClient Application"). Click Select.
Click Create to finalize the Security Group.
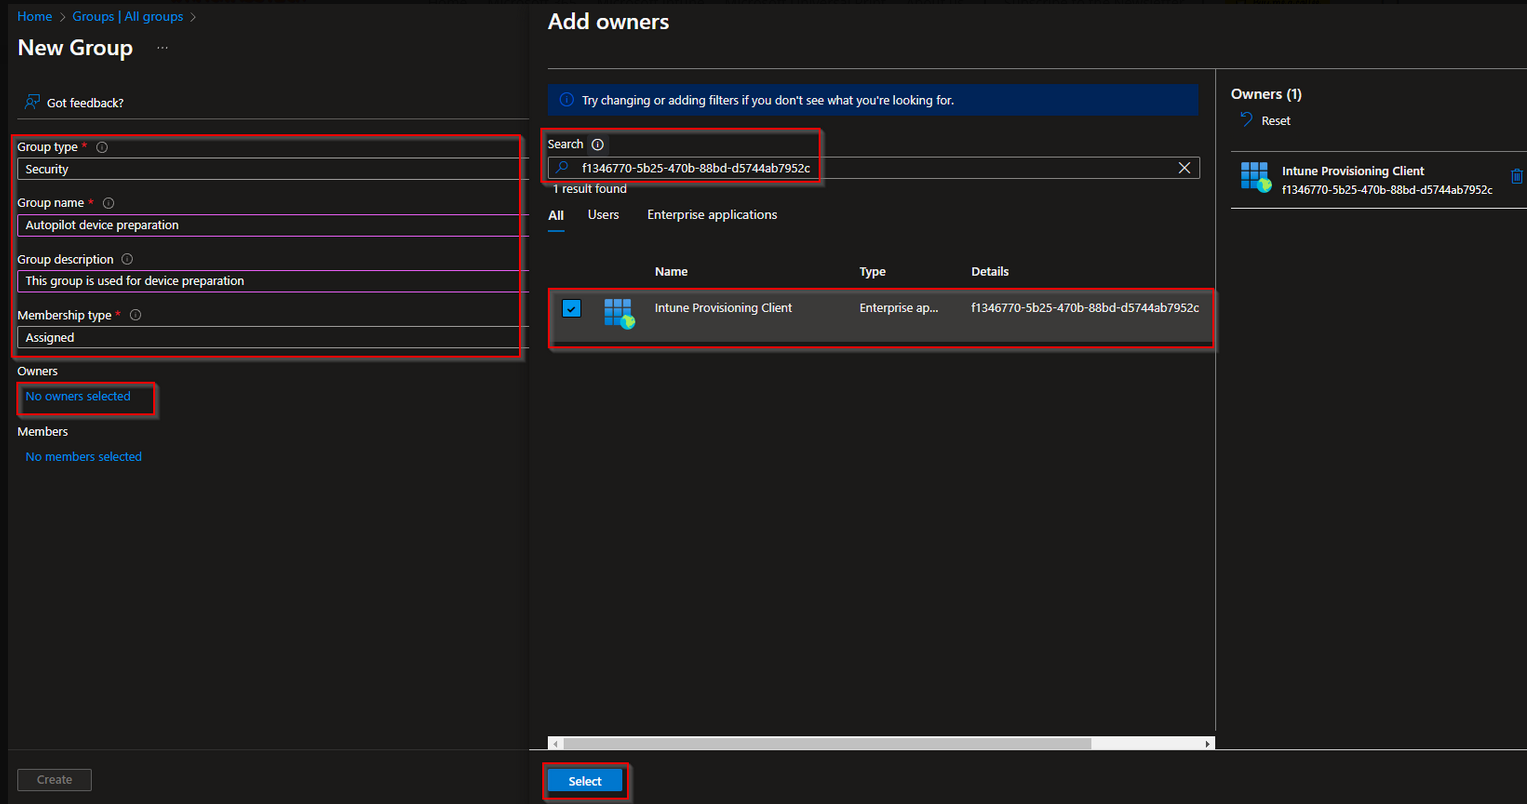
Once the group is created, it will be used to assign policies, apps, and scripts to enrolled devices. Proceed to the next step to configure the Device Preparation policy.
Great, you have successfully created a new security group. Now you can go ahead to step 2 and create the device preparation policy.
Step 2: Configure the Device Preparation Policy
In this section, we will guide you through the process of setting up the Device Preparation feature in Microsoft Intune. Follow the step-by-step instructions below to configure the new Autopilot deployment.
Steps:
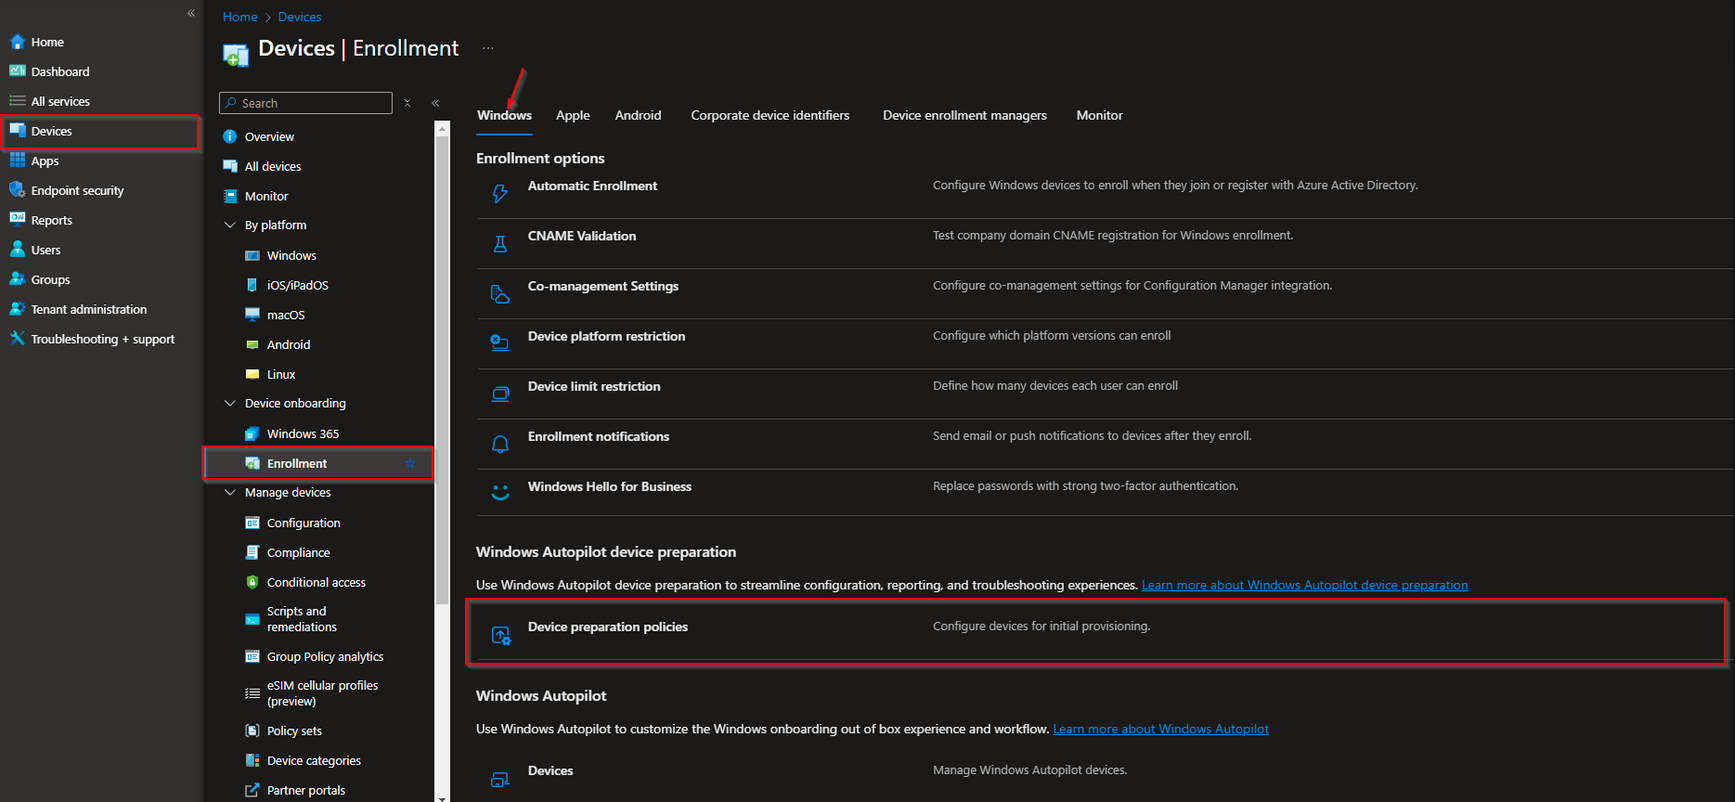
Go to Intune Portal.
Navigate to Devices.
Select Enrollment from the menu.
Under the Windows tab, click on Device Preparation Policies.
With this setup, you are now ready to define your device preparation policies and streamline the enrollment process. Proceed to the next step for further configuration.
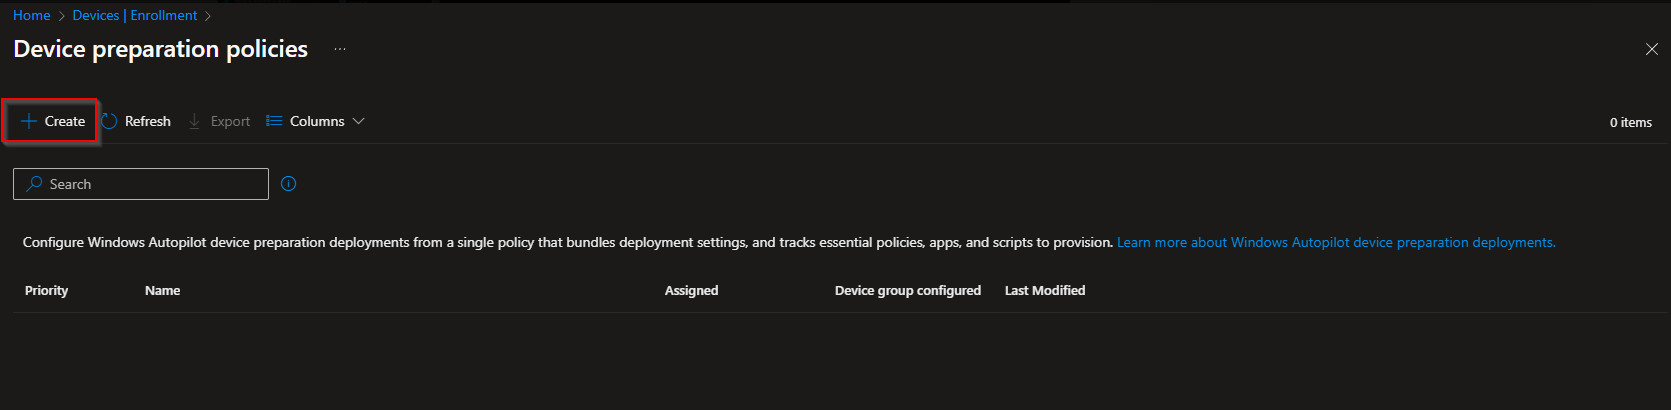
On here we will create a new Autopilot device preparation policy. Just click on Create.
Click on Create
On the Introduction screen click on Next.
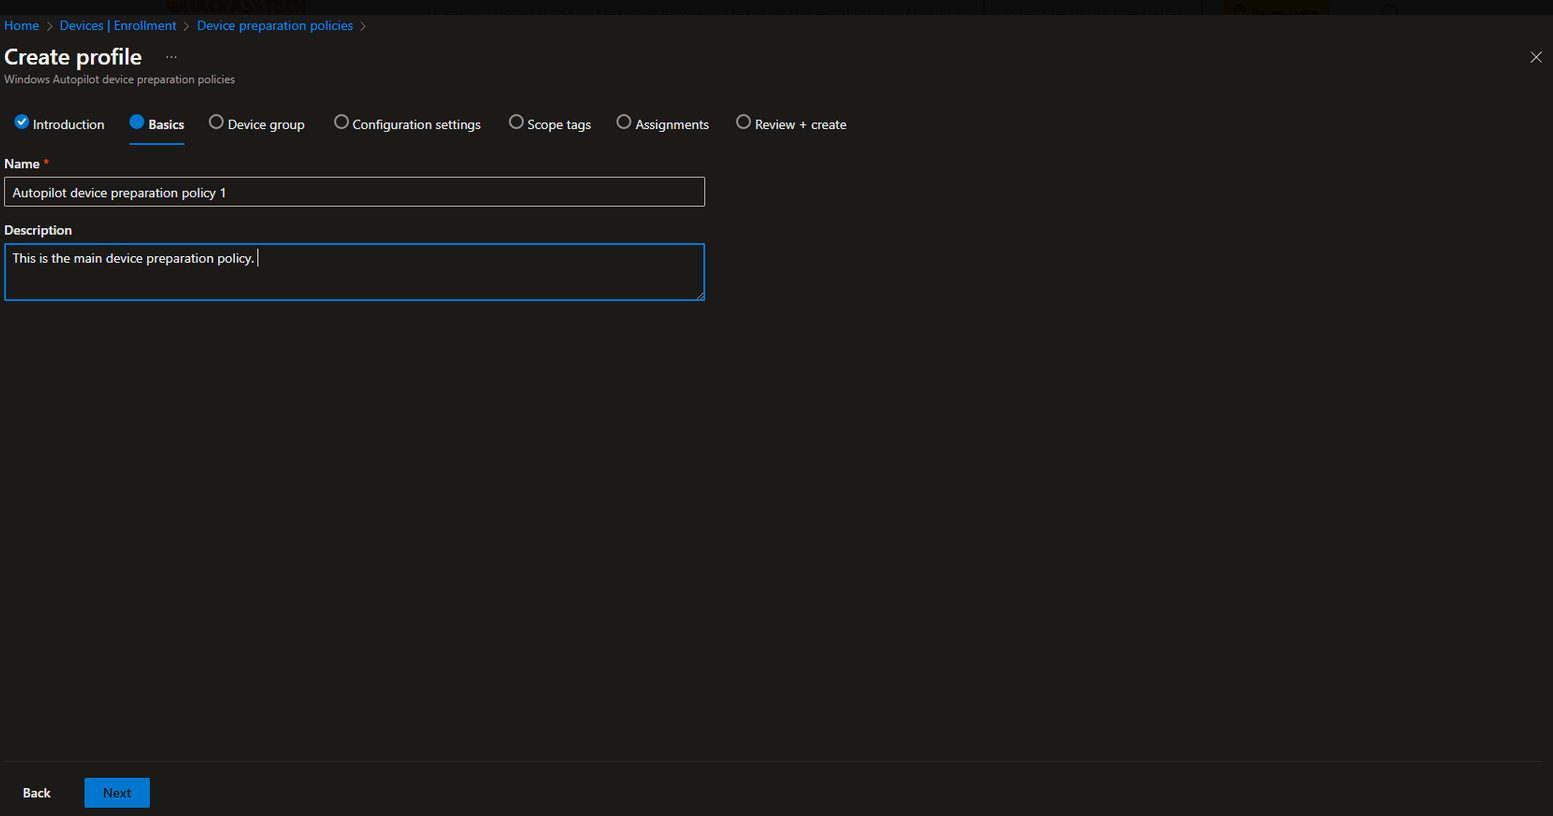
First give your Autopilot device preparation policy a Name and a Description.
Click on Next.
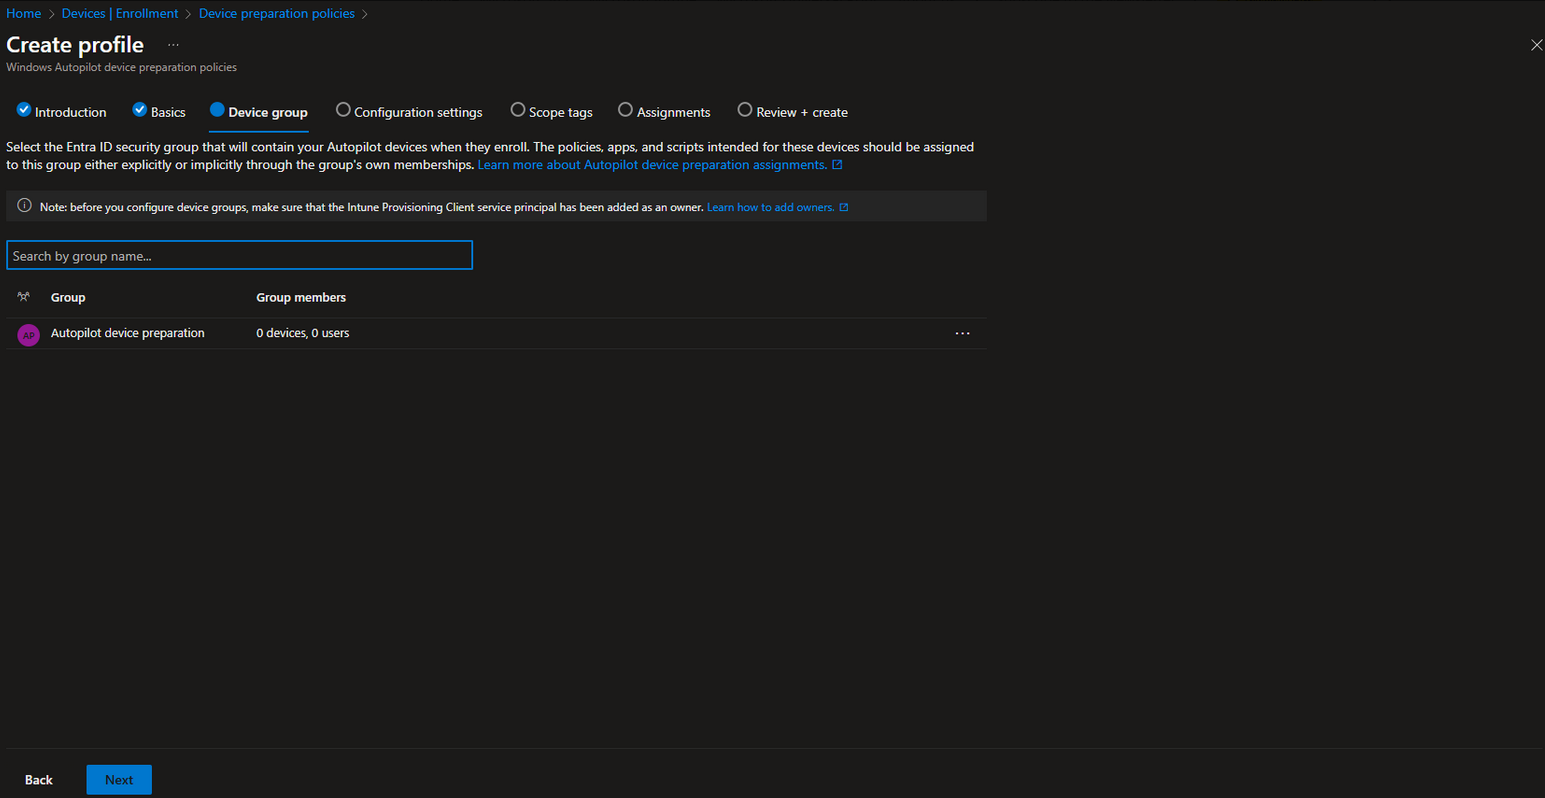
On the device group add the newly created group from step 1.
Search for the security group from step 1 and add it
Click on Next
Configuring Deployment Settings
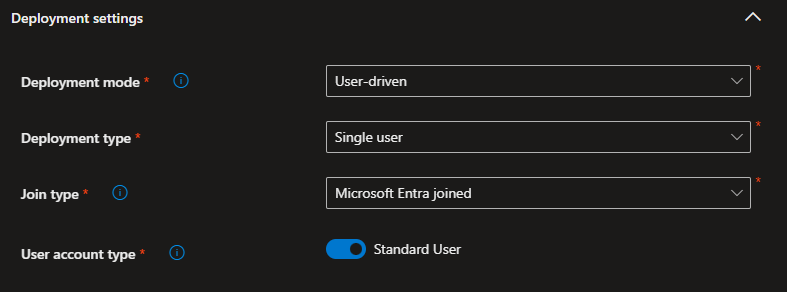
In the Configuration settings tab, we will define the deployment settings. This process is similar to configuring an Autopilot profile, so it’s straightforward.
Deployment Settings:
Deployment Mode: User-driven
Deployment Type: Single user
Join Type: Microsoft Entra joined
User Account Type: Standard User (Select "Administrator" if you want users to have admin privileges)
With these settings in place, the deployment process will be aligned with your organization's requirements. Proceed to the next step for further configuration.
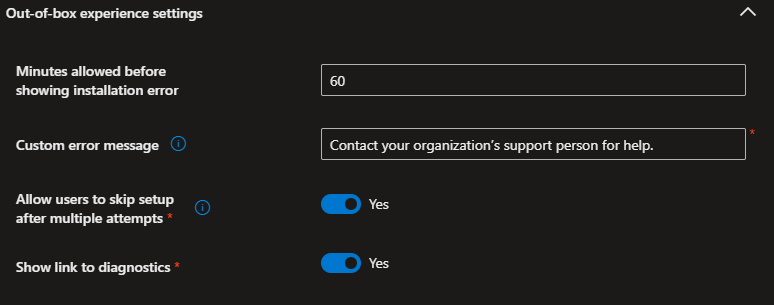
On the Out-of-box experience settings
Minutes allowed before showing installation error: 60 (This is the time in minutes after an error will be shown. You can change this to your need)
Custom error message: I leave this how it is. This text will be shown after an error.
Allow users to skip setup after multiple attempts: Yes
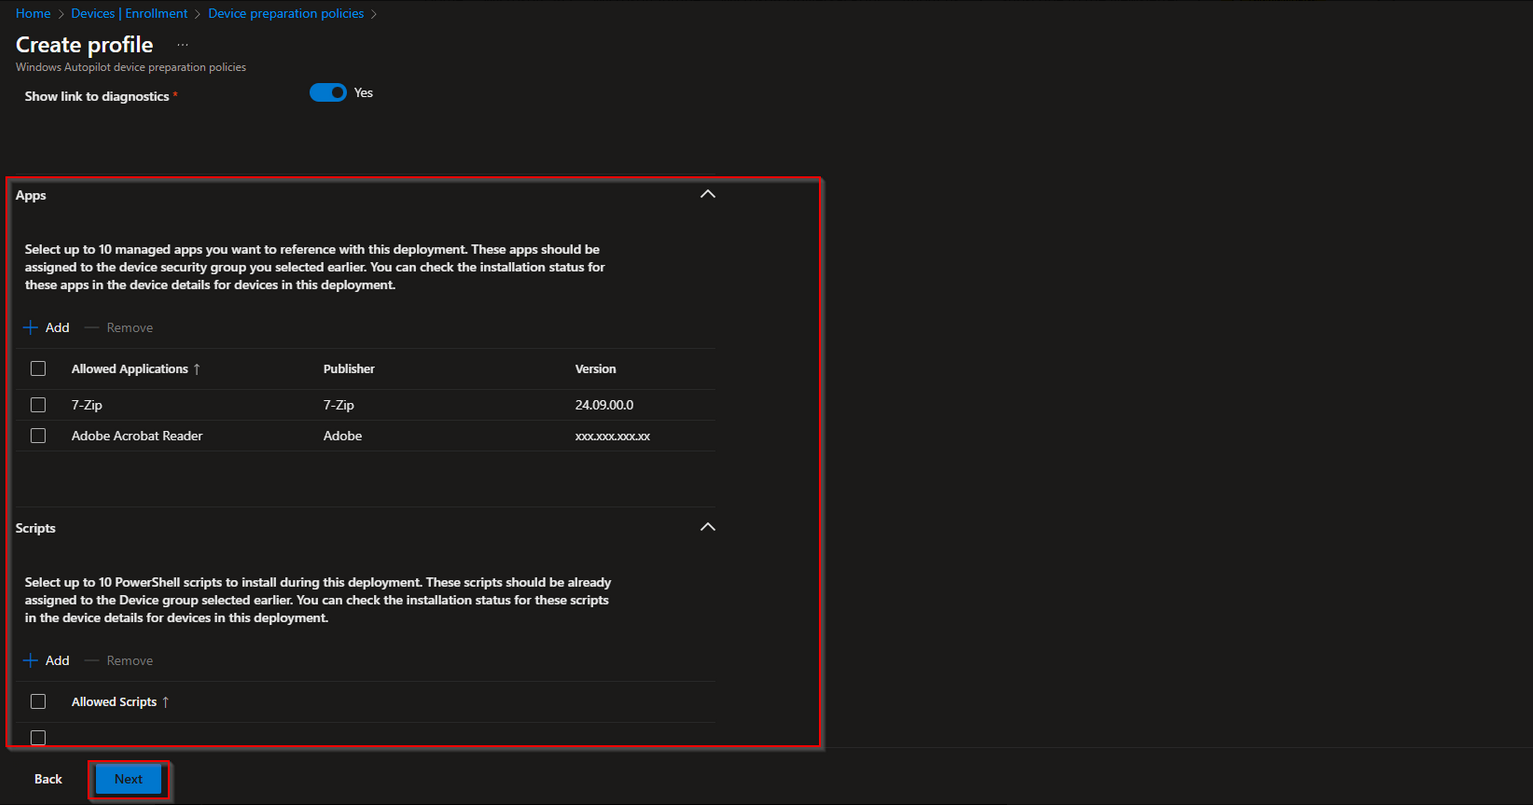
Show link to diagnostics: Yes
On the Apps and Scripts settings
You can add up to 10 managed apps or PowerShell scripts to install during the deployment. This apps and scripts need to be assigned to the same group which we have created in step 1.
Click on Next if you are finished.
On the scope tags enter scope tags if applicable and click on Next.
On the Assignment tab enter a group of users which can deploy devices with this device preparation policy. You can enter All users or create a new Group. I will assign the policy to All users.
Click on Next
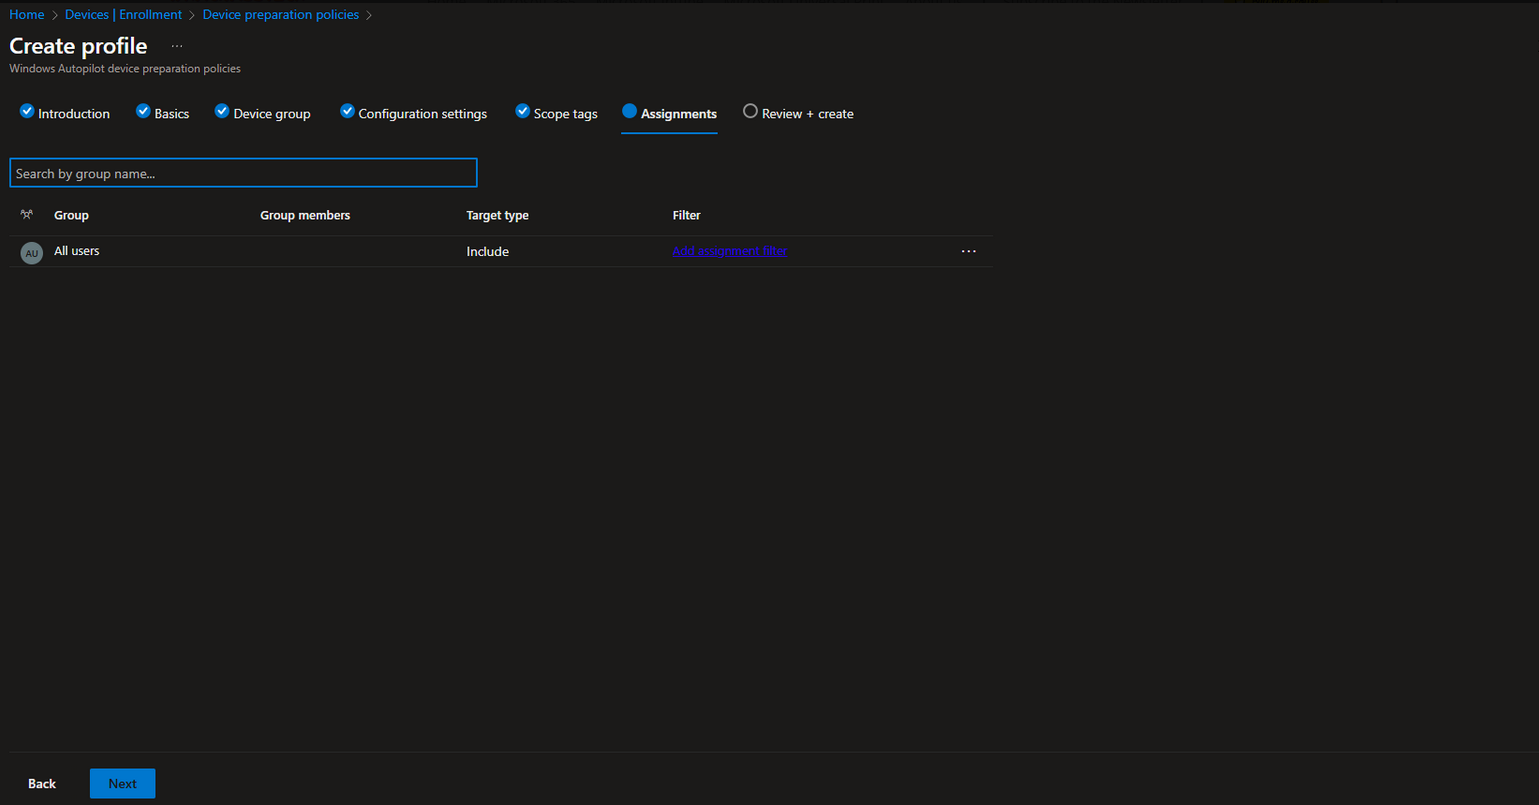
On the Review + create tab click on Save.
Device Preparation User Workflow
Congrats! You have successfully created a new Autopilot Device Preparation policy. Now, let’s walk through what the user experience will look like during the deployment process.
1. Out-of-Box Experience (OOBE)
Users power on the device and go through the Windows setup.
Unlike Autopilot v1, the device does not immediately recognize the organization’s tenant. This happens after the first login.
2. Authentication & Enrollment
Users sign in with Microsoft Entra ID credentials.
The device is automatically enrolled in Intune, applying assigned policies, apps, and scripts.
3. Configuration & First Use
Configurations continue in the background, allowing users to access the desktop sooner.
Device naming is not enforced, requiring IT admins to use post-deployment scripts if needed.
If set as Standard User, administrative actions are restricted.
Key Takeaways
Faster setup without hardware hashes.
OOBE does not initially enforce corporate ownership, requiring user awareness.
Some control features from Autopilot v1 are missing, impacting consistency.
Despite some limitations, Autopilot v2 simplifies provisioning, making deployments faster and more efficient for organizations.
Conclusion
In this blog post, we explored Device Preparation (Autopilot v2) with Microsoft Intune, covering key steps to streamline device deployment and management.
We started by creating a Security Group to manage enrolled devices.
Then, we configured a new Autopilot Device Preparation policy within the Microsoft Intune Portal.
Finally, we walked through the user experience, highlighting the key differences and improvements in Autopilot v2.
This guide aims to provide valuable insights into optimizing your device provisioning strategy. By leveraging Device Preparation (Autopilot v2), organizations can simplify deployments, reduce administrative overhead, and enhance efficiency.
More Information
For additional details on managing Device Preparation (Autopilot v2) with Microsoft Intune, refer to the following Microsoft Learn articles:
Overview of Windows Autopilot Device Preparation: Provides a comprehensive understanding of the device preparation process and its benefits. https://learn.microsoft.com/en-us/autopilot/device-preparation/overview
Windows Autopilot Device Preparation Requirements: Outlines the necessary software, networking, licensing, and configuration prerequisites. https://learn.microsoft.com/en-us/autopilot/device-preparation/requirements
Step-by-Step Tutorial for User-Driven Microsoft Entra Join: Guides through configuring a user-driven deployment scenario with Microsoft Entra join. https://learn.microsoft.com/en-us/autopilot/device-preparation/tutorial/user-driven/entra-join-workflow
Assigning Applications and PowerShell Scripts: Details the process of assigning applications and scripts during device preparation. https://learn.microsoft.com/en-us/autopilot/device-preparation/tutorial/user-driven/entra-join-assign-apps-scripts
Reporting and Monitoring: Explains how to access reports and monitor deployments in near real-time. https://learn.microsoft.com/en-us/autopilot/device-preparation/reporting-monitoring
Frequently Asked Questions (FAQ): Addresses common inquiries regarding Windows Autopilot device preparation. https://learn.microsoft.com/en-us/autopilot/device-preparation/faq
These resources offer in-depth information to enhance your device management strategy using Microsoft's latest tools and features.
Thank you!
🖥️ Ricardo Barbosa
📘 MCT Microsoft Certified Trainer | ☁️ Cloud Architect
🌐 Technology Director - https://altelix.com