

11 - Custom Branding – Strengthen Trust and Identity Across Your Tenant
Although often overlooked, custom branding in Microsoft Entra ID (formerly Azure AD) plays a key role in user confidence, organizational identity, and phishing prevention. When users sign in to Microsoft 365 apps, Teams, or even during device setup via Autopilot, seeing familiar logos, colors, and organizational messages immediately reinforces that they are accessing a legitimate company resource not a spoofed or malicious login page.
Why Branding Matters
While branding is not a direct “security setting,” it serves as a visual layer of security assurance. Users who see consistent branding across login portals, onboarding screens, and MFA prompts are less likely to fall for phishing attempts or credential-harvesting pages.
In hybrid and remote environments, where users may sign in from personal devices or new locations, these visual cues provide a sense of trust and continuity a safety blanket that reminds them:
| “You are signing into your organization’s environment.”
Additionally, branding contributes to:
A professional user experience during first sign-in or Autopilot setup
Brand recognition across all Microsoft services
Compliance and accessibility by including legal disclaimers, privacy links, or contact support info
How to Configure Custom Branding
To configure branding for your organization:
Go to the Microsoft Entra admin center: https://entra.microsoft.com
Navigate to: Microsoft Entra ID → Company branding
Click Edit default branding (or Add new language if you serve multilingual users).
Customize the following elements:
Banner logo (280x60 px) – visible on all sign-in screens
Background image (1920x1080 px) – shown on desktop login pages
Sign-in page text – use to provide login instructions or security reminders
Square logo (for Windows Hello or small screens)
Accent color – match your corporate palette
Username hint – example: user@yourcompany.com
Save your configuration and preview it across different Microsoft 365 services to ensure consistent visual alignment.
Tip: Always validate that your logos and colors meet accessibility contrast standards. You can use Microsoft’s accessibility checker to confirm readability for all users.
Official Microsoft Learn Reference: Add company branding to your sign-in page in Microsoft Entra ID: https://learn.microsoft.com/en-us/entra/fundamentals/how-to-customize-branding
Additional Enhancements
Localized Branding: Add versions of your branding for multiple languages to provide a native experience for global users.
B2B Collaboration: Extend your branding to external partners for consistent identity across shared applications.
Autopilot and Intune Integration: Your company logo and color scheme also appear during Windows Autopilot provisioning, reinforcing user confidence during deployment.
Key Goals of This Configuration
Strengthen organizational identity and user trust during sign-in Support phishing prevention through visual familiarity Enhance onboarding experience with consistent and professional branding
12 - Application Secrets – Manage Expirations and Prevent Service Disruptions
In every Microsoft Entra ID–integrated environment, application secrets (client secrets) act as digital keys that enable secure authentication between your apps, automations, and Microsoft APIs such as Intune, Graph, or Azure services.
However, these secrets are not permanent. They have a defined expiration period (up to a maximum of 24 months), and once expired, any dependent workflow, script, or integration will fail immediately.
This is why maintaining visibility and control over app secrets is critical to keeping your automations, integrations, and service accounts operational.
Understanding Application Secrets
When an application is registered in Microsoft Entra ID → App registrations, it can authenticate using one of several credential types:
Client secret (a generated password-like value)
Certificate (a more secure option using asymmetric keys)
Managed identity (recommended when running inside Azure or Microsoft 365)
If your integration or automation (such as Power Automate, Graph API scripts, or custom Intune connectors) uses a client secret, you must monitor its expiration date to avoid outages.
Once the secret expires, all authentication attempts from that app return an invalid_client or unauthorized_client error effectively breaking all related services or flows.
How to Monitor and Renew Application Secrets
Locate your registered applications:
Go to Microsoft Entra admin center → https://entra.microsoft.com
Navigate to Microsoft Entra ID → App registrations → Owned applications
Review existing secrets:
Open your app and select Certificates & secrets
Check the expiration date of each secret under Client secrets
Renew before expiration:
Click New client secret, set the desired expiration (e.g., 6, 12, or 24 months), and securely copy the new value immediately it will only be displayed once.
Update all scripts, services, or flows using that secret with the new value.
Enable proactive monitoring:
Maintain a simple Excel, SharePoint list, or Azure Automation script that tracks all app secret expiry dates.
Send email or Teams notifications 30 days before expiration.
Pro Tip: Wherever possible, replace client secrets with certificates or managed identities they are far more secure and reduce credential rotation overhead.
Official Microsoft Learn References:
Add credentials (client secrets or certificates) to your Microsoft Entra app registration https://learn.microsoft.com/en-us/entra/identity-platform/quickstart-register-app
Use Microsoft Graph to access Microsoft 365 data securely https://learn.microsoft.com/en-us/graph/auth-register-app-v2
Managed identities for Azure resources overview https://learn.microsoft.com/en-us/entra/identity/managed-identities-azure-resources/overview
Best Practices
Track all app secrets and their expiration dates in a centralized location (e.g., Intune Admin Notes, SharePoint, or Power BI dashboard).
Rotate secrets proactively at least 30 days before expiration.
Transition to Managed Identities or Certificates for critical automations.
Apply least privilege permissions only grant apps the exact scopes they need.
Key Goals of This Configuration
Prevent outages caused by expired app secrets
Implement structured monitoring and renewal procedures
Strengthen automation security using managed identities or certificates
13 - OneDrive & SharePoint – Strengthen External Sharing Governance
External sharing is one of the most powerful collaboration features in Microsoft 365 and also one of the most common sources of unintentional data exposure. If not configured properly, users or guests could share sensitive files outside your organization without oversight.
By defining clear external sharing rules in SharePoint and OneDrive, you can maintain a balance between productivity and control allowing collaboration while ensuring data remains protected and auditable.
Image Reference
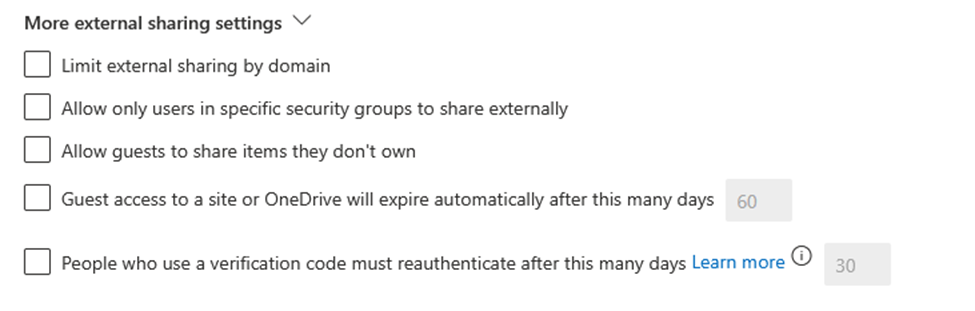
The image above (“More external sharing settings”) shows the granular controls available in the SharePoint Admin Center → Policies → Sharing section. These options allow administrators to:
Limit sharing by domain,
Restrict who can share externally,
Prevent guests from resharing content,
Define expiration periods for guest access, and
Enforce reauthentication cycles for external users.
Each of these settings contributes directly to strengthening your Zero Trust posture and reducing potential exposure.
Step-by-Step Configuration
Go to the SharePoint Admin Center from the Microsoft 365 Admin Portal: https://admin.microsoft.com
Navigate to: Policies → Sharing
Under External sharing, set the appropriate sharing level for:
SharePoint
OneDrive
You can select one of four levels of access, depending on your organization’s tolerance for external collaboration:
Anyone – Least restrictive, allows anonymous links.
New and existing guests – Recommended for most organizations, balances security and flexibility.
Existing guests only – Only allows users already invited to your tenant.
Only people in your organization – Most restrictive, no external sharing.
More External Sharing Settings (Image Breakdown)
In the More external sharing settings section (as seen in the image):
Limit external sharing by domain: Use this to whitelist trusted partner domains or block specific ones. Ideal for vendor-controlled environments.
Allow only users in specific security groups to share externally: Restricts external sharing to authorized roles, such as project leads or compliance-approved users.
Allow guests to share items they don’t own: Disable this option it prevents external guests from resharing internal content, a critical control against data leakage.
Guest access expiration: Define an expiration period (e.g., 60 days) for guest access to OneDrive or SharePoint. This ensures temporary users lose access automatically.
Reauthentication period: For users authenticating via verification codes, enforce reauthentication after a set period (default 30 days) to maintain continuous verification of identity.
Official Microsoft Learn References:
Manage sharing settings for SharePoint and OneDrive in Microsoft 365 https://learn.microsoft.com/en-us/sharepoint/turn-external-sharing-on-or-off
Microsoft Entra B2B Collaboration overview https://learn.microsoft.com/en-us/entra/external-id/what-is-b2b
Best Practices
Enable “New and existing guests” as your default setting for a controlled yet functional sharing model.
Regularly audit external access via the SharePoint Admin Center → Access Control → External sharing report.
Combine sharing restrictions with Sensitivity Labels, DLP policies, and Conditional Access for complete governance.
Educate users about safe sharing practices to reduce accidental exposure.
Key Goals of This Configuration
Prevent unauthorized resharing of corporate data by external users
Enforce domain and access-based restrictions for external collaboration
Maintain compliance and visibility while supporting productivity
14 - Access Control for Unmanaged Devices
When users connect to corporate data from personal or unmanaged devices, it introduces a significant data leakage risk. Without proper controls, sensitive company files could be downloaded, synchronized, or cached on personal endpoints that fall outside your security governance creating potential compliance gaps.
The “Unmanaged Devices” configuration in SharePoint and OneDrive is one of the most effective built-in methods to enforce access restrictions and maintain visibility over who can interact with corporate data.
Image Reference
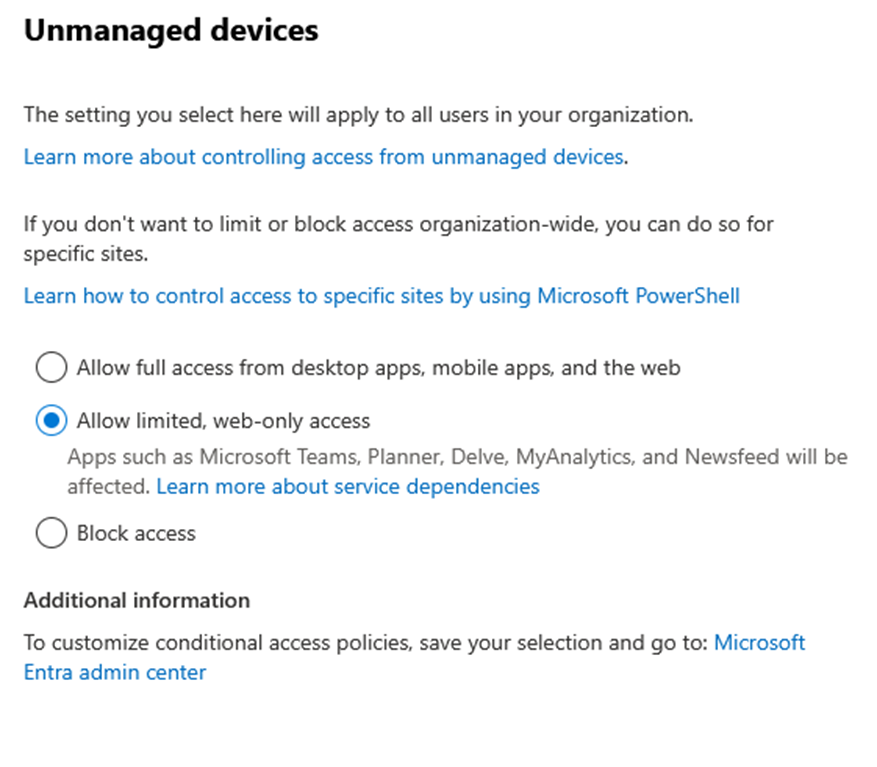
The image above shows the Unmanaged Devices access control configuration available in the SharePoint Admin Center → Policies → Access Control section. From this panel, you can define how unmanaged devices (not enrolled or compliant with Intune) access your corporate resources.
Recommended Configuration
Navigate to the SharePoint Admin Center: https://admin.microsoft.com
Go to: Policies → Access Control → Unmanaged Devices
Choose your preferred enforcement level:
Allow full access from desktop apps, mobile apps, and the web: Not recommended users could synchronize sensitive company data to personal devices or unmanaged storage.
Allow limited, web-only access (Recommended): Restricts access to browser-based sessions only, preventing data download or sync to local drives. This setting works well when combined with Mobile Application Management (MAM) for Microsoft Edge.
Block access: The strictest option, preventing unmanaged devices from accessing any SharePoint or OneDrive content. This can be applied to high-security environments or sensitive departments (Finance, Legal, etc.).
Personal Recommendation:
Implement MAM policies for Microsoft Edge to allow web-only access on unmanaged devices. This approach ensures productivity without compromising data protection and drastically reduces user complaints about blocked access.
Conditional Access Integration
For organizations using Microsoft Entra Conditional Access, this setting complements broader access policies that evaluate device compliance and risk posture. You can configure conditional access to enforce MFA, restrict download locations, or require Intune-managed devices for sensitive workloads.
Learn more: Control access from unmanaged devices: https://learn.microsoft.com/en-us/sharepoint/control-access-from-unmanaged-devices
Learn more: Conditional Access in Microsoft Entra ID: https://learn.microsoft.com/en-us/entra/identity/conditional-access/overview
Best Practices
Enable “Allow limited, web-only access” as your baseline configuration.
Pair with MAM app protection policies for browsers and Office apps.
Combine with Conditional Access for device compliance and MFA enforcement.
Regularly audit access patterns and revalidate your exceptions list.
Key Goals of This Configuration
Protect corporate data from synchronization to unmanaged or personal devices
Maintain control over browser-based access via Microsoft Edge + MAM
Strengthen your Zero Trust access model with Conditional Access integration
15 - Microsoft 365 Apps – Enable OneDrive Health Sync and Policy Management
When managing Microsoft 365 Apps (formerly Office 365 ProPlus), administrators can centralize configuration policies for Word, Excel, Outlook, Teams, and OneDrive. This ensures consistent compliance, performance monitoring, and user experience across all corporate devices whether managed via Intune or standalone environments.
You can access all Microsoft 365 Apps configuration options through the Microsoft 365 Apps Admin Center, available at: https://config.office.com/
Image Reference
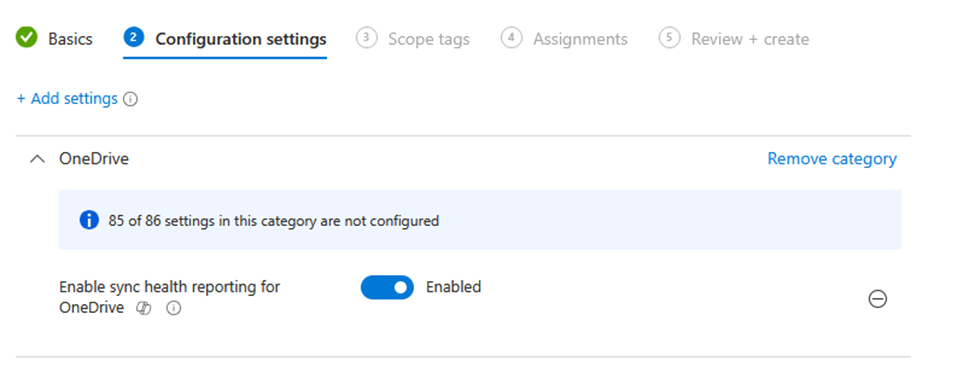
The image above illustrates the OneDrive Sync Health Reporting setting available in the Intune Configuration Profiles → Settings Catalog → OneDrive section. Enabling this option allows you to monitor synchronization issues and client status directly within the Microsoft 365 admin portals essential for proactive troubleshooting and reporting.
Step-by-Step Configuration
Access the Microsoft 365 Apps Admin Center
Navigate to: https://config.office.com/
Sign in using your admin credentials (Global Administrator or Intune Administrator roles).
Locate “Policies” and “Settings”
You can configure policies directly from the Microsoft 365 Apps Admin Center or through the Microsoft Intune portal.
Both methods are valid the difference is that policies set in the Apps Admin Center do not require Intune device management.
Enable OneDrive Sync Health Reporting
Within OneDrive Settings, toggle “Enable sync health reporting for OneDrive” to Enabled.
This feature provides visibility into OneDrive client sync health across all managed endpoints.
Create a Supporting Intune Policy
In Intune, create a Settings Catalog policy to configure the required registry key enabling Sync Health.
This ensures the setting is enforced on all enrolled devices and reports data to the Microsoft cloud dashboard.
Why This Matters
Monitoring OneDrive health helps you proactively detect:
Devices that stopped syncing or are using outdated clients.
Large-scale synchronization issues caused by policies or bandwidth throttling.
Potential compliance risks from unsynchronized files.
Integrating this with Intune policies allows IT to take early action before data loss or user disruption occurs.
Learn More
To learn more about enabling and using OneDrive Sync Health Reporting, visit the official Microsoft documentation: https://learn.microsoft.com/en-us/sharepoint/sync-health?tabs=windows
Key Goals of This Configuration
Centralize configuration for Microsoft 365 Apps and OneDrive via Intune or Office Configuration Service
Enable proactive monitoring of synchronization issues through OneDrive Health Sync
Improve compliance visibility and reduce user incidents related to file sync errors
16 - Intune Security Baselines – Understanding When (and When Not) to Use Them
Microsoft Intune includes Security Baselines, designed to help administrators quickly configure recommended policies and settings that align with Microsoft’s best practices for security and compliance. While these baselines offer a fast way to harden your environment, they can also cause unintended problems if applied without a full understanding of what each policy enforces.
Why You Should Be Cautious
Many administrators simply enable baselines without reviewing the configurations in detail. This often leads to issues such as:
Broken device functionality (e.g., blocked features or access to required tools)
Conflicts between Intune policies and other configuration profiles
Difficulties troubleshooting because baseline settings override custom configurations
Another drawback is version management. Every time Microsoft updates a baseline, your current version becomes read-only. That means you cannot modify the baseline you must either:
Upgrade to the latest version, or
Recreate your configuration manually.
Recommended Approach
Instead of relying entirely on Microsoft’s default baselines, consider these options:
Build Your Own Custom Baseline
Create configuration profiles in Intune tailored to your organization’s needs.
Start from a known framework, such as CIS, NCSC, or ACSC.
Use Baselines as Guidance, Not Enforcement
Review the Microsoft baseline templates to understand best practices.
Select only the settings that fit your operational and compliance goals.
Explore Community-Driven Options
Tools like EUCToolbox or OpenIntuneBaselines provide flexible, community-supported templates that you can adapt without locking yourself to Microsoft’s release cycle.
Helpful References
Learn more about Microsoft Intune Security Baselines: https://learn.microsoft.com/en-us/mem/intune/protect/security-baselines
Center for Internet Security (CIS) Benchmarks: https://www.cisecurity.org/cis-benchmarks/
OpenIntuneBaselines (community resource): https://github.com/SkipToTheEndpoint/OpenIntuneBaseline
Key Goals of This Configuration
Understand the advantages and limitations of Microsoft Intune Security Baselines
Learn how to create and manage your own custom baseline for flexibility
Avoid policy conflicts and unintended disruptions by selectively applying security settings
17 - M365 App Deployment – Choosing the Right Method for Reliability and Control
While Microsoft Intune includes a built-in feature for deploying Microsoft 365 Apps through a simplified visual interface, this option is not always the most reliable, particularly in environments leveraging Windows Autopilot.
In practice, the built-in deployment option often lacks advanced functionality such as supersedence, dependencies, and detailed control over installation behavior features that are critical for large or complex environments.
Why Win32 Packaging is the Best Practice
Whenever possible, it’s strongly recommended to deploy Microsoft 365 Apps as a Win32 package rather than using the built-in installer.
Using the Win32 app format allows for:
Full control over installation and uninstall sequences
Supersedence management for automatic version replacement
Dependency handling between applications
Improved reliability during Autopilot provisioning
Essentially, this approach transforms deployment into a “set and forget” operation once configured properly, it runs consistently and requires minimal maintenance.
Recommended Approach
Below is a proven and community-tested strategy for deploying Microsoft 365 Apps using a PowerShell installation script packaged as a Win32 app:
GitHub Resource: https://github.com/andrew-s-taylor/public/tree/main/Install-Scripts/O365
This script provides a streamlined, automated installation flow optimized for Intune and Autopilot scenarios.
Additional App Deployment Guidance
When deploying other applications via Intune:
Avoid MSI “Line of Business” Apps
They often fail silently or don’t handle updates gracefully.
Always convert these installers into Win32 packages using the IntuneWinAppUtil tool.
Use a Package Manager
Simplify ongoing application updates and version control.
Tools like Winget, Chocolatey, or Patch My PC can automate maintenance.
Test Before Production Deployment
Always verify your installations and uninstallations in a test group or pilot ring before rolling out to all users.
Learn More
Microsoft Learn – Manage Win32 apps with Intune: https://learn.microsoft.com/en-us/mem/intune/apps/apps-win32-app-management
Microsoft Learn – Add and assign Microsoft 365 Apps to Windows 10/11 devices using Intune: https://learn.microsoft.com/en-us/mem/intune/apps/apps-add-office365
Key Goals of This Configuration
Achieve consistent, reliable M365 app deployments across Autopilot and Intune environments
Gain advanced control through Win32 packaging (supersedence, dependencies, automation)
Simplify lifecycle management using package managers and script-based automation
18 - Device Platform Restrictions – Prevent Unauthorized Personal Device Enrollment
In modern environments, it’s critical to control which devices can enroll in Microsoft Intune. By default, users can accidentally or intentionally enroll their personal devices just by signing into Microsoft 365 apps which can introduce security risks, compliance violations, and unwanted management overhead.
To prevent this, administrators should configure Device Platform Restrictions to block personally owned devices across all supported operating systems.
Image Reference
The image above shows an example configuration in the Microsoft Intune admin center → Devices → Enrollment → Device Platform Restrictions panel.

Each platform (Android, iOS/iPadOS, macOS, and Windows) is configured as follows:
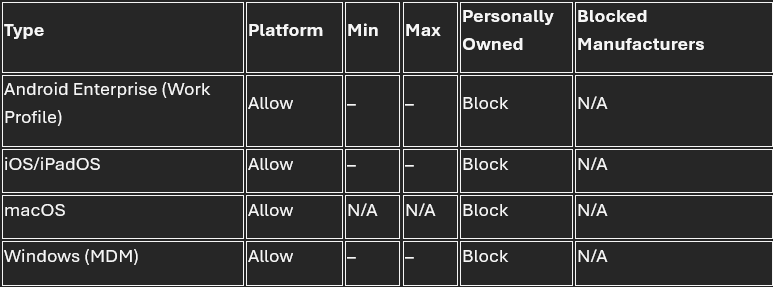
This ensures that only corporate-owned devices can enroll, maintaining full administrative control and compliance visibility.
Configuration Steps
Navigate to the Intune Admin Center
Sign in with Global Administrator or Intune Administrator privileges.
Open Device Platform Restrictions
Go to Devices → Enrollment → Device platform restrictions.
Click Create restriction or edit the Default restriction.
Block Personally Owned Devices
For each platform (Android, iOS/iPadOS, macOS, and Windows), set Personally Owned to Block.
Optionally, you can specify minimum and maximum OS versions or block specific device manufacturers if needed.
Save and Assign the Policy
Assign it to All Users or a specific group (e.g., “Corporate Users”).
Review and save your configuration.
Why This Matters
Blocking personally owned devices prevents:
Unauthorized access to company data from unmanaged endpoints
Data leakage risks through non-compliant or unencrypted devices
Unintentional enrollments that could confuse users and IT teams
It also enforces clear boundaries between corporate and personal environments an essential aspect of a Zero Trust security model.
Learn More
For detailed guidance, refer to the official Microsoft Learn documentation: https://learn.microsoft.com/en-us/mem/intune/enrollment/device-platform-restrictions
Key Goals of This Configuration
Prevent personal devices from being enrolled into corporate Intune management
Maintain data protection and regulatory compliance
Strengthen your Zero Trust device access strategy
19 - Enrolling Devices – Best Practices, Pre-Reqs, and Secure Enrollment Methods
When onboarding devices into Microsoft Intune, understanding the available enrollment methods and their security implications is essential. Incorrect enrollment practices often lead to compliance failures, loss of visibility, and policy misalignment across the organization.
Pre-Requisites
Before beginning any enrollment process, make sure you’ve validated the following Pre-Reqs:
Microsoft Intune & Entra ID licenses are correctly assigned
Automatic MDM enrollment is enabled in Microsoft Entra → Mobility (MDM and MAM)
Windows devices are joined to Microsoft Entra ID or Hybrid Joined (depending on your architecture)
Network & firewall rules allow outbound connectivity to the required Intune and Microsoft endpoints
Device platform restrictions are configured to block personal devices (see Step 18)
Enrollment Methods
Below are the primary enrollment methods available for modern device management through Intune. Each method fits different scenarios and security levels:
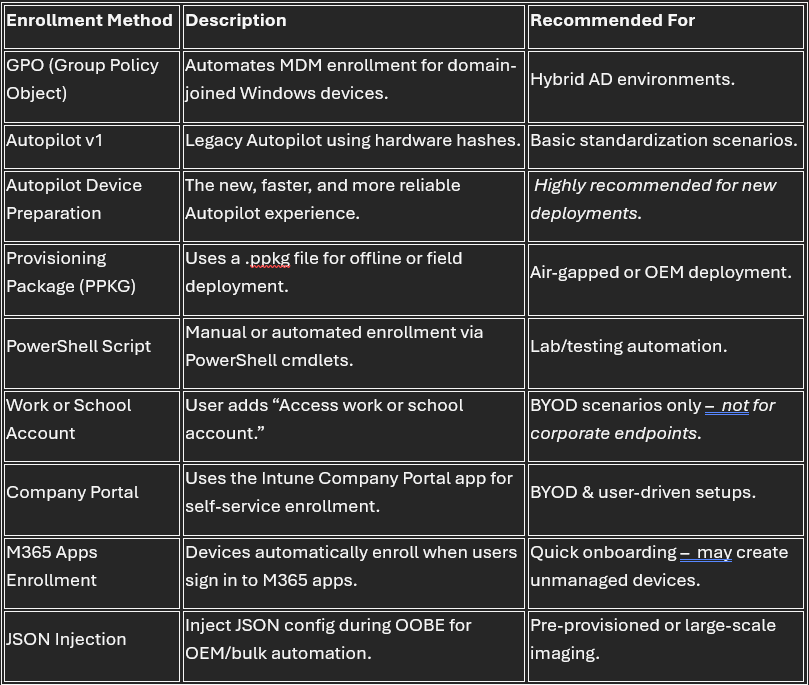
Avoid Common Mistakes
Even experienced admins fall into pitfalls that can break compliance or require full device reinstalls. Here’s what to avoid at all costs:
Using IT Admin Accounts for Enrollment
· The enrolling user becomes the permanent “Enrolled By” owner in Intune.
Even if you later assign a different primary user, that enrollment identity cannot be changed.
Disabling the Enrolled Account
If that account is disabled, all associated devices will immediately become non-compliant.
The only fix is a wipe + reinstall.
Relying on “Add Work or School Account”
This connects the device to Entra ID but does not fully enroll it in MDM leading to missing policies and reporting gaps.
Using DEM (Device Enrollment Manager) Accounts Broadly
DEM accounts bypass user-based compliance, Conditional Access targeting, and licensing.
Only use DEM for shared or kiosk devices, never for end-user endpoints.
Recommended Enrollment Methods for Security & Compliance
For secure, compliant, and scalable onboarding, Microsoft and MVP experts recommend the following approaches:
Windows Autopilot Device Preparation
Enables zero-touch provisioning, policy enforcement, and automatic Intune enrollment.
Works natively with Conditional Access and compliance policies.
Company Portal Enrollment
Ideal for BYOD and hybrid work models.
Combined with App Protection Policies (MAM) for data segregation.
Provisioning Package (PPKG)
Secure offline enrollment option for field or disconnected environments.
Recommended when combined with certificate-based authentication.
Learn More
Windows device enrollment methods: https://learn.microsoft.com/en-us/mem/intune/enrollment/windows-enrollment-methods
Windows Autopilot Device Preparation Overview: https://learn.microsoft.com/en-us/autopilot/device-preparation/overview
Enroll devices in Microsoft Intune: https://learn.microsoft.com/en-us/mem/intune/enrollment/device-enrollment
Key Goals of This Configuration
Implement standardized, secure, and automated enrollment workflows
Avoid common administrative and compliance pitfalls
Maintain a fully governed and auditable device lifecycle under Intune management
20 - Device Clean-up Rules – Maintaining a Healthy Intune Environment
Even with perfect configuration and compliance, tenant hygiene is often overlooked. Inactive or decommissioned devices can clutter your Microsoft Intune environment, create false compliance data, and even present security risks if not properly retired.
Why Device Clean-up Rules Matter
Over time, as users change devices or leave the company, many endpoints remain registered in Intune but stop checking in. These stale records:
Skew compliance reports and dashboards
Cause inaccurate Conditional Access evaluations
Can create unnecessary licensing and policy clutter
Configuring Device Clean-up Rules automates the removal of these inactive devices, ensuring your Intune environment remains clean, secure, and accurate.
Configuration Overview
Navigate to: Microsoft Intune admin center → Devices → Device clean-up rules
In this section, you can define how long a device may remain inactive before being automatically removed from Intune.
As shown in the image below:
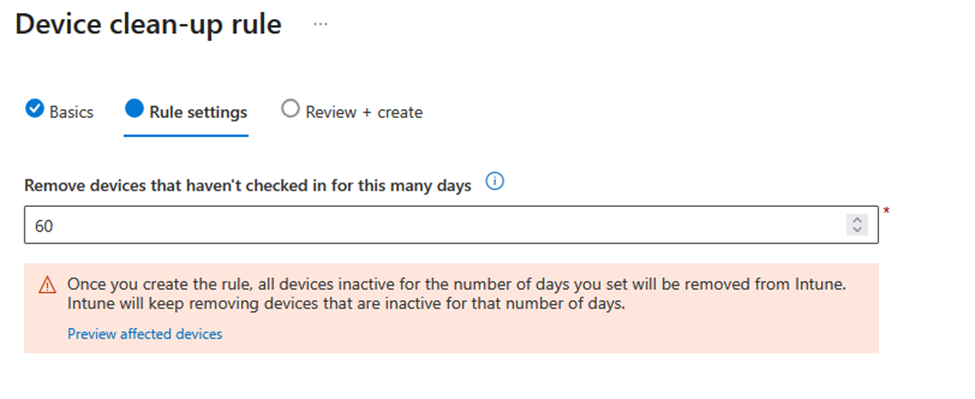
Figure: Example configuration of the Device Clean-up Rule in Intune
Here, the rule is configured to:
Remove devices that haven’t checked in for 60 days.
This means Intune will automatically identify and remove any devices that have not communicated with the service within the specified time frame.
Important: Once you enable this policy, all devices inactive for the set number of days will be permanently removed. Ensure you preview affected devices before applying.
Best Practices
To maintain a secure and efficient Intune environment:
Set the threshold between 30–90 days, depending on your organization’s re-enrollment or device refresh cycle.
30 days for dynamic, short-lifecycle environments
60–90 days for standard enterprise setups
Use the “Preview affected devices” option before enforcing to validate impact.
Coordinate with HR and IT offboarding processes to ensure device wipes are properly executed before automatic removal.
Combine with compliance policies that automatically mark devices as non-compliant before they hit the clean-up threshold.
Learn More
Microsoft Learn – Manage stale devices in Intune: https://learn.microsoft.com/en-us/mem/intune/remote-actions/devices-wipe#automatically-remove-devices-with-cleanup-rules
Microsoft Learn – Device lifecycle management in Intune: https://learn.microsoft.com/en-us/intune/intune-service/fundamentals/device-lifecycle
Key Goals of This Configuration
Maintain a clean and accurate Intune tenant
Reduce compliance drift caused by inactive devices
Automate stale device removal with minimal administrative effort
Default Compliance Settings – Strengthening Your Baseline Security Posture
Establishing a strong compliance baseline is essential to maintaining control and governance across all managed devices.
By default, Microsoft Intune may consider devices compliant even if no compliance policy is applied a configuration that can create false positives and security blind spots in your environment.
Properly configuring the Default Compliance Settings ensures that any unmanaged or misconfigured device is immediately marked as non-compliant, allowing Conditional Access and security controls to react accordingly.
Configuration Overview
Navigate to: Intune admin center → Devices → Compliance policies → Compliance policy settings
In this section, two primary options define your compliance evaluation logic:

Figure: Default Compliance Settings configuration example in Microsoft Intune
Key Settings
Mark devices with no compliance policy assigned as → Not compliant
This setting ensures that every device must have at least one compliance policy assigned to be considered secure.
Devices without an assigned policy will automatically be flagged as non-compliant, protecting the environment against unmonitored endpoints.
Compliance status validity period (days) → 30
Defines how long a device’s compliance status remains valid before requiring re-evaluation.
A 30-day period is recommended for most environments balancing performance and accuracy.
Devices that fail to check in within that timeframe will revert to non-compliant until they sync again.
Best Practices
To ensure a robust compliance framework:
Always enable “Mark devices with no compliance policy assigned as: Not compliant.”
Align compliance policies with Conditional Access to block or restrict access for non-compliant devices.
Set Compliance status validity between 7–30 days depending on your device check-in frequency.
Regularly review and update compliance policies as new security baselines and OS updates are released.
Learn More
Microsoft Learn – Create and assign compliance policies in Microsoft Intune: https://learn.microsoft.com/en-us/mem/intune/protect/compliance-policy-create-windows
Microsoft Learn – Default compliance policy settings overview: https://learn.microsoft.com/en-us/mem/intune/protect/device-compliance-get-started
Microsoft Learn – Monitor device compliance policies: https://learn.microsoft.com/en-us/mem/intune/protect/device-compliance-get-started#monitor-device-compliance-policies
Key Goals of This Configuration
Enforce consistent compliance across all managed endpoints
Automatically flag unprotected or misconfigured devices
Maintain a secure, accurate baseline for Conditional Access enforcement
More Information
Microsoft Entra Local Administrator Password Solution (LAPS) Learn how to configure and enable Microsoft Entra LAPS for secure, automated local admin password rotation and retrieval. https://learn.microsoft.com/en-us/windows-server/identity/laps/laps-overview
Restricting BitLocker Key Recovery in Microsoft Entra ID Step-by-step guidance on encrypting devices and controlling recovery key access using Intune and Entra ID. https://learn.microsoft.com/en-us/mem/intune/protect/encrypt-devices
Enterprise State Roaming (ESR) Overview of ESR and how to enable secure user setting synchronization across multiple devices in Entra ID. https://learn.microsoft.com/en-us/entra/identity/devices/enterprise-state-roaming-enable
Default User Permissions in Microsoft Entra ID Understand and configure default user roles and permissions to prevent unauthorized app registration and tenant creation.
Group Self-Service Management Controls Microsoft Learn article on restricting or delegating group creation and self-service access in Entra ID.
User Consent and Admin Consent Workflow Detailed documentation for controlling user consent to enterprise applications and implementing an approval workflow for admin consent.
https://learn.microsoft.com/en-us/entra/identity/enterprise-apps/user-admin-consent-overview
https://learn.microsoft.com/en-us/entra/identity/enterprise-apps/configure-admin-consent-workflow
Conditional Access and Break-Glass Accounts Microsoft Learn best practices for planning Conditional Access and setting up emergency access accounts.
https://learn.microsoft.com/en-us/entra/identity/conditional-access/plan-conditional-access
https://learn.microsoft.com/en-us/entra/identity/role-based-access-control/security-emergency-access
Tenant Restrictions and External Collaboration Control How to configure Tenant Restrictions to prevent unauthorized cross-tenant access and data leakage.
RBAC and Least Privilege Governance Official documentation on implementing Role-Based Access Control (RBAC) in Intune and enforcing least-privilege access.
https://learn.microsoft.com/en-us/mem/intune/fundamentals/role-based-access-control
https://learn.microsoft.com/en-us/entra/identity/role-based-access-control/best-practices
Microsoft Defender for Endpoint Integration Step-by-step guide on connecting Microsoft Intune with Defender for Endpoint for unified security posture and compliance enforcement.
Windows Autopatch and Update Automation Microsoft Learn article explaining how to deploy and manage updates automatically with Windows Autopatch.
Endpoint Analytics and Reporting Comprehensive overview of Endpoint Analytics for monitoring device performance, compliance, and user experience.
Thank you!
Ricardo Barbosa
Microsoft MVP | Microsoft Certified Trainer (MCT)
Intune & Cloud Architect | Technology Director at Altelix.com