

01 - Entra ID Device Configuration – Managing Local Administrator Rights Securely
When configuring Intune for a modern management environment, it’s essential to begin with Microsoft Entra ID (formerly Azure AD) since it controls how devices and identities are joined and secured. One of the most commonly overlooked yet critical configurations involves local administrator privileges during the enrollment process.
Local Administrator Settings Overview
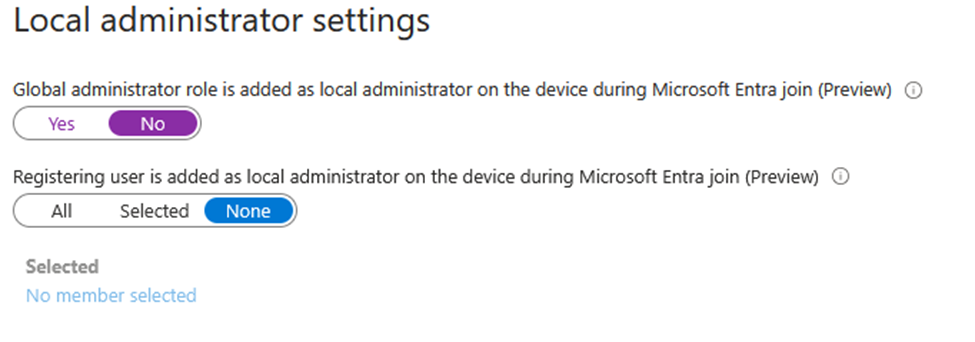
In Entra ID → Devices → Device Settings, you’ll find two key options related to local admin assignment when devices join Entra ID:
1.1 - Global Administrator role is added as local administrator
Recommendation: Set this option to No (as shown in the image).
Reasoning: Global Admin accounts already have elevated privileges through Entra and Microsoft 365 services. Adding them as local administrators on every endpoint increases the attack surface, making lateral movement easier in the event of a compromise.
1.2 - Registering user is added as local administrator
Recommendation: Set this to None.
Reasoning: By default, Intune may assign the enrolling user (the one who first logs in to the device) as a local administrator. While convenient for testing, this undermines your Zero Trust posture and introduces potential privilege escalation risks.
Best Practice Recommendation
To maintain a least privilege model, administrator permissions should be centrally managed rather than automatically granted during device registration. Instead, create a dedicated Azure AD security group (e.g., “Endpoint Local Admins”) and manually assign it to specific support or IT users through Intune’s “Endpoint Privilege Management” or Local Administrator policy assignments.
Why It Matters
Misconfigured local admin settings are one of the top missteps in Intune/Entra onboarding for SMBs and MSPs. Granting admin rights broadly can lead to:
Unauthorized software installations
Reduced visibility into configuration drift
Increased risk of credential theft and privilege escalation
By restricting local admin creation during Entra Join, you establish a hardened baseline that aligns with Microsoft’s Zero Trust and least privilege principles.
Illustration Reference: The image above demonstrates the correct configuration both toggles set to No / None, ensuring no automatic assignment of administrative privileges during Microsoft Entra join.
02 - Enable Microsoft Entra Local Administrator Password Solution (LAPS)
After restricting local administrator rights during device enrollment, the next critical step in securing your Microsoft Entra environment is enabling LAPS (Local Administrator Password Solution). This feature ensures that every device in your organization maintains a unique, automatically rotated local admin password, stored securely within Microsoft Entra ID.
What is Microsoft Entra LAPS?
Microsoft Entra LAPS is the cloud-native successor to the traditional on-premises Windows LAPS solution. It automatically manages the lifecycle of local administrator passwords across all your joined or managed devices no Group Policy or on-prem Active Directory required.
When enabled, LAPS:
Randomly generates strong, unique local admin passwords
Rotates them periodically or after usage
Stores them securely in Microsoft Entra ID (Cloud LAPS)
Allows authorized administrators to retrieve passwords via the Entra portal or PowerShell
Learn more (Microsoft Learn): https://learn.microsoft.com/en-us/windows-server/identity/laps/laps-overview
Recommended Configuration
In Microsoft Entra ID → Devices → Device Settings, enable the following:
Enable Microsoft Entra Local Administrator Password Solution (LAPS): YES
This ensures that the built-in local admin account is protected and automatically managed. Combined with the previous setting (preventing users from becoming local admins), this forms a strong endpoint security baseline for all devices joined to Entra ID or managed via Intune.
Why You Should Always Enable LAPS
Without LAPS, local administrator passwords across devices often become static, predictable, or shared a significant security risk. Attackers who gain access to one endpoint can use those credentials to move laterally across the network.
By contrast, Entra LAPS provides:
Automated password rotation for each device
Tamper-resistant credential storage within Entra ID
Granular access control (only authorized users can retrieve passwords)
Integration with Microsoft Intune for unified device governance
Illustration Reference
The image above shows the recommended configuration with the “Enable Microsoft Entra Local Administrator Password Solution (LAPS)” option set to Yes, ensuring full automation and protection of local admin credentials.

Key Goals of This Configuration
Prevent static or shared admin passwords across devices
Automate secure password generation and rotation
Store credentials safely within Entra ID
Enable password retrieval only for authorized admins
Strengthen compliance and Zero Trust posture
03 - Entra ID Device Protection – Restrict BitLocker Recovery Key Access
One often-overlooked yet critical security control in Microsoft Entra ID device settings is restricting user access to their own BitLocker recovery keys. If this setting is left open, end users can easily retrieve the recovery key, boot into recovery mode, and unlock the device effectively granting themselves local administrative access via command prompt.
This configuration is not just a recommendation it’s a security requirement for maintaining Zero Trust endpoint protection and preventing privilege escalation.
Why Restrict BitLocker Key Access
BitLocker is designed to protect sensitive data in case of device theft or compromise. However, if users have access to recovery keys, they can potentially bypass administrative controls or company compliance policies.
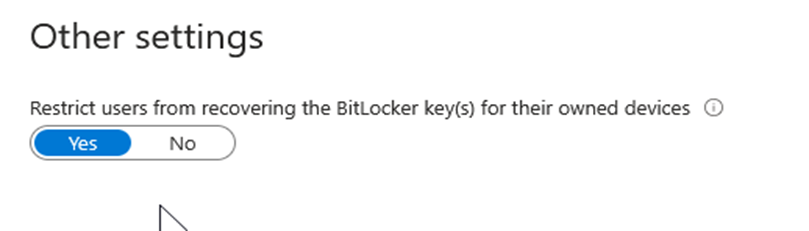
Enabling the setting “Restrict users from recovering the BitLocker key(s) for their owned devices” ensures that only administrators with appropriate Entra or Intune permissions can view or recover these keys.
This approach enforces separation of duties where device users cannot override corporate encryption or security compliance.
Learn more (Microsoft Learn): https://learn.microsoft.com/en-us/mem/intune/protect/encrypt-devices
Recommended Configuration
Navigate to: Microsoft Entra Admin Center → Devices → Device Settings → Other Settings
Set the following option:
Restrict users from recovering the BitLocker key(s) for their owned devices: Yes
This ensures that only authorized personnel can view or export recovery keys stored in Microsoft Entra ID.
Illustration Reference: The image above demonstrates the correct configuration toggle set to Yes, blocking end users from accessing or recovering their own BitLocker keys.
Key Goals of This Configuration
Prevent unauthorized recovery of BitLocker keys by end users
Protect against local privilege escalation and data exfiltration
Maintain compliance with Zero Trust and encryption governance standards
04 - Enable Enterprise State Roaming – Synchronize Settings Securely Across Devices
Enterprise State Roaming (ESR) is a feature available in Microsoft Entra ID that allows users to synchronize their settings and application data across multiple Windows devices providing a seamless experience similar to what older solutions like User Experience Virtualization (UE-V) offered in on-prem environments.
When enabled, ESR ensures that preferences such as Windows themes, language settings, passwords (if allowed), and Edge browser data follow users between devices without relying on local profiles or third-party tools. This is particularly useful in cloud-first environments where users may move between multiple devices.
How Enterprise State Roaming Works
When a user signs into a Windows device with their Microsoft Entra ID account, Windows automatically syncs supported system and app settings with the cloud. These settings are stored securely in Microsoft’s data centers and encrypted both in transit and at rest.
ESR eliminates the need for traditional profile management and offers a more reliable and lightweight alternative for cloud environments.
Learn more (Microsoft Learn): https://learn.microsoft.com/en-us/entra/identity/devices/enterprise-state-roaming-enable
Recommended Configuration
Navigate to: Microsoft Entra Admin Center → Devices → Device Settings → Enterprise State Roaming
Set the following:
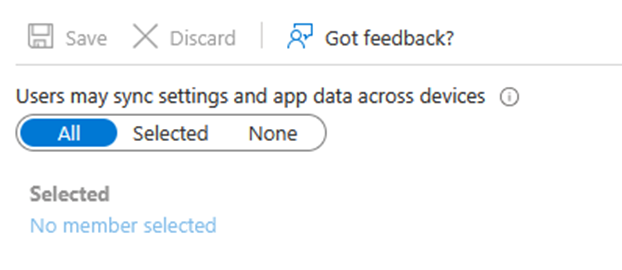
Users may sync settings and app data across devices: All
Illustration Reference: The image above shows the configuration for enabling synchronization across all users in the tenant. This ensures consistent user experience, policy compliance, and faster onboarding when users switch or replace devices.
Key Goals of This Configuration
Provide a unified and reliable experience across Windows endpoints
Reduce dependency on roaming profiles or local storage
Improve productivity and user satisfaction while maintaining security
05 - Entra ID User Permissions – Restrict Default User Capabilities
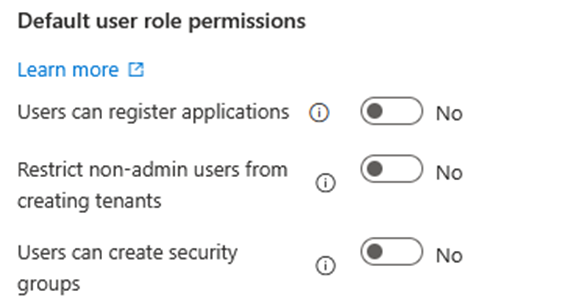
By default, Microsoft Entra ID allows end users to perform actions that can introduce unnecessary risk, such as registering applications, creating tenants, or managing groups. These permissions are convenient in testing environments but dangerous in production where security, governance, and identity hygiene are essential.
The settings below help establish a hardened baseline for user role permissions, reducing the attack surface and preventing unauthorized changes to your tenant structure.
Why Restrict Default Permissions
Allowing users to register applications or create tenants without oversight can lead to shadow IT, unmanaged enterprise apps, and potential data exposure. Restricting these permissions ensures that only authorized administrators can:
Register new Azure AD / Entra apps
Create new tenants
Manage security groups
Similarly, blocking access to the Microsoft Entra Admin Center prevents users from attempting administrative actions or viewing sensitive configurations.
Learn more (Microsoft Learn): https://learn.microsoft.com/en-us/entra/fundamentals/users-default-permissions
Recommended Configuration
Navigate to: Microsoft Entra Admin Center → Users → User Settings → Default User Role Permissions
Set the following:
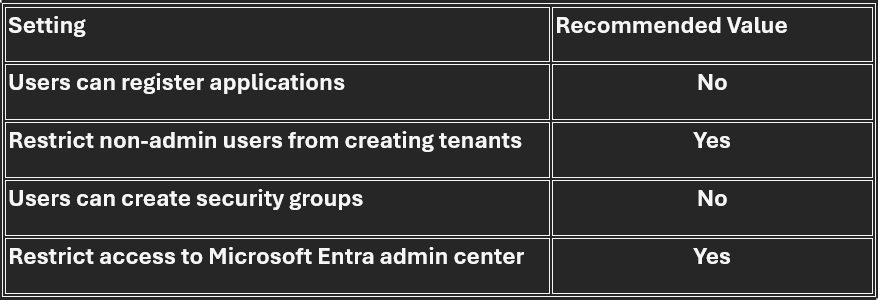
Illustration Reference: The images above show the recommended configuration to limit non-admin actions and secure Entra administrative access.

Key Goals of This Configuration
Prevent unauthorized app registrations and shadow IT risks
Maintain strict tenant and group creation governance
Restrict access to administrative portals to authorized personnel only
06 - Entra ID Group Governance – Restrict Group Creation and Self-Service Management
Group management in Microsoft Entra ID can quickly become unmanageable if users are allowed to freely create and modify groups. This is especially critical for environments with hybrid synchronization or Microsoft 365 integration, as uncontrolled group creation can lead to security gaps, duplicate resources, and inconsistent access control.
By restricting group creation and self-service capabilities, administrators maintain a clear, consistent, and auditable structure for both security and Microsoft 365 groups.
Why Restrict Group Creation
When users can create or modify groups in My Groups, or create Security / Microsoft 365 Groups through the Azure Portal, PowerShell, or APIs, it increases the risk of:
Shadow administrative access being granted unintentionally.
Unmanaged group sprawl that complicates policy assignments and Conditional Access targeting.
Duplicate collaboration spaces in Microsoft Teams or SharePoint.
Centralizing group creation and management ensures all permissions follow least-privilege and compliance principles.
Learn more (Microsoft Learn): https://learn.microsoft.com/en-us/entra/identity/users/groups-self-service-management
Recommended Configuration
Navigate to: Microsoft Entra Admin Center → Groups → General → Group Settings
Set the following values:
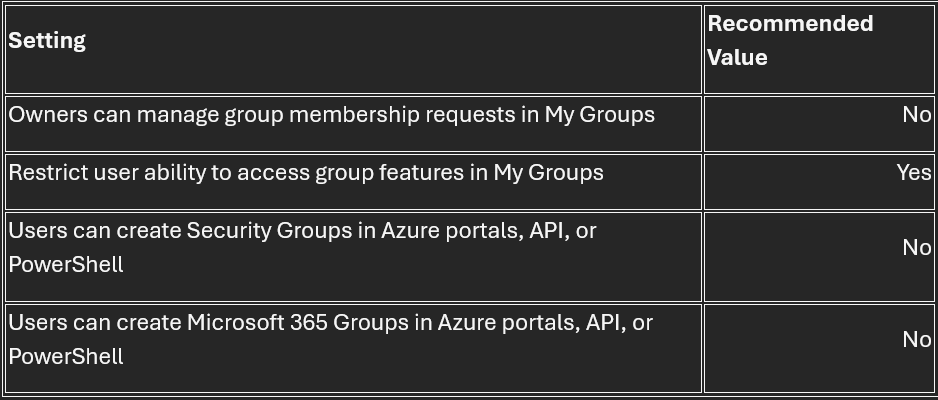
Illustration Reference: The image above shows the proper configuration to disable self-service group management and enforce centralized governance by administrators only.
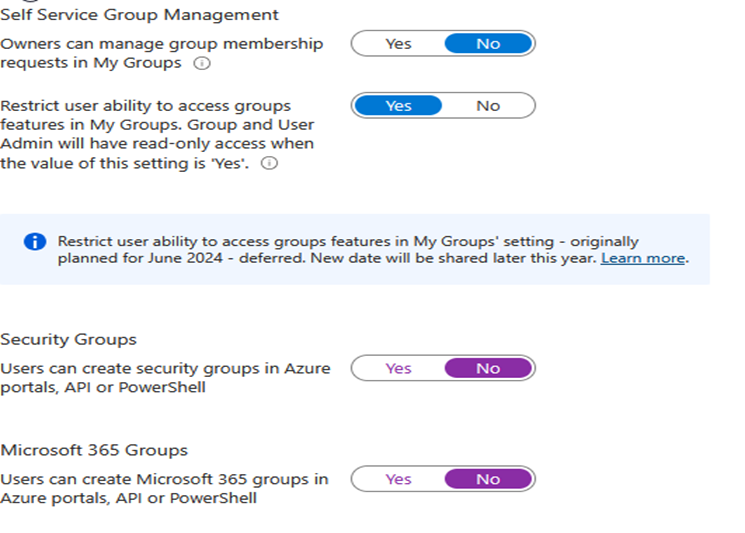
Key Goals of This Configuration
Prevent group sprawl and unauthorized access assignments
Maintain centralized control and consistent governance policies
Strengthen compliance alignment for Entra ID and Microsoft 365 environments
07 - Entra ID Application Consent Management – Restrict User Consent to Enterprise Applications
Application consent in Microsoft Entra ID defines whether users can authorize third-party or internal applications to access organizational data. Allowing users to consent freely to apps can introduce serious security and compliance risks, as malicious or unverified applications might request permissions that expose sensitive information (for example: reading emails, accessing calendars, or OneDrive files).
Restricting user consent ensures that only administrators can approve applications and permissions, maintaining control over what integrations and OAuth scopes are allowed within the tenant.
Why Restrict User Consent
By default, users can grant consent to applications that request access to Microsoft 365 data via the Microsoft identity platform. Attackers can exploit this through phishing or malicious app registration, gaining persistent access even after password resets.
To avoid unauthorized API permissions and “rogue app” infiltration, consent management should be handled exclusively by administrators through Entra ID.
Learn more (Microsoft Learn): https://learn.microsoft.com/en-us/entra/identity/enterprise-apps/user-admin-consent-overview
Recommended Configuration
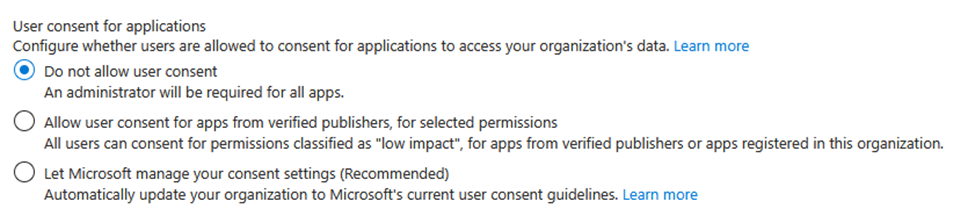
Navigate to: Microsoft Entra Admin Center → Enterprise Applications → Consent and Permissions → User Consent Settings
Set the following:
User consent for applications:
Do not allow user consent – An administrator will be required for all apps.
Illustration Reference: The image above demonstrates the configuration where user consent is disabled, enforcing administrative review for all application permissions.
This ensures that only verified and secure apps are integrated into the Microsoft 365 environment.
Key Goals of This Configuration
Prevent malicious or unverified applications from accessing corporate data
Enforce centralized control of all OAuth app permissions
Maintain compliance with Zero Trust and least-privilege access models
08 - Entra ID Admin Consent Workflow – Configure Controlled Approval for Application Requests
Even when user consent is disabled, organizations still need a mechanism for users to request approval for legitimate applications that require access to Microsoft 365 resources. The Admin Consent Workflow in Microsoft Entra ID allows IT administrators to review, approve, or deny these requests through a structured and auditable process.
This ensures balance between security and usability avoiding both the risk of unapproved apps and the frustration of users being completely blocked from using necessary tools.
Why Enable the Admin Consent Workflow
When “User consent for applications” is disabled (as recommended for security), users lose the ability to connect third-party or internal apps that require permissions. Enabling Admin Consent Requests provides a safe alternative users can submit requests, which are then reviewed by authorized administrators or specific Entra roles.
This approach reduces the chance of shadow IT while maintaining visibility and governance over all app integrations.
Learn more (Microsoft Learn): https://learn.microsoft.com/en-us/entra/identity/enterprise-apps/configure-admin-consent-workflow
Recommended Configuration
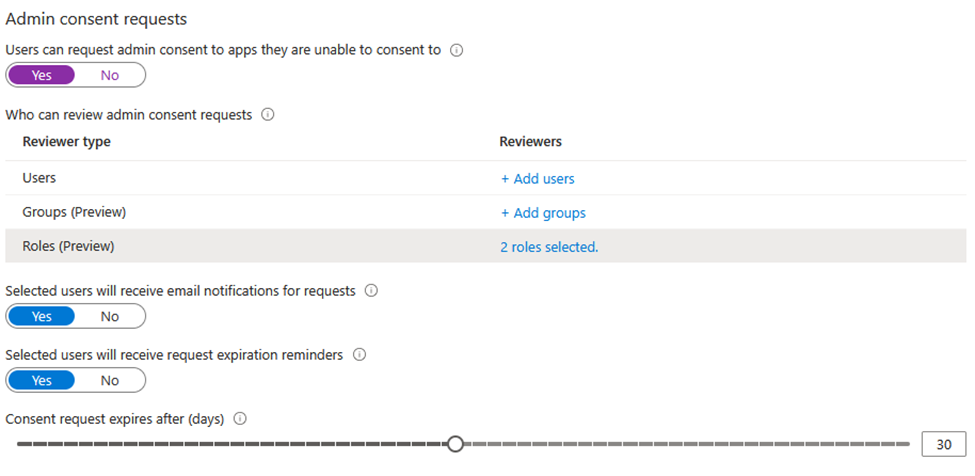
Navigate to: Microsoft Entra Admin Center → Enterprise Applications → Consent and Permissions → Admin Consent Requests
Set the following values:
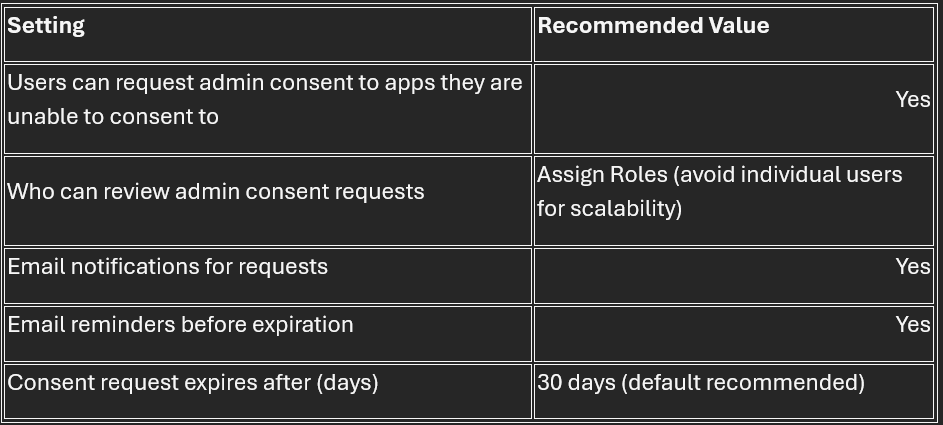
Illustration Reference: The image above demonstrates the setup for Admin Consent Requests enabling a secure review workflow through predefined roles or groups with audit logging and expiration control.
Key Goals of This Configuration
Provide a secure, auditable process for application approval
Balance security with productivity by allowing controlled user requests
Maintain administrative oversight and reduce unauthorized app usage
09 - Conditional Access – Secure Access Without Locking Yourself Out
Conditional Access (CA) is one of the core pillars of Zero Trust security in Microsoft Entra ID. It enables administrators to enforce contextual access decisions based on user identity, device compliance, risk level, and session context ensuring that only the right people, using trusted devices, under compliant conditions, can access organizational resources.
However, one of the most common and costly mistakes administrators make when implementing Conditional Access is accidentally locking everyone (including admins) out of the tenant. That’s why properly defining and protecting break-glass accounts is essential.
Why Break-Glass Accounts Are Critical
A break-glass account is an emergency administrative account designed for use only when Conditional Access or MFA settings prevent normal administrative access. These accounts act as a failsafe to regain control of your environment during outages, misconfigurations, or MFA disruptions.
Key characteristics of a secure break-glass setup include:
The account is excluded from all Conditional Access policies.
It uses a strong, unique password, stored securely in an encrypted or offline vault.
It is MFA-protected with a hardware token (e.g., FIDO2 key) instead of app-based MFA.
Access and usage are monitored and logged, with alerts for any sign-in activity.
Official References:
Plan your Conditional Access deployment in Microsoft Entra ID (Microsoft Learn) https://learn.microsoft.com/en-us/entra/identity/conditional-access/plan-conditional-access
Emergency access accounts in Microsoft Entra ID (Microsoft Learn) https://learn.microsoft.com/en-us/entra/identity/role-based-access-control/security-emergency-access
Best Practices for Conditional Access
Start in report-only mode Always test your policies in report-only mode to evaluate the real-world impact before enforcement.
Gradually expand MFA and compliance requirements Apply policies incrementally start with admins and privileged roles, then extend to all users.
Exclude break-glass accounts from all CA policies These accounts must remain accessible under any condition never apply restrictions to them.
Maintain redundancy Create at least two break-glass accounts, each protected and stored independently, to prevent single-point-of-failure scenarios.
Key Goals of This Configuration
Implement a resilient and secure Conditional Access framework
Maintain emergency administrative access through protected break-glass accounts
Align with Zero Trust, compliance, and operational continuity standards
10 - Tenant Restrictions – Control and Secure Cross-Tenant Access
In multi-tenant environments, cross-tenant access can be both a convenience and a potential security risk. While collaboration tools like Microsoft Teams and SharePoint Online allow seamless interaction between organizations, unrestricted external connectivity can expose your tenant to data leakage, identity risks, and shadow IT activities.
That’s why configuring Tenant Restrictions in Microsoft Entra ID (formerly Azure AD) is one of the most effective ways to control external access and enforce governance across all devices, users, and sessions.
What Are Tenant Restrictions?
Tenant Restrictions define which external Microsoft Entra tenants your users can access whether through Teams, SharePoint, or any other Microsoft 365 service that relies on Entra ID for authentication.
By default, users can freely sign in to any Microsoft 365 tenant they are invited to. This means that employees could, intentionally or not, connect to other organizations’ tenants from company devices potentially leading to:
Data exfiltration, if corporate data is copied to external tenants.
Unmonitored collaboration, bypassing IT visibility.
Policy violations, especially under regulatory or compliance frameworks.
When Tenant Restrictions are configured, only approved external tenants can be accessed. All other authentication attempts from corporate networks or managed devices are blocked at the token validation layer effectively enforcing a network-based security boundary.
How to Configure Tenant Restrictions
Tenant Restrictions are configured via a proxy or firewall layer that inspects outbound requests to Entra ID endpoints and injects specific HTTP headers to identify authorized tenants.
Add the required headers to your outbound traffic:
Restrict-Access-To-Tenants → List of allowed tenant IDs (comma-separated).
Restrict-Access-Context → Your own tenant ID (used for enforcement and validation).
Deploy via network edge (proxy, firewall, or secure web gateway):
These headers should be applied at your organization’s network egress points, ensuring all outbound authentication requests include the restriction context.
Validate enforcement:
Try to access a Microsoft 365 service from a non-allowed tenant. The authentication request should be denied with an error message referencing Tenant Restrictions.
Tip: If your organization uses Microsoft Defender for Cloud Apps (formerly MCAS), you can also integrate Tenant Restrictions at the cloud access level for deeper inspection and analytics.
Official Microsoft Learn Reference: Configure Tenant Restrictions in Microsoft Entra ID (External ID) https://learn.microsoft.com/en-us/entra/external-id/tenant-restrictions
Best Practices
Allow only trusted partners or subsidiaries limit tenant access to business-critical relationships.
Combine with Conditional Access enforce MFA, device compliance, and session controls for approved external tenants.
Monitor external collaboration activity using Microsoft 365 audit logs and Defender for Cloud Apps.
Revisit tenant lists regularly to ensure they reflect current business partnerships.
Key Goals of This Configuration
Prevent unauthorized cross-tenant access from managed devices
Enforce data governance and collaboration control policies
Strengthen Zero Trust network boundaries with identity-aware restrictions
More Information
Microsoft Entra Local Administrator Password Solution (LAPS) Learn how to configure and enable Microsoft Entra LAPS for secure, automated local admin password rotation and retrieval. https://learn.microsoft.com/en-us/windows-server/identity/laps/laps-overview
Restricting BitLocker Key Recovery in Microsoft Entra ID Step-by-step guidance on encrypting devices and controlling recovery key access using Intune and Entra ID. https://learn.microsoft.com/en-us/mem/intune/protect/encrypt-devices
Enterprise State Roaming (ESR) Overview of ESR and how to enable secure user setting synchronization across multiple devices in Entra ID. https://learn.microsoft.com/en-us/entra/identity/devices/enterprise-state-roaming-enable
Default User Permissions in Microsoft Entra ID Understand and configure default user roles and permissions to prevent unauthorized app registration and tenant creation.
Group Self-Service Management Controls Microsoft Learn article on restricting or delegating group creation and self-service access in Entra ID.
User Consent and Admin Consent Workflow Detailed documentation for controlling user consent to enterprise applications and implementing an approval workflow for admin consent.
https://learn.microsoft.com/en-us/entra/identity/enterprise-apps/user-admin-consent-overview
https://learn.microsoft.com/en-us/entra/identity/enterprise-apps/configure-admin-consent-workflow
Conditional Access and Break-Glass Accounts Microsoft Learn best practices for planning Conditional Access and setting up emergency access accounts.
https://learn.microsoft.com/en-us/entra/identity/conditional-access/plan-conditional-access
https://learn.microsoft.com/en-us/entra/identity/role-based-access-control/security-emergency-access
Tenant Restrictions and External Collaboration Control How to configure Tenant Restrictions to prevent unauthorized cross-tenant access and data leakage.
RBAC and Least Privilege Governance Official documentation on implementing Role-Based Access Control (RBAC) in Intune and enforcing least-privilege access.
https://learn.microsoft.com/en-us/mem/intune/fundamentals/role-based-access-control
https://learn.microsoft.com/en-us/entra/identity/role-based-access-control/best-practices
Microsoft Defender for Endpoint Integration Step-by-step guide on connecting Microsoft Intune with Defender for Endpoint for unified security posture and compliance enforcement.
Windows Autopatch and Update Automation Microsoft Learn article explaining how to deploy and manage updates automatically with Windows Autopatch.
Endpoint Analytics and Reporting Comprehensive overview of Endpoint Analytics for monitoring device performance, compliance, and user experience.
Thank you!
Ricardo Barbosa
Microsoft MVP | Microsoft Certified Trainer (MCT)
Intune & Cloud Architect | Technology Director at Altelix.com